A manual tile cutter is a simple tool.
But to use it correctly, you need to be aware of some features.
They will be discussed in this article, the topic of which is how to cut tiles with a manual tile cutter: video and description of the technology for using the tool.
Which tile cutter to use for cutting
When choosing a manual tile cutter, pay attention to the following characteristics:
- Carriage running mechanism. There are two types: roller and bearing. The roller carriage of a quality tile cutter moves easily at first, but soon loses its smoothness. Bearing tile cutters are more expensive, but have a number of advantages: they last longer, cut more accurately and provide a smooth ride for the carriage.
- The bed must have sufficient rigidity, which is provided by the ribs under the bed. The low-strength frame bends under load and the tile breaks crookedly, not along the groove.
- Guide thickness. The higher this parameter, the lower the likelihood of carriage play.
- Cutting roller diameter. The thicker the tile, the larger it should be.
- Bed size. It is advisable to purchase a tile cutter with a bed that is large enough to allow you to cut large floor tiles and make diagonal cuts.
- Manufacturer. The quality and durability of the tool are guaranteed by well-established, time-tested brands: Sigma, First, Matrix, Rubi, SA, Germans Boada.
- Additional features. These are a ruler (allows you to estimate the width of the cut and remaining parts) and a rotary bed (with its help, cutting is carried out at different angles).
Using a manual tile cutter
Before use, check the serviceability of the tile cutter according to the following criteria:
- The diamond roller is sharply sharpened, there are no chips or gouges on the cutting edge. Otherwise, the tiles break crookedly, resulting in a lot of waste. The defective video is replaced.
- There is no carriage play. If there is play, it is eliminated with adjusting screws. If it doesn’t help, the tile cutter is repaired or replaced.
- The carriage moves smoothly. If it sticks, lubricate the guides. It is also useful to lubricate the roller so that it rotates more easily.
- Clean bed. The ceramic crumbs on it are brushed off.
- The condition of the rubber mats that prevent the tiles from slipping. They should fit snugly to the base.
- The angle between the stop and the axis of movement of the carriage is 90 degrees. Checked with a square.
For left-handed people, it is advisable to purchase a tile cutter with a mirrored double ruler.
Preparing the tool for work
There are two types of tile cutters used for cutting – electric and mechanical. Models powered by electricity are suitable for large-scale construction. Mechanical models are also sufficient for home repairs. Just remember that their use requires skill and the use of physical strength.
The preparatory process of the tool for work consists of the following steps.
- Inspect the cutting roller for damage or bending; there should also be no nicks. Otherwise, the element will need to be replaced with a new part.
- Lubricate the moving carriage with oil to avoid moving problems.
- Cleaning the device body, guides, and bed surface.
- Tightening of all fastening elements.
- If the model has clamps for fixation, you need to take care of the tool's immobility.
Also for work you will need a marker with which to mark the cut, and special pliers.
Advantages of a manual tile cutter
Compared to an electric tile cutter, a manual one has the following benefits:
- Low cost. It should also be noted that the cutting element is cheap: a diamond disc is much more expensive than a roller.
- Compact and light weight - easy to transport.
- Simplicity of design.
- Independence from electricity.
- No noise or dust.
- No running costs: When using the electric version you have to pay for electricity.
- Ability to work at any humidity and temperature.
Marking before cutting
Here's what it loses:
- Performance. For significant amounts of work, it is better to use an electric tile cutter.
- Cut quality. After using a manual tile cutter, the edge, if it is not hidden by the baseboard, has to be sanded.
- Difficulty performing the operation. A beginner will have to spend some, albeit short, time learning to move the roller with the same force and uniform speed.
- Possibility to cut tiles only in a straight line. A regular electric tile cutter also has this limitation, but there are special models for curved (shaped) cutting. The cutting element is a ring rotated by a motor.
- It is not possible to cut a groove in the tile.
- The width of the cut part cannot be less than 1 cm.
In addition, a manual tile cutter has difficulty cutting hard tiles.
Safety regulations
Of course, working with a hand tool is not as dangerous as if you have to deal with an electric analogue, but it still requires compliance with safety precautions.
Basic Rules:
- It is necessary to start using the device only in a protective casing, special shoes and safety glasses. Compliance with this rule will help avoid injury.
- At the time of cutting, nothing should distract the worker, so it is best to carry out the work in rooms where no strangers will enter.
It is recommended to soften the finishing material before cutting.
Should tiles be wetted?
Before cutting the finishing material, it needs to be softened. To do this, you need to wet the tiles 1-1.5 hours before work.
How to cut tiles with a manual tile cutter
The operating principle of a manual tile cutter is the same as that of a glass cutter: a pressed diamond roller, when rolled, destroys the surface layer and leaves a groove, after which part of the tile is broken off. The difference is that the strong fastening of the roller and the presence of a lever allow you to press on it with great force.
It sounds simple, but to perform the operation correctly requires knowledge of some nuances. Let us consider in detail all stages of cutting.
Tile cutting technology
Tile cutting technology
The operation is carried out as follows:
- The tiles are laid face up on the bed, so that the line drawn with a marker is exactly above the edge to be broken. Above it there is a diamond roller.
- One side of the tile is rested against the stop on the frame - this prevents it from moving.
- If it is necessary to cut off a narrow strip, the main part of the tile hangs from the frame. For stability, plasterboard or bars of the same thickness as the frame are placed under it.
- By holding the lever, the tile cutter carriage is moved to the working position: the support legs are bent and the diamond roller is placed on the tile.
- By pressing the lever, roll the roller along the drawn line. The key to a quality cut is uniform force and speed of movement.
It is advisable for a novice master to practice on broken or defective tiles.
A furrow of sufficient depth must be cut in one pass. If you try again, it is impossible to install the roller in exactly the same position; you will end up with two grooves and the tile will break crookedly.
Should tiles be wetted?
Soaking the tiles in warm water before cutting is a useful procedure: the material softens and therefore crumbles less, and the cut is smoother.
Soaking time is 40-50 minutes. No longer needed - the tiles will deteriorate.
Porcelain tiles are not soaked - only tiles.
If the tile is large and there is no large container at hand, wrap it in wet rags.
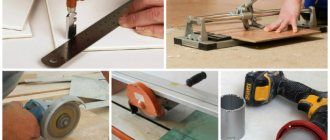
How to cut tiles without a tile cutter
Other tools are also used for cutting tiles.
Tile cutter
Special pliers with a plate on the upper jaw. There is a cutting roller installed at the bottom.
You need to run the roller over the material, then grab it with the jaws so that the groove is in the center of the plate, and squeeze the tool.
Nippers can also be useful if you have a tile cutter.
With their help, they bite off small fragments (when cutting with a tile cutter, the width of the cut part should be more than 1 cm) and form curved cuts, which a manual tile cutter is not capable of.
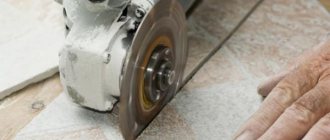
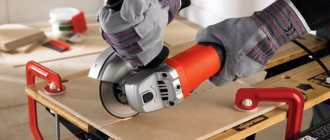
Bulgarian
While a tile cutter is a highly specialized tool, a grinder is used to solve a wider range of tasks and is therefore available in almost every household.
Consequently, when performing one-time work, cutting tiles is often carried out with this tool.
Cutting is carried out with a disk. Steel discs are preferred: they are thinner than stone ones and last longer.
Steel wheels are divided into two types:
- Segmented . They are divided into parts by slots, which improves heat dissipation and ensures free expansion of the metal when heated. Thanks to this, the disk is capable of 1 min. cut the tile without cooling, after which it is turned for 20 - 30 seconds. in idle mode to cool down. Due to their ability to cut material dry, such discs are called dry cutters. Their disadvantage is the low quality of the cut.
- Solid . Another name is a wet cutting disc. There are no slots for thermal relief, so you can only work dry without a break for 10-15 seconds. For long-term operation, cold water supply to the cutting zone is required. Compared to a segmented one, a solid disk cuts smoother and better.
- Combined . Can be used for both dry and wet cutting.
According to their characteristics, combined disks are located between solid and segmented:
- cutting quality: better than segmented, but worse than solid;
- continuous operation time: longer than that of solid ones, but less than that of segmented ones.
For one-time, small-volume work, a combined disk is considered the most preferable.
If it is enough to install the segmented and solid disks for cleaning from crumbs on the other side, then this option does not work with the combined one. This cutting element can only be installed on one side. Cleaning is done by cutting sand-lime bricks or concrete tiles.
Hard types of tiles, such as porcelain stoneware, are cut with diamond-coated discs. According to the method of fixing diamond chips, discs for household use are divided into two types:
- with soldering on silver solder;
- with geometric closure: the crumb is fused into the heated edge of the disk.
The latter are more expensive, but last longer and withstand overheating better.
To cut tiles correctly with a grinder, you should follow the rules:
- The cut begins from the front side: most chips are formed when the disk comes out of the material.
- The tiles are cut in one pass. With each new time the number of chips increases.
- If the requirements for edge quality are low, the tile is not completely cut: a groove is applied, then the module is broken. This produces much less dust.
Since it is difficult to make an even cut with a grinder without experience, it is recommended to leave an allowance of 3-5 mm for finishing with a grinding attachment.
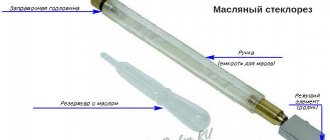
Glass cutter
This tool can handle thin tiles with a thickness ranging from 4 to 6 mm. It is better to choose a variety with a diamond roller. Having cut a groove, the module is placed on the edge of the table and broken.
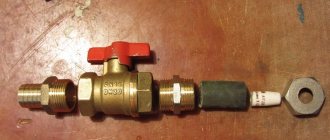
Drill with pobedite tip
Use a drill with a diameter of 6 - 8 mm. It is ground with a diamond wheel to the shape of a pencil, but so as not to wear off the pobedite soldering. The point is made round. If there are edges, the corners between them act as stress concentrators, which reduces the strength.
A groove is cut with a sharpened drill in the same way as a glass cutter. Then part of the tile is broken off.
Waterjet unit
Such equipment is available in large workshops.
The machine delivers under high pressure a stream of water with a diameter of 0.2 mm with the addition of abrasive chips. Cuts tiles evenly, quickly and along the trajectory of any curvature. If you don’t have the tools, you can order tile cutting in a similar workshop.
After a little training, even a novice master can cut cleanly and evenly with a manual tile cutter. You should only, based on the advice outlined above, choose a high-quality and serviceable tool.
If you don’t have one, you can use an alternative: a grinder, special tongs, or a homemade tile cutter made from a drill.
Glass cutter - basic rules and little secrets
But before you begin the process itself, it is important to familiarize yourself with the basic rules for cutting tiles, as well as little secrets that will allow you to cut the desired piece of tile efficiently and evenly
- Use a straight ruler and marker to mark the surface of the facing material.
- Use a glass cutter to cut along the markings.
- Place the tile on the table so that the cut line is level with the edge of the table.
- Using light pressure, separate the cut piece.
But there are still some tricks that will help you cope with the task perfectly.
- The cut with a glass cutter should be made once, starting from the far edge and towards you.
- if it is necessary to make the cut line as even as possible, before pressing on the surface of the facing material, it is necessary to place a nail or match under it. Apply pressure on both sides of the marking line.
- Before cutting the tiles, you need to keep them in a bowl of cold water for at least 1 hour.