Installing an angle on a new bathtub
When installing a new bathtub, the sequence of work and the type of corner used depend on the above factors that determine subsequent operations.
Installing a corner on a bathtub
However, the general order of work is as follows:
- The purchased bathtub is removed from the packaging and its sides are cleaned of dust and dirt, for which detergents and a sponge (soft rag) can be used;
- To install the bathtub, the elements of its fastening to the floor (legs, frame, podium, etc.) are mounted;
- On the surface of the wall adjacent to the bathtub, markings are made corresponding to the height of the side from the floor level;
- Further work is carried out depending on the type of plinth used.
Inner corner
When using a tile corner, installation is performed as follows:
- The surface of the wall and the side of the bathtub are degreased, the bathtub is installed close to the wall surface.
- A silicone sealant is placed in the gap between the wall and the side and time is given for it to harden.
- After the sealant has hardened and based on the markings made, the plinth is cut and installed.
- The plinth is attached in such a way that its lower (horizontal) strip rests on the side of the bathtub, and the vertical strip rests on the surface of the wall.
- For fastening to the wall, spacer dowels or other fasteners are used.
- The wall is finished using tiles, finishing panels or other waterproof material.
When using a corner on a tile, work is carried out in the following order:
- Preparing the wall and bathtub is carried out in the same way as when using a corner for tiles.
- The surface of the wall is being finished, while laying tiles and other finishing elements is carried out in accordance with the markings (from the top edge of the side of the bathtub).
- After finishing the wall, the bathtub is installed and the places where it adjoins the wall are sealed (similarly to the case discussed above).
- After the sealant has hardened, the baseboard is cut and using adhesives (sealant, mastic, liquid nails, etc.) the corner is attached to the wall and the horizontal edge of the bathtub.
- When installing a plinth, shaped parts (corners, connectors, etc.) are used; fastening is carried out by pressing the element to be fixed to the elements to be covered.
Outer corner
When using an external corner installed on the side of the bathtub, the key to successful operation in this case will be the correct preparation of the wall surface at the junction of the bathtub, as well as the correspondence of the dimensions of the baseboard to the dimensions of the bathtub.
The wall surface is cleaned of dust and dirt, after which the outer corner is placed on the side of the bathtub and glued to the wall surface using an adhesive layer.
Collapsible corner
When using a collapsible corner, its installation technology combines the methods of installing the corner under the tile and on its surface.
Initially, the internal component of a profile of this type is installed, and the work is performed as in the case of installing an internal corner going under the tile.
After this, the second part of the profile is mounted, for this purpose silicone and a special design are used that connects both components of the corner into a single whole (“tenon and groove”).
Installing a border in the form of a corner
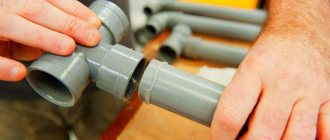
To install any type of plastic bathtub sides you will need the following tools:
- roulette, level;
- miter box – a tool for making oblique cuts;
- rubber and plastic spatula;
- masking tape;
- construction knife;
- sealant, acetone, liquid nails;
- construction pistol.
Before the installation procedure, it is necessary to clean, degrease and dry the surface on which the corner will be mounted. Next, you need to use a construction gun to fill all the cracks with sealant. While the sealant is drying, you can stick masking tape on the tiles and the bathtub around the entire perimeter - this will protect them from getting glue.
The plastic corner itself must be cut into the required number of pieces of appropriate sizes.
Then you need to apply glue to the inside of the corner, preferably evenly distributing it over the entire surface. Next, the corner is installed on the bathtub and pressed until adhesion occurs. In the corners of the bathroom, the border is cut at an angle of 45 degrees, and special caps are attached to the ends for a pleasant appearance and completeness of the canvas. After a day, you can use the bathroom and not be afraid of leaks.
After the glue has dried, you can proceed to the final stage - covering the joints of the corner border with a transparent sealant.
Types of plastic corners for the bathroom
Bath skirting boards are made of polyvinyl chloride in the form of a strip in the shape of a corner of various geometric sizes and characteristics, such as:
- in hard, semi-hard and soft form;
- in glossy and matte finish.
Matte bathroom corner
Plastic bath corners are classified as:
- Internal – wall mounted.
This type of plinth can be installed either under a tile, which means placing one of the corner shelves on the side of the bathtub, and the second - under the wall finishing layer, as well as on a tile - when one side of the plinth is located on top of the tile, the other on the surface of the bathtub.
- External – installed on the sides of the bathtub.
The presence of a self-adhesive edge of the baseboard, located on the wall side, ensures the tightness of the junction and prevents water from penetrating onto the wall behind the bathtub being installed.
- Collapsible.
This type of plinth is more difficult to install, because its design assumes the presence of two components (inner corner and outer decorative edge). This ensures effective protection against moisture penetration into the enclosing structure (wall, podium, etc.), which prevents the formation of mold and mildew on their surface.
Geometric dimensions may vary and are within:
- width – from 30.0 to 50.0 mm;
- length – 1.8 to 3.0 meters.
In the manufacture of plastic tapes used as bath skirting boards, a film with a thickness of 150 microns, an edge width of 20.0 mm and a length of 3.0 meters per coil is used.
Kinds
The modern construction market offers a wide variety of materials that, in terms of price range, are suitable for any wallet. Bathroom fillets are no exception: they differ in material, method of fastening, color, width, manufacturer and price. To begin with, you should know that there are only two types of installation methods:
- external - installed on top of the finishing material;
- internal - installed under the finishing material.
The second type has a long service life and provides protection more effective than the first. The material from which the plinth is made is the most important parameter that determines the advantages and disadvantages.
Acrylic
This is a very popular option, although it is more expensive than others. Its popularity is primarily due to its appearance - acrylic baseboards for the bathroom are made in many decorative forms, have a huge color palette and make it suitable for any style of room and its color palette.
Acrylic is a high-density material, but a corner made from it is still inferior in its characteristics to its plastic and silicone counterpart. Acrylic baseboard for the bathroom has its disadvantages:
- poor flexibility - it cannot be used for edging complex shapes;
- fragility - if handled carelessly it will simply burst;
- does not tolerate temperature fluctuations well - steel and cast iron bathtubs usually expand when heated, which leads to the appearance of cracks.
When choosing an acrylic option, it can only be mounted on liquid glue with a silicone base - this way it will withstand changes in temperature conditions. This fillet is perfect for decorating toilet rooms or the ceiling in a bathroom.
Silicone
Silicone corner is often used to decorate the corners of toilet rooms and protect the space between the bathtub and the walls . It is highly flexible and easily takes even the most complex shapes. Its advantages include:
- high flexibility;
- resistance to temperature changes;
- smoothness, which makes it pleasant to the touch and non-slip;
- ease of installation.
Silicone plinth can withstand even the highest temperatures and does not deform from them. At the same time, the bathroom corner is similar in its characteristics to a rubber one. The disadvantages of this option include:
- poor tolerance to aggressive detergents;
- susceptibility to abrasive cleaning agents.
Important! The silicone baseboard has an adhesive composition on the back side, which makes its installation on the bathroom extremely simple, but the owners will have to carefully select detergents for cleaning it, otherwise it will not only lose its appearance, but also cease to be airtight.
Plastic
This type is the most popular and widely used today; the famous Leroy Merlin store offers a wide selection of such profiles. Low cost and many advantages make it extremely attractive to buyers. You just need to choose carefully: a purchased plinth for a bathroom on the floor cannot be installed between the bathtub and the wall; for this there is a special model that will guarantee the tightness of the joint.
The advantages of this model include:
- low price - the part can be bought for a couple of tens of rubles;
- easy installation - you only need a knife and glue;
- resistance to temperature changes;
- flexibility - this allows you to use the plinth to decorate complex curves;
- resistance to aggressive detergents;
- ease of care;
- maintaining shape for a long time;
- wide selection of colors.
Choosing a model is easy, you just need to choose the right width . The most popular profiles are 50 and 25 mm wide and 2.5 m long. To design a standard joint between a bathroom and two walls, you will need to buy two standard profiles at once. Using a sharp knife, they can be easily cut into the desired pieces.
This model also has its disadvantages:
- poor resistance to fungi - requires regular care with antibacterial agents;
- insufficient tightness - it is recommended to treat the joints with additional means to preserve them from the penetration of moisture and bacteria;
- short service life - effectively protects joints only for 2-3 years.
Today there are various types of plastic models - with self-adhesive tapes, with rubber sides and others. Before purchasing, be sure to read the specifications to make sure you make the right choice.
Ceramic
Ceramic models are often suggested to be purchased immediately along with tiles, since this will not only simplify the task for tilers, but will also allow you to create a single color image for the room.
Despite the rather high cost, such a corner has its advantages:
- strength - has a long service life and retains its tightness longer than other corners if handled carefully;
- easy to clean - just wipe it regularly with a damp cloth and detergent;
- resistant to any detergents and chemicals;
- high tightness;
- resistance to microorganisms and fungi.
The only disadvantage of this option is its high cost, but all its advantages cannot cost less. Its service life is up to 15 years, which also justifies the considerable price.
Self-adhesive tape
This tape is called polymer and is made from PVC with the addition of some components.
It is essentially a self-adhesive soft and flexible corner that is very easy to install. It is often used to finish curved and uneven walls, as it covers any curves and makes them airtight . The benefits include:
- ease of installation;
- low cost;
- waterproof;
- elasticity.
When replacing the tape, you should first remove the remnants of the previous glue, thoroughly degreasing the surface.
Its only disadvantage is its short service life - such a profile will have to be changed every 5-6 months.
Prices for self-adhesive bathtub curb tape
Border adhesive
What is the best way to glue skirting boards if they are not self-adhesive? Typically, craftsmen advise laying them on sealant with silicone, and periodically changing the adhesive. Any sealant darkens from water (after 2-3 years) and gradually lags behind the wall. You have to remove the installed baseboard, clean and disinfect the wall and the edge of the bathtub, and reattach the material. If the quality of the sealant is poor, its service life can be reduced to 4-8 months, which depends on the intensity of use of the bathtub and the type of ventilation in the room.
There is a way out, you need to follow these tips:
- Use the “correct” sealant, which is intended for aquariums. Thanks to antiseptic additives and a special composition, it does not darken and is not susceptible to mold.
- Choose a white or transparent product (the latter usually costs more).
- Buy only expensive sealant from a well-known brand. If the composition contains MS polymers, this gives high hydro-repellent properties (an example is “Moment Crystal”).
- The elasticity of the sealant should be at a high level, this will allow the product to maintain its integrity even with small movements of the bath.
If there is no sealant, you can use other means. A reliable adhesive composition for borders with high moisture resistance and the addition of acrylic, silicone, and polymers is suitable. Liquid nails and tile adhesive are suitable.
How to properly glue a bathroom corner, what glue is best to use
Most DIYers install bathtub baseboards using silicone sealant. Very often, the seam darkens due to the fact that mold begins to develop in it. If such a situation occurs, it is recommended to completely dismantle the product, disinfect and degrease the surface, and then reinstall it.
Depending on the quality and composition of the sealant, the period before mold appears is from 6 months to three years. Additionally, this is influenced by the quality of ventilation and the intensity of use of the bathroom. To prevent such a development of the situation, there are several ways out. For example, before gluing the border to the bathtub, you need to apply a special sealant intended for aquariums. Due to the presence of antibacterial components in the composition, this adhesive composition “does not bloom.”
Aquarium sealant can be transparent or white, is mainly sold in small jars and has a high price. But the long service life eliminates this disadvantage.
In most cases, bathtub baseboards are installed using silicone sealant
Another option is waterproof glue, which is a little more expensive than regular glue, but much more reliable. If you use the glue strictly according to the instructions, it will last a long time, and fungi and mold will not multiply and spoil the appearance of the bathroom.
Important advice! If the border is attached to the surface of an acrylic bathtub, then before applying the sealant it is imperative to fill the bowl with water as much as possible and leave it in this form until the adhesive composition has completely hardened. Otherwise, during operation, the sealant will move away, which is why a gap will form.
A good, high-quality, but expensive sealant is considered to be based on MS polymers that have a hydrophobic effect. This allows the product to repel water even a year after application, while conventional acrylic glue flows after only 4-6 months.
Among polymer sealants you can also find options with antibacterial components in the composition that prevent the appearance of fungi. Another advantage is considered to be high elasticity, even after drying, which allows the adhesive mixture to maintain its original position when heavy cast iron or metal baths move.
The border should be glued to the plane of the wall, while the lower part should be pressed as tightly as possible against the surface of the bathtub
Why the baseboard can come off and how to avoid the problem
Many users, after installing a tile border, note that after a short time the tape partially or completely peels off. This happens due to constant vibrations and small movements of bathtubs or showers that occur when filling water and when a person is inside.
No matter how carefully you use the bathtub, there will still be minimal movement of the plumbing. This is especially noticeable in the presence of lightweight acrylic bathtubs and showers, from which the curb usually falls off faster than from steel or cast iron bowls.
To avoid such a problem, you need to know how to glue the border in the bathroom correctly. If we are talking about a PVC product, then the plinth should be glued only to the plane of the wall. In this case, it will be possible to avoid leaks into the gap between the bathtub and the wall. The lower part of the side should be pressed as tightly as possible to the surface of the bath to minimize the ingress of water.
To avoid the problem of unpleasant odor coming from under the side, it is recommended to fill the gap with sealant before installing it.
With this installation option, movements of the plumbing fixtures will be compensated due to the elasticity of the curb, and the product itself will adhere tightly to the wall surface. Another reliable option is the same sealant based on MS polymers, which is more suitable for metal bathtubs than for acrylic ones.
Another common problem when using PVC skirting boards is the appearance of an unpleasant odor from under the plastic. The cause of this problem is the microscopic cracks left after installation, where a small amount of moisture penetrates. A damp and dark area is an ideal environment for pathogens to multiply. This is why it is highly recommended to fill the gap with sealant before installing any baseboard, even if the curb manufacturer does not suggest this action.
How to properly attach a tiled border to a bathtub
The edge made of ceramic tiles consists of straight, end and corner elements. The required number of straight parts depends on the parameters of the bathtub bowl or tray. Experts recommend taking one more straight piece so that there is at least a minimum margin for trimming. With a traditional bathtub installation, you will need 2 corners and ends each. If we are talking about a standard rectangular shower, it will be enough to take one element each.
Installation of a tiled border on a bathtub should start from the corner
Before purchasing, it is recommended to carefully check all components not only for damage, but also for perfect joining of the elements with each other. If there is minimal discrepancy, it is permissible to trim the edge a little using a file. The method of installing the tiled edge depends on the type of wall cladding and the size of the gap:
- If it is a glossy smooth tile, it is enough to use waterproof glue for fastening.
- When textured tiles or rough plaster are laid on the walls, it is better to use a special adhesive for ceramic tiles for installation, intended for application in rooms with high humidity. This adhesive composition is sold dry, and to prepare it you just need to add a little water.
- If there is a significant gap, it is better to seal it first and lay the tiles on a slope, especially if a shelf larger than 5 cm is formed.
- In any case, installation should begin from the corner, covering two adjacent areas in parallel.
Each bathtub curb has its own advantages and disadvantages. When choosing a product, you must take into account that the baseboard must be waterproof, practical and ideally combined with the surrounding surfaces. When purchasing, you also need to make sure that the product fits the width, completely covers the gap, and has at least a small margin. If you follow all installation rules and choose high-quality glue, you will not have to deal with leaks.
Installation of a plastic corner
Sequence of work
Removing the old curb. The border, which in some places or completely has moved away from the wall, where rot has already begun to form, is carefully separated, after which dirt is removed from the wall, the remains of old glue or sealant using a knife/chisel/spatula.
- Preparing the base. The surface is wiped with a damp cloth or sponge soaked in water with the addition of bleach to completely remove all dirt. You can also use White Spirit. After cleaning, the surface of the wall and bathtub is dried with a household hairdryer or allowed to dry naturally.
- Taking measurements. The length of the bathtub is measured using a construction tape, and then the resulting distance is measured and marked on the curb.
Cutting to the required length and angles. The border is sawed off to the required length, and the two edges that create the internal corner must be cut at an angle of 45 degrees (to create that same internal corner) - a miter box is used for this. After this, a fitting is performed to make sure that it will cover the joint between the bathtub and the tile.
Gluing tape. The bathtub plinth along its entire length at a level of 2 mm above and below the edge is covered with a line of masking tape. After this, the border is removed, leaving the sticky tape.
Applying sealing foam or sealant. Using a construction tool, apply a small layer of foam or sealant along the area where the bathtub baseboard will be attached, being careful not to extend beyond the height of the masking tape.
Sealing. 20 minutes after the foam has dried, the junction of the tiles and the border itself is treated with sealant, carefully moving the edge of the border with a spatula. The filled seam is very carefully smoothed with a rubber spatula so that the sealant is distributed evenly along the entire border. All joints, both top and bottom, as well as corners, must be filled with sealant, after which the tape is removed.
Important installation details
- When gluing the border, it is important that not only the wall is clean, but also the bathtub itself. Residues of soap are removed using liquid detergents, washing away dirt with water.
Advice! The cleaned bathtub must be wiped dry - for this it is optimal to use paper rather than rag towels, which will not ensure an absolutely dry surface.
- The surface of the bathtub must be degreased using white spirit or gasoline.
Attention! Do not use aggressive solvents - they can ruin the acrylic bathtub and wall panels!
- If the surface adjacent to the bathtub is finished with tiles or clapboard panels, it will be difficult to achieve a tight fit with the curb at the joints, so they should also be treated with a sealant to prevent water leakage.
- Apply the sealant according to the instructions, trying to make the seam even, thin and continuous. Spot layer is not allowed!
ps Instead of foam, you can use sealant or liquid nails.
Attaching a plastic curb
When renovating a bathroom, the question inevitably arises: how to properly install a corner in the bathroom so that even after a long time you will not be disappointed with the result?
The installation process is divided into certain stages. Placement of adhesive tape on the working surface. The tape will prevent sealant and glue from getting onto the enamel bowl and tiles. Preparing the border for installation: measuring and trimming. It is easier to measure the material with a tape measure. Cutting plastic can be done with either a hacksaw or a knife, depending on the density of the product and its characteristics. Fastening the product. Liquid nails are applied to the inner surface of the curb, after which the part is pressed forcefully into the joint. In the place where the edge of the corner is adjacent to the bowl and the wall, you need to lay transparent silicone sealant. Attaching a ceramic border It was described above how to install a plastic corner on a bathtub most correctly and quickly.
Advantages
The most popular option for sealing the junction when installing a font is a plastic curb for the bathroom. The advantages of this option include:
- Versatility. Installation of a plastic corner is possible with any type of wall decoration. It can also be glued to tiles, but this type of edging will look especially harmonious if the walls are covered with plastic panels.
- Simplest installation. If installing a tiled border is not an easy task, then installing a plastic corner is quite possible for a person who has never held a construction tool in his hands. It's even easier to install self-adhesive skirting boards.
- Good performance. A plastic border is not afraid of water; it easily withstands changes in humidity and temperature in the bathroom. In addition, plastic is resistant to the development of mold.
- Easy care. The plastic corner requires virtually no maintenance. It can be easily cleaned from soap scum and dirt with water and detergents. However, it is not recommended to clean plastic with hard (metal) sponges or products containing coarse abrasive particles.
- Affordable price. When performing budget renovations in the bathroom, you should choose a self-adhesive flexible border or a hard plastic corner, as these materials have an affordable price.
Plastic borders
This is the most common and economical option.
Every hardware store offers a large selection of different plastic borders. Such parts can be attached both under the tile and on top of it. Having chosen a similar option, you need to think about how to stick the plastic corner in the bathtub. It is much better to use “liquid nails”. Specialized silicone glue is also great. To install plastic curbs, you do not need to have any specialized skills in construction. In addition, they are inexpensive, and there are quite a few different colors and sizes available. All this makes plastic corners a very popular material for sealing cracks in bathrooms. When purchasing this border, you first need to think about how to stick the corner onto the bathtub, and more specifically to the wall: under the tile or on top of the tile.
Let's look at what types of plastic borders there are.
They are produced in the form of corners and baseboards. Two options are great for concealing the connection between the wall and the plumbing. Borders in the form of an angular profile can be installed both on top of the tiles and under them. If, for example, you choose a plastic plinth, then it is placed only on top of the cladding material. Now manufacturers have begun to produce curbs with rubberized edges. This makes it possible to perform a more reliable seal. Along with the profiles themselves, you must purchase all the necessary components (plugs, corner components)
Features of installation work
If the walls in the plumbing unit are tiled, then there are two options for fastening the curb:
- Under tiles
- On top of the tiles.
Which option to choose and how to stick a plastic corner on a bathtub?
Of course, the first option must be used if, along with the installation of plumbing fixtures and curbs, wall tiling is also planned. The tile will lie on top of the half of the corner that is attached to the wall. This is quite a job that requires a lot of work and requires great abilities. And therefore, if you have chosen this option, it is better to ask professionals. The priority of such fasteners is considered to be sufficiently large water protection: water in this option will definitely not leak. But if you have to change the curb after a couple of years, this can only be done by dismantling the tiles above the bathroom.
The second option is much easier. If the walls are already covered with ceramic tiles, then everyone can handle the task of how to stick a border on a bathtub. In this option, you need to start working by cutting a plastic corner or baseboard into pieces along the length of the bathtub.
It is best to first “measure” these pieces to the opening and outline them with chalk or a pencil. Then apply tape to those parts of the wall and bathtub where you don't want the glue to get.
This will greatly simplify your further work. Of course, the surface must be prepared in advance (as in the option with a border strip). How to glue the plastic corner in the bathtub and wall?
“Liquid nails” are much better: this is one of the most reliable options. If the gap is large enough, seal it in advance with caulk or foam for installation.
When it is dry, apply glue to the back surface of the corner and press it against the wall and edge of the bathtub for 20-30 seconds. When the part is glued, you will need to install the components and remove the repair tape.
In apartments of our time, PVC panels are often used instead of tiles as finishing materials. Let's look at how to stick a plastic border onto a bathtub, if this is your case. In this option, it is better to choose rubberized curbs.
Panels are also usually placed both on top of the corner and under it. If the distance is large, then you can “bring it closer” to the wall using a repair profile, on which the panels will be installed.
And then the corner can be placed on top of the panels. Here, instead of a corner, you can use a plastic plinth, just do not forget to secure the seal with a specialized sealant. After all the work is completed, you need to leave your bathroom for the day. Only then can you safely use it for its intended purpose.
Now the question of how to stick a corner on a bathtub will not cause you any difficulties.
Main types of borders
The following types of borders are distinguished:
- Border tape. The most budget option, but also the easiest to install. The main disadvantage is the fragility of the device.
- Plastic. It can be mounted both on the wall and under tiles. The main advantage is ease of use, ease of installation, and low cost.
- Ceramic. The main advantages are attractive appearance, good performance properties, and long service life. Disadvantages: high cost and comparative complexity of installation. To carefully stick it to the bathtub, a good eye and accuracy are required. The task is made easier by silicone glue, which allows you to adjust the position of the elements within 30 minutes.
- Made from natural stone . The main advantage is the beautiful appearance. Disadvantages: installation complexity, high cost.
Tip When choosing a curb, you need to consider not only its performance, but also the design of the bathroom.
Brands that produce borders:
- PROSEAL - from 200 rub. / 1m;
- Makroplast - from 200 rub. / 1m;
- PROBATH - from 250 rub. / 1m;
- Lemal - 750 rub. / 1m;
- Ceramics - from 45 rubles. / 1m.
Choosing a border to seal the gap
The absence of cracks near the sink and bathtubs without sealing can only be achieved by perfect alignment of the walls and floors, precise installation of plumbing fixtures and laying of tiles. It is not always possible to carry out work of such high quality, and without extensive experience it is almost impossible. Even after installing tiles and a bathtub by craftsmen, most often there remains a thin gap. The risk of water penetration, increased humidity and mold growth is greatly increased.
The choice of materials for sealing seams is not very large; there are several options for borders on sale. The most budget-friendly of them is self-adhesive tape, the more expensive ones are products made of ceramics, natural or artificial stone. It is necessary to choose the correct border size. When selecting the length, follow these recommendations:
- ceramic products - according to the width of the tile;
- plastic skirting boards - along the length of the side;
- border tape - for the entire length of the seam.
Flexible self-adhesive border tape
Tape border, or border tape, is an original material that allows you to seal the joints between the bathroom and the wall. It can be installed with your own hands; you don’t need any special skills for this. The downside of such a curb is its relative fragility (average service life is 3 years), but due to its low cost, replacing it will not be difficult. In addition to protecting against dirt and moisture, curb tape is used to give a finished look to the room - gluing the strip completes the repair. The plinth fits perfectly with an acrylic bathtub - which one is better to choose can be determined depending on its shape (oval, square).
The elastic baseboard for the bathtub is made of special plastic with various polymer additives. The reverse side is coated with liquid butyl adhesive covered with a peel-off film. The material is sold in rolls of 3.5 meters, in shape it can be angular or figured. The specified length is enough to cover any standard bathtub. Some manufacturers sell kits with applicators and cutting knives, as well as a couple of corners. Skirting boards are also produced with antiseptics and fungicidal additives against fungus and bacteria.
Plastic borders
A plastic corner is a budget option for closing an unsightly gap near the wall. The highest quality plastic borders imitate a ceramic surface. There are several types:
- internal, they can be placed under the tiles;
- external, mounted at the joints after wall cladding is completed;
- two-part profiles consisting of a holder strip and an upper decorative element.
The dimensions of plastic borders are usually 3-5 cm in width, the length of individual elements is 1-3 meters. For a standard bathtub, 2 elements of 1.8 m each or one three-meter element are enough. Before installation, the skirting boards are cut to the required dimensions. Additionally, you should buy end caps and sprockets for mounting in the corner. Plastic profiles can have different shades - beige, green, pink, blue. Unfortunately, over time the material darkens from water and household chemicals; after a couple of years it will have to be changed.
Ceramic borders
Ceramic baseboards in the bathroom match the tiles better than others. It is not afraid of water, does not lose its luster for decades, and has unique wear resistance. Other advantages of the material:
- environmentally friendly, harmless to humans;
- frost resistance (withstands large temperature changes);
- fire resistance - ceramics do not burn and do not emit harmful substances.
The material provides good protection against leakage, does not peel off in high humidity in the bathroom, and the design on the borders does not lose its brightness. The baseboard will be ideal even if there is a large gap between the bathtub and the wall. In this case, the gap is closed with bricks, then covered with decorative elements. Ceramic borders do not turn yellow over time, and the soap deposits covering them are easy to clean. The range of products is very rich, many fit perfectly with tiles and are sold together with them as a set. They are not only functional, but also aesthetic:
- the geometry of the tile is emphasized;
- complement the thematic drawing;
- highlight the perimeter of the bath.
Natural stone borders
The characteristics of such products are similar to ceramic tiles - they serve reliably and are durable. True, the design of the bathroom must be appropriate - solid, otherwise the stone borders will not look the best. There are economy class products (made in Moscow, Ukraine) and more expensive ones. Marble and granite profiles have a beautiful appearance, while travertine elements look luxurious. Such an interior can only be decorated by a professional; independent installation of stone borders is not recommended.
Functional purpose of the bathtub frame
The absence of a gap between the bathtub bowl and the wall can be achieved in the only way: to perfectly level the wall and also ideally lay ceramic tiles. However, even after the work of professional tilers, a narrow, barely noticeable gap remains. In addition, some incompleteness will spoil the overall appearance, and the risk of moisture entering the gap will remain.
For this reason, experts insist on laying a border - a continuous sealed tape or structure that tightly closes the wall space and protects the space under the bathroom from high humidity and mold. Thus, the additional element performs two functions:
- provides a comfortable atmosphere, protecting from moisture;
- helps to give a finished look to the finishing design.
Even if you have rounded corners (found in panel houses) or uneven walls, borders for ceramic tiles in the bathroom will correct the situation - they will compensate for the shortcomings and cover the gap.
The space under the bathtub is not ventilated - and humidity, as in the entire room, here the decorative border performs a protective function
On the Internet you can find advice on how to do without a border altogether. “Craftsmen” advise installing the bathtub flush against the wall, and then laying the tiles so that the bottom row rests directly on the acrylic (or steel) side. This method is used provided that 100% capacity stability is ensured. If the bathtub settles over time, there will be an untidy gap that will still have to be masked.
It remains to find out what size the border should be. Its length can be any (ceramic parts are selected according to the width of the tile, plastic parts - according to the length of the side), the width depends on the size of the gap. A narrow gap (up to 3 mm) is initially filled with sealant, a gap of 0.3-2.5 cm is filled with polyurethane foam, a distance from 2.5 cm to 6 cm is filled with concrete mortar (using formwork).
Therefore, in the first case, a border 3 cm wide is sufficient, in the second - 3-6 cm, and in the last case you will have to look for the widest possible option.
Gluing tape
The easiest way is to lay curb tape at the joint. The figured one is somewhat different from the corner one - it has a middle longitudinal sector without an adhesive composition. It is necessary to make preliminary markings. The border is taped with paper tape at the required height, since it is difficult to wash off a pencil or marker from the surface of the tile. When finished, the tape can be removed.
Before installation, cut the border. For each section of the bathtub, you need to make an allowance of 2 cm. Then the profile is bent in the right place, heating it with a hot hairdryer. Once it becomes elastic, it will take on the desired shape. This is also necessary to ensure that the tape does not come off ahead of time. The installation instructions are as follows:
start work from a corner; carefully separate the film from the tape in small sections - 15 cm each; At the same time, press the profile with the applicator; this must be done as firmly as possible (then the tape will stick more firmly); pay attention to the places of contact between the product and the tile seams; Place the border in the corners with special care; the overall appearance of the bathtub depends on this (the corner strip is left flat on top, cut from the bottom at an angle of 45 degrees approximately to the middle); Insulate the joints of the tape with sealant; Do not use the bathroom for 24 hours; then, if there are lagging areas, glue them with “liquid nails.”
Installation of plastic plinth
You need to install a plastic border in a different way, but the preparatory measures are similar. Next, you need to measure the length of the bathtub with a tape measure, make a mark on the border, and cut off the material. The easiest way is to immediately cut out elements equal to two sides of the bathtub. File the corners at an angle of 45 degrees. Next, glue paper tape 2 mm above and below the future corner so as not to stain it with glue.
The sequence of work is as follows:
- attach a piece of curb to the wall, press it;
- bend the corner at the top, leaving space between the wall and the curb;
- insert the tip of the gun, squeeze sealant or “liquid nails” into the gap;
- Carefully smooth out the sealant with a spatula;
- do the same with the bottom of the curb;
- press the corner firmly;
- After a few minutes, remove the tape.
Adhesive ceramic corner
Laying ceramic corners is more difficult, but usually even beginners can do the job after a little training. The material is installed under the tiles as follows:
- Apply a layer of sealant between the bathtub and the wall, filling the gap evenly, level it with a spatula or a wet hand;
- mix tile adhesive according to instructions;
- cut borders for joints and corners at an angle of 45 degrees, using a grinder, a tile knife (you can use “biting off” with pliers, then sand the surface with sandpaper);
- start work from a corner;
- put tile adhesive on the back side of the borders, glue it to the joint, remove excess product with a spatula;
- continue installation, leaving minimal gaps between elements;
- the next day, pour water over the corners to seal the glue, and after another day, apply sealant or grout for the seams.
The border is mounted on the tiles in a different way. You need to treat the wall with “liquid nails”, press the ceramic corner to the wall, and perform similar actions for other elements (don’t forget to use a level). After the glue has dried, fill the seams with sealant.
Bath Curb Installation Instructions
Let's look at the procedure for installing plastic and ceramic borders in more detail, since it is a little more complicated than gluing tape. First, make your choice and do not forget to follow the rules of interior design: economical PVC is not suitable for a room with expensive cladding, and exclusive ceramics do not combine with budget tiles or plastic panels.
Ceramic corner installation technology
If the tile collection does not have corner elements, select similar style and color pieces from other collections or take a universal white option. The total length of the elements must coincide with the length of the areas of contact between the bathtub and the walls (taking into account the “stars”). We recommend adding one detail in case of breakdown.
To avoid cutting out corners from pieces of border, try to find a set that includes either three-sided concave “stars” or elements with diagonal ends
For installation on a wall, in addition to the border, you will need tile adhesive, waterproof grout, sealant, spatula and sponge. You should start by preparing the base - removing old material, washing and drying. Then we perform the following steps:
- we fill the gap with a material that ensures tightness (sealant is suitable for a narrow gap, polyurethane foam is suitable for a wide gap);
- prepare the tile adhesive strictly according to the instructions;
- We begin laying the elements from the corner: smear the back surface with glue and carefully press it to the base;
- We leave a small space between the individual parts - as when laying tiles;
- if the last element is longer than necessary, cut off the excess fragment with a grinder or carefully bite it off with pliers;
- let it dry for a day, and the next day we fill all the cracks with grout, immediately removing the residue with a damp sponge.
If there is no corner “asterisk”, cut out a similar part from a straight blank. Instead, you can cut two corner pieces at an angle of 45º, like a ceiling plinth. To make the edges of the cut fragments look neat and natural, we grind them.
When filling the wall gap with sealant, use a special gun - this way the material will be used more efficiently and the result will look neater
If the bathtub is already installed and the wall is tiled, the ceramic corner can be fixed in a simpler way - by placing it on “liquid nails”, filling the gaps with sealant.
Video instructions for installing a ceramic border:
The finished result: a bathtub with a white ceramic border:
Original solution
If you want aesthetics, plastic corners for the bathroom for some reason do not suit you, pay attention to... borders for kitchen units. Essentially these are the same plastic corners, they can be smooth or convex, equipped with corner elements and plugs to aesthetically cover the cut ends.
Their distinctive feature is that they all come with an elastic band, which additionally protects against leaks.
It is mounted in the same way as regular plastic corners.
The only drawback of such designs is that they cannot be bought everywhere. In kitchen showrooms, corners are often sold only as a set with the kitchen. But sometimes they can still be ordered separately. As an independent product, they can be found in large construction hypermarkets.
Ceramic borders
Despite the ease of installation of the above materials, they still do not allow us to obtain a durable structure. It is for this reason that many users prefer to use skirting boards of a different type. In particular, this applies to products such as ceramic bathroom borders, which are usually supplied complete with tiles, that is, in the same collection. Therefore, if the walls in the sanitary room are lined with ceramic tiles, then it is advisable to make the border from the same material. Today you no longer have to cut out pieces of tiles of the required size yourself; manufacturers have taken care of customers and offer them a fairly wide range of similar products. Moreover, the kit includes not only straight elements, but also corner ones.
Ceramic border for a bathtub in the bathroom
The main advantages include:
- attractive design and a huge selection of shapes and colors;
- durability;
- strength;
- do not deform during operation;
- excellent tightness;
- easy care of the material, which can even be washed with cleaning agents and without fear of damage;
- resistance to alkaline and acidic environments.
However, it is worth considering that the product has low impact resistance. Also, the disadvantages include the fact that it can be problematic to install it yourself and you have to hire a specialist, which is an additional expense, and the tiles themselves are not cheap.
Of course, if you have experience in laying tiles, then you can lay the baseboard on the side of the bathtub yourself; this is what will be discussed below.
Varieties of bathroom corners
Before you learn how to properly install a plastic corner on a bathtub, you should understand what they generally are in order to choose the best option for your home. People also call them curbs, which are an inexpensive, practical means of eliminating gaps between walls and fonts.
There are these types of corners:
- Internal borders. These are corners that are installed during the process of covering the walls with tiled materials, and then the sides of the bathtub are mounted on top of them. Thanks to this design, it is possible to reliably isolate the joints between the wall and the bowl from moisture.
- External curbs. These are plastic corners that are mounted on top of the sides of the bowl. In other words, these are planks curved at an angle of 45 degrees. Such self-adhesive sides do not allow water to penetrate between the wall and the bathtub, since all the liquid flows along them into the container.
- Demountable corners for the bathroom. They consist of two parts - an inner and a decorative outer side. Their installation is more complicated, but they provide excellent protection against mold and moisture penetration.
Installation of self-adhesive tape
Self-adhesive border tape is an affordable material that can be used to very quickly seal the gap around the perimeter of the bathtub. This border option is flexible, so it is perfect even if the bathtub has a non-standard shape, for example, round.
Border tape is available in different widths, so before purchasing you need to make sure that the chosen option is able to completely close the gap at the side of the bathtub. Installation of curb tape is carried out as follows:
- The surface is prepared in the same way as in the case of installing a hard plastic border;
- The gap at the side of the bathtub is sealed with sealant (the sealant layer must be allowed to dry);
- The tape already has an adhesive layer, but for reliability you can additionally use “liquid nails” type glue;
- First you need to measure the tape to the required length, and then begin gluing, gradually removing the protective strip covering the adhesive layer;
- The tape must be pressed very tightly against the wall and side of the bath; it is recommended to use a plastic spatula to form a corner.
- In the corners the tape is glued with an overlap.
Plastic is a practical material for finishing a bathroom. It is waterproof, quite durable, looks great and, at the same time, has an affordable price. Therefore, if it is necessary to seal the junction of the bathtub to the wall, you can use plastic skirting boards, especially since it is quite possible to install them yourself.
Corner installation
The process of installing a corner depends on its type. However, before performing installation work, it is recommended to prepare the surface.
Preparing to install the corner
How to glue a corner to a bathtub? First of all, it is necessary to thoroughly prepare the surface, which will increase the level of adhesion between the corner and other surfaces and, as a result, ensure the necessary tightness and extend the life of the element.
The preparation process takes place in the following sequence:
- cleaning from the old corner (when replacing the sealing device);
- alignment of walls and bathtub, which will ensure a tighter fit;
- complete cleaning from all types of contaminants;
- degreasing;
- maximum drying (if there is no time for drying, you can use a hair dryer);
The corner will stick more firmly to a completely dry surface.
applying sealant to the gap, which will increase the level of protection. It is recommended to use only moisture-resistant sealing compound.
Applying a sealing compound to the gap
Installation of self-adhesive tape
Installation of self-adhesive tape begins from one of the corners of the bathtub in the following sequence:
- removing the protective layer by 10 cm - 15 cm;
- gluing the tape in compliance with the dimensions;
- a fold is formed in the corner, which is subsequently cut and sealed.
Soft tape gluing process
You can use the bathtub 24 hours after installation work is completed. This is the time required for the glue to dry completely.
Installation of hard curbs
Installation of hard corners is done as follows:
- the surface of the bathtub and the wall is covered with masking tape to prevent contamination during the work;
- an adhesive composition is applied to the corner between the wall and the bathtub, as well as to the edge of the bathtub and the wall (the adhesive can be applied directly to the corner);
- a corner cut to size is glued;
- seams formed when the corner and bathtub (wall) come into contact are treated with sealant;
- is expected until the used compounds have completely dried.
Installation of a hard corner on a bathtub
The process of installing a plastic border is presented in the video.
If all conditions are met, the selection and installation of a sealing element for a bathtub can be done independently, without the help of professionals.
We calculate the quantity
To calculate the number of borders, you need to take the total length of the sides of the bathtub in contact with the wall (preferably with a margin) and divide this length by the length of the border.
Some people prefer to save money and buy the required length of curbs, and then, when something goes wrong, they look all over the city for the remains of the curb of the required texture and color.
We recommend that you purchase a couple of borders in reserve in case one of them cracks during work or you cut something incorrectly.
In addition to the length, it is also necessary to consider the width of the gaps between the bathtub and the walls. The fact is that when purchasing, you will need to decide not only on the length, but also on the width of the material used. If the gaps between the bathtub and the wall turn out to be too wide compared to the purchased border, water will still flow into them and the point of using the border will then be lost.
Related article: Methods for connecting an indirect heating boiler
If you are going to purchase a border made of ceramics or natural stones, you need to measure the length of each line of the border as accurately as possible, since it will be very difficult to adjust it locally at home.
Selection of materials
When installing skirting boards to the side of a bathtub, special attention should be paid to the choice of adhesive. It is advisable that it be transparent, because
the composition may protrude beyond the edges of the part.
After the adhesive has dried, its excess is removed. This can be done using a strong solvent or improvised means, although this option is not always possible. A bathtub made of PVC cannot be cleaned this way - the adhesive from its surface should be removed with white spirit. What is needed to attach the curb and how to install it
- metal or rubber spatula;
- hair dryer for drying surfaces;
- knife;
- tape measure;
- if necessary, use a hacksaw or grinder;
- mounting gun;
- Scotch tape and mounting tape.
If a curb was previously installed on the bowl, it must be removed and the dirt formed under it must be cleaned off. This should be done with a cloth or sponge soaked in water with chlorine. After this, the surfaces are degreased and dried. The adhesive tape is attached 2 centimeters above the place where the border will be installed. The adhesive should be applied starting from the corner joints. The composition must be laid evenly. The space between the wall and the corner must be sealed. In this case, the sealant should be silicone. Sealing is best done using a mounting gun. To avoid accidentally staining the tiles and bathtub bowl, mounting tape should be glued under the plastic corner and at a distance from its edge. The edge of the plinth is bent with a spatula, after which the border from the inside is filled with silicone compound. Its layer is then leveled with a rubber spatula. These actions are carried out both with the upper and lower edges of the plinth. Corner joints must be especially carefully filled with sealant.
It is not difficult to install the corner yourself. But you need to approach the choice of the product itself very carefully. Inspect the plastic for damage such as scratches, nicks, and dents. The baseboard should bend easily at the edges and be durable. Plastic strips are much cheaper than ceramic ones, and in most cases are not inferior to them in terms of reliability, functionality and aesthetics. A ceramic product also requires a careful approach. The border must be smooth and without flaws. The ceramic corner looks very beautiful and greatly transforms the bowl, while at the same time performing its direct function - sealing the joints.
A properly installed ceramic border can last for decades. Fastening such an element is more difficult, but it can also be done without the help of others.
Installation Tools and Materials
In order to stick the border, you need to prepare:
- miter box;
- border;
- roulette;
- hacksaw for metal;
- stationery knife;
- silicone sealant;
- plastic spatula to remove excess.
Selection and advantages of sealant
For work, you should use a sealant for aquariums; a ruler for the bath and kitchen is also suitable. Its advantages:
- is water resistant and highly elastic;
- contains an antifungal additive;
- does not turn yellow;
- has good adhesion.
It also makes sense to choose a clear sealant. It costs more, but its performance properties are better than the usual one.
Advice: Even the highest quality silicone sealant loses much of its properties after 2-3 uses. It has to be replaced with a new layer. For comparison, low-quality sealant lags behind surfaces after only 3-7 months.
How can I replace sealant?:
- tile adhesive;
- liquid nails;
- special adhesive composition with polymers, silicone and acrylic.