Advantages of a homemade sharpener
There are a large number of devices on sale that can be used for sharpening wood chisels. The key features are the type of material used in manufacturing. Examples include diamond and synthetic stones, as well as natural minerals. An electronic sharpening device for wood chisels with vertical and horizontal orientation can also be used. However, as practice shows, all these tools are practically no better than ordinary sandpaper, which perfectly copes with removing the required layer of material from the surface.
When considering how to sharpen a chisel at home, we note that when using a homemade design, you can save a lot. Its other advantages include the following:
- Compact sizes.
- Easy to maintain.
- Can last for a long period.
You can make your own sharpener using available materials. Before proceeding with the actual assembly of the structure, the required material and tools are selected.
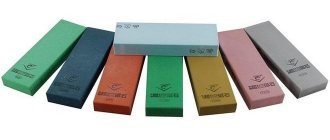
Tools and materials for sharpening
To adjust the sharpness of a wood carving chisel, various types of tools and materials are used:
- sharpening machines of vertical and horizontal types;
- sharpening stones;
- bars with sandpaper;
- sheet abrasives;
- cloth polishing resources and felt bases.
Sharpening of chisels can be done using a machine.
To fix the tool, use:
- metal models of factory-made mandrels with angular adjustment;
- homemade wooden versions of devices in which the angle is formed using wedges.
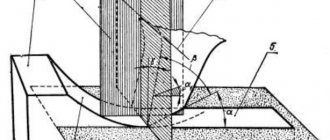
The fixing device provides two functional components in the form of a carriage for moving along the abrasive surface and an inclined platform with a clamp. The latter is pre-set at a given angle.
Materials and assembly rules
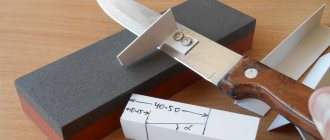
An excellent option for wood chisels is black sandpaper, the working surface of which is silicon carbide. This material is suitable for dry and wet grinding; the high hardness of the abrasive determines increased productivity when sharpening the cutting edge. The key points are the following:
- To sharpen a wood chisel at home, you need sheet paper with different grain sizes.
- The work is carried out in several stages. At the finish, sandpaper with fine abrasive is used.
- It is possible to ensure comfortable work when sharpening the tool in question for wood only by placing the sandpaper on a flat wooden surface. An MDF block is suitable for this, which is pre-wetted to eliminate the possibility of sandpaper slipping. This device is very convenient to use.
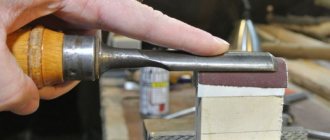
Even with the proper experience, it is almost impossible to carry out the procedure in question without a special device; most often, a lens with eightfold magnification is used. Thanks to such a device, it is possible to see most of the flaws of the instrument.
A device for sharpening a wood chisel of this type does not allow you to control the sharpening angle, which significantly reduces the quality of the resulting edge. That is why a special wooden device is being created that allows you to control this indicator with high accuracy. Due to it, the instrument is fixed at the proper angle. In addition, reliable fixation ensures uniform removal of material over the entire surface.
Recommendation "Arsenal Master RU"
We recommend for purchase, we will deliver throughout Russia. The sector of planes between the main chamfer of the sharpening angle and the micro-chamfer may often not be parallel and may be skewed relative to the cutting edge. However, this is not a defect and does not negatively affect the performance of the instrument. The cutting edge will have an adjusted angle (90° to one of the side edges of the tool being sharpened), even if the area between the main sharpening angle and the micro-chamfer looks skewed. View All options for purchasing a Veritas sharpener PROFITABLE! : SPECIAL SET: Veritas Sharpening System sharpener plus Japanese combined abrasive stone
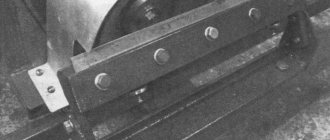
Assembling a sharpening machine
As previously noted, the sharpener must ensure that the tool is secured at a certain angle. A special device is created for this. In most cases, the required value is 25 degrees. On the Internet there is simply a huge number of drawings for creating a sharpening machine for a wood chisel; when choosing, it is worth considering what type will be processed.
When considering how to make such a device, attention should be paid to the following points:
- The beginning of the assembly involves creating a base of solid wood. In this case, you need to leave a reserve.
- The next step is to create a tongue and groove, which is cut using a suitable cutter.
- Next, a bevel is made at an angle of 25 degrees, after which the part can be fixed with double-sided tape.
- The vertical bevel ensures a product length of 190 mm.
- The next step is to create the cart. The groove disk creates a recess in which the wood chisel or chisel being processed will be attached at the required angle.
- A clamp is also required, for which holes are made for screws in the middle of the created workpiece. The distance from each edge is maintained at 32 mm.
- The handle is glued using a special glue that can withstand the impact.
A device for sharpening a wood chisel ensures reliable fixation, as well as maintaining the required sharpening angle. Due to this, you can count on high efficiency of the tool when used in a wide variety of conditions.
The process of sharpening on a homemade machine
It is important not only to assemble the required device, but also to consider how to properly sharpen a wood chisel. Incorrect operation can cause serious defects. The main recommendations for carrying out such work include the following:
- The device is placed on coarse-grain sandpaper.
- The cutting part is placed in a special holder under the clamping element, the chamfer should be located downwards.
- Tight fixation of the product is ensured by tightening the screws. The blade is positioned perpendicular to the working plane.
- At the beginning of sharpening, characteristic marks can be seen on the surface of the sandpaper. Gradually the tool is moved to continue the process on the untouched part.
- The procedure is carried out until the cutting part is processed evenly and acquires a matte appearance.
- From time to time the abrasive is replaced, due to which the required result is achieved.
When using a special device, the sharpening process is as simple as possible. You can sharpen a wood chisel quite quickly, which makes it possible to carry out the procedure quickly, without delaying the processing procedure.
The process of sharpening a chisel with your own hands
Sharpening the cutting edge of a chisel with your own hands requires a strong grip, attentiveness and patience, as well as a minimum set of sharpening and grinding materials. If you need to significantly change the sharpening angle, it is better to first use a sharpening machine. If there is no such need, then you can sharpen your chisel in the following order:
- Grind the chamfer using an abrasive stone until there are no visible holes or damage. It is necessary to strictly maintain its inclination not only in the longitudinal, but also in the transverse direction. This can be done either by hand or using a homemade jig made from several pieces of wood.
- Check the line of the cutting edge, which should be strictly perpendicular to the chisel blade. If not, straighten it with a sharpening stone and then re-sharpen it to a sharp point.
- Wrap a block of wood in fine-grained sandpaper, secure it with nails or staples, moisten it with water, and then, carefully pressing the chamfer against the abrasive surface, sand it until the edge is shiny and extremely sharp. If desired, the blade can then be polished on a felt wheel using polishing paste.
- If you need to sharpen a chisel with a bevel on the edge, then grinding is best done with a stop, lifting the blade up by about 5º.
- After finishing work, carefully wipe the chisel dry.
To properly sharpen a chisel, you need to remember one important technical rule for performing grinding and sharpening work: all movements should be performed only in one direction.
In Russian-language articles, authors almost never focus on sharpening the bevel of the cutting edge. In practice, many people actually do without this option and use straight edge chisels. What do you think about this? What's the best way to sharpen a chisel? Please share your thoughts and experiences in the comments to this article.
Edit
In some cases, a special device is not created, but a leather belt rubbed with a special GOI paste is used. Due to this substance, the cutting part is polished to a mirror shine.
In some cases, the special paste is replaced with a specific kitchen cleaner. The procedure is quite simple:
- The selected substance is applied to the surface of the cutting edge.
- Rubbing is carried out to the proper condition.
This procedure can significantly improve the accuracy of the cutting part. Editing is carried out after each sharpening, due to which minor defects are removed from the surface.
Geometry of a plane blade, chisel, chisel
The optimal profile of the cutting edge of a carpentry tool was formed experimentally. It is slightly different from the usual cross-section of a regular knife, described in the article on the rules for sharpening a blade.
Although the blade blade also has a rectangular shape.
A one-sided profile is created in the cross section of the carpentry tool blade.
We can say that the plane of the bevels is aligned with the approach, and the cutting edge is finally finished due to the formation of micro-approaches during polishing on the grinding belt.
The sharpening angle can vary from 25 to 45 degrees. It depends on the density of the wood being processed.
Device for sharpening semicircular chisels
A device for sharpening wood chisels with a semicircular shape is also used. A recess of the appropriate shape is created on a wooden block. To complete the work you need:
- Silicon block.
- Suitable abrasive powder.
- Plywood.
- Leather.
- Sandpaper with different grit levels.
Sharpening chisels for wood carving is carried out according to a certain algorithm. It looks like this:
- The bar is wetted in a soap solution.
- The chamfer is pressed against the stone and a sideways movement is performed to remove the material.
In order to sharpen a wood chisel efficiently, polishing is carried out at the finishing stage. A leather product is used for this. Sharpening a semicircular chisel by hand allows you to achieve an almost mirror-like surface that will not have defects.
Sharpening technique
In order to properly process the working surface of the chisel, it is recommended to use special products that have both grinding and polishing properties. Most often, preference is given to sharpening water stones or fine-grained sheet abrasives on a water-resistant basis.
Preparatory stage
Sharpening stones are pre-soaked in water. During the sharpening process, the liquid helps create a viscous grinding suspension, as it mixes with abrasive dust.
Angle editing and chamfering
The wood chisel is fixed at a given angle; according to the standards, the inclination is about 25°. This parameter may vary depending on the purpose of the joinery:
- The chamfer of the tool for slotting work is sharpened at an angle of 27-30°;
- for accurate trimming of wood with the removal of thin chips, a correction of the working surface by 20-22° is required;
- A universal chisel for most woodworking is sharpened at an angle of 25°.
It is worth considering that the sharpening angle of the chisel also depends on the parameters of the blade: thick blades provide a relatively steep bevel.
If you need to form a chamfer with significant adjustments to the sharpening angle, you should start working on a sharpening machine. To easily correct the sharpness of the cutting edge, perform the following steps:
- process the chamfer on the abrasive stone until visible damage is completely eliminated. In this case, the specified slope must be maintained both in the longitudinal and transverse directions;
- check the cutting edge for geometric evenness. Here it is necessary to achieve strict perpendicularity of the line in relation to the canvas. Otherwise, you will have to straighten the edge on the sharpening stone, after which the working surface is ground again to an ideal sharpness.
The angle for sharpening chisels should be about 25°.
If it is necessary to adjust the sharpness of a chisel with a bevel on the edge, grind it with a stop, lifting the cutting blade up within 5°.
Features of cutter processing
The work is carried out taking into account the following recommendations:
- First, the flat side of the canvas is processed. Movements are performed along the same trajectory along the entire length of the stone;
- then change the position of the chisel and work with the main working surface of the wood carving tool. Movements should be uniform, without jerking, but quite fast. In this case, it is necessary to maintain the desired angle of inclination;
- after the coarse-grained abrasive begins to leave scratches on the surface of the cutting blade, switch to a medium-grained stone. Next, if necessary, use an abrasive material with fine grain;
- when sharpening the chamfer, 1.5-2 mm is allocated, the perimeter is made at an acute angle of 5-7°. The chamfer is formed in just a few movements along the entire length of the stone.
It is noteworthy that the process of sharpening a wood chisel takes no more than 10 minutes if a simple correction of the sharpness of the carpentry is performed. If there are significant irregularities, chips or other defects on the surface of the tool, sharpening will take up to 1 hour or more.
Final polishing
The process of sharpening a chisel for wood carving is completed by straightening using various devices. Most often, they use a leather belt rubbed with GOI paste, or a kitchen cleaner on a flat wooden surface. The blade can also be polished on a felt wheel using polishing paste.
Sharpening tools
There are quite a large number of different tools that can be used for sharpening. An example would be:
- Grinding wheel.
- Special sharpeners.
- A combination of sandpaper and block.
Special tools can significantly increase the efficiency of the procedure.
How to make a universal sharpener for carpentry tools and knives
Hello, dear readers and DIYers!
Every carpenter knows that the key to quality processing of parts is sharp carpentry tools. Some of you will be surprised that when working with a blunt instrument, the likelihood of injury is much higher.
In this article, the author of the YouTube channel “JSK-koubou” will tell you how to make a sharpener for chisels, plane blades and some knives with a straight cutting edge.
This project is quite easy to make and does not require welding or turning. Materials needed for homemade products. — Sheet plywood, wood panel — Steel stud, rod, nuts, washers — Furniture mortise nuts — Ring screw — Two-component epoxy glue — Wood screws, oil-wax, polyurethane varnish, wood glue. Manufacturing process. This device is in some ways very similar to the so-called “Skomorokh’s sharpener” (its production was described in detail in a recent article). Analogues of the Skomorokh sharpener can be purchased on aliexpress using this link.
These sharpeners differ in the places where the knife and stone are secured. In the first, the stone is fixed on a movable guide, and the knife is on the base. In this sharpener, everything is the other way around, and the stone is motionless.
First, using a hand-held circular saw, the craftsman cuts a rectangular base from a wooden panel. The dimensions of the base are 450×250 mm.
The edges of the base are cut at an angle of 45 degrees with a mini-plane.
To fix the water sharpening stones to the base, the master glues two small sides. Their height should be slightly less than the stone.
Having marked the center line, the master drills a row of five holes for M5 mortise furniture nuts.
The guide dimensions are 300×35 mm. Both parts are glued together to form a T-shaped part. The position of the holder with holes is leveled using a square. During gluing, the elements are fixed together with F-clamps. This connection can be further strengthened with a pair of nails or screws.
Using an inbus (hexagonal slot) wrench, the craftsman screws the furniture nuts into the holder.
The clamp will be tightened with a bolt and an M6 nut, for which a transverse hole is prepared.
First, the block is cut in the tail section to the hole for the pin.
A steel rod with a diameter of 10 mm will serve as a kind of hook. To ensure that the glue is evenly distributed inside the hole, the author slightly twists the rod during installation.
You need to screw a nut with a mounting plate to the middle of the far edge of the base. To drill pilot holes for self-tapping screws, the master uses self-centering drills. This drill eliminates the need to mark hole centers, which is very convenient when installing door hinges.
The stand will be an M14 steel pin 350 mm long. It screws into the nut.
A clamp with a hook is put on the rack, its position is fixed with a wing-head screw.
The device is magnetized to the piece of iron. Based on his readings, the author sets an angle of 30 degrees.
When sharpening, you need to control the position of the blade, trying to press it with its entire plane.
Tools used by the author. — Digital protractor — Set of water sharpening stones — Mini plane set — Screwdriver, three-point wood drills — Self-centering drills — Jig for drilling holes — Electric jigsaw, orbital sander, carpenter's vice — Svenson square, marker, awl.
I thank the author for a simple but useful device for sharpening a variety of carpentry tools!
Good mood, good health, and interesting ideas to everyone! Subscribe to the telegram channel
site so as not to miss new articles.
The author's video can be found here.
Source
Become the author of the site, publish your own articles, descriptions of homemade products and pay for the text. Read more here.
Correcting the cutter angle of a semicircular chisel
An incorrect sharpening angle for a wood chisel causes a serious reduction in performance. That is why the sharpening angle of a wood chisel is adjusted when using a special device.
It is recommended to carry out a similar procedure immediately after detecting serious defects. This is due to the fact that an incorrect sharpening rate causes rapid wear of the surface.
Sharpening a chisel on a grinder
Grinding machines have become quite widespread. They are characterized by increased efficiency in use. The procedure being carried out can be characterized by the following features:
- Metal is removed at high speed.
- It is possible to replace the sandpaper if necessary.
The only drawback is the rather high cost. In addition, some tools do not allow you to maintain the required angle.
Chisel sharpening angle
An incorrect angle indicator causes a significant decrease in the efficiency of the work being carried out. The recommendations are as follows:
- Various tools can be used to measure the sharpening angle.
- You can maintain the required indicator when using purchased and homemade devices.
Over time, due to increased wear, there is a possibility that the tool used will not cope with the task. However, when sharpening it is important to maintain the correct rate.
Sharpening the inside of a semicircular chisel
The inner side of a semicircular wood chisel is also sharpened using a special device. The features of the procedure are as follows:
- Requires special equipment.
- The tool must be securely fastened at the time of operation.
- It is necessary to maintain a strictly recommended indicator.
Similar work can also be done in a home workshop. At the same time, on the Internet there are diagrams according to which home-made structures are assembled.
Sharpening the cutter
The frequency of sharpening the cutter largely depends on the area of application and some other points. It is worth considering the following:
- The need for such a procedure is manifested by the fact that it is impossible to carry out surface treatment.
- Defects also appear visually; a routine inspection can reveal them. An example is various chips and burrs.
When using emery, all irregularities and defects can be eliminated within a short period.
Restoration of the handle
The handle is also subject to wear. That is why work often involves their restoration. Among the features we note the following:
- The strength of the fastening can be restored through the use of an adhesive composition.
- Often this element is made from wood, so there are no difficulties with processing. But the plastic handle is practically impossible to restore.
The information above indicates that much of the work can be done independently. Due to this, it is possible to eliminate the possibility of delaying the procedure for processing wood with a chisel. Homemade devices, as a rule, are practically in no way inferior to special ones, with the exception of the speed of removing metal from the cutting edge.
How to sharpen a semicircular chisel?
To correct carpentry tools with a semicircular cutter, a wooden block with an edge that follows its shape is used.
- silicon block;
- wood blank;
- abrasive powder;
- sandpaper with a grain size of 400, 800, 1000, 2000 microns;
- a piece of leather for polishing.
- Wet the silicon block in a soap solution. Next, they begin to work, performing sideways movements, pressing the chamfer to the touchstone at the desired angle until a burr is formed.
- Next, a wooden block with a rounded edge, which is decorated with sandpaper, is used. During the processing process, the abrasive is changed to an analogue with a small denomination.
- At the end of the process, the cutting edge is polished and straightened using leather.
If you sharpen the chisel correctly, ensuring the appropriate chamfer angle, the quality of the carpenter's work improves. Moreover, not only the accuracy of the cut, but also the level of productivity of the woodworker depends on the sharpness of the working surface.
Read also: Artistic forging railings for stairs photo
There is one true rule: a sharp blade is much safer than a dull one. It's right! The rule applies not only to the production of sharp edges of a chisel, but also to other carpentry and even kitchen utensils. Therefore, first of all, it is necessary that the pointed edge of the chisel is regularly cleaned at least a couple of times a year. If the tool is actively used in work, it is necessary to clean it much more often.
First stage
Even a set of brand new chisels that have not yet been used in work may not be suitable for starting to work with them. Even though they remain sharp for a very long time, you must know how to sharpen a chisel correctly. After all, the quality of the work performed depends on this.
If the joinery is a little old, has a little uneven edges or rust, then you can correct this with a sanding wheel. Gently hold the beveled chisel against the grinding wheel to remove large burrs and rust.
To work, you need a three-level sharpening stone - the smallest, beginner and medium, in order to achieve greater sharpness of the chisel. Sharpening stones can be purchased at hardware or garden stores and are often used for sharpening kitchen knives. The stone you purchase should come with lubricant, or purchase it separately. Note:
- Do not use water-based lubricant on oil stones. For them you need to buy special products in construction stores;
- Waterstones prefer water as a lubricant. They need to be soaked in plain water for a few minutes, after which they can be used. This method is quite common in Japan.
Now you need to prepare the stones accordingly. Usually such stones come with instructions. Instructions are also written for oil lubricants.