Composition of the cistern
The functioning of the toilet depends on the filling and “quality” of the flush cistern. Its breakdown significantly complicates the life of any family. Based on this, the choice of flush mechanism and toilet bowl must be taken as responsibly as possible.
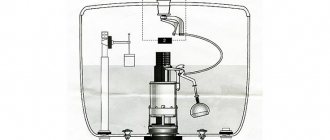
Any cistern contains the following details:
- Essentially a tank that will hold water.
- Fittings that regulate the filling of the tank.
- Water drainage mechanism.
- Button for draining water.
The most common circumstances in which the cistern mechanism stops functioning are:
- Failure of the drain button.
- Damage to the fittings regulating the filling of the tank.
- Failure of the “rocker arm”, which is specifically responsible for draining water into the toilet.
All these troubles can be solved independently, without the help of a plumber. A good preventive measure for any breakdowns can be the installation of toilet flush fittings. It will ensure uninterrupted operation in arbitrary conditions for a long time.
Flush tank for toilet: device, installation, configuration, repair
But if you have the desire and straight arms, then why not try. Checked by a specialist: Amir Gumarov.
Contents of the article: Design options for modern models General recommendations for installing toilets Preparation of tools and materials Dismantling the old toilet Sequence of assembly of the structure Connection to the sewer Connection to the water supply Options for connecting a plumbing fixture Option 1 - with a vertical outlet Option 2 - with a horizontal outlet Option 3 - with an oblique outlet Installation features of compact models Photo guide for assembling and installing a compact Installation of a monoblock toilet Installation of suspended structures Conclusions and useful video on the topic.
The design of the bowl of floor-standing and hanging models can be anything, for example, a dish-shaped, funnel-shaped or even a canopy modification. It is impossible to do a high-quality installation of a toilet with your own hands without a minimum set of necessary tools that any owner has in his home. If you plan to connect the toilet to a cast iron socket, you need to prepare a rubber adapter sleeve measuring x millimeters.
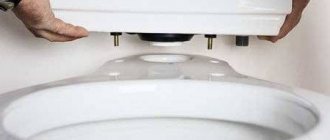
The sewer hole must be closed so that toxic hot gases do not spread beyond the pipeline. Photo from. The easiest way to dismantle it is if the old toilet was installed on a tiled floor and secured only with screws. It can be removed entirely and taken out. It is much more difficult to dismantle a toilet mounted on a taffeta board immersed in a concrete screed and nailed to the base.
The final step in bathroom renovation is the installation of plumbing fixtures. If you wish, it is quite possible to do this part of the work on your own, without turning to plumbers.
In this case, the plumbing will have to be broken and taken out in pieces. The toilet connected to the sewer outlet by a corrugated pipe is quickly and easily disconnected. It is enough to disconnect it from the pipes. The contractor will need a lot of effort and patience if the connection to the sewer was made with a cast iron pipe. Most likely you will need to change the pipe and install a new plastic tee. When assembling the structure, key attention should be paid to the correct installation of the float, the main task of which is to regulate the pressure and volume of water filling the tank.
To level the position of the structure being installed, you can dismantle the old cladding and pour a mm-thick cement screed.
Corrugated pipes bend perfectly and stretch over the entire length of the product, and eccentric collars can easily compensate for the angle of deviation from the alignment of the joined pipes. When carrying out work, you should place the gasket that comes with the equipment or a piece of soft cloth under the landing heel. The tank of a compact toilet is installed on a shelf that is structurally or technologically connected to the toilet, to which it is screwed with plastic bolts.
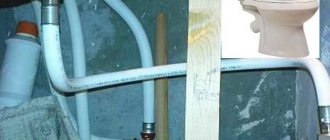
Tap water can be supplied to the flush tank either from the bottom or from the side of the tank. There is no fundamental difference in the operation of these two options. The side connection has several advantages: it is easier to identify leaks and adjust the drain system. After connecting the hose from the tank to the water line, it is filled with water and the fittings are adjusted according to actual indicators.
The water in the container should not reach the drain hole located in the upper third of the tank. To be able to shut off the water between the water supply and the tank in case of an unforeseen or emergency situation, a shut-off valve is installed. We install the flange into the drain hole located in the floor. We are preparing the fasteners included with the toilet for the work.
It cannot be exchanged for hardware of a different size. We insert the mounting screws into the mounting holes of the flange with the rods facing up, and screw the flange to the floor. We try on the sealing ring to the location and fixation of the toilet. If necessary, we adjust the fasteners. We treat the drain hole and the lower edge of the toilet with silicone sealant, put a sealing ring on the hole and place the device in the prepared place. We install a drain valve in the tank, having previously treated the surface of the drain hole in contact with it with silicone.
We insert fasteners into the screw holes located on the bottom of the tank.
There are holes on the bowl itself. Then install the new toilet properly, on the dowels. Professional plumbers do not recognize this installation method and do not consider it reliable. But due to the high error, not every plumber will want to take risks.
We place the tank on the shelf located at the back of the toilet. Carefully insert the tank screws into the holes on the shelf and align the drain holes of the tank and toilet. Having checked the position of the tank with a building level placed on its upper edge, we fix it by screwing the nuts onto the screws from the bottom of the shelf. The main feature of toilets with a straight horizontal outlet pipe is that for proper installation a strictly fixed connection point to the communications is required.
The weak point of devices with oblique outlets is the connection points between the product and the sewer pipe, which can become covered with cracks if installed incorrectly. The simplest option for connecting a toilet with an oblique outlet is to use corrugation, which ensures perfect tightness.
If corrugated pipes are used to make long-term rather than temporary connections, then you need to use a reinforced version of the corrugated pipe. Using a corrugation, a toilet with an inclined outlet can be connected to a drain located in the floor or wall.
If it is possible to reduce the distance between the toilet and the sewer system, it is recommended to use a sealed cuff and a plastic outlet instead of corrugation. If holes have to be made in tiles to minimize damage to the surface, first slowly drill the top layer by hand, and only then turn on the hammer drill with an impact drill mode.
Before installing a new toilet, we dismantle the old plumbing, clean the floor underneath, repair it and fill it with semi-dry cement mortar. We install a new plastic adapter into the sewer outlet, to which we will connect either a corrugation or a rigid plastic elbow.
If necessary, we change the cold water supply pipes in the area behind the toilet. According to the completed connection from the toilet to the sewer, we set up the plumbing fixtures for fitting in order to mark the attachment points and outline the leg. We drill holes in the base at the points marked during fitting. The diameter of the holes is equal to the diameter of the plugs that will be driven into the floor before fixing the screws. Advice: Try to initially determine the location of the toilet in such a way as to ultimately not disturb the symmetry of the room.
Tip: If you have tiles in the room, first drill the top tile layer without using a hammer drill, and then use the impact mode of the drill. Tip: If you do not have a gasket, use a special gel-type silicone sealant.
It effectively prevents rust and dust and contaminants from entering holes. Advice: Use exclusively sealing washers, which are optimal for fastening between the tank and the bathroom itself, as well as the tank and bolts. Tip: It is advisable not to use a winding in the sealing procedure, since it often causes leaks.
This is all! Self-installation of the bathroom has come to an end. However, you should not immediately use it for its intended purpose: you must allow the silicone to harden. He does this for 6 hours. By the way, don’t skimp on the sealant!
Features of the drain mechanism
There is never too much of it in installation work. But be sure to make sure that the silicone does not end up inside the pipe. Note: To install the toilet and its tank yourself, you do not need professional tools. It is enough to stock up on a set of wrenches and adjustable types.
This point should be given special attention. The scheme for connecting a bathroom to a general sewer system involves the traditional use of eccentric, or more common - corrugated cuffs, plastic outlets and fan pipes.
In the latter case, the toilet takes on a more aesthetic appearance, since in general terms the combination of a faucet pipe and a toilet is visually perceived as a solid plumbing product. Moreover, if you intend to use a fan connection in the installation procedure, you need to know its specifics: Toilet corrugations bend perfectly and extend to their full length, while the eccentric connections can be rotated in relation to their axis.
The latter successfully compensates for the misalignment angle of the connecting pipes. Tip: If the connection will be made in a hard-to-reach place, it is best to use corrugated cuffs. Let's look at the main three types of bathroom connections in more detail. Perhaps some of the nuances listed below will make you take a different look at the selected toilet model. Types of sewer connections.
This model is especially popular in European countries.
Installing a toilet on taffeta
Such a toilet is a device in which the siphon located in the bowl and the outlet pipe are directed downwards when installed. This universal design allows you to install the bathroom at any angle to the wall. Installation of a toilet with a vertical outlet. Most common in Russia. The outlet of such a toilet is invariably directed backwards. The outlet pipe in this design is connected to the sewer pipe using a specific cuff. Installation of a toilet with horizontal outlet.
In the installation procedure, pay attention to the attachment of the bathroom to the floor.
Fittings for cistern
Shut-off valves are now the most effective means of preventing the most common drainage problems.
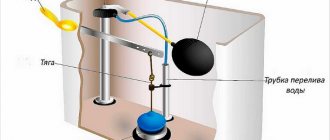
The mechanism of the flush tank is a complex of the following details:
- A drainage mechanism with an angular slope (located at the bottom in some models).
- Overflow tube located slightly to the side.
- A mechanism that fills the tank with a new portion of water.
- A mechanism that includes a drain function.
Advice! The correct and uninterrupted functioning of the flush cistern greatly depends on how to set up the toilet fittings. This is done immediately after installing the plumbing product in the bathroom. Or, if it was not done immediately during installation, during the next repair.
Do-it-yourself fittings installation
Any type of shut-off valve for water supply can be installed in three ways:
- welding method;
- on flanges;
- using thread.
Installation of fittings by welding
Welded fittings in private water supply systems are currently used extremely rarely, since installing such a device requires a welding machine and skills to work with it.
Device installed using a welding machine
However, the welding method is still used in the installation of industrial pipelines. How to install fittings by welding:
- a section of pipes is cut out at the location where the tap, valve or valve is installed;
- the edges are cleaned and polished;
- the reinforcement is installed on the prepared area and fixed with a welding machine;
- Welding seams are protected and covered with a layer of paint or primer.
Reinforcement fixed using a welding machine
The welding seam cannot be separated to repair the fittings, that is, in the event of a breakdown, the previously installed device will have to be cut out. However, the weld seam is the most durable and airtight.
Installation with threaded connection
The threaded connection is detachable, that is, if the fitting breaks, it can be replaced as soon as possible without any problems.
To arrange a threaded connection you will need:
- grinder for cutting pipes;
- thread cutting tools;
- wrench.
Threaded shut-off valves of the water supply system are installed according to the following scheme:
- a section of the pipeline is cut out. The ends of the pipes are processed;
- thread is cut;
Thread cutting for installation of shut-off valves
- the threads on the fittings are sealed using any material, for example, FUM tape or linen thread;
Thread sealing on fittings to improve the tightness of the connection
- the device is fixed;
- The tightness of the resulting connections is checked.
You can watch the video on how to properly cut threads and install shut-off valves.
Installation of fittings on flanges
The flange connection is also detachable, but is mainly used on industrial plumbing systems.
It is quite difficult to arrange a flange connection on your own in a domestic water supply system, since it is necessary to initially weld special rings onto which the fittings will be fixed. If such rings were installed previously, then flange fittings can be installed according to the following scheme:
- between the ring on the pipe and the flange located on the device being installed there is a sealing gasket that increases the level of tightness of the connection;
- the device is fixed using fastening bolts, which are included with the fittings upon purchase.
Installation of fittings using a flange connection
Knowing the functional features of certain types of shut-off valves and the rules for their installation, you can choose the most suitable device and install it on the water supply system with your own hands.
Installation of fittings
The fittings will prevent water from leaking from the cistern and will regulate the flush - either full or partial.
Structurally, water drainage mechanisms can vary significantly depending on the manufacturer. Based on this, when purchasing fittings, you need to carefully inspect the mechanism. This will help:
- understand how it functions
- find out its weakest points - in case the drain tank fittings need to be replaced in the future,
- recognize the shortcomings of the details, which can cause the entire drain mechanism to fail in the near future.
Advice! The fittings of the cistern look like a complex mechanism, and at the same time, it is entirely possible to install it yourself, without resorting to the services of a plumber.
If the fittings are installed before installing the toilet, this requires:
- Place a rubber gasket on top of the drain mechanism.
- Install the cistern fittings into the cistern and carefully, but without overtightening, secure it with the nut supplied in the kit, mostly plastic.
- The fastening bolts must be equipped with rubber gaskets and the mechanism must be secured with their help.
After installing the fittings, the tank must be installed on the toilet, water must be supplied to the flush tank and a test flush must be performed.
The height of the reinforcement is adjusted as follows:
- First you need to disconnect the rod placed on the overflow pipe.
- Release the drain mechanism lock so that the “glass” of the fittings can move freely vertically.
- Carefully adjust the position of the cistern fittings to the desired level. The top level of the tank (without a lid) should not be more than 4–5 cm.
- Record its condition and bring the rod back so that the overflow tube is at least 1–2 cm above the water.
- If the drain mechanism has the function of draining half of the tank, then it will also need to be adjusted using the small flush float.
Fittings for a cistern with a bottom water supply. Installation and operating instructions
Complies with the requirements of TU 4953-001-02903999-2014 AB 69.57.55.3
Purpose of the product
The fittings for the flush tank are designed to fill the flush tank (popularly a flush cistern) with water and supply it for flushing into the toilet.
Security measures
The materials used for the manufacture of fittings do not emit harmful substances into the environment under operating conditions and do not have a harmful effect on the human body upon direct contact. Working with fittings does not require special precautions.
Specifications
- Operating pressure range, MPa 0.05 - 1
- Filling time for a 6.0 liter tank, no more than 2.5 minutes
- Level stability: change in water level when pressure changes by 0.1 MPa, no more, mm 5.0
- Diameter of the hole in the tank lid, 38…44 mm
- Installed resource is not less than 150.0 thousand cycles
- Connection size G1/2-B
- Product weight, no more than 0.62 kg
Completeness
The fittings kit includes:
Inlet valve Exhaust valve
Product storage and care
The fittings should be stored in packaged form in dry, closed rooms at a distance of less than 0.6 m from heating devices.
The use of detergents containing abrasive, acidic and alkali-containing substances, and organic solvents is not allowed.
Manufacturer's Warranty
The guaranteed service life of the fittings is five years from the date of commissioning, but not more than six years from the date of production. The service life of the fittings is 6 years.
The product warranty does not apply in the following cases:
- its mechanical damage;
- installations in violation of the requirements of this instruction;
- improper maintenance during operation:
- non-compliance of water with the technical requirements of GOST 2761-84.
Manufacturer's recommendations
To increase the reliability and durability of the fittings, it is recommended to additionally install a filter in the water supply network.
Installation of fittings
The fittings are supplied assembled, complete and configured for a specific type of tank
- The procedure for installing fittings in a tank
After installing the fittings, do not allow the moving parts of the valves to touch each other or the walls of the tank.
When connecting the water hose to the inlet valve, hold the valve from turning.
- Tank installation
To avoid leakage from under the gasket, tighten the wing nuts evenly on both sides.
- Installing the Reservoir Cap and Push Button Assembly
Check that there is a gap of 3 - 19 mm between the tank cap and the push-button assembly inserted all the way into the thread of the release valve (without screwing it in).
To reliably center the threads, before screwing in, make 1–2 turns counterclockwise until a characteristic click is heard, which will indicate that the thread has “sat” into place.
Adjustment of fittings
- If the distance between the tank lid and the push-button assembly goes beyond 3...19 mm, it is necessary to adjust the release valve in height (see Fig. 2 and the table for adjusting the height of the fittings). Disconnect the rod 23 from the overflow body 12. Press out the cup clamps 10 and move the stand 6 up and down until the gap is 3...19 mm.
Attach the rod to the overflow body.
- To adjust the water level in the tank, disconnect rod 2 (see Fig. 1), move the float up or down, and reattach the rod to it. The minimum distance between the water level and the top edge of the tank is 45 mm.
- After adjusting the water level in the tank, adjust the overflow pipe 7 (see Fig. 2). To do this, unscrew the bayonet cap 9 and move the overflow pipe to a position where the mark on the pipe corresponds to the water level in the tank. Tighten the bayonet cap.
* For fittings with an extended stand ** when setting to this division, remove the overflow pipe 7
Reinforcement height adjustment table
| Division on the rack scale | Height H, mm | Division on the rack scale | Height H, mm |
| M** | 285-304 | 15 | 360-379 |
| 1 | 290-309 | 16 | 365-384 |
| 2 | 295-314 | 17 | 370-389 |
| 3 | 300-319 | 18 | 375-394 |
| 4 | 305-324 | 19 | 380-399 |
| 5 | 310-329 | 20 | 385-404 |
| 6 | 315-334 | 21 | 390-409 |
| 7 | 320-339 | 22 | 395-414 |
| 8 | 325-344 | 23 | 400-419 |
| 9 | 330-349 | 24* | 405-424 |
| 10 | 335-354 | 25* | 410-429 |
| 11 | 340-359 | 26* | 415-434 |
| 12 | 345-364 | 27* | 420-439 |
| 13 | 350-369 | 28* | 425-444 |
| 14 | 355-374 | 29* | 430-449 |
Possible malfunctions and ways to eliminate them
| Fault name | Probable Cause | Remedy |
| 1. Intake valve | ||
| Valve does not close | Clogged hole in the slider 5 - guide 3 assembly | Disconnect guide 3 and wash the assembly with the slider |
| Valve does not open | Clogged hole in the slider 5 - guide 3 assembly | Disconnect guide 3 and wash the assembly with the slider |
| Slow tank filling | Filter 11 clogged | Unscrew the water supply hose, remove filter 11 from housing 8 and rinse |
| 2. Release valve | ||
| There is water leaking into the toilet | The bottom valve 13 is installed incorrectly on the overflow body 12 | Adjust the landing of the bottom! valve 13 on overflow body 12 J by rotating around its axis |
| Nut 21 is loosely tightened | Tighten nut 21 | |
| Overflow pipe 7 is incorrectly positioned | Adjust | |
| Thrust 23 is set incorrectly | Adjust | |
NOTE: Due to the presence of various impurities in the water, the operation of the release valve may deteriorate over time due to sediment deposited on its parts. In this case, it is necessary to disconnect the valve from the seat, wash it and reinstall it.
Valve drawings
Intake valve (bottom connection) | Rice. 1
Release valve | Rice. 2
Replacement
In some cases, an already installed drain mechanism fails. Quite often, troubles arise due to the deformation of some low-quality fittings, especially if an inexpensive option was installed. In addition, water has a huge impact: its excessive hardness can have a very bad effect on the condition of the fittings. Moreover, foreign mechanisms do not help. They are designed for a different water composition and quite often break due to excess impurities in the incoming water.
Advice! To replace the fittings of the drain tank, it is necessary to turn off the water supply to the drain tank, remove the lid and carefully inspect the mechanism itself. In many cases, a breakdown can be eliminated by replacing one part.
What does a malfunction of the drain mechanism look like:
- Constant leakage of water into the toilet.
- Constant flow of water into the tank.
The first case is due to the transformation of the position of the float that regulates the water level. To eliminate the problem, you need to adjust the position of the float. If the manipulations done did not help, it is necessary to change the float - it is quite possible that it has a defect that allows it to pass water and transmit incorrect information about the water level to the drain mechanism.
The second case shows that the membrane located in the siphon of the drain mechanism has failed. It needs to be replaced with a new part.
But if the drain mechanism has been installed long enough, all its parts have worn out so that installing new ones will not help. This means that it is necessary to change the drain mechanism completely.
When purchasing new fittings for a drain tank, you must make sure that all its parts are free of any damage and that the mechanism is functioning properly. It is possible to buy another set as insurance.
Requirements for shut-off valves
Shut-off devices make up about 80% of pipeline fittings in prevalence. Their main purpose is to completely block the flow of the medium, however, they can perform protective, distribution and other additional functions. Depending on the scope of use of the devices and the nature of the transferred liquid or gas, special requirements are imposed on shut-off valves, especially for chemically aggressive, as well as fire and explosive environments. However, most often pipeline fittings for this purpose are used to equip heat and water supply systems.
General requirements
- The tightness class of shut-off valves must be maintained after at least 2500 cycles.
- Duration of operation – from 50 years.
- The mechanism must be driven with a maximum force of no more than 250 N/m.
- Tightness of drives and connecting pipes.
- Correspondence of connecting dimensions to the diameter of pipes, threads or flange connections.
- Reliability of operation of shut-off valves of heating and water supply networks at temperatures from -10 to + 80 °C when installed underground, from -40 to +60 °C when installed above ground.
- Availability of graphic designations of boundary positions and direction of movement.
Hydraulic resistance
One of the requirements for shut-off valves is efficiency, which is achieved by minimizing the hydraulic resistance of the devices, and, accordingly, saving electrical energy by pumps transmitting the working fluid
Hydraulic losses, to a greater extent, occur in the radial direction of the networks, therefore special attention is paid to the resistance of the sections’ reinforcement
Tightness of fittings
The level of tightness of shut-off devices is determined by the tightness class of the flow shutoff. If the nominal diameter is 1000 mm, the following leakage volumes are allowed: for classes B, C and D - 18, 180 and 1800 cm 3 /min, respectively. Class A implies a tight fit of parts and no leakage.
The following requirement is imposed on the shut-off valves of the water and heat supply system: no leaks on elements such as vents and drains (class A), minimal leaks in sectional networks and branches (class B).
Drain tank - do-it-yourself installation, configuration and repair
The legs of this type of toilet are usually equipped with specific holes designed for fixing plumbing fixtures specifically to the floor surface. Tip: You should start connecting a bathroom with direct outlet during its installation.
Dowels and standard screws are used as fasteners. We install mounting bolts inside the tank, not forgetting to put gaskets. We put the drain tank in place until it can be leveled. The main thing is to get the screws and the outlet part into the seats. When both nuts are installed, but not yet tightened, level the container. Then, using a wrench, we begin to tighten the fastening. We turn it a few turns, first from the right, then from the left.
Lastly, install the inlet valve for the drain tank. It could have been installed earlier, but then it would be inconvenient to install the mounting bolts - there is too little space.