For the normal functioning of any toilet connected to a centralized or autonomous sewage system, it is fundamentally important to ensure high-quality and uninterrupted operation of the flush tank. It is possible to say without exaggeration that the level of quality of flushing food and biological waste, the degree of contamination of the inner surface of the toilet bowl, the functioning of the self-cleaning property of the sewage system, both the working quantity and the average per day level of consumption of water used mainly depend on the correct setting and adjustment of this device.
Design and principle of operation of push-button tanks
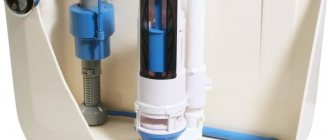
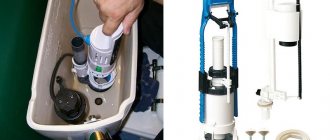
All flush tanks are structurally very similar, the only difference is in the water release mechanism. They are a container for storing water necessary for flushing after using the toilet. Equipped with fittings for operation. Consist of:
- filling valve;
- float;
- drain mechanism;
- overflow protection.
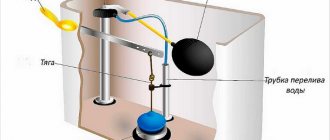
The principle of operation of the cistern is quite simple. When the float is lowered, water flows through the filling valve, which is responsible for maintaining the liquid level in the tank at a certain level.
Cistern with button
The float itself is attached to the filling mechanism and controls its operation, rising when the tank is filled and falling when it is empty.
Attention! In addition to the already familiar flush tanks, in which water is connected from the side, other types of devices are increasingly common today. In them, water is supplied to the tank below. They differ from devices with a side connection by the presence of a membrane valve that regulates the water supply.
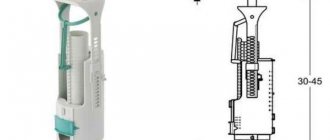
The flush mechanism is controlled manually using a button on the tank. It is equipped with overflow protection - a mandatory element of the tank, which is adjustable in height when a limit is set in the liquid level. When it is exceeded, it goes directly into the sewer pipe without spilling beyond the container.
Common faults
Drainage malfunctions may well lead to the toilet losing its functionality. For many, such a sudden breakdown can be a real natural disaster. In addition, no one will like increased water consumption either.
Read about what a hygienic shower for a toilet with a mixer is and what types it comes in in a separate article.
We described how to choose a pump to increase water pressure and in what situations it is needed in another article on the site.
What kind of breakdowns are typical for drain tanks? We list them in order of frequency of occurrence:
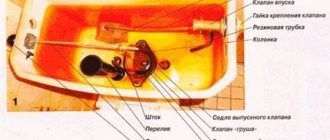
1. Water leaking from the toilet onto the floor . Most often, water leaks through the o-ring located between the bottom of the tank and the toilet shelf. If the ring is cracked or warped, water will leak through it. Also, the place of leakage may be the gaskets of the mounting bolts that secure the tank to the shelf. They will have to be replaced if tightening the bolts does not work. And it doesn’t matter whether an old-style toilet cistern is being repaired or a modern system is being repaired. After all, they all have the same fastenings.
A high-quality sealing ring of the drain tank is the key to its good sealing
Tip: When replacing gaskets and seals, it is recommended to lubricate them with liquid silicone to extend their service life and prevent cracking.
2. There is a constant flow of water in the toilet . Most often this is due to the tank overflowing, in which water flows out through the overflow tube. This can happen due to a change in the height of the overflow, a loose fit of the float to the shut-off valve, or the float losing its tightness. The rubber seal on the drain fitting may also be worn out. Most often, the malfunction can be corrected through adjustment. If the locking gasket is worn out, it is advisable to replace the entire drain mechanism.
3. Malfunction of the starting mechanism . If you are using a push-button water supply mechanism, when you press the button, water may not flow into the drain. You can repair the fittings of the drain tank yourself, since, most often, the lever mechanism connecting the button with the drain breaks. This also applies to tanks with a handle or chain.
4. Noisy filling of the tank . This happens due to the disconnection of the tube through which water is poured into the tank. This is typical for tanks into which water is supplied from the side. If the tube falls off, the noise of incoming water will be clearly audible. To fix the problem, remove the top cover and install the tube on the fitting.
5. Water does not flow into the tank . Repairing a toilet flush cistern with a button or with other flushing mechanisms when such a problem occurs comes down to checking the inlet hole into the cistern. You need to remove the valve from the tank and clean the inlet hole with a thin steel wire and rinse it with water.
Types of push-button flush mechanisms
The drain valve is connected to a button on the tank. When you press it, water drains into the toilet. Drain mechanisms come with:
- one button;
- two buttons.
In the first option, when you press the button, the entire volume of liquid in the tank is drained into the toilet. The button in the second option is divided into two parts. When the small button is pressed, the water is not completely drained. And if you press the big one, it will pour out of the tank into the toilet in full. This separation allows you to save water in the apartment and not overpay for its excessive consumption when draining.
Tank repair with one button
Many people, accustomed to old-style cisterns, do not know how to fix a toilet flush cistern with a button. In fact, the differences between these systems are very minor. For many, the main problem is disassembling such a tank. Indeed, the button located on the tank lid requires careful handling during disassembly. But the device is very easy to disassemble.
The procedure will be as follows:
- turn off the water;
- empty the tank;
- carefully unscrew the plastic nut near the button;
- remove the cover.
Further actions depend on the nature of the breakdown. Failures of a tank with a button can be as follows:
- There is not enough water in the tank. Check the position of the float and adjust it.
- The water start button is stuck. This may occur due to clogging of the button shaft. It is necessary to clean it and return the button to its original position.
- Water does not flow into the toilet when the button is pressed. Most likely, the mechanism between the button and the drain valve has broken. You can restore it yourself. If this element of the fittings is broken, then to replace it you can use copper wire or replace the valve completely.
- Water flows through the overflow neck. The overflow height or float needs to be adjusted. The overflow is very easy to adjust. To do this, unscrew the union nut and set the required overflow level.
- Water leaks into the toilet from under the valve. The drain valve gasket may be worn out. It is best to replace the entire valve. To do this, unscrew the plastic nut at the bottom of the tank and remove the valve from its place. Install a new valve.
Note: It happens that the valve does not fit tightly into place due to misalignment. Opening and closing it again helps eliminate the leakage problem.
Toilet button malfunctions
Any item is designed for a certain period of use. Likewise, the service life of a toilet button also has its limits. But it can fail even earlier if the mechanism was initially made of inadequate quality. And if the button begins to function poorly as a result of mechanical damage, it may be necessary to completely replace it with a new one.
Button mechanism for toilet cistern
As a result of one or another malfunction of the drain mechanism, the button, when pressed, may:
- stick - you have to press the button more than once to drain the water;
- fall through - the button lowers when draining, as if falling inside.
Water does not flow into the tank container
This problem occurs when debris gets into the narrow part of the valve device. First you will need to drain all the water from the tank. Remove the valve with lever and float completely. Then you can see the clogged hole. Through this passage, water is drawn into the reservoir. You can clean out the debris with a thin wire or a sewing needle.
The valve on the inlet fitting is slightly unscrewed and the inside is washed with a stream of water. If, after removing the blockage, water flows without obstacles, then you can screw the clamp back and reassemble the entire mechanism.
Troubleshooting
When the button sticks and you need to press it multiple times to drain the water, the problem is most likely in the rod that connects the drain valve to the drainage device. To fix this you need:
- block the access of water to the drain tank and drain the water that is in it;
- open the tank by removing the lid, then unscrew the locking ring from the part of the button that is inside and remove it. After this, remove the button;
- repair the rod or replace it with a new part;
- After repairs have been made or partial replacement of parts, put everything back together.
Advice.
If you need to replace the rod, but it is not possible to immediately install a new part, you can temporarily replace it with a homemade element made from a piece of thick wire. If the button fails when pressed, one of the reasons for this may be a break in the spring, which returns the mechanism to its original state. This will require replacing the broken part. Another possible reason for the button to fail may be an incorrect choice of its height when adjusting the drain mechanism. To eliminate this, you need to turn off the water supply, drain the remaining water, and remove the lid from the tank. Then remove the drain valve. Loosen the clamps, adjust the height of the glass, then put everything back together and check whether the system is now working normally.
Double button for cistern
Features of the toilet cistern drain system
The vast majority of modern toilets are equipped with floor-standing toilets of the compact system, in which the flush tank is installed on a special ceramic platform, which is an integral part of the toilet body.
This arrangement allows you to minimize the overall dimensions of the device, also provides sufficient drain water pressure, and, if necessary, makes it possible to carry out routine repairs of a toilet cistern with a button yourself, without turning to professional plumbers for help.
Internal structure of the cistern
Currently, the building materials market offers a wide range of plumbing fixtures, the price of which largely depends on the manufacturer, material of manufacture, complexity of internal fittings and functional features of a particular device.
In order to independently repair a toilet cistern with a button, you should know that despite the apparent external similarity, all such devices may have different shut-off and drain valves, which in turn can be of several types.
- Top water supply with a side inlet pipe is most often used in inexpensive models
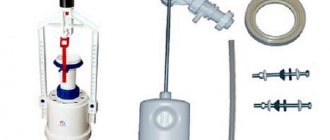
. This scheme allows you to quickly install and connect it yourself, but it is characterized by an increased noise level created by water pressure. - In the case of bottom water supply, the device of the toilet tank with a button is designed in such a way that the inlet pipe and the float shut-off valve are located in the lower part. Installation and maintenance of such devices is a little more complicated, however, they have a more aesthetic appearance, and also have a low noise level when filled with water.
According to the principle of draining water, all devices are divided into two types: single-mode and dual-mode.
- Single-mode drain fittings provide for the release of the entire volume of water by pressing the drain button once. It has a simpler design than a dual-mode system, but in some cases it leads to excessive and inappropriate consumption of cold water.
- The release button of a dual-mode mechanism is usually divided into two unequal parts, which can move in the housing independently of each other. When you press the larger part, the entire volume of water is flushed, and when you press the smaller part, only half of the total volume of flush water enters the toilet. The internal structure of a toilet cistern with a dual-mode button is more complex, however, thanks to this design, significant savings in tap water are achieved.
Note! Some models of dual-mode fittings may have one common button, and the portioned dosing of water can be adjusted by the duration or intensity of pressing it during flushing.
Repair of shut-off and control valves
The most common toilet flush failures may be a malfunction of the shut-off valve, or a malfunction of the drain fittings.
In any case, to carry out repairs, you need to know how to remove the toilet cistern lid with a button, so as not to damage its body and not break the fragile plastic parts of the internal fittings.
- First of all, it is necessary to close the shut-off valve, which is located between the supply pipeline and the reinforced flexible hose.
- Before opening the lid of the toilet cistern with the button, you need to unscrew the outer chrome-plated rim, which is located where the button abuts the cistern lid, by hand using the thread, pull it out, after which you can easily remove the top cover.
- The first thing you need to pay attention to is the float. It must be absolutely sealed, and have no visible damage or distortions, as well as traces of friction against the internal surface or parts of internal fittings. If there are any, it should be replaced.
- Next, you need to check the operation of the hinged lever, with which the float is attached to the shut-off valve. It should have smooth free movement vertically, without jamming or dips.
- To check the operation of the shut-off valve, you need to drain all the water from the tank, and then open the tap of the supply pipeline. When the float is lowered, water should flow freely into the tank, and when the float is raised to the maximum level, the shut-off valve should completely block its flow.
- If water does not flow, you should clean the internal lumen of the shut-off valve, and if it does not close, you need to replace the rubber seal, or adjust the position of the float hinge arm.
If significant faults are detected, the easiest way is to buy and install a new set of shut-off valves. Such components are consumables, so they are sold in any hardware store and, as a rule, have a low cost.
Advice! To reduce the noise level when filling with water, a rubber or plastic tube must be installed and secured to the outlet pipe of the shut-off valve, the lower end of which should end at the very bottom of the drain tank.
Water drainage system repair
If the flush mechanism malfunctions, before repairing the toilet cistern with the button, as in the first case, you need to turn off the tap water supply and remove the top cover.
- After removing the cover, the first thing you need to do is check the integrity of the plastic rod that connects the button to the shut-off valve of the drain mechanism. If any breakage or damage is detected, it should be replaced.
- Next, you need to check the integrity of the rubber diaphragm of the drain siphon. Its destruction leads to a constant flow of water into the toilet. To replace it, there are special repair kits, but in inexpensive models of tanks it is better to immediately install a new siphon.
- The internal siphon bushing rarely wears out, but if it breaks, a spare part can also be found in the repair kit, or you can immediately install a completely new siphon.
- Another reason for the incorrect operation of water drainage may be the ingress of small debris, rust particles, or fragments of internal fittings between the siphon bushings, connecting rods, levers, or other parts of the drain mechanism.
To eliminate such problems, it is enough to disassemble and thoroughly rinse with water, and then correctly assemble and reinstall all parts of the internal shut-off valves.
Advice! For those who are interested in how to disassemble a toilet cistern with a double button, we can recommend the same method: first unscrew the round decorative rim around the button by hand, pry it off with something sharp, and then remove the lid without any effort.
To get a clear idea of the internal structure of plumbing fixtures, you can watch the video in this article, or study similar materials on this topic on our website.
Without such a plumbing device as a toilet, it is already difficult to imagine normal living in an apartment. Only, like any plumbing fixture, it can also fail, and more often this happens very unexpectedly for the residents. But you can fix a lot of things in it yourself without calling a repairman to your home. Adjusting, for example, a button if it jams or does not work at all, or completely replacing it with a new one, is quite possible and independently without the involvement of specialists, even for a person who does not have much experience in such work.
Replacing the button with a new one
Sometimes it happens that it is not possible to repair a damaged part, or it can no longer be repaired. Then you may need to completely replace this button with another one. The new part must fully match the one that broke. If the desired option could not be found on sale, then the drain mechanism itself will have to be changed. To carry out work on replacing the button, you need to remove it from the outlet valve and install a new device. It is better to carry out all work with sufficient care so as not to accidentally break other fittings in the tank.
A flush mechanism button that sinks, fails, or does not work at all usually causes quite a lot of inconvenience when using the toilet. Therefore, you should not put off solving such an important issue for long, especially since you can try to adjust the system, repair or replace the part yourself. If you can’t cope on your own, it’s better to call a specialist to fix the problem.
Button repair
Tank fittings may become unusable for the following reasons:
- use of low-quality mechanisms. Professional plumbers recommend installing tank fittings manufactured by companies such as Cersanit, Vidima, Jika;
- natural wear and tear. Any device is designed for a certain number of years of use or number of flushing cycles;
- mechanical damage. Careless use may result in damage.
Expert answer
Good day, Sergey!
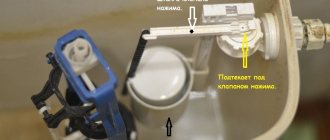
To eliminate the cause of the malfunction, you will have to remove the tank cap. Most often, it does not have additional fasteners and is kept from moving only by one button, which must be unscrewed counterclockwise. After accessing the interior, carefully inspect the drain drive. Unfortunately, you did not indicate its type, so we will try to describe a way to fix the problem using one of the common designs (see figure below).
Very often the malfunction you described occurs due to spontaneous displacement of the pressing rod. In the picture it is represented by a red detail. In addition, excessive force when pressing the button could cause the locking ring to move (the blue round part). Less commonly, this type of trouble occurs when moving the tongue of the drain mode switch (it is indicated by an arrow).
Repairing the drain mechanism in this case is simple - just fix the rod one or two notches higher, install the stopper in the recess on the body of the internal pipe, and return the tongue to its place.
If the malfunction is caused by damage to parts of the drain fittings, then you can try to restore them using epoxy resin or replace the entire assembly. Fortunately, the drain mechanism has a low cost, and you can find it in any construction market.
Source
One of the common problems with the operation of the flush tank is that when you press the drain button, it “sticks” in the lower position. At the same time, water continues to flow into the toilet bowl. Sometimes such “sticking” happens right away and you won’t notice it, because the part has visually lifted, but the mechanism has not stopped the water. Hence - rusty stains in the toilet, condensation always flowing from the tank. What to do in such an unpleasant situation?
To find out the cause of the sticking, you need to remove the tank lid and the button itself. How to do this depends on the drain design.
- Eighty percent of cisterns use a single-button flush mechanism. In this case, the button just needs to be unscrewed. Grasp the ring and rotate it counterclockwise. Pull out the fastener and remove the cover.
- In two-button mechanisms the scheme is different. Press one of the buttons and hold it in that position. Simply pry the second one with a non-sharp knife or other similar object, pull it up and pull it out. You will see a fastening screw in the mount - unscrew it. After this, the tank lid can be easily removed.
Take a close look at the removed button. In some older drain systems, the problem may be that the return spring of the part has worn out. Then it should be replaced.
Often the cause of the button sticking is that its leg is pulled too tightly into the sleeve - this interferes with the free movement of the flush fittings. Even while unscrewing, you will feel that it is a bit difficult to do. Try screwing the part back in without force. This is often sufficient for normal operation.
This option often helps. Take the button in your hand. Press it and, holding it pressed, screw it all the way into the bushing of the pressure mechanism of the flush fitting. The screwed-in button may sink a few millimeters relative to the ring, but this is not important for its normal operation.
Troubleshooting a non-working tank flush button
Without such a plumbing device as a toilet, it is already difficult to imagine normal living in an apartment. Only, like any plumbing fixture, it can also fail, and more often this happens very unexpectedly for the residents. But you can fix a lot of things in it yourself without calling a repairman to your home. Adjusting, for example, the button on the drain tank if it sticks or doesn’t work at all, or completely replacing it with a new one, is quite possible and independently without the involvement of specialists, even for a person who does not have much experience in such work.