Installing a shower tray is a serious undertaking. Especially for novice home craftsmen who do not know which way to approach this plumbing fixture. Calling specialists requires money, and the qualifications and integrity of untested craftsmen can be unpleasantly surprising. To protect yourself from unprofessionalism, just brush up on your theory a little, roll up your sleeves and start doing the work yourself.
Pallet classification
There are shower cabins of various shapes and sizes. The shower tray can be square, round, rectangular or oval. The shape and size are selected taking into account the area of the room. The right plumbing fixture ensures ease of use. The configuration of the walls depends on the shape of the pallet. Products are made from the following materials:
- Marble. They have an attractive appearance, retain heat well, and give a pleasant sensation when in contact with the skin. Such products are fragile, which is why they are often damaged during installation. All work must be carried out with care. Chips often occur during operation.
- Cast iron. They are distinguished by stability, durability, strength. The material retains heat transferred to it by water flows. Despite its small size, the cast iron base is heavy, which causes inconvenience during transportation and installation.
- Steel. They have less weight than cast iron products. They cool quickly, and when a stream of water falls, you can hear the sound of it hitting the surface.
- Acrylic. The tray retains heat and is pleasant to the touch. Due to the fragility of the material, the product may be damaged during installation.
- Quarilov. They are made from acrylic reinforced with quartz dust, which gives the plumbing fixtures increased strength.
- Ceramic. Such models heat up slowly. They are resistant to dirt and aggressive chemicals. The disadvantage is fragility; if hard objects fall, the ceramics can be damaged.
The difference between the pallets is the depth. Flat ones (with a side height of no more than 10 cm) require a high-quality drainage system. Deep products in some cases can replace a bathtub. There are models with medium side heights.
Marble tray.
How to choose the right model
When choosing a pallet, pay attention to the following characteristics:
- Color. Most acrylic, ceramic or plastic products come in white. Some manufacturers offer interesting design solutions. You can purchase a base in black, gray or blue. The original design in color harmonizes with any interior. However, traces of soap are visible on such products; they have to be cleaned of dirt more often.
- The shape is selected taking into account the layout of the room. If the cabin is installed in a niche, only rectangular or square models are suitable. Using a soft curtain is impractical, and a door for a round or oval tray is rarely made.
- Type of drainage system. For a deep model, a siphon of any size is suitable. Low products are connected to plumbing fixtures with a wide pipe. The drain hole should be standard. In other cases, choosing a drainage device will be difficult.
- Installation method. Tall models are equipped with adjustable legs. This makes installation easier. Low products do not have legs or a decorative screen, so a pedestal should be formed before installation.
- Availability of additional devices. A decorative cover covers the drain hole, which gives the structure a neat appearance. Deep models are equipped with seats. This detail allows you to perform water procedures while sitting.
Pallet in two colors.
Specifics of the work
Installing a pallet in some cases requires certain specific knowledge possessed by specialists. There is no doubt that such a familiar procedure will take them little time, especially since you will receive a guarantee for the installation. But it’s much nicer when everything is done with your own hands.
Before installation, you should read the product instructions, determine the dimensions of the structure, and its convenient location. The instructions will definitely indicate the number and set of components that are needed to install the pallets yourself.
Types of shower trays
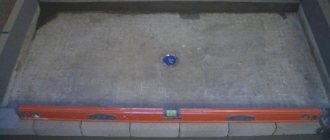
During the installation process, you need to correctly adjust the horizontal surface of the pallet. This is explained by the fact that insufficiently high-quality level markings can affect the operation of the waste drain into the sewer. Therefore, it is necessary to control this process so as not to disrupt the wastewater regime.
Depending on which shower cabin you purchased: with a deep or shallow frame, the complexity of installation will depend. To install a flat pallet you will not have any difficulties, but installation will require additional dexterity.
You can use bricks or foam blocks. And additional rigidity can be given to the pallet using a metal frame. This greatly simplifies DIY installation.
If the model you choose has a fairly high base, then you should think about installing a step. To ensure that the tray will be installed correctly, you should carefully stand on it.
Acrylic pallet on a prefabricated frame
Steel pallet on a metal frame
The cast iron pan requires almost no installation
DIY Pallet Installation Instructions
The shower enclosure comes with an installation guide. Here is a list of necessary tools. In most cases, the following items are required:
- drill;
- wrench or adjustable wrench;
- pliers;
- marker;
- screwdriver;
- sealing compound.
Installation of a shower corner with a tray.
If the pallet is installed on bricks, you will need a trowel and cement mortar.
Preparatory work
When choosing any type of pallet, preparation of the room for its installation is required. Perform the following actions:
- Lay a waterproofing layer. The floor and lower parts of the walls are covered with appropriate material.
- The possibility of connecting the cabin to sewerage and water supply systems is assessed. The pipes must have holes to allow hoses to be inserted.
- The pipes are closed with plugs. Upon completion of installation, these elements are removed.
- Electrical wiring. Cables must be hidden and have a minimum number of connections. For connection, a three-core double-braided copper wire is recommended. It is connected to the panel directly by installing a circuit breaker.
Installation of a cast iron pan
The difference between installing a cast iron pan lies in the design features of the process:
- Cast iron is insensitive to mechanical stress. The package does not include reinforcing components. The legs are part of a monolithic product. For leveling, steel strips or other materials are used to prevent damage to the floor covering.
- The boards are not attached to the walls of the room. The stability of the container is given by cementing, in which the solution holds each leg in the correct position. A matchbox is used as formwork. Cast iron products are installed together with a curtain or screen.
- The height of the legs does not always allow the installation of a siphon. In this case, a parapet is formed. Bricks are laid around the perimeter, the space between them is filled with concrete mortar.
The pan is cast iron.
Installation of acrylic models
Modern cabins are placed on acrylic bases. Installation steps:
- Turn the product over and screw in the legs. They are fixed on the body itself or a metal frame.
- Level the tray by twisting the legs. The height of the structure must exceed the size of the siphon.
- Install a drainage device. To do this, the base of the cabin is turned on its side, a bushing is placed on the front side, and a pipe is placed on the back side. Treat joints with sealant. Threaded connections are equipped with rubber seals.
- Place the tray in the correct position and adjust the height of the legs. The bottom should take a horizontal position. When leveling, use a building level. Plumbing fixtures should not be left on the floor.
- Adjust the height of the drain hole in relation to the entrance of the sewer line. The optimal slope ensures rapid outflow of water.
- The central part of the structure is secured without changing the position of the product. If the cabin is placed in a corner, the joints of the walls and sides are treated with glue. After the composition has dried, a sealant is applied.
- Connect the sewer pipe outlet to the siphon pipe. Install a decorative screen. If all actions are performed correctly, the cabin will be in a stable position.
Installation of an acrylic corner with a tray.
Features of installation of steel products
Such products are produced using the stamping method. The legs are made separately from the body. The steel pallet is installed on a metal structure made of a profile with threaded bushings. Legs are inserted into these parts. Installation is carried out as follows:
- The walls and floor are marked, indicating the location of the drain hole and the profile frame.
- The legs are inserted into the bushings so that the plumbing fittings do not touch the floor.
- Using pre-made markings, a metal structure is installed, a siphon and drain pipes are installed. The joints of the connections are treated with sealant.
- Fix the base of the cabin, holding it in a strictly horizontal position.
- Combine the drain hole with the socket of the plumbing fittings.
- The iron pallet is reinforced with brick support pillars. Their height must match the size of the cabin base. Otherwise the bottom will be damaged. The pedestal is tiled. It is laid with a slope towards the structure.
Attaching the shower tray.
Installation of ceramic and marble models
Heavy marble or ceramic products are placed on the floor without using legs or a frame. Sometimes products have a recess for a siphon. More often there are monolithic bases that have only a drain hole. In this case, use flexible tubes to drain the water or place the tray on a pedestal. When using the last option, perform the following steps:
- The floor is covered with waterproofing material, forming a cement screed. The brick is laid around the perimeter of the shower base so that there is space for installing a drainage device.
- The hole in the pan is aligned with the siphon socket, and the outlet is aligned with the outlet pipe.
- The base of the cabin is placed on a layer of cement so that the plumbing fittings fit into the niche.
- The front part of the pedestal is covered with mosaics or tiles. Glue is applied to the tile and base. The joints are coated with sealant and plastic corners are applied.
Marble shower tray.
Preparatory activities: what to consider
Even before purchasing a pallet, you should decide on its shape, material and installation location. And if form is a matter of taste, then other aspects should be approached with special attention. Having chosen the place where you plan to install a shower, check the following parameters:
- Communications supply. If we are talking about a hydromassage cabin, then in addition to water and sewerage, an electricity supply will be required. Select a separate electrical wiring line and do not forget to equip it with an RCD.
- Distance from risers. The dream of placing a shower in a remote corner of the apartment may be difficult to realize. The sewer system must have a sufficient slope for the unhindered outflow of water, and if it is long enough, the floor level will need to be raised.
- Correct angles. When planning to install a shower in the corner of the room, make sure that the walls are clearly perpendicular. If the corner is even the slightest bit sharp, the tray will not fit into the space provided for it. An obtuse angle is not so critical, but a deviation of more than 6 mm per meter is undesirable.
- Base. The smoother the floor, the easier it will be to position the pallet. This parameter is not critical, but if the floor has not yet been finished, it is better to correct the unevenness with a screed.
- Waterproofing. Particular care should be taken to waterproof the base when you plan to install a shower tray on a wooden floor. In this case, the wood is impregnated with antiseptic solutions, and a roll of waterproofing material is laid on top, extending onto the wall 20 cm high.
The further algorithm of actions will depend on the selected pallet material. Each of them requires its own approach, and deserves consideration in a separate section of the article.
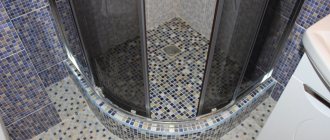
How to veneer the side of a shower tray
The cladding hides the unsightly cement base. The traditional finishing option is to use tiles on a glass or polymer base. Glue is applied to the surface of the pedestal. Excess composition is removed immediately after laying the tiles. Mosaic can be used to cover uneven surfaces; it can be easily cut with a construction knife. To ensure that the distance between the elements is the same, marking crosses are installed. All seams are treated with sealant and waterproof grout. You can see how the tiles are laid in the video.
Side on the tray in the shower.
Important points
- The shower tray has a concrete base.
- The tray must be adjacent to one of the walls of the bathroom, which also serves as a barrier against water splashes.
- A drain is laid inside the concrete base at a slight slope to drain water into the general sewer system.
- When constructing a pallet, the concrete base is treated with waterproofing solutions that contain cement. Additional waterproofing can be a layer of roofing felt laid on the floor and walls (the height of the wall planes covered with material is approximately 40-60 cm).
- The facing tiles are laid using waterproof glue, the seams are treated with a special grout.
Creating a custom-made pallet - step-by-step instructions
The process of constructing a structure with your own hands includes the following steps:
- Preparing the installation site. First, a waterproofing layer is laid. This will prevent the fungus from spreading.
- Arrangement of the drainage system. The finished drain can be purchased at a plumbing or building materials store. The drainage system is connected to the sewer line. The connections are sealed with special compounds or rubber gaskets.
- Laying the base. Lay bricks or form a cement base. It is recommended to give the sides a square shape. The protruding corner is rounded so that it does not injure residents, and the structure takes up less space. After 3 days, a waterproofing layer is laid out. After this, the surface is covered with a cement screed with a slope towards the drain.
The surface of the structure is leveled with a special mixture. After additional waterproofing, the tiles are laid.
Similar articles
How to install a shower system with your own hands
How to put a bathtub on a brick support
How to assemble and install a siphon under the sink yourself
Using other bottom mounting options
The bottom design with low sides is installed according to a simple scheme. The main thing is to install the siphon correctly. It is installed below floor level.
It is important to determine the location of the drain hole and its capacity. For example, for a bottom with a permissible liquid height of 12 cm, the hole is selected 0.52-0.62 cm. Then the water will drain without delay. For a liquid height of 15 cm, the drain hole is at least 0.9 cm.
After installing the drain, a model with low sides or a flat one is glued to a special base. The pan bowl is filled with cargo for 24 hours. The joints with the walls are treated with sealant.
You can replace the metal frame with brickwork or foam blocks. After such installation, the strength of the structure is ensured and the space between the bottom and the floor is removed. Deformation of the pallet is completely eliminated.