Supply to the toilet.
A well-equipped bathroom in the house guarantees a comfortable stay for all residents. Before installing the toilet, you should choose the right model of plumbing fixtures and select the necessary tools to securely attach the toilet for safe use. The toilet liner is an important stage in the installation of plumbing, which needs to be given attention in order for the system to operate without failures or leaks. The plumbing connection consists of a tube connecting the toilet tank and the water supply system. The type of tube is selected taking into account the characteristics of the toilet model. A flexible hose can be connected to the drainage pipe at any angle and slight bend.
General information
Toilet installation steps
Installation work in the bathroom has its own nuances and involves certain sequential actions:
- 1. Selecting a toilet model. There is a wide range of products on the market; you need to choose one that is convenient for a specific room, durable, and easy to install.
- 2.Preparation of tools and materials. It is necessary to determine the method of fixing the product, whether a cement solution or epoxy glue will be needed. Modern models are fastened using anchor bolts or dowels. Therefore, it is necessary to prepare those elements that are suitable for this type of toilet. You will also need flexible hoses for water supply, sealant, etc.
- 3.The immediate process of installing the toilet. Different methods are suitable for this; it is important to install the toilet level and firmly so that its use is safe.
- 4.Connecting plumbing to the drainage and sewer system.
- 5. Testing the device for the quality of the work performed, so that there are no leaks, failures of the drain and filling systems.
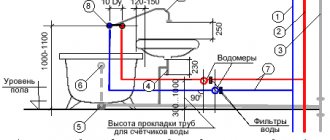
Water supply to plumbing fixtures
You can do the supply work to the toilet yourself. There are features of the work at each stage. They must be taken into account in order to quickly and correctly install the system.
Before starting work, completely turn off the water supply system to prevent leaks and flooding.
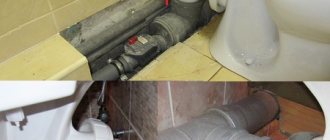
Next, the type of connection to the drain tank is determined. The hard type of liner, formed from special steel pipes, is widespread. The often used flexible hose method is created from highly flexible hoses. They have increased wear resistance, strength, and do not lose their properties during installation and further use.
Attention! Rigid liners can be found in old houses; in modern apartments the flexible type is more often used.
For the toilet liner, a rubber method is used; the surface of the liner is formed from special metal threads. Connecting the toilet to the water supply in this way guarantees the operation of the plumbing for many years, but only water from the cold drainage system should flow through the rubber liner.
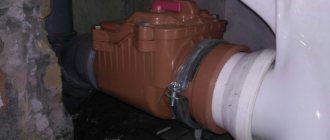
A fairly common method of installation is metal, using a corrugated pipe. The corrugated pipe is created from heavy-duty material; all structural elements are made of stainless steel, which does not lend itself to corrosion. In this way, you can easily and efficiently supply water to your plumbing fixtures.
Attention! The choice of supply elements depends on the specifics of the installation work, the cost of the product and the availability of certain functions. Flexible eyeliner costs from sixty to three thousand rubles.
Different ways of eyeliner
Each toilet model has design features, and therefore differs in the way it is connected to the tank, which are equipped, depending on the type, with different elements in individual places. The tank can be attached to the base of the toilet, or be hinged, or hidden, in which case it must be attached to the wall, or hidden behind a false wall. It is possible to install any type of toilet liner yourself, the main thing is to decide in advance on the appropriate type of liner.
How to choose the right eyeliner. Before going to the store, determine the type of water supply to the toilet yourself.
First, measure the cross-section of the hose, the distance between the pipeline and the toilet. Determine the type of water supply to the tank, in which part of the tank the hole for the tube is located, take into account the internal or external thread, and the indicator of water pressure in the pipes. In order not to resort to installing adapters, you must remember to match the threads of the plumbing fixtures with the threads on the fittings. It is better to take eyeliner from plastic or silumin.
Important! A high-quality eyeliner cannot weigh little.
If you have collected enough information about the product and the features of installation work, then the correct choice of eyeliner is easy to make.
Comparison of known models
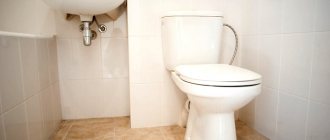
Compact toilet with bottom connection
The range of reinforced pipes is distinguished by a variety of braids and hose materials. They have a fixed value. The reliability of the products depends on the compression density of the braid and the tube material.
Features of rubber products:
- low price;
- service life - 1 year.
Rubber products are characterized by:
- wear resistance;
- service period - 5 years.
Aluminum:
- withstands pressure of 5 atmospheres;
- warranty period - 5 years;
- is subject to corrosion in rooms with high humidity.
Nylon:
- withstands pressure of 20 atmospheres;
- operation - 15 years;
- high price.
Stainless steel:
- withstands pressure of 10 atmospheres;
- serves for 10 years;
- does not rust.
Parts made of brass will last longer than those made of plastic and silumin. The material from which the fitting and nuts are made is also of great importance.
The bellows flexible toilet hose is distinguished by a corrugated stainless steel surface. The product can change length if made by crimping.
Eyeliner characteristics:
- withstands pressure from 15 to 35 bar;
- service life up to 25 years;
- dampens vibration of the water supply system;
- not afraid of moisture.
The disadvantages are insufficient flexibility with a small bend radius and high price.
Manufacturers offer a wide range of supply products. The choice depends on cost, functional features, and installation method. Prices for flexible toilet hoses vary from 60 to 3,000 rubles.
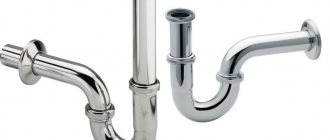
Types of water supply to the toilet
The drain containers contain holes for supplying water; the holes can be located in different places in the tank, so the following types are distinguished:
The liner is on the side of the tank. The water hole is on the side; this type of toilet is the most common. Installation work on the eyeliner can be carried out easily if there is room for access on the side. If the sink is installed closely, then difficulties may arise. In this case, it is better to choose a flexible hose method, when the hose can be slightly bent.- Eyeliner at the back of the tank. This type of liner is less common because access to the rear hole is not always convenient or possible. In this case, the toilet should be mounted at a distance from the wall to allow access to the pipes in case of emergency.
- Eyeliner from the bottom of the tank. This method is the most invisible to others, but has a number of difficulties during installation. First, the tank is connected to the plumbing system, and then secured to the toilet bowl.
To summarize...
First you need to decide on the location of the toilet, options for laying communications and ensuring thermal insulation of the entire room. It makes no sense to install a toilet in a cold room for a private home. After preparation has been ensured, it is necessary to choose a high-quality and reliable model. Currently, there are a variety of products on sale for every taste and preference, as well as with any functionality and option for supplying communications (oblique, vertical, horizontal).
Afterwards, it is necessary to install the toilet with all the necessary accessories, such as a tank, drain pipe and other fittings. If you follow this sequence, then all the work will be crowned with success.
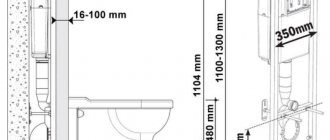
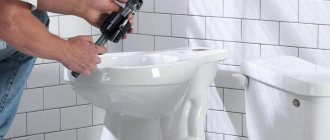
Self-installation of the toilet
These instructions apply to a regular remote toilet. But there are also console and built-in models. Their installation is similar, but at the same time has its own nuances.
Features of installation work on water supply to plumbing fixtures
Installation of the water supply system occurs in the following order:
- 1. First, you need to turn off the power to the plumbing fixture so as not to flood.
- 2. One side of the line, consisting of a flexible hose or rigid pipe, is connected to the riser of the pipeline system; a regular fitting will cope with this task.
- 3. The opposite part of the liner is inserted into the tank; for this purpose, there is a small hole in the drain tank.
- 4. The eyeliner is tested for the quality of the work performed using an artificial method. For greater strength of connections between structural parts, all joints must be treated with silicone sealant and provided with gaskets.
- 5.Next, the operation of the system is checked in natural mode; to check, the water is washed off two to three times; during operation of the drain and fill system, the presence of leaks and malfunctions is carefully monitored. If no problems arise, then you can use the toilet.
The work on connecting the toilet is simple and understandable even for a beginner; it does not require special knowledge and the use of special equipment, as well as large physical costs.
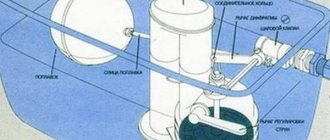
Installation of drain fittings
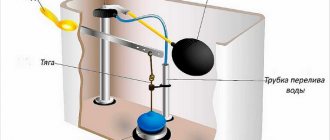
Before installing the toilet, you should check the drain fittings. A rubber gasket must be installed on this part. If she is not there, then this is very bad and you will have to look for a replacement. An overflow tube is also installed on this part. It is this that works if the fill valve for some reason does not work, thereby pushing water directly into the toilet. If it is not there, then the water will directly drain onto the floor, and this is not very pleasant.
Overflow tube shown by arrow
A standard toilet cistern usually has four main openings. The largest recess is intended for installing the drain valve. Before connecting these two structures, you must make sure that the valve itself has the widest and thickest gasket. After this, install a plastic washer on the outside of the tank and tighten the nut.
Holes in the toilet: for flushing, for filling and two for fastening
To tighten the nut, some manufacturers include a special wrench in the kit, but if this is not available, then you can tighten the part by hand. It is advisable not to overdo it, because strong pressure can cause the washer to break. The component should fit as tightly as possible to the tank. To accurately tighten the product, you can additionally tighten it with an adjustable wrench.
After this, they proceed to installing the toilet fill valve. Be sure to check that a cone-shaped gasket is installed on the structure. Usually its flat side is placed directly next to the valve itself, and the cone-shaped part is inserted into the hole in the tank. It is with the help of the gasket that maximum tightness is achieved.
When installing the toilet flush fittings, as in the case of the flush valve, a plastic washer is installed on the structure for fixation. Some kits do not have it, but its presence still makes screwing much easier. In addition, there is usually a special filter in the fill valve, which is not recommended to be removed.
It is imperative to ensure that the float does not touch the wall of the tank, because otherwise it simply will not work. To check the float, you can shake it with your hand or turn the tank over. In addition, this valve can also be adjusted and you can set the amount of water entering the tank yourself.