Choosing a tool
Let's start by choosing a suitable router. Today, models are produced that have different purposes and, accordingly, bear different names:
- Submersible - used to create grooves and recesses, the depth of which is easily adjusted.
- Edging – used when processing various wooden products to ensure the most aesthetic appearance.
- Combined - combines the functionality of the two varieties described above.
- Special – designed for working with dowels and lamellas.
In general, if you need a router for inserting hinges, both the first and the third model will do. But keep in mind here that submersible models are highly specialized. At the same time, combined ones are more likely to be considered professional. Having more weight, they are more difficult to set up.
If you do not have experience working with routers, then it is better to use a regular plunge router
Therefore, if you do not have experience working with milling cutters, it is better to give preference to a standard submersible one - there will probably not be any problems.
Main settings
Once you have decided what type of router you will use, it is also a good idea to decide on a specific model. Each of them has a number of important factors.
One of them is power. Everything is quite simple here. The higher the power, the larger the layer the cutter can immediately remove. Therefore, experienced professionals usually buy powerful milling cutters in order to quickly cope with a large amount of work. But for a home craftsman, a tool with medium power is better suited. After all, you have to pay for power - such models cost much more, and even have more weight. Often, beginners, when they pick up a powerful router, simply cannot handle it and damage the work surface. Therefore, there is no point in chasing high power.
It is also worth paying attention to the presence of a speed control function. And here it is advisable not to save money - take a model with this function. Thanks to this, it will be possible to select the optimal speed mode for performing any job. Select a high speed for roughing and a slower speed for fine finishing. Then the result of the work will be more accurate.
Some models have a backlight function. This is not a waste of money at all - if you work in low light conditions, it can be difficult to get the job done really smoothly. Therefore, it is definitely worth investing in a tool with such a function.
A backlit router is often needed when working in low light
The remaining functions (unless you are a professional choosing a universal tool) can be considered unnecessary, increasing the cost of the router and the complexity of working with it.
Finally, it wouldn’t hurt to simply hold the router in your hands, weigh it, estimate how ergonomic its handles are, and whether it will be convenient to work with. Be sure to make sure that the model you choose is not too heavy for you. Otherwise, when using the tool, you will not concentrate so much on the work as on not dropping the router.
Preparing the box and filing the hinges correctly
We inspect the frame slats for any curvature. Depending on the profile, there are different types of cuts, it can be at 45 degrees, but in our case, the classic profile with a sample. We cut straight corners, make the length of the slats 2021 mm (this takes into account the gap from the floor of 10 mm or 15 mm and the gap for doors between the frame and the door is approximately 2 mm). The best and fastest way to make it easier to install hinges yourself. To do this, take two clamps and twist them towards the door at the ends. We place the rail and boxes on the clamp from the top using a square and measure 3 mm or use a loop to determine the gap.
It is important to leave a gap of 1-2 mm between the edge of the frame and the door leaf. This is necessary so that the doors do not rub or creak when closing and opening.
Since the depth of the box varies, you need to clearly calculate the gap here. Usually a gap is made from the edge of the loop plus 2 mm. Having established the height and lateral distance gaps, we screw the box to the hinge, check the closure, trace everything perfectly around the contour of the hinges with a knife and remove the rail.
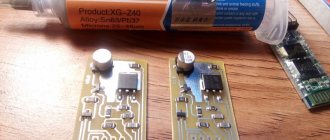
Read also: What is solder used for?
I sewed down the loops on the box
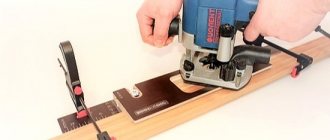
We take it with help and use a chisel to make a selection. This can be done with a router, as in the photo there is the same manipulation, we set the zero mark plus the depth of the loop. For clarity, we use the second stick of the box; it will prevent the sample from being accidentally deepened. We remove the door frame with a milling cutter and fix it with a clamp for convenience. After sampling, we modify it with a chisel. That's it, now our door hinges clearly match.
Lock mortise and handle installation height
The usual standard for installing a lock handle is from 900-100 mm depending on the door lock and ease of use. Locks and latches usually come in varying thicknesses and can be either rectangular or semicircular edged. Let's look at options for installing door locks, but they all have the same principle. We screw a lock with rectangular edges to the door with the front side in the center, assuming that the handle will be 1 meter from the edge of the door . We trace the outline with a construction knife, and we get a contour for inserting with a chisel or using a milling machine. A method of inserting a lock with semicircular edges, these locks are usually designed to be installed using a router.
It is important not to go too deep under the decorative plate of the lock, but let it protrude a little. We take and screw the lock to the end of the door with the front side taking into account that the handle will be in the middle of the door, the distance of the handle from the floor is 1 meter: We clearly outline the outline of the lock with a pencil; Take the required cutter diameter; We set the depth of penetration; We set the stop of the milling machine. Now we slowly begin the first selection, following the contour, the main thing is not to go beyond the edges, so as not to spoil the door. We proceed to the second stage of inserting the lock, measure the width of the lock body, take a collet of the required diameter and begin sampling the depth. We change to an extended collet and select the full depth of the lock.
Work very carefully, hold the machine tightly, because there may be nails, knots, and screws. It is important to know that the milling machine vibrates, and the coating of the door leaf may be damaged (this is especially true for cheap machine models).
Let's start installing the handle, mark the centers of the handle with a pencil and outline the outline of the lock cylinder, and use wood feathers of the required diameter to drill holes. Be sure to drill holes on both sides of the door so as not to tear out a piece of the canvas.
Assembling the box
Since we have already decided on the length (2018mm). We calculate the width with the condition that you need to make a gap between the frame and the door of 2 mm on each side. You need to pay attention to the hinges, what kind of longitudinal gap there is. Having taken everything into account, we cut down the width. When assembling the box, it is very convenient to use a corner clamp. We place all the parts on a flat surface and clearly set the angles and slopes.
An important detail is to prevent the door from rubbing, you can slightly tilt one side to widen it. If the gaps are correct, this is not necessary. We connect the elements of the door frame, using screws to pre-drill holes for them so that the frame does not crack. The box is ready for installation.
Here is a video on door installation, various installation options, advice from door installers and methods for inserting door hardware.
Locks on interior doors are most often installed using the mortise method. But it is not at all necessary to invite masters for this. But you will have to use a professional tool (and carefully select it) in any case.
Setting up the router before work
In many ways, the ease and quality of work depends on how correctly the router for door hinges is configured. So, before you start cutting the grooves for the door hinges, you need to do certain things. The most important thing here is the depth to which the cutter will cut into the surface being processed. It depends on the thickness of the hinges that will be installed on the door. Therefore, it is advisable to already have them on hand in order to be able to correctly configure the router.
All work can be done in several stages:
- Place the router on a hard, level surface.
- Loosen the threaded element that secures the feed pin - on most routers, this function is played by a small lever.
- Lower the cutter that will cut into the door all the way to the supporting surface. After this, set the number “zero” on the scale indicating the processing depth.
- Measure the thickness of the hinges for which you are going to make grooves.
- Set the resulting value on the scale that feeds the router pin.
As you can see, there is nothing complicated here - every beginner can cope with this work.
In some cases, you have to work with a particularly large depth - more than 5 millimeters. Standard loops are not this thick, but you should still know how to act in such a situation. You will have to work in several stages, dividing the required depth into several values and setting the appropriate value on the scale with each processing.
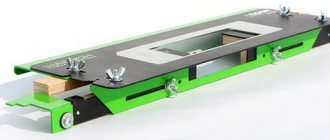
How to choose a milling fixture
Experts note that it helps speed up the work process several times. Moreover, the prepared niche turns out much smoother and neater than when using hand tools. When reading reviews, you need to immediately find out whether both of these parameters are provided or not. There are different types of locking devices, but they do not replace each other - so this point is worth paying special attention to. The vertical, also known as submersible, device allows you to select grooves of arbitrary depth.
Please note: this tool is useful for securing not only locks, but also door hinges. If you want to make the edges of a recess more aesthetically pleasing, an edging (sometimes called edging) device comes to the rescue. Experts prefer to use a combined device. It combines both functions and eliminates the need to move two heavy machines to each site. However, the cost of such equipment will naturally be higher.
At home, it is better to use a specialized router. At the same time, it does not require particularly high power; on the contrary, it will only unjustifiably increase the weight of the machine. But the option of adjusting the rotation speed of the cutter is very valuable for amateurs. It will help you complete all planned work more accurately. Important: in a good machine, such a switch is placed in a safe place (even when working, you can stretch your hand there without fear) and allows you to regulate the speed of rotation smoothly, and not stepwise.
Read also: The simplest do-it-yourself switching power supply circuit
Another significant factor is how far the cutter can extend beyond the clamp. Usually this indicator is illustrated by numbers in the model name, and is expressed in millimeters. But it’s still worth reading the technical documentation to eliminate errors as much as possible. In addition, you need to look at whether it will be convenient to use the router.
This is determined by:
network cable length;
location of knobs and other controls;
list of functions performed.
Before purchasing, you should start the machine. If it is of high quality, the head should move completely freely. The slightest distortions and backlashes are unacceptable. The less noise the better. Also worth looking at:
Is there a wide view of the working surface?
is there any additional lighting provided?
Are there auxiliary attachments, holders, etc.
Installing hinges with a router
To carry out the work, the home craftsman will only need the hinge router itself, as well as a pencil, felt-tip pen or office cutter - any tool that allows you to leave marks on a wooden surface will do. However, if you do not have jewelry precision, then it would not be a bad idea to stock up on a well-sharpened chisel and a small hammer.
Before starting, be sure to mark the loops with a pencil or felt-tip pen
The entire process of making grooves with a milling cutter occurs as follows:
- Set up the router accordingly - the whole process is described above.
- Attach the hinge that you will install on the door to the installation location and mark on three sides with a pencil or cutter.
- Having removed the loop, put the router to work. Carefully follow the marked outline, removing the wood. If you are not sure that you can do everything perfectly the first time, it makes sense not to approach these boundaries closer than 1-2 millimeters - it is better to leave a small gap.
- When the boundaries of the groove are marked, you can relax a little and quickly select wood in the remaining area - you no longer risk going beyond its limits.
- Using a hammer and chisel, carefully tap the edges. First, cut through the borders to the desired depth, and after that, work from the sides, cutting out the excess and creating a groove into which the loops will fit perfectly.
- Even if you decide to use only an electric tool, going straight along the marked boundaries, you will still have to work with a chisel. After all, the router carefully rounds the corners. And the hinges have angles of 90 degrees. Therefore, they will have to be trimmed accordingly
- Repeat the entire procedure on the door frame to install the second part of the hinges.
At this point, the work can be considered complete - all that remains is to insert the hinges into the prepared grooves and securely fix them with self-tapping screws.
The article was prepared with the information support of the Multicut company https://www.multicut.ru/catalog/frezery/ milling and engraving machines from the manufacturer.
Inserting hinges yourself
We determine where the door opens and check the ease of opening. We lay the doors on their side; ideally, for ease of work, make corner stops for the door so that the door holds on its own, this will make the work much easier. We step back, put marks with a pencil 20 cm from the edge of the door , apply a hinge and put marks. We take it, screw the hinge to the door with screws, and make sure that the hinge holds well. We take a construction knife and carefully and with little effort trace the outline of the door hinge, as shown in the photo, then with great effort we draw the outline of the door hinge, and carry out the same operation with the second hinge. As a result, we get a clearly cut outline. Learn about new modern ways to quickly insert locks and hinges, using special templates and carriages that significantly help speed up work and improve quality. Details about the devices and templates used when installing doors by professional craftsmen.
The insertion of the loops can be done by eye using a chisel. Of course, you can do it more quickly using a hand router. Don’t think that a router is something big and industrial, it’s a completely acceptable tool that will require at least a couple of diameters for different types of locks. The milling cutter will greatly facilitate and speed up the process of cutting in door hinges; with it, you can clearly guess the depth of the cutting, and it is very helpful if you come across knots and uneven wood fibers.