Plumbing fixtures can break, and everyone knows this. The easiest way is to call a plumber, but if you know how the toilet tank fittings work, you can repair it yourself. The first thought that arises when trying to repair it yourself is how to remove the lid from the cistern of a modern toilet? At first glance, this seems difficult. For example, Roca or Jika models have lids with buttons. The main thing is to unscrew the button correctly and get to the fittings.
How to disassemble a toilet cistern: instructions on working with various structures
A toilet tank is a sealed container into which tap water flows in order to flush at the right time. Thanks to its extremely simple design, you can easily repair this plumbing fixture yourself. And for this you need to know how to properly disassemble and reassemble. Do you agree?
We will tell you in great detail how to disassemble a toilet flush cistern, in what order the container is dismantled and the functional mechanisms are removed from it. Let us indicate in which situations it is necessary to remove it, and in which it is enough to perform actions without disassembling.
The article presented for your review lists typical malfunctions and cases requiring mandatory intervention. We have looked at repair options for old and new models. For visual perception, the information was supplemented with photo collections, diagrams, and videos.
Dismantling and disassembling the cistern
There is a water supply and level control system in each toilet tank. Modern toilets are equipped with mechanisms of a rather complex design.
Apartment owners use (and dismantle, if necessary, repairs) both outdated models and technically advanced ones. The disassembly process can be carried out directly on site - without removing the tank or after dismantling the latter. Which option will be used depends on various factors.
Typically, dismantling is carried out with the aim of completely replacing the tank along with the mechanism with a more advanced model. The storage tank must also be removed in case of water leakage at the connection points with the toilet. For example, due to wear of sealing gaskets, breakage of fastening bolts, and the appearance of microcracks in the housing.
Let's look at how the toilet tank is removed in any of these situations.
Removing the water reservoir on the toilet
The classic design involves fastening the toilet cistern with just two studs or bolts (d = 5-7 mm). Typically, metal (bronze, brass, steel) studs with double-sided threads for nuts are used as fasteners.
Steel fasteners were used on older models. The service life of steel fasteners is relatively short. Sometimes such pins “burn out” from rust after a year of using the device.
Fastening to the base of the toilet is usually done through two holes (or through 3) made in the bottom of the tank. The same two holes, in the same axes, are on the rear extension shelf of the device.
Fastening pins are passed through the aligned holes, gaskets are put on them on both sides and tightened with nuts. The cavities of the tank and toilet bowl are united by a common pipe, insulated at the junction with a rubber sealing ring.
The problem of how to remove the tank from the attached toilet shelf is solved as follows:
- Close the centralized water supply valve.
- Disconnect the water supply hose.
- Empty the storage tank by pressing the drain button.
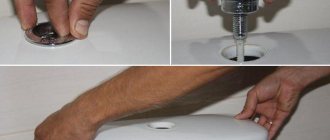
- Unscrew the drain button head and remove the top cap of the tank.
- Collect the remaining moisture inside the tank with a sponge.
- Unscrew the nuts on the mounting studs (on the bolts) under the attached shelf.
Now all that remains is to carefully lift the tank, separating it from the installation site (possibly with some effort, because sometimes the gasket sticks) and then move it to the place where you plan to perform further work.
Next, we’ll find out how to quickly disassemble the drain mechanism that equips all types of flush plumbing fixtures.
Disassembling the drain mechanism
Modern models in the mid-price segment usually use a push-button mechanism for double water flush (3/6 liters). One press of any button switches on the operating mode of the drain and fill modules. You can come across a variety of versions of such mechanisms.
However, the assembly configuration for them is the same:
- head with buttons and threaded part for the valve mechanism;
- valve mechanism with lower threaded part;
- sealing gasket;
- valve mechanism fastening nut.
When the top cover is removed, the head with the buttons will already be twisted. All that remains is to remove the sealing gasket from the fastening nut. The gasket (rubber ring) has a pentagon-shaped or circular inner area.
The fastening nut has the same shape along the outer border (not always). When assembled, the sealing rubber ring is placed on the nut. It is removed and the nut is unscrewed. The released mechanism can be easily removed. The filling system is attached using the same method.
The material used for making the fittings is plastic. If repairs are necessary, the mechanism is disassembled, but it is easier to buy a new one to replace it.
The video will tell you in detail how to properly disassemble the tank to care for the fittings:
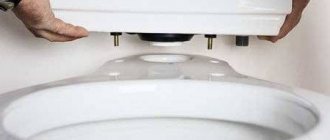
Removing the tank cover
Again, returning to modern toilet models, it should be noted that users are often faced with the problem of how to remove the lids on such models?
Indeed, these designs are somewhat different from outdated toilets in that they are made more technically, including the fastening of the lid. But in general, the principle remains the same - the cover is pressed with a nut included in the valve mechanism kit.
On new models, heads with buttons, single-button and double-button, act as a clamping nut.
To remove the one-button fastener and remove the cover, follow these steps:
- The button is pressed as if draining water and held in this position.
- Carefully turn the head with the button counterclockwise.
- Finally, turn the head with the button out of the valve mechanism bushing.
The threaded connection may differ on different models. There is a wide-field external bushing thread, as in the picture below, and there is also an internal bushing thread for a small diameter rod.
Along with single control buttons, the head of which simply unscrews, there are designs that are more difficult to disassemble, made with latches. Often this solution has two-button mechanisms.
The video tutorial clearly demonstrates the procedure for removing the reservoir cap:
Disassembling a tank with two buttons
On toilet cisterns, where a flush mechanism with two buttons is installed, there are different fastening methods. With this configuration, it is sometimes impossible to simply unscrew the head with the buttons.
In such situations, the disassembly technology is as follows:
- You only need to press one of the buttons (small) into the head body.
- On the opened inner wall, a small groove will open in the lower part.
- Using a screwdriver, carefully press the retainer through this groove.
- Remove one button (large) from the case and then the other in the same way.
- Unscrew the fixing screw located under the buttons.
After these operations, the tank lid with two buttons can be removed without any difficulty.
There are also tank designs where, first of all, you need to unscrew the decorative nickel-plated washer, then turn the lid 90 degrees - that is, install it across the container. In this position, press out the fixing brackets located inside the button head bowl. After these manipulations, the cover is completely freed from the fasteners.
Having successfully completed the procedure for freeing the tank from the lid, you need to find out the reason for the water incontinence of the fittings and troubleshoot the problem.
Replacing the flush mechanism in the toilet cistern
Toilet cistern device: how to fix it yourself
The drain tank is broken, but there is no way to call a plumber? It’s okay, because it’s quite possible to repair the toilet yourself. In this article we will tell you the basic rules for fixing your plumbing yourself.
Toilet device
Before you take action, you need to study a little theory and understand how the toilet flushes. Any model has two main parts: a bowl that stands on the floor or mounted on the wall and a water container on top. This container is called the “drain barrel”.
The operation of draining water is based on the principle of a water seal. When you press the lever (button), the plug opens and water is flushed into the riser under the influence of gravity.
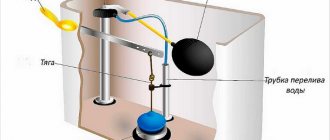
If you remove the lid on the cistern, you will find the toilet cistern device. It consists of a float, a seal and levers. Conventionally, we can divide the mechanism of the toilet cistern into 2 parts: the water intake system and the flush mechanism.
When you release the button, the drain hole closes and water begins to fill. The float controls its level and closes the tap at the right time.
Of course, depending on the manufacturer, the design may be slightly different, but the meaning remains the same.
Water collection system
The fittings that regulate the water supply can be of several types:
- With side water supply (fittings are located at the top). Basically, such a supply of water to the tank can be found in Russian-made toilets. This mechanism is cheap, but very noisy. On more expensive models, to reduce noise, a tube is attached that will supply water to the bottom.
Drainage tank: side feed mechanism - With bottom water supply. This type can be found both on foreign models of toilets and on domestic ones. Thanks to this mechanism, water noise is reduced to a minimum.
Bottom feed to cistern
Push-button flush mechanism The flush mechanism is activated either by pressing a button or by pulling out the stem. The most popular is the push-button version with a lever, which is shown in the photo. In toilets with a hidden cistern, this button is located on the wall. Therefore, repairing a wall-hung toilet is more inconvenient - all actions are carried out after removing the button through a small hole. The video shows the process of dismantling the fittings from the built-in tank (installation).
The push-button mechanism can be 1 or 2 mode. In a two-mode drain, there are two buttons: one drains the water completely, and the second half. This allows you to save water when necessary. Also, such a mechanism can be implemented with one button, when the drain depends on the degree of pressing.
The price of rod flush devices for Soviet toilets is approximately 250-450 rubles. A set of Polish Cersanit fittings with a bottom supply will cost about 650 rubles. Fittings from Vidima already cost 1,250 rubles. but you can separately order a membrane for it for 300 rubles. Domestic products will cost less: you can find stock models from 100 rubles and push-button models from 200 rubles.
Preparation for repair
First of all, you need to visually inspect the internal mechanism for defects. To do this you need to remove the top cover. Usually it is fixed with a drain button. You either just need to unscrew it, or pull out the button and unscrew the fastening screw.
Before you repair the toilet cistern, you must turn off the water supply.
Replacement and fastening of parts
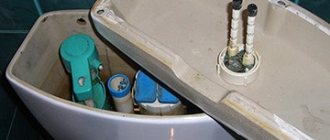
After you open the lid, you will see several holes with a diameter of 1.5-2 cm for supplying water (maybe only 1). One of them will contain a filling fitting with a diaphragm valve.
The principle of its operation is simple: when the tank becomes empty, it starts supplying water, when it is full, it stops. A float is required to determine the water level. If you have little or, on the contrary, a lot of water, you can adjust the desired level yourself. It is recommended to use a volume of 5-7 liters of water.
The membrane is very sensitive to water quality, so its service life will depend on water filters. If you have no filters at all, then it is better to replace the mechanism with a domestic one with a rod valve.
Most often, the question of how to repair a toilet cistern can be resolved by completely replacing parts. For expensive toilets you can find a repair. kit with bushing and membrane. On cheap models it will be more profitable to buy new fittings; they are not very expensive. The main thing when purchasing is to choose the desired pipe diameter; they usually come in 10, 15 mm, as well as 1/3 and ½ inch.
Set of fittings for toilet repair
When replacing, you need to make a sealed joint, so put on a sealing gasket before fastening. The fittings are tightened to the tank with a nut. Do not tighten them too much, otherwise cracks may appear.
Decorative plugs are inserted into the remaining free holes. If necessary, you can change the position of the water supply. If the plug is simply inserted into the hole until it clicks, and is not held on to the nut, then there are no seals in it, so water will leak out if there is a malfunction.
At the bottom of the tank there are holes for attaching to the toilet. Fastening occurs with metal or plastic bolts. Bolts made of brass and stainless steel are best suited for attaching the toilet. Regular metal fasteners will be stronger than plastic ones, but will quickly rust. Before attaching them, washers and rubber gaskets must be installed.
In the center there is the largest hole for draining water. The shut-off valve for the drain tank is secured with a cap washer through a gasket.
Popular cistern breakdowns
The most common breakdown is continuous filling and leakage of water from the container. The reason for this is the following factors:
- Float misalignment;
- The float mechanism does not work;
- Loose shut-off valve, old rubber seal.
The easiest way to solve the first problem is because you won’t even need to repair the toilet cistern - you just need to open the lid and adjust the float. Also, sometimes the shut-off valve does not fit into place; it is also easy to manually place it in the recess.
The next problem is if the water fills the tank to the limit and does not stop. To check the mechanism, lift the float up until it stops. If the water does not stop, the float mechanism will need to be replaced.
And the last point is the old seal. It is very simple to determine such a breakdown: you just need to press the valve with your hand. If the water stops, the seal needs to be replaced. Also sometimes this is due to the locking mechanism being too light. In this case, you need to add weights inside to make it heavier.
Another common breakdown is associated with a worn float. Its seal is broken and it does not float well, so the water in the tank does not rise to the required level. You will need to replace the fittings of the drain tank, but you can fix the float yourself. To do this, you need to seal the hole in it with sealant, glue, heated plastic or any other material at hand. You can also look at a plumbing store, they may have something similar to your float.
This video shows how you can repair a toilet cistern with your own hands:
Usually repairs come down to a maximum of replacing fittings, and this can be done yourself without calling a plumber. The main thing is to choose a quality product and the right size, and then you will not be disturbed by the sound of dripping and collecting water.
Instructions for attaching the bathtub to the wall, sealing seams and sealing cracks. How to install an acrylic, cast iron or steel bathtub with legs and a podium.
How to independently assemble and connect a shower cabin with a high tray in the bathroom.
How to properly solder polypropylene pipes and fittings. Necessary tools for work and instructions on how to make a homemade welding machine for polypropylene.
How to replace the fittings in a toilet cistern yourself
A familiar picture - you go to the toilet, and there is water under your feet. And it’s good, if not a few centimeters. Or, as an option, you come out of the toilet, but the tank doesn’t want to empty. There may, of course, be other troubles. But despite all the variety, the reason for their occurrence is always the same - a malfunction of the toilet flush system.
It would be nice if restoring the functionality of the product only involves replacing the gasket or tightening a loose screw. What if not, and the entire system needs to be replaced? Sounds threatening. But don't worry.
Knowing the basic designs of drainage systems, how they work, and having basic skills in repair work, it is quite possible to replace all the fittings yourself. But the question arises, where to start?
Before starting work, you just need to take 5 minutes of time and carefully consider how the flush system of our toilet works. This will save both time and money.
A real owner must know the basic designs of drainage tanks
You may not even know how to replace the fittings in a toilet cistern of a certain model. But all the work can be done the first time, if you at least roughly understand the structure of the main types of tanks. In fact, according to the principle of operation, everything is the same. The only difference is in the material of manufacture, the water supply system, and the drainage control. Let's look at the main models.
Old-style tank - “Sovdepovsky”
It has two modifications: with a string - you pulled it, the water ran, and a newer one, what they began to call “compact” - without a pipe, with an upper rod for opening the valve.
The first fittings were made of metal. Only in the first case, the tank is mounted on a pipe and has only one lower hole. In the second, it stands on the toilet. The bottom has two pairs of holes: one pair for attaching the drain rod, the second for attaching the tank to the toilet, plus an additional hole for the overflow tube.
Tanks with one or two button flush control
Such fittings have plastic parts, with the main fastening in the center.
They differ from each other only in functionality:
- With one button, the water drains all at once.
- With two buttons, it can “dispense” water. One drains the entire volume of water, the other only part of it.
- We turn off the tap on the riser that is responsible for supplying water to the tank. Disconnect the water supply hose.
Tank with water supply from below
Modification of previous push-button ones. Everything is basically the same: fastening, material, operating principle. Only the pipe connected to the water supply is located not on the side, but on the bottom.
We begin work on dismantling the old fittings
Step by step, all the preliminary work looks like this:
After turning off the tap, you need to drain all the water and soak up any remaining water with a rag. Sometimes, in a hurry, people forget to do this. They begin to unscrew the fastening screws - and there’s a flood.
We disconnect the tank from the drain pipe (old model) or the toilet bowl in new products. In the first case, unscrew the large metal nut located on the pipe. In the second there are two nuts located below, under the toilet platform. In older modifications, there are difficulties with dismantling - the iron fasteners rust and are difficult to unscrew. A problem has arisen - we cut off the nuts. This can be done with a hacksaw blade or a file.
- Filming;
- Place the removed tank on a wide, stable surface;
- First we dismantle the float and the water pipe with the valve;
- Remove the main drain system.
When removing the drain mechanism, this applies more to old structures, you should be careful. A metal tool used incorrectly will damage the surface of the plumbing fixtures.
Having removed the old fittings, wash the tank and wipe it dry. We inspect for damage in the form of chips on the holes or possible cracks appearing on the surface of the sanitary ware.
We install new fittings in place
It was said above that older models of drain systems have more holes for attaching fittings. This does not matter if new parts of similar design are installed in place of worn fittings. But often, to equip our old plumbing with a more reliable new “filling”, we have no choice but to replace the toilet cistern fittings that have become unusable with modern fittings. In particular, we will devote a few lines to this in the general assembly process.
- In older models, we attach a bracket with a rod and a metal bulb to the bottom of the tank. In new ones, the drain system is secured in the center with one plastic nut.
- Be careful! We work with plastic fasteners gently. Excessive tightening force may damage one of the fastener elements.
- We install the water supply pipe. In older systems, we will then attach a spoke with a float to it. In new ones, the pipe can be combined with a water level control system. That is, the float and water intake pipe are combined into one structure. We install everything together.
- Next, the tank with the assembled drainage system needs to be installed on the toilet.
- In older models, between the cistern and the toilet we use a large rubber gasket-shock absorber of an oblong shape. It “captures” two holes: a drain hole and a hole for overflowing water. If a modern drainage system is installed in the “Sovdepov” compact, we close the additional hole for the water overflow tube with a plug.
- The compact of today is equipped with a shock absorber gasket in the form of a ring.
- We place the tank on the gasket installed on top of the toilet. We press it to the toilet with two fastening bolts and nuts.
When buying fittings, you need to focus on original products, from a “branded” manufacturer. It will last longer and there will be fewer problems during operation.
The assembled drain system needs to be adjusted
- we adjust the position of the float so that the distance from the surface of the water to the top of the container, with the tank filled and the valve in the water supply pipe closed, is within 4-5 centimeters. Or the water was 1-2 centimeters below the edge of the hole in the water supply pipe;
- the top of the overflow tube should be approximately 2 centimeters above the water level.
All. Close the lid and we can use it.
How to fix a toilet cistern: review of the most common breakdowns + replacement of fittings
When installing sanitaryware in a new house or recently purchased apartment, you need to worry in advance about the correct installation of the toilet, the tight connection of hoses and pipes, the serviceability of gaskets and fasteners. Old plumbing also occasionally requires a preventive inspection. Due to poor water quality, the fittings quickly wear out and fail, and then urgent repairs to the toilet cistern are required. Delay costs your home, including your downstairs neighbors, flooding.
What does the cistern consist of?
At first glance, it’s a simple device: a container equipped with a drain and water supply system. When you press the button, the mechanism releases water, the supply valve opens, and the empty tank is refilled.
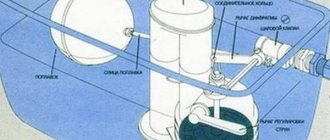
The main functional parts of the tank: 1(1) – inlet (filling) fittings; 1(2) – drain (drain) mechanism; 1(3) – water drain button. All details are interconnected
It turns out that even such a basic device can break down. Let's take a closer look at how to repair a toilet cistern without the help of plumbers.
Troubleshooting the float mechanism
If water constantly fills the tank and immediately flows into the toilet, look for a problem in the float mechanism. There may be several reasons for the breakdown:
- intake valve wear;
- misalignment of the lever (“rocker arm”);
- displacer malfunction.
The float (buoy) from long-term use develops cracks through which water enters it. It sinks and ceases to perform its main function - it simply needs to be replaced.
If the lever is bent, it is necessary to return it to the correct, horizontal position. The location of the lever is approximately 2 cm below the hole through which water enters.
Modern drain fitting kits have a different structure - they do not include a traditional float on a rocker arm, although the principle of operation of the mechanism has been preserved
The valve that closes the incoming water has a different structure for different models of tanks. In some cases, the valve cannot cope with high pressure - it is necessary to install a float valve.
How to get rid of noise when filling the tank?
The loud noise that accompanies the process of filling the tank with water creates discomfort for others. It is easy to get rid of it by adjusting the diameter of the inlet hole or adding a small plastic tube to the fittings. The water will no longer flow freely and noisily into the tank, but will flow through the tube, and accordingly, the loud sound will disappear. To do this, we put a tube 30-35 cm long with one end over the hole, and place the other below the water level with the tank drained. Even if the noise does not completely disappear, it will become quieter.
A plastic or rubber tube placed over the inlet hole muffles the noise of water entering the tank. This device is suitable for tanks with top supply
Replacing bolts in case of tank leakage
How to fix a toilet tank yourself if the water is not pouring into the right place, but directly onto the floor? Most likely, the steel bolts that secure the tank to the toilet shelf have rotted - they need to be replaced urgently. Having purchased a new set of bolts, we proceed to dismantling the tank:
- Turn off the water by turning the valve perpendicularly.
- We remove water and the remains of rusty fasteners from the tank.
- Unscrew the nut and disconnect the inlet valve.
- We unscrew the old bolts securing the tank to the toilet shelf.
- Remove the tank from the thick rubber cuff.
- We take out the old bolts. Both must be removed, even if only one of them is faulty.
- We clean the connection points of the bolts with the tank and the tank with the toilet.
- We tighten new brass or steel bolts.
- We install the tank on the shelf, having previously secured the cuff.
- We tighten the fasteners carefully so as not to damage the sanitaryware.
- Let the water flow and check if it is leaking at the bottom of the tank. We flush the water a couple of times and check again.
Sometimes a leak may appear a little later, so for two days it is worth carefully examining the problem area from time to time. As you can see, it is not always necessary to carry out major repairs - sometimes it is enough to replace the fasteners.
To unscrew the bolts connecting the flush cistern to the toilet shelf, no special tool is needed: usually “ears” are provided for easy gripping
Toilet cistern fasteners are available at every plumbing store. The price of the cheapest one is 40-50 rubles, the more expensive option will cost 250-300 rubles
What to do if water is constantly flowing?
There can be no talk of saving water if it constantly flows in a thin stream into the toilet, not allowing the required volume to accumulate in the tank. The question arises: how to repair the parts of the toilet cistern to eliminate the leak? Most likely, the problem is in the siphon membrane, which has worn out and lost its ability to seal the hole hermetically. The problem is solved by simply replacing the membrane with a new one.
To do this, you need to perform several steps:
- empty the tank of water;
- remove the siphon;
- remove the old membrane and install a new one;
- place the siphon in place, attach it to the lever, and screw in the fastening nut.
Sometimes the problem is not the membrane, but a broken rod, which can also be easily replaced.
The siphon membrane is located at the bottom of the drain fittings. It is a rubber gasket that ensures a tight connection of parts
What to do if the drain tank does not fill?
So, suddenly the water completely stopped flowing into the tank. Will it be enough to repair it yourself, or will you have to turn to plumbers? Let's consider three ways to solve this problem.
First, let's check the serviceability of the supply hose. We turn off the water, disconnect the hose from the tank and place it above any container (you can also above the tank). We unscrew the valve a little and let the water flow again. If everything is in order with the hose, water will flow freely into the container. Otherwise you will have to replace it.
It is possible that the connection point of the supply hose to the tank is clogged, since after repairing the pipeline, sand and other mechanical contaminants enter the water and can clog small holes. You can try to clear it with a long, sharp object, such as a screwdriver.
The cost of a new supply hose is about 100 rubles. It is better to buy a product that has a shut-off valve - if the cistern leaks, it is much easier to turn off the water
Another reason is a malfunction in the float mechanism due to wear of the intake valve. In this case, it is better to replace the faulty float valve with a new one.
Total renovation: replacement of fittings
If you don’t want to tinker with small parts of the fittings that have become unusable, you can simply remove the old one and install a new mechanism purchased in a store in its place.
When removing old fittings, pay attention to faults. It may not be necessary to completely replace the mechanism; sometimes it is enough to change one small part
Fitting kits for flush tanks have design differences. For example, their structure varies depending on the type of eyeliner - side or bottom
First, let's figure out how best to disassemble a toilet cistern using the example of fittings with bottom connections:
- We turn off the water.
- Carefully unscrew the button.
- Remove the cover.
- Disconnect the liner.
- We remove the drain column in parts: first we dismantle the upper part (rotating it 90 degrees).
- Unscrew the fasteners of the drain tank.
- We place the tank for further work on the toilet.
- We unscrew two nuts: the valve and column fastenings, and take out the second part of the fittings.
- We install a new mechanism and carry out reverse work on installing the tank.
As you can see, changing the insides of a toilet cistern is not difficult: the whole operation takes no more than 10-15 minutes. Another advantage of doing it yourself is that no special tools are required; all actions are carried out using hands, pliers and wrenches.
- Repairing a toilet cistern The toilet cistern is a rather complex mechanism that regulates the amount of water in…
- Condensation on the toilet cistern. How to get rid of it? Why is it formed? How to get rid of it? Replacing the tank Forced ventilation As sad as it may be, the bathroom...
- Adjusting the toilet cistern Home » Bathroom: bathroom and toilet » Toilet cistern: device, installation, configuration, repair…
- How to get rid of condensation on the toilet cistern Eliminating condensation on the toilet cistern December 14, 2013 You have renovated the toilet and are happy...
Removing an old toilet cistern
A number of outdated toilet models are still in use. It is necessary to repair battered products more often due to significant wear of their components. But the owners of such structures do not have to think much about how to repair or remove the toilet cistern, due to the extremely simplified design.
So, to dismantle the same cover, it is enough to twist the handle on the drain mechanism rod and unscrew the plastic (or metal) washer nut.
Under the lid inside the tank there is a float mechanism for collecting water and a lever-valve drain mechanism. The valve system of such a mechanism is usually attached to the tank through two additional holes in the bottom.
General recommendations for handling the toilet
Since the drain system is located inside the tank, you need to remove the top part. Push-button models are similar to each other in external design. Old toilets are much easier to deal with. Their covers can be easily lifted up and quickly returned to their original place after repair.
Once the cover is removed, never remove the fitting in a hurry. It is important to remember in what order all its elements are located so as not to make mistakes during assembly. The tank lids are made of ceramic and can break if handled carelessly. Prepare a small container in advance. You will need to put all the fasteners, clamps and other spare parts into it.
When disassembling the fittings, do not use unnecessary force, do everything carefully. If the button does not give in at first, you should not hit it with a hammer or pliers: fragile parts may break, and it will be difficult or impossible to find the same ones. The best way is to try to unscrew it manually. If there are no manufacturing defects or serious damage inside, it can be easily unscrewed.
Tank drain device
Diagram of a toilet with a flush cistern.
As already mentioned, all waste tanks have a similar structure and differ only in design. What does a toilet flush cistern look like?
A cistern is primarily a container that is filled with water. It can be ceramic, plastic or even metal. Moreover, a container made from such materials can take on a variety of shapes, and this container is covered on top with a lid made from the same material as the tank itself. A button, lever or handle, which is connected to the trigger mechanism of the flush tank, is responsible for draining the water.
The main “insides” of the tank include fittings, a float, a siphon, a diaphragm and a jet adjustment lever.
Any internal mechanism consists of only two fittings: locking and drain. The shut-off valve is responsible for filling the tank with water. It is the locking mechanism that shuts off the water that enters it and is activated at the moment when the tank is completely filled with water. The second drain valve is a mechanism that is activated when the release button or lever is pressed.
The cistern has a standby mode. In this mode, the container is completely filled with water to the specified level. The mass of water presses down on the rubber bulb, which, with its elastic surface, presses tightly against the saddle, thereby preventing water from passing through. Thanks to the column, the water remains in the tank. Then, to drain, depending on the design of the tank, you need to pull the top handle, press the button or pull the lever. The drain hole becomes open and water begins to flow freely into the toilet.
Replacing cistern fittings
In the old toilet cistern, we dismantle the old fittings that have become unusable and install a new water supply and drainage system. We purchase universal fittings suitable for all toilet flush tanks. To use water economically, we buy a two-button drain mechanism that allows you to change the volume of drainage depending on the type of human waste being flushed away.
In such fittings the manufacturer uses:
- dual-mode push-button mechanism;
- manual adjustment of the volume of small and large water discharge;
- drain mechanism stand adjustable to the height of the tank;
- changing the thrust by reinstalling the lever in one of the existing holes;
- clamping nut with rubber gasket;
- valve that closes the drain hole in the toilet bowl.
A mechanism for economical drainage of water from the tank, carried out using two keys, which are activated by a blue or white pin when one of the buttons is pressed
We will replace old fittings. To do this, unscrew the button holding the toilet lid and pull it out of its socket. Let's remove the cover. Let's shut off the water supply to the tank. Disconnect the flexible hose. Unscrew the screws holding the flush tank to the toilet bowl. Remove the tank and place it on the folding seat cover. Remove the rubber sealing gasket, and then unscrew the plastic clamping nut by hand. Then we remove the old drain mechanism.
Next, we install a new drain mechanism, having first removed the rubber seal from it and unscrewed the clamping fastening nut. After installing the drain mechanism into the hole in the tank, we fix its position with the removed parts. When installing the tank on the toilet, do not forget about the sealing ring placed on top of the plastic nut. Then we insert the tank pins into special holes in the bowl, screwing wing nuts onto them from below. We tighten the fasteners evenly on both sides, avoiding distortion of the installed part. If necessary, we replace fasteners with new parts with sealing gaskets.
Using two fasteners, the tank is securely attached to the toilet. At the bottom of the bowl, wing nuts are screwed onto the screws, and thin gaskets are first put on
When connecting the water hose to the side inlet valve, hold the part inside the tank from turning. Tighten the nut with a special wrench or pliers. Install the tank cap and tighten the button. If necessary, adjust the stand and move the lever.
The two-key button has two pins that activate the desired drain mechanism. The length of the pins reaches 10 cm. They are shortened to the required length depending on the height of the tank. Screw it into the button. Insert it into the lid and secure the position of the button from the inside with a nut. Install the lid on the tank. Turn on the water supply. Press the small part of the button, about 2 liters of water are drained. Press most of the button, about six liters of water are drained.
What can break inside
If the float is damaged, it stops holding water inside the tank, and it begins to overflow over its edges. In this case, the old float must be replaced with a new one. When the float is empty inside, depressurization may occur since it is constantly in contact with water.
Helpful advice!
The crack or hole is temporarily sealed with a soldering iron, but after 1 or 2 months the float will still have to be replaced.
If the lever part of the float fails, it must also be completely replaced.
A defect in the fittings can be caused by improper actions of the plumber. If the installation of backlash connections was carried out with deviations from accepted standards, the fixing elements become weakened. This defect is easy to fix. Simply turn the top clockwise.
If the shut-off valve is faulty, water may leak out. Testing the shut-off valve is simple: press it slightly by hand. If water flows, it means the cause of the breakdown is in it. The fittings are disassembled, the container is cleaned, including its bottom. If necessary, replace the old gasket with a new one. The same is done when the siphon membrane is deformed.
How to remove a one-button tank
Each toilet is equipped with a system that collects water and controls its quantity. Most elements are made of plastic and non-ferrous metal, and they are controlled using buttons.
Removing the toilet cistern lid is easy with one button. The valve mechanism of older models is equipped with a clamping nut that secures the cover. In new models, this role of the nut is performed by a one-button or two-button head. The algorithm of actions is simple and looks like this:
- press the head;
- drain some water;
- carefully turn left;
- turn it out of the sleeve all the way;
- Having removed the button and disassembled it, open the cover.
How to remove the toilet lid?
A plumbing fixture that refuses to work is best left to a professional, but cleaning the tank or adjusting the fixture are operations that can easily be done without outside help. The dismantling procedure will not take much time, but to ensure that this conclusion is correct, you need to learn how to remove a toilet lid with a double button. However, before that, it’s better to get acquainted with how they “deal” with models that have simpler controls - just one mode. The reason is the slight differences in both operations.
How to remove a toilet lid with one button?
The good thing about old “toilet duos” is that any owner or housewife can easily and quickly get to the “filling” of the container. New models do not allow such “liberties”. Therefore, anyone who conceives of this operation must act according to a certain algorithm, which is no different for all manufacturers and all models.
In both cases, first shut off the water entering the container. To do this, close the shut-off valve located between the pipeline and the supply line: flexible or rigid. Then the tank is emptied.
- First, use a screwdriver to pry up the ring located around the button. After it moves from its place, the tool is removed to the side, turning the element counterclockwise with your hands.
- The unscrewed ring is set aside. Take the lid with both hands, lift it slightly, then carefully unfold it so that it is perpendicular to the tank.
This movement is necessary in order to be able to reach the clothespin that secures the button. Then the button block is carefully released from the plastic element, then the tank lid is removed and set aside.
How to remove a toilet lid with a double button?
Knowing how single-button models are disassembled, it is easy to understand how to remove a toilet lid with a double button. This procedure does not have any fundamental differences, but there are some peculiarities regarding the two keys.
- To disassemble the mechanism, first press one of the buttons. As a rule, it is smaller in size.
- On the inner side of the second part, a small slot is found into which a flat-head screwdriver is inserted.
- The button is removed, then the remaining key is treated in the same way. A slotted screw is found in the hole, which is also unscrewed.
- In a similar way, lift the tank lid, turn it across, then disconnect the fixing clothespin.
After all manipulations, the cover is removed and maintenance or adjustment is carried out. Then the results of the work are checked, after which the product is assembled in the reverse order. The procedure is almost the same for all toilet models. A problem may arise with unscrewing the fasteners located under the buttons.
For some manufacturers, these are ordinary elements that can be easily removed with a Phillips screwdriver. In some models, the usual fasteners are replaced with plastic nuts that require a special wrench. In this case, the problem can also be solved: the missing tool is replaced with ordinary pliers.
When there are problems with installation
These are relatively new plumbing fixtures in which the tank is hidden behind a wall, often made of plasterboard. Judging by the reviews of satisfied owners, such models in most cases work properly, and for years. However, no one is immune from accidental breakdowns. The best way out in such a situation is to seek help from a specialist.
In this case, in order to dismantle the cover, you will have to disassemble part of the wall. If the installation model has a two-button drain system, then it differs from most conventional outdoor appliances. Each button of structures built into the wall has its own pusher rod. For this reason, each of them will have to be disconnected. To remove the cover, perform several sequential steps.
- First, press the button from below, trying to gently pull it out using up and down movements. The fasteners are unscrewed with a Phillips screwdriver.
- Also carefully pull out the clamps, then remove the plastic pusher rods.
- Remove the brackets and dismantle the partition, which is fixed with special clamps.
- Shut off the water supply, dismantle the valve lever and the valve mechanism itself.
- Remove the latch by carefully bending the petals.
The drain valve is not touched; only the upper part of this fitting is removed. This type of work is relatively complex, so it is best to proceed with caution. First you need to study the model documentation. Many manufacturers supplement it with step-by-step instructions designed for correct installation of products. However, the best solution will always be to contact the technician who installed the built-in tank of the plumbing fixture.
Main causes of malfunction and their elimination
If the tank breaks or stops working correctly, then after disassembling it it is necessary to determine what the malfunction is and what causes it. Here are some of the most common problems:
A very common problem is the constant flow of water into the toilet. The reason for this may be wear of the membrane that is included with the siphon. Replacing the membrane is very simple; you need to disconnect the tank from the flush pipe and remove the siphon.
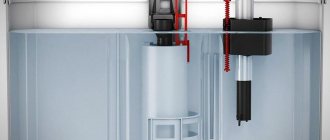
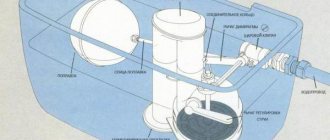
Diagram of the fittings of the drain tank.
If the water flows too slowly or, conversely, too quickly, the problem is in the float. Float misalignment is the simplest and most common malfunction. Moreover, to fix it, you will not need any tools or spare parts. All you need to do is lift the lid, move the locking mechanism so that the bulb snaps into place and shuts off the water. The float must close the shut-off valve. If it doesn't, adjust it. To do this, bend the pin on which the float is attached to create a larger angle for the drain mechanism, which means it will operate when it is less full.
Causes and troubleshooting
As practice shows, sooner or later any toilet is susceptible to leakage, regardless of its cost and design features. The source of trouble is often the drain tank.
Typically, the cause of a tank malfunction is the breakdown of some part of its design. Often the rubber diaphragm wears out and allows water to leak through. In this case, you will have to remove the siphon and replace it with a new membrane. To do this, you need to remove the drain tank and disconnect it from the water supply.
To fix a toilet malfunction, you will have to disassemble the flush cistern.
Sometimes leaks occur due to clogging of the diaphragm and the appearance of plaque on it. In such cases, you can do without replacing the part, but simply clean it. However, carefully inspect the membrane; the slightest crack can lead to a recurrence of the problem. A damaged gasket must be replaced.
Filling the container with water too quickly or too slowly indicates a possible misalignment of the float. To do this, you simply need to remove the cover and adjust this unit so that the gasket fits tightly and completely to the drain hole. To perform these steps you do not need special tools; everything can be easily done manually.
When the float rises to the desired level, the water supply to the tank must be stopped
In this case, it is important to determine the correct angle of the drain assembly by bending the float mounting fittings. By creating more space for the drain mechanism, you will ensure that water is drained when the tank is not completely filled, which will help save water costs.
As you can see, eliminating any malfunction in the drain tank will necessarily entail work on disassembling the tank. To figure out how to remove the tank from the toilet, you need to study its structure and understand the principle of its operation. Recommendations from professional craftsmen and step-by-step dismantling instructions can also make your work much easier.
Drain tank: dismantling and disassembling the mechanism
There is a water supply and level control system in each toilet tank. Modern toilets are equipped with mechanisms of a rather complex design.
Apartment owners use (and dismantle, if necessary, repairs) both outdated models and technically advanced ones. The disassembly process can be carried out directly on site - without removing the tank or after dismantling the latter. Which option will be used depends on various factors.
Modern toilet cistern design. Such products are equipped with more advanced mechanisms for collecting and draining water. Non-ferrous metals and plastic are used here as materials for technical fittings. Uses a push-button control system
Typically, dismantling is carried out with the aim of completely replacing the tank along with the mechanism with a more advanced model. The storage tank must also be removed in case of water leakage at the connection points with the toilet. For example, due to wear of sealing gaskets, breakage of fastening bolts, and the appearance of microcracks in the housing. Let's look at how the toilet tank is removed in any of these situations.
Removing the water reservoir on the toilet
The classic design involves fastening the toilet cistern with just two studs or bolts (d = 5-7 mm). Typically, metal (bronze, brass, steel) studs with double-sided threads for nuts are used as fasteners. Steel fasteners were used on older models. The service life of steel fasteners is relatively short. Sometimes such pins “burn out” from rust after a year of using the device.
Typically, flush tanks are fixed to the toilet body in the rear area. There is a specially protruding shelf for installing the tank. There are two holes on the surface of the shelf, which exactly coincide along the axes with the holes in the bottom of the tank. Most designs support two-point fastening
Fastening to the base of the toilet is usually done through two holes (or through 3) made in the bottom of the tank. The same two holes, in the same axes, are on the rear extension shelf of the device.
Fastening pins are passed through the aligned holes, gaskets are put on them on both sides and tightened with nuts. The cavities of the tank and toilet bowl are united by a common pipe, insulated at the junction with a rubber sealing ring.
Option for mounting the drive according to a three-point scheme. This solution is considered more reliable, as it provides better stability of the container. In addition, fastening the tank at three points contributes to a better fit of the sealing gasket. The risk of leakage in this place is reduced, which means you will have to disassemble the tank less often
The problem of how to remove the tank from the attached toilet shelf is solved as follows:
- Close the centralized water supply valve.
- Disconnect the water supply hose.
- Empty the storage tank by pressing the drain button.
- Unscrew the drain button head and remove the top cap of the tank.
- Collect the remaining moisture inside the tank with a sponge.
- Unscrew the nuts on the mounting studs (on the bolts) under the attached shelf.
Now all that remains is to carefully lift the tank, separating it from the installation site (possibly with some effort, because sometimes the gasket sticks) and then move it to the place where you plan to perform further work.
Bottom view of the toilet cistern after removing it from the attached shelf. In the center you can see a rubber sealing gasket covering the plastic nut securing the drain mechanism. On the sides there are two studs for fastening the drive. A little lower on the right you can see the threaded part for the hose of the water supply module and a plastic fastening nut
Next, we’ll find out how to quickly disassemble the drain mechanism.
Disassembling the drain mechanism
Modern models in the mid-price segment usually use a push-button mechanism for double water flush (3/6 liters). One press of any button switches on the operating mode of the drain and fill modules. You can come across a variety of versions of such mechanisms. However, the assembly configuration for them is the same:
- head with buttons and threaded part for the valve mechanism;
- valve mechanism with lower threaded part;
- sealing gasket;
- valve mechanism fastening nut.
When the top cover is removed, the head with the buttons will already be twisted. All that remains is to remove the sealing gasket from the fastening nut. The gasket (rubber ring) has a pentagon-shaped or circular inner area.
The fastening nut has the same shape along the outer border (not always). When assembled, the sealing rubber ring is placed on the nut. It is removed and the nut is unscrewed. The released mechanism can be easily removed. The filling system is attached using the same method.
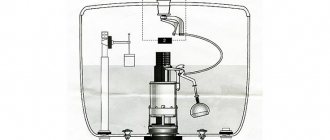
Diagram of most drain mechanisms of foreign and domestic production. One-button control design, which can be found on almost all budget toilets.
The material used for making the fittings is plastic. If repairs are necessary, the mechanism is disassembled, but it is easier to buy a new one to replace it.
How to remove the tank cap
Again, returning to modern toilet models, it should be noted that users are often faced with the problem of how to remove the lids on such models?
Indeed, these designs are somewhat different from outdated toilets in that they are made more technically, including the fastening of the lid. But in general, the principle remains the same - the cover is pressed with a nut included in the valve mechanism kit.
Technology showing how to disassemble a modern toilet cistern, starting with removing the lid. The main task is to carefully unscrew and separate the button head. After this operation, the lid is removed and steps are taken to repair (replace) the drain mechanism
On new models, heads with buttons, bottom-button and double-button, act as a clamping nut. To remove the one-button fastener and remove the cover, follow these steps:
- The button is pressed as if draining water and held in this position.
- Carefully turn the head with the button counterclockwise.
- Finally, turn the head with the button out of the valve mechanism bushing.
The threaded connection may differ on different models. There is a wide-field external bushing thread, as in the picture below, and there is also an internal bushing thread for a small diameter rod.
This is what the dismantled head of a single control button looks like. This is just one of the possible configurations. In practice, there are different designs of push-button heads. This point must be taken into account when starting to disassemble the toilet cistern.
Along with single control buttons, the head of which simply unscrews, there are designs that are more difficult to disassemble, made with latches. Often this solution has two-button mechanisms.
How to disassemble a tank with two buttons
On toilet cisterns, where a flush mechanism with two buttons is installed, there are different fastening methods. With this configuration, it is sometimes impossible to simply unscrew the head with the buttons. In such situations, the disassembly technology is as follows:
- You only need to press one of the buttons (small) into the head body.
- On the opened inner wall, a small groove will open in the lower part.
- Using a screwdriver, carefully press the retainer through this groove.
- Remove one button (large) from the case and then the other in the same way.
- Unscrew the fixing screw located under the buttons.
Removing the water reservoir on the toilet
The drive with the button is mounted on two rods (studs) with a diameter of 5 to 7 mm. For fastening, metal studs (bronze, steel, brass) are used, with threads on both sides for nuts.
Such fasteners are typical for outdated models. It can last relatively little. It happens that such a part may rust a year after work.
The design of such a mechanism is mounted on the back of the plumbing body. For them, there are protruding surfaces on which there are two or three holes for the tank studs.
Rods are passed through them, after which special gaskets are put on and a screed is made. The cavities of the cistern and toilet bowl are connected by a pipe.
First of all, to remove the storage tank, you need to stop the water supply. After this, the hose through which it is supplied is removed and the storage tank is released (to do this, you need to press the drain button).
Next, the head of this button is turned away and the top cover is removed. After the remaining moisture inside the drive is collected with a sponge, you need to unscrew the nuts on the studs under the protruding shelf.
When all these steps are completed, you only need to carefully separate the drive from its installation location.
If the tank has two buttons
Removing a toilet lid with one button is much easier than with two. With this design, it will be a little more difficult to disassemble it - due to different methods of fixation. The repair procedure looks something like this:
- the small button is pressed down;
- an inner wall will appear;
- there is a small groove on the wall behind which there is a latch;
- through the groove, using a screwdriver, press out the fixing element;
- take out the large button, and then the small one;
- unscrew the screw under them.
After these manipulations, opening the toilet lid (tank) will be easy.
There are tanks with a decorative nickel washer. First you need to unscrew it, and then unfold the lid across the toilet. Now all that remains is to press the fastening brackets inside the button and free it from the fastening elements.
How to disassemble a tank with a button
The specific method depends on the brand and model.
Threaded one-piece fastening (for example, AlkaPLAST tanks):
- Slightly recess the button and pinch the framing ring-sleeve with your fingers.
- Unscrew (counterclockwise).
- Remove the cover.
- The drain mechanism is mounted on pins: you need to turn the pipe with the rod counterclockwise so that the pins come out of the grooves, and remove the entire mechanism.
The brands Santek, Roca, Sanita, Cersanit, Jika have the same fastening.
A similar device is when you first need to unscrew the ring-bushing, and then the button, which is screwed into the movable bar (this makes the mechanism more universal and allows the button to fit exactly in the center of any tank lid).
Push-button mechanism with stoppers (using Ifo as an example):
- Tilt the button to the side, pry it with your fingers or a plastic knife and remove it.
- There is a fastening screw under the button; you need to unscrew it and put it aside.
- Using needle nose pliers, pliers or your hands, release the stoppers that hold the frame for the button on the sides.
- Remove the frame and loosely remove the earthenware cover.
Key release (using the example of a Gustavsberg tank):
- Slightly press the key away from you.
- A small groove will appear at the near end of the key - grab it with a screwdriver or a plastic knife and pull it up until it clicks.
- Under the key there is a screw that actually holds the structure together. It can be easily unscrewed by hand, but due to the narrow framing frame it is more convenient to use narrow-nose pliers.
- Remove the plastic frame, which also doubles as the lid.
Important Before disassembling any barrel, be sure to turn off the water, otherwise the constantly accumulating water will interfere with work.
Video: how to replace the drain mechanism
A few practical tips will help you cope with self-adjustment of fittings.
Instruction before performing work related to repairing household appliances with your own hands is voluntary. However, extra information never hurts in any endeavor. The more information there is about a specific object, the simpler and easier it is to perform all actions. Disassembling modern toilets, despite the simplicity of the steps, also does not exclude reference to the instructions.
Removing an old toilet cistern
A number of outdated toilet models are still in use. It is necessary to repair battered products more often due to significant wear of their components. But the owners of such structures do not have to think much about how to repair or remove the toilet cistern, due to the extremely simplified design.
View of the mechanism inside the cistern of an outdated toilet model. Float control system and traction control for drainage. The tank is also attached from below with two bolts. The top cover can be removed easier and faster than on new models
So, to dismantle the same cover, it is enough to twist the handle on the drain mechanism rod and unscrew the plastic (or metal) washer nut. Under the lid inside the tank there is a float mechanism for collecting water and a lever-valve drain mechanism. The valve system of such a mechanism is usually attached to the tank through two additional holes in the bottom.
The tank itself of the old design is removed in the same way as is done with new models. It is necessary to unscrew the two bolted connections in the area of the bottom of the tank. The passage area for water from the storage tank to the bowl on old toilets is isolated with an ellipsoidal sealing ring. Often in older systems there are overflow tubes secured at the bottom of the tank with a plastic nut.
Some models of flush tanks are equipped with mounting screws with screwdriver heads. But it is recommended to traditionally disconnect such fasteners by unscrewing the nuts from below. This prevents the gaskets from becoming deformed. The screwdriver is used only to lock the screw from turning.
To dismantle the lever-valve drain mechanism, you will need to unscrew two more bolted connections that secure the drain mechanism's rocker arm. The water supply module is dismantled by unscrewing just one nut from the outside of the tank body.
First, you need to disconnect the water supply hose from the storage valve. It should be noted: there are models of tanks with water release levers embedded in the side wall. On such devices, the toilet lid is not secured at all - it simply lies, resting on the walls of the body.
Malfunctions that force you to disassemble the tank
Typical malfunctions that force disassembly are often:
- leakage during flushing in the area of the gasket at the connection between the tank and the toilet bowl;
- leakage in the places where the storage tank is attached to the toilet shelf;
- dysfunction of the drain mechanism;
- dysfunction of the water collection mechanism.
Leakage problems are often eliminated by simply tightening the fastening nuts. The functionality of the drain and set mechanisms may be impaired due to insufficient water pressure in the centralized system. Therefore, before you start disassembling, you should make sure that there are no other possibilities for eliminating defects.
Defects in functional fittings
If there is an involuntary flow of water from the reservoir into the toilet bowl, most likely the lock ring is defective. It needs to be replaced. The same effect can be observed when the closing mode of the mechanism does not work. A possible reason is that the control button is stuck.
Insufficient filling of the container with water indicates some defects in the dial module. Often the cause is the displacement of the float on the limit bar or its contact with other parts of the mechanism (the wall of the tank). A complete lack of drainage is possible due to a non-working dial module or drainage mechanism.
Reasons for removing the toilet lid
There is only one reason: this is a “strike” of mechanisms designed for two tasks - for collecting and draining water. First, the container is filled to a certain level, after which the flow stops due to the operation of the shut-off valve. When you press the button, the lever is activated, raising the locking device. Therefore, water again begins to flow into the empty container.
The relative simplicity of designs does not mean the absence of problems. The reason is the wear and tear of plastic and rubber elements, which do not have a long service life in an aquatic environment, so at some point they fail. Reasons requiring the intervention of a specialist or owners:
- inoperative water drain;
- liquid flowing onto the floor from under the tank;
- continuous flow of water into the toilet bowl;
- There is not enough water in the container; this indicates that the device is not adjusted correctly.
Problems with the water level or breakdown of any of the consumables require adjustment or prompt replacement of the failed part. Sometimes it makes sense to purchase a new set of fittings and replace the entire assembly, rather than a separate part of it. As a rule, such sets do not have a ruinous price, and the new mechanism almost completely guarantees the absence of problems. At least in the near future.
Features of covers of foreign models
If you have an Ifo toilet, you will need a flat-head screwdriver to remove the lid. Under the button you will find a nut. Unscrew it with a socket wrench and remove a small container that looks like a cup. It is held in place by pushers, and if you press them at the same time, the cup rises up. Once it is at the top, carefully remove the lid and set it aside.
The cover of the model from the Ika company is removed as follows: first, unscrew two buttons, then the screw. You will need a Phillips screwdriver for this. After removing the glass, the lid can be easily removed. If you bought a “solid” toilet from the Gustavsberg company, you need to press the button inward, find the groove and pull out the structure using a flat-head screwdriver. At the bottom you will find a plastic nut that also needs to be unscrewed.
Installed toilet cisterns
Installations - special designs of flush cisterns. Installation models are designed in such a way that when disassembling the tank, you have to partially demolish the wall. The cover is removed approximately according to the following algorithm:
- lightly press the button below;
- remove it by lifting it from bottom to top;
- unscrew the screws using a Phillips screwdriver;
- carefully remove the fasteners;
- remove the pushers from the plastic;
- remove the brackets;
- press out the upper latches;
- remove the partition;
- turn off the water in the tank by moving the tap all the way;
- remove the valve mechanism and rocker;
- bend the petals and remove the lower clamp.
The flush valve does not need to be removed. When disassembling, only the upper part is removed. To do this, turn it counterclockwise. The upper part of the valve is set aside separately. The drain mechanism has become smaller and can now be easily removed from the tank.
Number of blocks: 13 | Total number of characters: 21312 Number of donors used: 3 Information on each donor:
Source