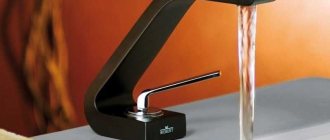
Faucets are used not only in kitchens, but also in bathrooms and toilet rooms. If previously the difference was that kitchen units did not have a shower, today there are faucets with showers for the kitchen. They not only make washing dishes easier, but also solve problems with collecting water in large containers that cannot be placed in the sink. It is impossible to repair faucets without knowledge of their structure. Such actions most often cause complete breakdown of the faucets, when instead of cheap repairs you will have to make an expensive replacement.
But this is not all the problems. There are situations when small leaks, after improper intervention, turn into a large leak that threatens to flood the apartment. You should know that quite often cheap Chinese crafts are used for central taps. They gradually oxidize, which greatly complicates the opening/closing process. The faucet body is made of silumin alloy, which can crack even with relatively little effort, and the problem from your personal becomes a general one. In this regard, we strongly advise you to study the technical features of the structure of mixers and only then proceed with repairs.
Do-it-yourself single-lever kitchen faucet repair
Types of single lever faucets
There are two types of faucets on the market: ball and cartridge. Some of them have become widespread, others are less common. The reason is low durability.
Table. Types of single lever mixers
| Mixer type | Design differences and main performance characteristics |
Cartridge | Very reliable modern devices for mixing and supplying water with one control lever. There are options for making cartridges from plastic and ceramics, the latter are characterized by increased strength and reliability. A cartridge is a set of special plates, seals and rotating elements assembled in one housing. All parts are driven by a lever. Not only the percentage ratio of warm and hot water, but also the overall flow force depends on its position. The cartridge at the bottom has three holes with rubber seals. One hole is the outlet and is connected to the spout, the other two are connected to the cold and hot water pipelines. If you wish, you can disassemble the cartridges yourself, but it is almost impossible to buy parts for them. True, some of the worn-out ones can be restored, although this will require a lot of time and special knowledge. Such a cartridge will work much less time than a new one. In practice, ordinary repairs most often end with the replacement of the element. |
Ball | Inside the faucet is a metal or plastic ball with holes to direct water into the spout of the faucet. Two holes for entry and one for exit. Adjustment is carried out by changing the cross-section of the holes. There is a rule in mechanics: the fewer parts, the more reliable the mechanism. A ball valve does not meet this rule. Despite the fact that it has much fewer components than a cartridge one, the reliability of the device is much lower. The fact is that the surface of the ball has a very complex geometry; seals with it cannot provide adequate sealing reliability. |
Each mixer must have instructions with a drawing of all components. Before disassembling, you need to carefully study it, understand the principle of fastening the parts, the order of their assembly and disassembly. Most often, repairs will require an inspection of the condition of the internal parts, and for this they will have to be removed from the case.
Single lever mixer device
Prices for different types of kitchen faucets
Kitchen faucets
How the device works
The device consists of two main parts in the form of a metal body and a cartridge. Body of monolithic construction. The cartridge has two types of locking devices: a ball or two disks. These elements regulate the flow of water and its temperature.
Attention! The mixer has a minimum of parts. The cartridge must be replaced periodically; other structural elements are permanent; if necessary, they can also be replaced.
Inside the case there is a cartridge fastened with a nut, which is hidden behind a cap designed for beauty. The cartridge is controlled by a joystick located on its lever. There are no complex parts in the device, so there are no difficult problems. Inside the mixer there can be a different type of control device in the form of disks or a ball.
Disc mixer
The device operates using a special flask - a cartridge, which acts as a locking and adjustment mechanism. The cartridge is located inside the mixer. A ceramic mechanism is considered to be of high quality; in cheap devices it is made of plastic.
Attention! Two disks in the cartridge act as a shutter in the disk mixer; they are equipped with holes for water outlet. When the discs are aligned, the fluid flow stops.
The cartridge mixer is easy to operate; the temperature and pressure of the liquid can be adjusted with a simple movement.
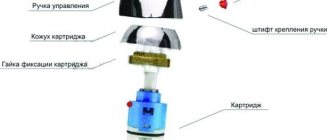
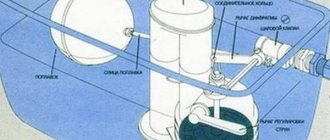
The cartridge mixer contains the following elements:
- - spout, in other words gander,
- -switch with screw for fixing,
- - lock nut,
- -cartridge (pictured on the right),
- - housing for a cartridge device,
- -elements to make the structure tight: gaskets, nuts with studs.
The discs are made of ceramic material or steel. The upper disk has protrusions for holes for the lower one. If the discs are completely aligned, a hermetically sealed joint between the two parts is formed. If the alignment is not complete, water flows from the gander. A strong jet is formed when the disks are completely misaligned. For the mixer to work properly, the plates must fit snugly against each other. Dirty water with solid suspensions quickly damage the shutter mechanism. In some cases, a coarse particle filter is installed at the factory, which is located in front of the mixer inlet.
Attention! To extend the service life of the mixer, you should install a filter on the water pipeline yourself.
Features of the ball mixer
In the center of the mixer there is a ball that regulates the flow of water and its temperature. The element is made of metal so that it is hollow inside. The outside of the ball should be very smooth and have holes for supplying hot, cold and mixed water. A rod is attached to the part, its other end is connected to the control handle of the crane. By pressing the handle, the ball starts to move. Thus, water flows or stops flowing from the tap, while its temperature is regulated.
Operating the mechanism is even more convenient; all structural elements are smooth, fit together in shape, and the lever moves smoothly. The ball is placed in a special sleeve cartridge, which can be removed during repair or replacement. The ball type of mixer requires purification of water from impurities. If dirt particles get into the cracks between the ball element and the seats that hold it, leaks will form. You can prevent problems by installing cleaning filters.
Common problems with faucets
Faucets have quite a few points with seals, and a leak can appear in each of them. In addition, associated rubbing parts wear out, corrosion destroys threaded connections, etc. Due to poor water quality, entire components quickly fail. You can find out exactly the cause of a leak only after a thorough inspection of the condition of all parts. But there are a few common leaks.
Leak at the base of the faucet
Water on the floor under the faucet
This is a current problem that has several causes.
- Violations of the tightness of the siphon, pipe connection points, technological plug, etc. Violations have nothing to do with the mixer, they are simply eliminated; any beginner can do the work.
- Leaks at the points where flexible hoses are connected to the mixer body. It can be caused by three reasons: damage to the rubber seal, loosening of the fastening, or a violation of the tightness of the hose at the point where the threaded fitting is connected. For repairs, the mixer does not need to be removed; just unscrew the hoses and perform an accurate diagnosis.
Leaks may be caused by a leak in the hose.
Water sprays from the spout in all directions
Most often, such problems appear after the mesh on the nose is blocked. It has very small holes, which over time are completely closed by hard calcium deposits. The seals cannot withstand the increased pressure, and leaks appear under the threads. There is no need to disassemble the entire mixer; unscrew and clean only the mesh.
A clogged aerator causes water to splash
Cleaning the faucet aerator
Constantly leaks from under the lever or spout
The most complex problem can have many variations. To repair, you need to completely disassemble the mixer, determine the cause of the leak and fix it.
To fix the problem, you need to completely disassemble the mixer
As you can see, most problems with the mixer can be fixed without dismantling it and completely disassembling it. Take your time, carefully study the cause of the problems.
Important. When performing any repair work on water supply devices, do not forget to turn off the central tap. If you have more modern wiring and the ability to turn off individual rooms or household appliances, then block only them.
Nuances of having a cartridge
Typically, the problem is that the faucet continues to flow even when the handle is fully lowered, water is pouring over the top of the faucet, the lever is moved too hard, or the mixing quality is poor.
Usually these problems can be solved by replacing the cartridge. It's not that difficult to do it yourself:
- First, carefully lift and remove the plug above the retaining screw, then loosen the screw. This must be done carefully, after spraying it with WD40 so as not to tear off the splines.
- Loosen the screw, remove the handle from the cartridge lever and unscrew the decorative cap.
- All you have to do is unscrew the fixing nut counterclockwise and the cartridge itself will open. It is easy to pull out without using any tools. It's better to take it with you to the store to buy exactly the same one.
Step-by-step instructions for repairing a mixer
It must be borne in mind that quite often the repair cannot be carried out immediately; you will have to interrupt the repair work to go to the store to buy spare parts. It is impossible to prepare them in advance; manufacturers produce a large number of different types of cartridges. There are no fundamental differences between them, but due to the slight difference in size they are not interchangeable. This is done deliberately. Due to such features, companies encourage consumers not to repair their devices, but to buy new ones. This makes it much more profitable for companies from an economic point of view.
Cartridges have certain differences from each other
Let's look at the instructions for eliminating one of the most unpleasant leaks - from under the swing arm. Such leaks not only leave marks on the surface of the case, which greatly worsens its appearance, but also provoke big troubles. Water finds cracks where the faucet is attached to the sink and ends up on the floor. Leaks go unnoticed for a long time, resulting in critical damage to floor coverings. Unless, of course, they are afraid of moisture, and are not made of ceramic tiles or other materials that are impervious to water.
Step 1 . Remove the plug on the handle; it closes the hole and indicates the direction of movement of the handle to increase the supply of cold and hot water. Remember its position, otherwise the usual adjustment will have the opposite effect.
The first thing to remove is the plug on the mixer.
Step 2 . Unscrew the handle fixing bolt. Its head is for a hex key; if you don’t have one, you can use small screwdrivers from a special set. The hole width is approximately 3 mm. The bolt unscrews easily, no great effort is needed.
Unscrew the screw holding the handle
Practical advice. Loosen the lock by only 1–1.5 turns, this is enough to remove the lever.
Do not unscrew it completely; two problems may appear.
- A small bolt will fall to the floor, finding it later is a big problem. And this is provided that the floor does not have cracks into which hardware can fall.
- The thread for the retainer is located in an inconvenient place. Screwing it back will take time and nerves.
A small screw can easily fall inside the case
Step 3 . Unscrew the upper decorative cap of the housing. This is done by hand, if it is difficult for you, then place a dry cloth, it increases the coefficient of friction and the process is greatly facilitated.
Remove the upper part of the body
Step 4 . Try to tighten the clamping nut by hand; it is made of brass and yellow in color. Leaks may occur because the rubber O-rings are not tight enough or have become loose. If the nut turns easily, tighten it with a wrench and check the tightness. Everything is normal, there are no leaks - put the mixer back together. If this is not the case, then you need to completely unscrew the nut.
Use an adjustable wrench to remove the clamping nut.
Prices for adjustable wrench
adjustable wrench
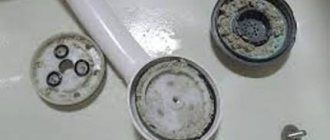
Step 5 . Remove and inspect the cartridge. More often, its leaks appear due to cracking of the housing; replacement is necessary to eliminate the problem. The case cracks for two reasons. The first is very poor plastic made from low-quality recycled materials, which cracks at the slightest load. The second is the inexperience of the plumber: the master overdid it and clamped the cartridge very tightly, the loads are so great that no plastic can withstand it.
The cartridge must be carefully inspected for damage to the housing.
This information will be useful to you when purchasing and installing a new element.
Step 6 . Go to a specialty store for a new element. In order not to make a mistake when choosing, be sure to take the old cartridge with you, carefully compare all the parameters: height, diameter, placement of holes for cold and hot water, length of the rod for the swing arm, dimensions of the side of the square, location of the recess for the fastening bolt. There is one more nuance - at the bottom of the cartridge there are special protrusions for fixing it in a given position in the body. Compare these elements too, they may have different locations.
The new cartridge must be identical in shape and size to the old one
Important. Inspect the cartridge very carefully in the store. If you find small depressions and curvatures on the surface, this indicates uneven shrinkage of the plastic during cooling. Such negative changes occur only with low-quality materials.
Step 7 . Place the new part into the mixer body, check that its position is correct; the protrusions on the bottom should fit into the technological holes in the mixer body. To check, scroll the part a little, it should lock into place.
Insert a new cartridge into the mixer body
Step 8 . Screw the brass clamping nut back on, remembering the above recommendations.
Reinstall the clamping nut
Step 9 . Open the water supply and check the results of the repair. Wait a little, open/close the mixer several times.
Checking the operation of the mixer
If everything is normal, screw on the decorative cover, put on and secure the handle. At the last step, insert the colored plug according to the location of the hot and cold water.
Video - Do-it-yourself single-lever kitchen faucet repair
Now you know the design principle and technology for repairing kitchen sink faucets; this is a very important attribute for improving the convenience of cooking. But it is also important to have optimal air parameters in the kitchen, and there are several professional secrets here. Having the skills to perform various repair work, you can take on the installation of a hood. On the pages of our website there are detailed step-by-step instructions on how to do this.
Replacing the crane axle box
The faucet is a regulating element in two-valve mixers. Sometimes during repairs it is enough to install individual new parts, in other cases it is necessary to replace the entire assembly. This is determined during the repair. First, you need to unscrew or remove the protective polymer cap, and also remove the hardware and flywheel (“lamb”). This frees up the crane axlebox for inspection. Repair features depend on the type of device.
Axle box with rubber latch . Older type of mechanism. It is characterized by several malfunctions:
- Gasket wear. In this case, water will constantly drip from the tap. Wear occurs due to natural causes or due to the presence of solid inclusions in the flow. To solve the problem, just replace the gasket. To do this, you need to remove the locking screw, install a new element and screw the hardware back.
Important! This problem is also typical for axle box valves with a ceramic valve.
- Worn rubber sealing ring. Leads to leaks at the junction of the valve axle box and the housing under strong pressure. To eliminate the problem, the ring must be replaced.
- Wear of internal seals. Leaks appear at the flywheel. Jamming is also observed during its operation. In this case, it is advisable to completely replace the crane axle box. Repairing the element is impossible or impractical.
Axlebox with ceramic valve . Special repair kits are offered for sale for repairs. When choosing them, you should take into account the existing model. The most likely malfunctions include:
- deformation or wear of the silicone gasket. Leads to constant flow of water into the spout. To solve the problem, it is enough to install a new gasket;
- production of fluoroplastic plate. This defect is easy to check. To do this, press the axlebox rod from above. If the leakage stops, the fluoroplastic ring should be urgently replaced;
- wear of adjacent ceramic plates. Occurs due to constant abrasive effects of heavily polluted water. In this case, the tap operates unevenly; it does not always hold the flow. In case of such malfunctions, you should find a repair kit with ceramic plates or completely replace the axlebox;
- reducing the thickness of the O-rings on the rod. When worn, water leaks into the flywheel area. To eliminate this, new elements must be installed.
Do-it-yourself kitchen sink faucet repair
Repairing kitchen faucets yourself is a fairly simple task if you have the right tools and minimal knowledge of plumbing equipment. The task is greatly simplified when single-lever devices break down - to restore functionality, you simply need to replace the damaged cartridge.
Required Tools
To disassemble a faucet with two handles or change the cartridge in a single-lever model, you need the following tools:
- Adjustable plumbing wrench. With its help, you can dismantle a two-valve type mixer by unscrewing the decorative trim and the nut that secures the cartridge; the wrench is the main tool of any plumber.
- Hex wrench or screwdriver. The tool is necessary when disassembling the valve to remove the handles and heads of the mixers, which can be screwed to the locking axle boxes with hex or Phillips screws.
- Sharp knife. May be needed for work on removing plugs, adjusting rubber seals, cutting flax tow or synthetic sealing tape.
Plumbing repair tools and components
Before you repair a kitchen faucet, you need to purchase the necessary parts (cartridge, rubber seal) and auxiliary sealing materials in the form of silicone grease and linen rags. It is useful to have modern, highly effective household chemicals on hand to combat limescale, which makes dismantling plumbing parts difficult.
Preparatory work
When solving the problem of how to fix a leaking faucet in the kitchen yourself, you should make the necessary preparations before performing the work. When complex repairs are coming up or you doubt your ability to cope with the task, you can make a small supply of water.
Faucet repair involves shutting off the common water supply in the apartment, so before carrying out work you should make sure that closing the common water supply valves completely eliminates leaks.
Repair and replacement: gander
It is also necessary to replace the rubber gaskets on the gander - this will eliminate the problem of leakage from under the gander in a two-valve tap:
- Repairing will not be difficult if the gaskets fit into special grooves.
- It happens that a bushing is screwed into the gander, into which rubber rings are installed. In this case, unscrew the bushing with a hexagon, change the rubber bands and put everything back together in the reverse order, not forgetting to tighten the bushing thoroughly with the hexagon, otherwise the leak will not stop.
To replace the gander itself, simply unscrew it and replace it with a new one. In the single-lever model, the gander is installed in the housing, so it cannot be removed. The entire mixer must be replaced.