Greetings, my dear readers.
The topic of this article: “ Installation of a wall-hung toilet .”
When purchasing an apartment in a new building or carrying out a major renovation of your home, sooner or later the question arises about choosing new plumbing fixtures.
Scientific and technological progress fills modern human life with various techniques and equipment. An indispensable item in the toilet room, the toilet bowl is also being modernized. The new look and design of the equipment will fit perfectly into any interior. Therefore, consumers increasingly prefer a wall-mounted toilet.
Design and types of wall-hung toilets
Despite the dramatic change in the appearance of the toilet, the item has not undergone innovation in its basic functionality, but the water supply and drainage systems have been thoroughly modernized.
The plumbing item is made in such a way that during installation all elements are hidden, with the exception of the toilet bowl. The drain tank is installed in the wall, and the liquid drain button goes outside. This installation is called hidden installation.
Wall-hung toilets are divided into two types according to the method of fastening:
- Block installation
If you plan to install the toilet on a load-bearing wall, then installation of the equipment can be done using a block installation. To do this you will need metal plates and anchor bolts. After installation, communications and the drain barrel are hidden behind a false wall made of plasterboard.
- Frame installation
To install a wall-hung toilet with your own hands on a non-load-bearing wall made of plasterboard or other material, the installation is carried out using a metal frame. Steel pipes welded together are attached to the wall and floor. The main load of the frame is determined on the floor. This type of fastening is designed for loads up to 400 kg.
Wall hung toilets vary in size:
- small (length 50 - 54 cm);
- medium (length 54 - 60 cm);
- large (length up to 70 cm).
The width, as a rule, varies from 30 to 40 cm. The best option for most consumers is a medium toilet. Small and large sizes are less popular, but are also in demand.
Manufacturers present a range of more expensive models with additional functions.
- The anti-splash system provides a certain protrusion in the bowl design - a shelf that prevents splashes during operation.
- The micro-lift system , thanks to the smooth lowering of the lid, prevents impacts on the toilet body and avoids any damage to the integrity of the device.
- The reverse drain helps maintain cleanliness and hygiene, flushing water under the rim, washing away unwanted dirt.
- Anti-dirt coating is an additional layer on the inside of the bowl that prevents the formation of yellow spots and rust, making the cleaning process easier.
- The rimless design , without any bends, eliminates hard-to-reach places where germs hide and allows for easy cleaning.
- The drainage system completely cleans the bowl using two sprayers located on the sides, through which water flows for flushing.
Design Features
Before proceeding directly with installation, you should understand the design. Installing a wall-hung toilet will become much easier when you know its structure and operating principle. It will immediately become clear how to act correctly and what is necessary.
The main feature of the product is that only the bowl remains visible.
The basis of the entire structure is a durable metal frame. The visible part is directly attached to it. It is from this element that all installation work starts. The frame must be firmly attached to the wall and firmly placed on the floor. As a result, it should be able to support an adult without any problems. Based on this, we can say that it will not be possible to fix the frame to a weak wall.
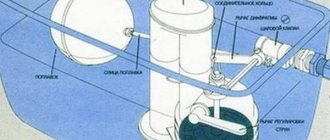
The frame has an element that allows you to change the height of the bowl, which is secured using special pins. They are the main fasteners when installing a toilet installation.
A common option is to attach two installations at once - a toilet and a bidet.
The second element is a plastic drain tank. He is also hiding in the wall. It has a specific shape, because must fit in limited space. The tank is also installed in a metal frame and insulated with a special material that prevents the formation of condensation. There is a cutout on the front wall of the tank for mounting a drain button. Modern models, including floor-mounted ones, have a dosed water discharge - 3 or 6 liters.
The next element is the toilet bowl. The only part that is visible and in active use. It has a traditional shape, but some designer models have original configurations.
The delivery set contains all the necessary parts and accessories. The attached instructions can also show the entire installation sequence of the toilet installation.
Installation of a wall-hung toilet on an installation
An installation is a structure on which a wall-mounted toilet is installed. Performs the main function of holding the bowl, water supplies and, in some models, holds the cistern. It can be purchased either complete with the toilet or separately.
Manufacturers present installation options with bowl height adjustment, which allows the consumer to individually install the toilet to the desired level.
The installation system is divided into several types:
- standard: width 50 cm, height 112, depth 12 cm. Used in rooms where the dimensions of the structure allow the installation of the system
- low: if installation is planned in a place of limited height, for example under a window sill, the installation height is up to 82 cm
- double-sided: provides for installation of the toilet bowl on both sides
- corner: the frame is installed in the corner of the room
- linear: used when installing several plumbing fixtures, such as a toilet, bidet
To complete the installation of a wall-hung toilet, you will need a set of tools:
- hammer drill or hammer drill
- drill for concrete and brick with pobedit coating
- screwdriver with bits
- construction level or laser axis - builder
- anchor bolts
After selecting and purchasing the model you like, you should open the packaging and check the toilet for integrity, absence of cracks and chips, as well as completeness. The box should contain assembly instructions and a product passport, which specifies all the elements included in the kit.
If necessary, by turning off the water supply tap, dismantling work is carried out to remove the old toilet.
Before proceeding with the installation, it is necessary to check whether all communications (sewer pipe, water supply hose) are connected for further connection.
- Step 1
The first step is to install the frame. The location for mounting the frame is determined, necessarily on a load-bearing wall. It is necessary to install the frame structure efficiently, since the reliability of all equipment during further operation depends on this. Using a laser axle builder or a building level, horizontal and vertical lines are determined for clear installation of the frame.
Markers are made on the wall with a marker through the holes in the frame. Using a perforator or drill in impact mode, holes are drilled at the fastening site. The steel frame is installed and secured with anchor bolts under strict level control.
- Step 2
The next step is work on connecting to the water supply. The tank valve must be closed during all installation work.
- Step 3
The installation is then connected to the sewer drain. There are several connection options, the most common is using a special corrugation for connecting toilets.
- Step 4
When the installation is installed, the next step is decorative design - hiding communications by creating a false wall made of plasterboard or other material, followed by decoration with tiles.
- Step 5
When the wall is completely ready, the toilet bowl is hung on special studs. After complete connection, the water supply tap opens. A visual inspection is carried out for leaks.
What is installation
Installation of a wall-hung toilet is a set of a tank, flush control, pipes and a wall fixation system. They come in two types, block and frame.
Block installation . The name already shows that the entire system is divided into blocks and not connected together. That is, the cistern is separately integrated into the wall and the toilet is hung separately.
A special feature of the block installation is the need for fixation to the main wall. This is a clear disadvantage, but a positive quality is the smaller dimensions of the structure. In particular, the depth of the block installation varies from 10 to 15 cm.
Frame installation. This is a full-fledged structure made of a metal frame, with a tank and communications fixed on it. It itself can be fixed to both the wall and the floor. If desired, it can even be installed in the center of the room. There are also frame installations for installation in the corners of the room.
See also: Choosing a comfortable and reliable shower cabin
It is larger in size. The depth of the structure is from 15 to 30 cm. Height is up to 1.4 m. Width is 50-60 cm.
When choosing an installation, you need to take into account the size of a particular room and the presence of main walls in it.
For an apartment, block installation seems more preferable. Because the size of the toilet is small, and if desired, you can place the tank not at the back, but on the side of the toilet.
In any case, a wall-hung toilet must be purchased with installation. Otherwise, the whole zest of this plumbing device is reduced to “no”.
Installation of a toilet without installation on a concrete base
There is another option for installing a wall-hung toilet that does not involve installation. In this case, fastening is carried out on a concrete base. This method is a more budget-friendly option, but requires additional work to arrange the necessary foundation.
- Step 1
Wooden formwork is assembled. On the front part, it is necessary to mark in advance and drill the places where the bowl is attached, through which a mark is applied to the wall through the formwork. Next, holes are drilled in the wall into which a chemical anchor is poured. This action will allow you to fasten the metal pins to concrete and brick by the force of cohesion and adhesion.
- Step 2
Through the formwork, pins of the required length are inserted into the wall with a chemical anchor and pressed with nuts to the wooden formwork. On the front side it is necessary to glue a small piece of foam plastic, which will later be removed, and the recess remaining after it will serve as a place for the coupling.
- Step 3
Concrete solution (about 40 liters) is poured into the formwork cavity and left until completely dry (about a week). After hardening, the wooden panels are removed, leaving a monolithic base with spokes for hanging the toilet bowl. The foam is removed and a coupling is installed in the recess connecting the pipe and the sewer.
The drain barrel is installed, the wall is decorated with decorative trim and the system is checked for functionality.
Preparation for installation
Before carrying out the main work, preparation should be carried out. It includes the purchase of tools and materials that will be needed for installation. Markings are made on the floor and walls, taking into account recommendations for placing such plumbing fixtures in the room.
Necessary tool
To install the installation system and attach the bowl to it, you should prepare the following tools:
- screwdrivers and adjustable wrenches;
- drill or hammer drill with a set of drills;
- hammer and pliers;
- bolts and dowels;
- level and tape measure.
Materials
Most of the materials needed for installation are included with the wall-hung toilet. However, before you begin installation, you should carefully study the instructions for the plumbing fixtures and accessories. If necessary, you will have to purchase some materials for installation.
Mandatory elements are a drain outlet and an angle valve. Teflon tape is used for sealing, and pins are used to secure the bowl. The plumbing system is connected to the tank using plastic tubes. Moisture-resistant drywall helps close the tank and installation.
What to consider
Workers must take into account the following features of installing a wall-mounted toilet:
- Availability of parts included. It is advisable that the toilet be sold with a full set of fasteners and adapters. This will avoid mismatched holes and sizes.
- Accuracy of niche marking. Errors in its application will lead to problems during installation.
- Location of communications. If there is a pipe in the path of the studs, it is recommended to bend them - although some manufacturers recommend choosing a different fastener.
Sizing and marking
The process of determining the size of the system and marking the walls includes the following steps:
- Drawing a centerline that passes through the center of the system.
- Measuring the clearance between the wall and the main structure - this distance should not be less than 15 mm.
- Making marks for the placement of the cistern.
- Marking points for fastening on the floor and walls.
How much space do you need?
To place a toilet in a toilet or bathroom, you will need a certain space. It is determined taking into account the following dimensions and requirements:
- the toilet itself is about 400 mm long and 550 mm wide;
- installation behind the toilet takes up to 600 mm in width and up to 300 mm in length;
- for ease of use of the toilet, you should leave at least 200 mm of space on each side and from 600 to 800 mm in front of the plumbing.
This means that the width of the room in which such plumbing is located must be at least 80-90 cm, length - from 140 cm. Most bathrooms, including separate toilets, meet these requirements.
Advantages and disadvantages of wall-hung toilets
Wall-hung toilets are gaining popularity due to their main advantages over floor-standing ones:
non-standard appearance allows you to create an exclusive interior
Thanks to its design features it saves space
Hidden installation of all communication pipes and hoses will give the bathroom a more aesthetic appearance
free access to the floor covering will facilitate cleaning work
Despite the large number of positive characteristics, the wall-hung toilet has some disadvantages:
higher price for the suspension system range
quite complex installation, requiring skills in this work
hidden communications create difficult access during maintenance