Features of the cistern
Two types of flush mechanisms can be installed in toilet tanks:
- Button
: water drains down when you press a button, of which two can be installed - this allows you to empty the tank only halfway for more economical water consumption.Toilet flush mechanism with button
from 950 rub.
Go to catalog - Rod
. The water drains after the rod is raised - this design is more typical for toilets of old Soviet models.Column for the toilet cistern of the old style
630 rub.
More details
During normal operation of the mechanism, water immediately enters the bowl, and then its flow stops completely. If breakdowns occur, the water either overflows or constantly drains down. This leads to constant noise, excessive waste and creates a risk of flooding in the toilet room.
If your toilet tank won't hold water, you need to identify the cause of the problem and find a way to fix it. Most problems can be resolved quickly enough on your own without calling a specialist. To prevent breakdowns, it is recommended to periodically clean the fittings - prevention will rid it of limescale and other contaminants. Which can lead to accelerated wear in the future.
We recommend reading our article - Toilet cistern fittings: purpose, types, design features, operating principle, main faults and repair methods.
Water flows into the toilet after flushing
The problem associated with water leakage after flushing occurs both in old-style systems with cast-iron wall-mounted tanks and in new “compact” systems. The reason for this phenomenon is the improper operation of the flushing mechanism.
When you press a key or button, water is discharged and the drain hole opens as wide as possible. At this time, the locking and adjusting mechanisms are in a suspended state - when the button is pressed, the valve or weight with the gasket cannot lower, but as soon as the button is released, the mechanism returns to the lowest position and closes the drain neck.
A sudden release of the button causes the locking mechanism to move along the guides under the influence of the water flow. At the same time, the deterioration of plastic parts becomes more and more visible, this leads to distortions and “freezing” of the mechanism itself. The result of such a defect is the following: the drain neck is skewed and incompletely closed; the water entering the tank is simply immediately drained into the toilet.
The method of troubleshooting is to completely replace the drain mechanism and then adjust its operation:
One of the additional causes of the problem may be increased water hardness and the natural aging processes of plastic.
Installation of flush fittings
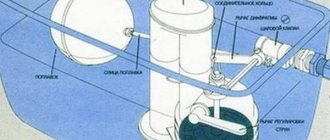
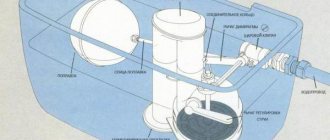
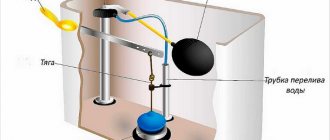
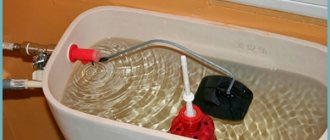
The body of the tank is made of sanitary ware or special plastic. Unlike traditional cast iron, these materials do not corrode and can last a very long time. Any toilet flush mechanism consists of three basic components:
- An inlet valve
connected to a float. It is responsible for controlling the water level in the tank during collection. As soon as the float rises to the desired height, the valve stops the flow of liquid. - Locking mechanism
ensuring water drainage. In Soviet plumbing, a lever or chain was installed for this; they were connected to a bulb placed at the bottom of the tank. New models have a push-button mechanism, and sealing gaskets are provided to protect against water leakage. - Overflow system
. Its purpose is to protect against flooding of the room if for some reason the inlet valve stops working. The shut-off valve ensures that water drains into the bowl if its level exceeds a certain level.
To ensure timely operation of the intake valve, several types of floats are used. Modern toilet models use a hollow rubber float with air inside. Old plumbing used a glass-shaped plastic float. Thanks to the air filling, it begins to float as soon as the water reaches a certain level.
If there is a leak in the tank, do not panic. Most problems can be resolved on your own. To determine the cause of the problem, remove the toilet tank lid and examine the condition of the mechanism.
Causes of toilet cistern leaking
If the toilet does not hold water, it is necessary to quickly identify and eliminate the true cause of the problem. Turn off the shut-off valve on the pipe that supplies water to the tank, then press the button or lift the lever to release the tank for inspection. Unscrew the button or lever, then lift the reservoir lid to inspect the mechanism. The double button is a little more difficult to remove: to do this, you need to press both halves in sequence, and then unscrew the button from right to left. You can list several of the most common breakdowns and DIY repair options.
Stop valve failure
First of all, check the condition of the filling valve. Lift the float lever and open the water. If it is poured into the container, it means that the mechanism is not fulfilling its task and cannot contain the flow. This problem can occur due to the valve being clogged with debris, the rubber gasket in the toilet tank wearing out, or the valve itself being damaged. To resolve the problem you need to do the following:
- Dismantle the valve and free it from accumulated contaminants. It becomes clogged with rust, silt, sand, and lime deposits due to the poor quality of tap water.
- Check the condition of the rubber gasket and replace it if necessary.
- Assemble the components of the mechanism, install it in the tank and recheck.
If the problem is not solved, the valve will have to be replaced completely. This will completely eliminate the leak and avoid the risk of reoccurring problems.
Toilet shut off valve
from 260 rub.
Go to catalog
The problem may also occur due to depressurization or improper operation of the float. The float mechanism may become loose over time, causing it to fail to operate on time. If the float is depressurized, water gets inside and it stops floating. If such damage is detected, the faulty float must be replaced.
Malfunction of the drain column membrane
Another common malfunction is related to a malfunction of the drain column membrane. It can become unusable due to constant contact with hard water. It cannot be repaired, but only replaced completely. To troubleshoot the problem, you need to carry out the following manipulations:
- Empty the tank of water and turn off its supply using the tap.
- Using a wrench, unscrew the nuts that secure the drain hose.
- Disconnect the internal drain fitting, which is located at the bottom of the container.
- Replace the membrane or the entire column. Install new parts and tighten the nuts to their original position.
A complete replacement is a more expensive, but also more reliable method; it will guarantee long-term trouble-free operation of the tank.
Drain system breakdowns
If the overflow valve does not work, this will ultimately lead to flooding of the room, as water will flow into the tank without stopping. To check the functionality, turn on the flush and press the valve at the same time. If water does not flow into the tank, then it is necessary to tighten the loose fastening - the fixing nuts may become loose over time.
If this does not solve the problem, the valve must be sealed. To do this, unscrew the nuts and wind sealing material onto the valve threads.
Damage to the tank body
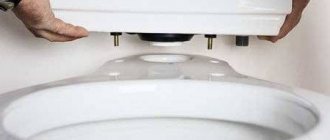
Quite often, a leak occurs at the junction of the container and the bowl. The connecting cuff wears out over time, and eventually it ceases to perform its functions. For diagnostics, you can use a simple paper towel: apply it to the fastening point, and you will immediately see exactly where the leak occurred.
To temporarily solve the problem, you can use construction tape to seal the sealing gasket. You can also use a silicone-based sealant; it is applied to a previously dried surface, and after hardening it provides a seal. For more reliable troubleshooting, it is necessary to disconnect the tank and replace the connecting collar in the hole. A leak can also occur due to wear of the corrugation; it must be completely replaced with a new one.
Sometimes breakdowns occur as a result of incorrect installation of the tank; to fix the problem, it needs to be adjusted. Mechanical damage to the tank is possible: after a strong impact, cracks may appear on it. It is safer to replace it entirely, but as a temporary measure, you can repair cracks using ceramic glue.
In some cases, drops of water under the tank are not the result of a water leak, but due to the accumulation of condensation. The tank may fog up due to high humidity in the bathroom and non-functional ventilation; it is necessary to find and eliminate the cause of the problem.
Causes of water leakage in a small stream
Tank is faulty:
- Overflow. The water supply should stop at a certain time (when the float is raised 2.5 cm below the pipe), but there are a number of reasons why this does not happen: the gasket in the tap is deformed; the gasket is not pressed well; the pin is rusted or deteriorated; The valve inside the tank is cracked.
- The lever moved out of place and the toilet began to leak.
- A rusty steel bolt or a cracked plastic bolt.
- Hardening of the rubber of the pear (when the rod is raised, the pear also rises; if the rubber hardens, the pear does not take the desired shape and does not sit correctly in place).
- If the plumbing is new, then a leak is possible due to improper assembly.
- Malfunction in the cuff (water flows between the tank and the bowl).
- Weak fastening of bolts and nuts (connection of the tank to the toilet shelf).
Also read our article, which will tell you in detail how to clean rust. A malfunction of the drain bowl is a rare occurrence; the main reason for this can be attributed to improper fastening of the toilet to the floor or wall.
Conclusions and useful tips on the topic
Restoring the tank to normal operation is not as difficult as it might seem at first glance. There are no particularly complex elements in the design; most breakdowns can be quickly eliminated with improvised means. To avoid repeated problems, it is important to use high-quality spare parts for the toilet cistern and promptly identify possible vulnerabilities.
Like any other mechanisms, the shut-off valves of the drain tank wear out over time, but they can be restored without any problems. If a problem occurs, carefully inspect the mechanism and identify the damaged component. After replacing it, the toilet will again be ready for trouble-free operation.
To other materials:
- Do-it-yourself toilet cistern repair
- How to disassemble a toilet cistern
Consequences of a leak
The constant flow of water from the tank into the toilet leads to the following unpleasant consequences:
- Depending on the reasons, the water does not completely fill the toilet and too little liquid remains in it for a proper flush.
- Leakage leads to excessive consumption of water and, accordingly, unnecessary waste of financial resources.
- The toilet tank is constantly replenished with water, which, together with the babbling stream, creates increased noise in the room, worsening the comfort of living.
- The flowing water flow leaves traces on the surface of the bowl in the form of lime and oxide rusty deposits.
- Continuously flowing cold water lowers the temperature in the room, increases humidity and promotes the formation of condensation on the surface of the tank and metal products.
Main components of toilet fittings with bottom supply
