The toilet in every home is an element of everyday life that is simply impossible to do without. It is used much more often than all other plumbing fixtures. That is why it fails more often than other devices. And its most vulnerable component is the tank, which consists of several internal components. Their mechanical damage, as well as careless handling of the tank, are the reasons for this device to lose its functionality. In this article we will look at how to repair a toilet flush cistern with a button yourself, without calling a team of plumbers.
Construction and operation of drain tanks
All flush tanks have a similar design. The only difference is in the water release mechanism.
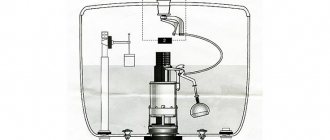
Structurally, a toilet cistern with a button or two buttons, as well as a flush lever, can be represented as a set of interacting nodes:
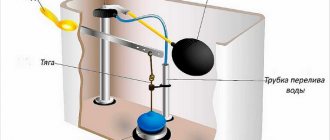
- Filling valve . It is responsible for maintaining the water level at a certain level. The operation of the valve is controlled by a hollow float. When the water rises to the desired level, the float closes the water supply channel to the tank;
- Plastic float attached to the filling valve. It works on the principle of a rocker arm, rising when the tank is filled;
- Drain valve having an overflow system. Modern versions of tanks involve controlling this valve by pressing a button. With the old-style manual flush control, it is enough to pull the lever or chain to release water into the toilet;
- The overflow is a mandatory component of the tank. It is height adjustable, allowing you to set the maximum water level. When this level is exceeded, water flows through the overflow tube into the sewer without spilling out through its walls.
The basic design elements and the principle of operation of the mechanism are the same for all types of flush tanks, only their execution differs.
A tank with a mechanical drain of water works very simply. Water enters it through the filling valve when the float is lowered. After reaching a strictly defined level, the float shuts off the water supply. The drainage is controlled manually. If the tank is equipped with buttons, then the water is drained after pressing them. In this case, the flush valve partially or completely opens, allowing water to flow into the toilet. The float lowers, opening the filling valve slightly.
The structure of a toilet cistern with two buttons is a little more complicated, but such a cistern can be used more economically. If you press one of the buttons, the water is partially drained. Complete drainage occurs when you press the second button.
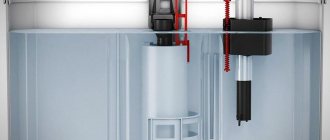
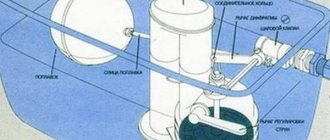
More and more often you can find new types of tanks that have a lower connection to the water main . It is advisable to install them if using a side connection is not possible due to lack of space. The main difference between such a tank is the presence of a membrane valve . Under the influence of water pressure in the pipeline, the valve opens slightly and lets water inside. As the water rises, the float presses on the piston rod, which gradually closes the diaphragm valve. When the set level is reached, the valve closes completely.
Fittings with bottom water supply and controlled by push button
The toilet doesn't flush well
Master baths are often located away from the rest of the plumbing in the house, so they often have their own vents independent of the other plumbing in the house.
If there are no blockages in the toilet, for example, there is no rag stuck there or something similar, then the reason may be very simple. Sometimes plumbers forget to remove the temporary plug that is used to pressurize lines after rough plumbing. They are located at the top of the roof vent pipe. If you can't see the rubber cap clamped to the vent above your bathroom from the ground, get on the roof and look around the end of the vent above your bathroom and I bet you'll find a leaking plug. If so, use a screwdriver to break the plastic and pull out the pieces and the toilet will work fine.
If this is not the problem, you may have a faulty toilet or an obstruction in the drain line. Contact the plumber who worked on the house. He should be able to solve the problem.
Common faults
Drainage malfunctions may well lead to the toilet losing its functionality. For many, such a sudden breakdown can be a real natural disaster. In addition, no one will like increased water consumption either.
Read about what a hygienic shower for a toilet with a mixer is and what types it comes in in a separate article.
We described how to choose a pump to increase water pressure and in what situations it is needed in another article on the site.
What kind of breakdowns are typical for drain tanks? We list them in order of frequency of occurrence:
1. Water leaking from the toilet onto the floor . Most often, water leaks through the o-ring located between the bottom of the tank and the toilet shelf. If the ring is cracked or warped, water will leak through it. Also, the place of leakage may be the gaskets of the mounting bolts that secure the tank to the shelf. They will have to be replaced if tightening the bolts does not work. And it doesn’t matter whether an old-style toilet cistern is being repaired or a modern system is being repaired. After all, they all have the same fastenings.
A high-quality sealing ring of the drain tank is the key to its good sealing
Tip: When replacing gaskets and seals, it is recommended to lubricate them with liquid silicone to extend their service life and prevent cracking.
2. There is a constant flow of water in the toilet . Most often this is due to the tank overflowing, in which water flows out through the overflow tube. This can happen due to a change in the height of the overflow, a loose fit of the float to the shut-off valve, or the float losing its tightness. The rubber seal on the drain fitting may also be worn out. Most often, the malfunction can be corrected through adjustment. If the locking gasket is worn out, it is advisable to replace the entire drain mechanism.
3. Malfunction of the starting mechanism . If you are using a push-button water supply mechanism, when you press the button, water may not flow into the drain. You can repair the fittings of the drain tank yourself, since, most often, the lever mechanism connecting the button with the drain breaks. This also applies to tanks with a handle or chain.
4. Noisy filling of the tank . This happens due to the disconnection of the tube through which water is poured into the tank. This is typical for tanks into which water is supplied from the side. If the tube falls off, the noise of incoming water will be clearly audible. To fix the problem, remove the top cover and install the tube on the fitting.
5. Water does not flow into the tank . Repairing a toilet flush cistern with a button or with other flushing mechanisms when such a problem occurs comes down to checking the inlet hole into the cistern. You need to remove the valve from the tank and clean the inlet hole with a thin steel wire and rinse it with water.
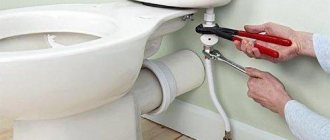
If the toilet is rocking
If your toilet is not securely attached to the floor, problems may arise in the future. Any movement of the toilet damages the seal of the drain. This leads to leaks and eventually major repairs. To secure a rocking toilet, cut off the plastic pads and slide them under the toilet (you may have to remove the caulk before adding the pads). Next, tighten the bolts that secure the toilet to the floor. Don't overdo it, or the toilet will crack.
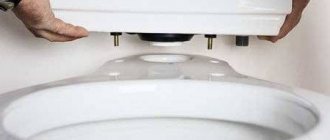
Tank repair with one button
Many people, accustomed to old-style cisterns, do not know how to fix a toilet flush cistern with a button. In fact, the differences between these systems are very minor. For many, the main problem is disassembling such a tank. Indeed, the button located on the tank lid requires careful handling during disassembly. But the device is very easy to disassemble.
The procedure will be as follows:
- turn off the water;
- empty the tank;
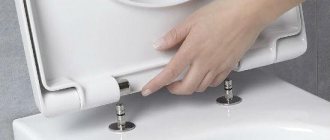
- carefully unscrew the plastic nut near the button;
- remove the cover.
Further actions depend on the nature of the breakdown. Failures of a tank with a button can be as follows:
- There is not enough water in the tank. Check the position of the float and adjust it.
- The water start button is stuck. This may occur due to clogging of the button shaft. It is necessary to clean it and return the button to its original position.
- Water does not flow into the toilet when the button is pressed. Most likely, the mechanism between the button and the drain valve has broken. You can restore it yourself. If this element of the fittings is broken, then to replace it you can use copper wire or replace the valve completely.
- Water flows through the overflow neck. The overflow height or float needs to be adjusted. The overflow is very easy to adjust. To do this, unscrew the union nut and set the required overflow level.
- Water leaks into the toilet from under the valve. The drain valve gasket may be worn out. It is best to replace the entire valve. To do this, unscrew the plastic nut at the bottom of the tank and remove the valve from its place. Install a new valve.
Note: It happens that the valve does not fit tightly into place due to misalignment. Opening and closing it again helps eliminate the leakage problem.
Cracked toilet seat
Installing a new toilet seat is an easy two-minute job: simply slide the seat into place and tighten the nuts. Removing an old seat, on the other hand, can be a real challenge. Often the bolts that hold the seat in place are so rusty that you simply cannot remove the nuts. But there is no need to be upset, much less angry - there is a solution.
First, look at the bolts that secure the seat. If the bolts or nuts are made of plastic, they are not subject to corrosion and can be easily unscrewed. Simply open the cover behind the seat to reveal the bolt head. Unscrew the bolt with pliers or a screwdriver while holding the nut with pliers or a wrench.
Repair of a two-button tank
Economical water consumption adds to the popularity of such a plumbing fixture. How to repair a toilet cistern with two buttons? The principle of disassembling such a tank remains the same, as with the one-button version.
Typical failures of a two-button tank:
- Buttons sticking. To install the buttons in place, remove the cover by unscrewing the locking ring near the button. Sometimes the buttons snap back into place if you press them again.
- If the water does not drain, check the integrity of the connecting fittings. Reinstall it or replace it with a piece of copper wire.
- Water flowing through the drain valve indicates that the valve is not positioned correctly relative to the drain hole. If water flows through the overflow neck, adjust the water level by changing the position of the float or the overflow height.
To adjust the float, just raise or lower it a little
Wondering how to choose a bathtub shower faucet? You will find the answer in our separate article.
And if you are interested in how to install a shower cabin with your own hands, then we also have material on this topic.
Before purchasing a water filter, we recommend that you read our tips for choosing them.
Continuous water supply
The reason for the continuous flow of water into the toilet bowl is damage to the membrane of the flush tank. In order to eliminate the malfunction, it is necessary to replace it.
To do this you should:
- tie the float lever to the crossbar, then drain the water from the tank;
- unscrew the fixing nut that connects the pipe to the drain tank;
- loosen the siphon retaining nut, which is located at the base of the tank;
- disconnect and pull out the siphon from the liquid release lever;
- replace the membrane;
- Reassemble the drainage fittings in the reverse order.
Let's look at the most common reasons for the continuous flow of water into the flush tank.
- Skewed float lever. To eliminate the problem, it is necessary to install the element in the optimal horizontal position 2.5 cm below the inlet level of the underwater hose.
- Damage to the float lever, which, as a result of water passing through, becomes heavier and sinks to the bottom. In this case, the element should be replaced. If this is not possible, you can wrap the float in a plastic bag or seal the hole with heated plastic. This will “temporarily” eliminate the problem.
- Worn float lever. The only way to solve the problem is to replace the element.
Thus, we looked at the most common toilet breakdowns and methods for eliminating them. As you can see, troubleshooting does not require special skills; it is enough to find out the cause of the problem, buy a worn-out element, study in detail the sequence of work and begin solving the problem in a timely manner.
Source
The bowl overflows when flushing
What should you do if the toilet bowl fills up completely? As a rule, the cause of this is a clogged toilet connection pipe or siphon. To solve the problem, you need to take a plunger and try to push the dirt out with compressed air. If the water is washed off well, then the problem is solved. Often you have to push through the blockage with a plumbing cable.
If there is contamination in the corrugation, the cable should not be too long. As a last resort, you can remove the corrugation or eccentric if the toilet still does not flush. The problem can be solved by using a chemically active medium that is poured over the clog. Since the weight of household chemicals is greater than water, it settles, dissolves and penetrates to the problem site, destroying it.