Comfortable living in any home cannot be imagined without a comfortable bathroom. The main element in it is the toilet. However, if it does not function very well, inconvenience will occur. To ensure comfortable use of this plumbing device, it is necessary to assemble it correctly. The most difficult part is its tank. To a person who has not assembled it with his own hands, it may seem complicated. But that's not true. Let's look at how to install a tank on a toilet, assemble its mechanism and put it into operation.
Device and principle of operation
In the current level of competition, manufacturers are trying to offer the consumer maximum choice. This also applies to tanks. The differences will be in the material used, quality of implementation, and price. In order to understand how to adjust a toilet tank or install a new one, you first need to understand its structure.
The basic work will be the same for everyone. The differences will be in the design of the tank . They may be as follows:
- One operating mode – one button;
- Equipped with a dual-mode operation mechanism - two buttons.
A tank with one button means the entire volume of water is released at once. The presence of two buttons and 2 operating modes provides significant water savings. They allow you to drain only half the volume when draining. With this design there are two buttons. The large one will drain all the water, and the small one will drain partly.
The water discharge process can also be performed in different ways. Here, the methods of transmitting force to the valve that closes the drain hole differ.
The liquid flushing pattern may vary.
- Direct flush. The water from the tank drains directly into the toilet. Does not change direction of movement.
- Reverse flush. During flushing, the liquid changes direction of movement. It is more efficient, but noisier.
If you know the structure of the cistern, then you can easily figure out how to fix the toilet cistern. Let's now look at the principle of operation and structural elements . There are two phases of work:
- The process of collecting the required amount of water;
- Direct flush.
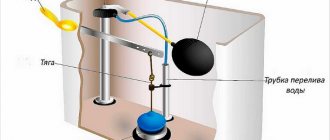
The design of the drain tank will be similar to a regular hydraulic valve. The main elements are the locking element, the float and the lever system. By pressing a button, we act on levers. They lift the lock that closes the drain hole. As a result, water is supplied to the toilet flush sink.
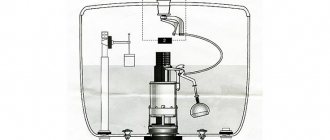
With the external design everything is simple. It has only 3 elements - a tank, a lid, and a drain button. The internal part is more complicated. It includes the following:
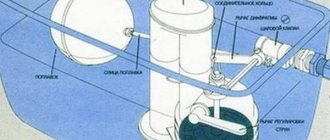
- Float valve. Controls the presence and level of water. It includes a float and its lever. The faucet body contains gaskets, a piston, and a union nut for connecting the water supply hose.
- Pear. Rubber element that covers the drain hole.
- Drain fittings. Transfers force from the button to the pear.
In order to understand how to assemble the tank, you need to understand the principle of operation of the drain mechanism. He's next. When the button is pressed, the lever system transmits movement to the rubber valve (bulb). It rises, freeing the passage of water down. The water level is falling. At the same time, the float lowers, opening the water supply tap. The container is filled to a certain level. The float is understood and the tap closes.
For smooth and smooth operation during installation, it is necessary to adjust and fix the float in a suitable position. Finding out the required position is easy.
- More water is supplied than required. Lower the float lower.
- A lack of water indicates the need to raise the float.
Using other flush systems
When using the flush valve, the tank is silently filled.
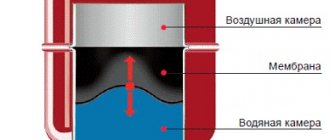
Developments in technology in recent years have meant that the cistern can be replaced with a druckspühler. Druckspühler (translated from German as “press release”) is a mechanism that drains water directly from the water supply system.
It can be installed in several ways: embedded in a wall, hung on a wall, or hidden behind any decorative fence. Inside the device body there are actuators that are responsible for directly draining water into the toilet. The body itself is divided into 2 compartments. When the drain lever is pressed, a difference in water pressure is created in these compartments, and a hole between them opens. It is at the moment of equalization of pressure between the compartments that water is drained into the toilet. When the pressure is finally equalized, the return spring is activated, which closes the valve. The system works in such a way that between pressing the drain lever and closing the valve with a spring, exactly 6 liters of water are drained.
Related article: How to make liquid acrylic for covering bathtubs with your own hands
The Druckspühler allows you to save space that would be occupied by a flush tank, while providing greater reliability, since the entire mechanism is made of steel and is very difficult to break or damage. If the mechanism is damaged, it is simply removed and replaced with another (or repaired in a workshop), which takes very little time. In addition, its undeniable advantage is that you do not need to wait until the tank is filled again for the next use. But the use of a dryer also has some disadvantages: it does not have a water supply: if the water is turned off, there will be nothing to wash it off with. In addition, the system functions normally at a pressure in the riser from 1.2 to 5 atm, which is difficult to achieve in Russian conditions. Well, don’t forget that such mechanisms are intended for plumbing systems with high water quality.
In our conditions, the drukspühler may well become clogged with banal pieces of rust from the main pipes.
Types of installation of waste cisterns
If you need to figure out how to fix a toilet tank, this is one event. If you are considering installing new equipment, then you should definitely know that there are 3 types of installation of drain tanks.
- Tank on the shelf . Behind the drain bowl there is a shelf designed for installation. It is on this that the container is mounted. The process of draining the liquid is carried out with a button.
- Located separately . It is located on top of the wall. Connected by a pipe. Draining occurs after exposure to the rope or chain.
- Built-in . The entire structure is called an installation. Combines with hanging sanitary ware. The toilet bowl is mounted on the wall surface. The drainage container is hidden behind it in the wall. The liquid is drained by a button located on the wall.
Installation of the tank on a shelf
Now this is the most common layout option. Here the container is installed on the toilet itself through a special gasket.
The process should begin with the rubber cuff lining. This gasket must be selected as best as possible. Its service life depends on its quality. If you use low-quality rubber, after some time it will dry out and water will penetrate.
Please pay attention! The gasket must be made of elastic rubber or a similar material. If purchased separately, check that the shape is correct.
The surface of the shelf should not have any defects. After installation, the cuff should fit as tightly as possible into the opening of the shelf and the tank. In order to eliminate the possibility of leakage, it is advisable to treat the cuffs with a layer of sealant. This will also help keep the elastic in place during installation.
Then pay attention to the side openings of the tank. Check that they match correctly with those on the shelf. They are necessary for installing the mounting bolts. They must also have sealing gaskets.
The holes must be aligned and the bolts inserted. Using a suitable open-end wrench, carefully tighten them. Don't forget to install gaskets on both sides. If you miss installing them, you may end up with a split or leak.
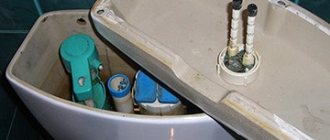
After fixing the container, you can begin installing the drain fittings. The whole process is shown in the image. Detailed assembly instructions should also be included in the included instructions.
Please pay attention! The connected water supply hose must also have a rubber gasket. In its absence, leaks will occur.
After securing all elements of the drain mechanism, water can be supplied. Check the water supply process immediately. If in doubt, adjust the float valve.
Preliminary work before installation
Before proceeding directly to the installation work, it is necessary to prepare both the site of action and the object of application of forces, in this case, the drain tank with all the auxiliary elements.
Moreover, preliminary work is carried out in several stages (although not all of them are mandatory - it all depends on the type of equipment chosen).
Step #1 - dismantling the drain tank before replacing
Before installing a new cistern, you must first dismantle the old one. And if your toilet is from the times of the Soviet Union, it is better to enlist the help of an assistant - it will not be easy to move the cast-iron tank alone and knock off the rusted bolts.
The disassembly itself occurs according to the following scheme:
- Turn off the water supply to the tank (close the central valve).
- We remove the remaining liquid from it, that is, we simply drain the water.
- We disconnect the container from the pipes - the water supply and the bypass, if there is one (it is at this stage that an assistant will be very useful).
- Unscrew the mounting bolts and remove the old structure. We carry out these operations with care so as not to drop the heavy tank and damage the tiled floor or toilet bowl.
- We clear the free space for a new installation. We try to completely remove rust and cement residues, leaving only a smooth, defect-free surface.
Installation of a separate tank
First, you will need to measure the height of the tank mounting. Here it is necessary to relate the height of the fastening to the fastening of the lower end of the pipe. The pipe can be metal or plastic. Diameter – 32 mm. It connects to the cistern and toilet.
After marking the height, prepare the holes using a suitable power tool. If the kit does not include special fasteners, fix it using dowels. However, it will be more convenient to use special brackets. They can be purchased separately.
Before installation on the wall, assemble the drain fittings. The sequence is the same as in the previous case. Be sure to follow the factory instructions.
Next, fix the container at the required height. Using rubber seals, connect the pipe. You supply water to the tank. Check the system for leaks. If there are no leaks and the water level is correct, you can start using it.
Subtleties of choosing a toilet
We will not delve into design nuances - everyone selects the color and shape of a faience friend, as well as other necessary plumbing fixtures, to their own taste. But it is simply necessary to figure out which type of tandem “toilet bowl - flush cistern” will be most convenient for manual installation.
Let's look at the most common types of cistern by type of installation.
Compact is a flush cistern that is located directly on a special ledge of the toilet and, after installation, forms almost a single whole with it. For those who cannot boast of a plumbing education, this layout scheme is the most preferable, since in this case the assembly is as simple as possible.
Built-in (hidden) cistern for a wall-hung or floor-standing toilet. Installed in a special niche or hidden behind a false wall. In principle, the installation itself is not too complicated, since the kit includes a special support frame - an installation, to which the main parts are attached.
Still, some additional skill and extra care are required to get it exactly right. In addition, then you will also need to cover all the equipment with decorative materials, which also requires additional effort and resources.
Mounted or free-standing cistern. It is mounted separately from the toilet on the wall and connected to it using an additional overflow pipe.
The length of this pipe can be quite short, which allows you to use modern fittings (internal filling) of the tank and use a small lever or a familiar button to drain water instead of a Soviet chain with a handle. However, installing such a tank requires a lot of effort, skill and time.
It should also be noted that in terms of financial costs, the first option will be the most profitable - everything you need is already included in the purchase package. You just need to check the presence of all components.
But in the third and especially in the second case, funds are needed for additional parts, and it is far from a fact that they can be purchased in the same store where the main plumbing fixtures were chosen.
Before purchasing a new replacement plumbing tank, carefully examine its condition. It is possible that it is enough to repair the drain tank. To do this, in most cases the container will also have to be removed and then put back.