The toilet cistern is a key element, the performance of which determines the quality of the flush. Despite the simple device, it may well fail, and most often this is due to a malfunction of the internal fittings. Repair, as a rule, consists of replacing elements that have become unusable, but a more radical option is also possible - replacing the entire structure.
Replacing the tank
When is it necessary to replace a toilet tank?
Replacing a toilet cistern yourself is a completely doable task, so it is not necessary to involve professionals. There are many reasons why there is a need to replace the tank. Among them are the following:
- mechanical damage to sanitaryware (breaking, cracking, etc.);
- the formation of plaque on couplings, joints and other internal parts of the tank;
- covering the inside of the tank with a thick coating of limestone.
When you call a specialist online
There are other reasons, but in all cases the step-by-step guide for replacing plumbing fixtures is approximately the same. To work, you will need a new tank, supply fittings, gaskets, bolts, sealant, and fittings.
How to dismantle the tank yourself
Let's find out how to replace a toilet flush tank? It all starts with its dismantling. First of all, turn off the water supply through the flexible hose - there should be a shut-off valve for this. Turn it clockwise and drain the water from the tank, and then make sure that it does not fill, that is, the tap is holding. Unscrew the drain button counterclockwise and then remove the cap.
Remove any remaining water from the bottom of the tank with a sponge or soft cloth, and then unscrew the supply hose. In older models of plumbing, it is supplied to the side wall, and on new tanks the supply is most often from the bottom, although there are exceptions.
The tank is held on the toilet by two bolts that need to be unscrewed with a wrench. Some modern models use plastic fasteners instead of metal ones - they are easier to unscrew. You also need to remove the rubber gaskets and then remove the bolts from inside the tank, after which it can be dismantled. Proceed carefully, especially if the old toilet tank has cracks that could cause it to fall apart in your hands.
Analysis of the drain mechanism
Depending on the modification, the push-button mechanism consists of:
- chrome buttons,
- return rod,
- sliders – regulators,
- gaskets,
- membranes,
- fastening nut.
After the button is unscrewed and removed, all that remains is to remove the sealing collars and unscrew the nut. The button block thus freed is removed from the tank body. After this, you can remove the tank from the toilet. Assembly and installation of the drain tank is carried out according to the specified algorithm in the reverse order. The assembled module must be installed on the pedestal and screwed through the holes of the shelf.
We remove the rusted bolts to remove the drain tank
Many people, wondering how to replace the drain tank with their own hands, are not aware of one difficulty that they may encounter - unscrewing the old bolts. If they are metal, they are almost certainly rusty and won't just come off. It is possible that you simply cannot turn the head of the bolt, which is located inside the tank. In this case, you will have to resort to tricks.
For example, you can use WD-40 liquid or regular kerosene, pour it over the fasteners and leave for 10-15 minutes, and then try to remove the bolt. If it doesn't help, repeat the procedure. If after several times you still cannot unscrew the anchors, you will have to carefully cut them off with a hacksaw or grinder.
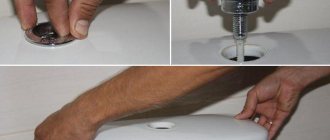
Removing the cover with two buttons
The arsenal of bathroom appliances has recently been replenished with two push-button models. The principle of design and operation of the newest modification is not much different from its one-button counterpart and can be replaced with your own hands. The only difference is that the algorithm of actions is repeated twice. To remove the drain tank:
- Press one of the buttons. At the same time, remove the second button from the slot inside the second half.
- In the opened hole we find and unscrew the slotted screw.
- Lift it up and turn the drain tank lid 90 degrees.
- Remove the clothespin that holds the button.
- Remove the lid and put it aside.
How to replace a toilet tank yourself
When replacing a new or old style toilet cistern at home, you need to install the new element without haste and very carefully. It is important to ensure that the hole in the bottom of the bowl lines up with the hole in the stock on the back of the bowl. First you need to place plastic washers with rubber gaskets on the mounting bolts, after which a rubber gasket is also put on the drain and a tank is placed on top. For reliability, you can coat all rubber bands with silicone sealant. Make sure that all the holes line up perfectly, after which you can insert the mounting bolts and start screwing the nuts - you need to do this gradually: first left, then right. This will avoid distortion. The main thing is not to overdo it so that the bottom of the tank does not burst.
If you buy a new tank, the fittings should be installed in it from the factory, so you will not have to install them, which will simplify your task. All you have to do is connect the flexible supply hose from the side or bottom, but don't forget to use a gasket. Then open the tap to fill the tank. Do not rush to drain the water, but first make sure there are no leaks - water should not ooze or drip anywhere.
If everything is in order, all you have to do is cover the tank with a lid and tighten the drain button, and then check how the drain works.
Installing a new module
When the place is prepared, they begin to install the new toilet themselves. Before starting work, the product is unpacked and the completeness of the package is checked. To prevent damage to the material of the plumbing fixtures or the decorative finish of the toilet room, it is recommended to cover all hard surfaces with cloth or cardboard.
Tank equipment
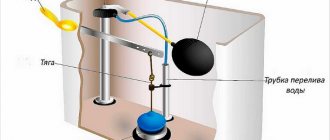
It is known that before replacing a toilet with your own hands, the tank is assembled and installed. It is equipped with two valves: filler and drain. Water will flow into the tank through the filler, and it will be discharged using the drain. The fill valve is equipped with a hollow float that controls the water level in the tank. When the critical level is exceeded, the float lever shuts off the flow of water.
The drain valve is attached to the drain hole with a nut mounted on a plastic washer. The connection is sealed with a rubber O-ring. The valve may be equipped with a safety structure to prevent the tank from overfilling. It is a tube installed inside or outside the valve body.
The drain valve can be controlled in one of three ways:
- lever (after pressing the lever, it rises and unlocks the drain);
- push (pressed button raises the side posts, causing the drain to open);
- exhaust (the user pulls the lever by the handle, thereby opening the outlet);
If the control is push or pull, when installing the cover it is important to correctly align the button/piston knob with the hole in the cover. In the case of lever control, the handle is brought out through a special hole on one of the side walls of the tank and its alignment with the lid is not required.
If any fittings are not included in the kit, they must be purchased separately. It is important to ensure that the fasteners are made of brass, plastic or stainless steel, because... standard steel will be quickly destroyed by corrosive deposits. The flexible tube that lets water in is usually not included in the kit and must be purchased separately by the client.
Collecting the tank
Following the recommendations from the attached documentation or manuals from the Internet, which explain in detail how to replace an old toilet with a new one, install the outlet and inlet valves, carefully sealing the holes with gaskets. The nuts are tightened by hand and tightened with a wrench. The force must be controlled so that the thread does not break. If the design includes plastic tubes - flow extenders, they are installed in the bottom of the tank before it is attached to the bowl.
The connection point of the flexible hose supplying water is reinforced with FUM tape or similar material. A detailed valve assembly diagram can be found by viewing the attached documentation, manual or video tutorial on the Internet. The height of the overflow tube and flush volume are adjusted according to user preferences.
The tank is bolted to a special platform located on the side of the toilet bowl. Reliability of fastening is ensured by sealing washers, which must be screwed evenly onto the bolts to prevent the tank from skewing.
Installing the bowl
The work does not require special skills; each user will be able to install the module after only reading the instructions on how to replace the toilet (text or video materials). The client will only need a few components: they purchase in advance a corrugated pipe or cuff for connecting to the sewer outlet, as well as bolts holding the toilet to the floor, if its type is floor-standing and the presence of bolts is not provided for in the package.
The outlet pipe is attached to the sewer pipe with a cuff/corrugated pipe, and the module itself is fixed to the floor with bolts or special glue. Installation on concrete putty is not recommended, because This method does not provide for careful dismantling and during subsequent replacement the toilet will need to be split.
First, a cuff is connected to the outlet, and then the cuff is attached to the sewer inlet. The bowl is placed in the place prepared for it, the surface is checked for evenness (the bowl should not wobble), and marks are made in the places where the fasteners will be screwed in. Holes are drilled at the points marked on the floor.
All connection points are firmly fixed, mounting bolts are tightened. If the bowl is fastened with adhesive, the floor must first be cleaned and degreased.
Installing an add-on module
Wall hung toilets are secured in a special way. Visual examples of how to correctly replace a wall-hung toilet in an apartment with your own hands can be seen in thematic videos. A metal frame is mounted above the sewer drain, equipped with pins on which the tank and bowl are hung. The frame is decorated in such a way that the cistern and all input and output communications are hidden behind a false wall, and only the toilet bowl remains outside.
After all structural elements are securely fastened and sealed, their functionality is checked several times. After this, the final design is arranged: the casing is attached to the installation (if the module is wall-mounted), the seat and decorative elements (handles, buttons, decorations, etc.) are mounted.
Replacing the internal mechanism
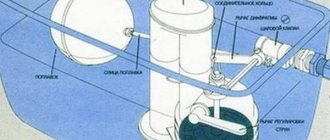
If you decide to change the tank yourself, leaving the old mechanism, you will have to reinstall it. In older toilet models, the fittings are more difficult to attach, but there are no fundamental differences. You need to act according to the following algorithm:
- First, a bracket with a rod and a bulb is attached to the bottom of an old tank using metal fasteners. If the plumbing is new, the drain system is attached with one nut in the center.
- Use caution when working with plastic fasteners. If you use too much force, you may damage them.
- Attach the water supply pipe. In Soviet systems, a spoke with a float element is attached to it, and in new ones the pipe is combined with a system that controls the water level. The water intake pipe and the float are connected into a common mechanism.
- The tank with the installed flush system is mounted on the toilet.
In older models, a large shock-absorbing rubber pad with an oblong shape is placed between the stock and the tank. It covers both holes: drain and overflow. When installing modern flush fittings into an old compact toilet, the overflow hole is closed with a plug. In modern compacts, the shock-absorbing pad is ring-shaped.
General arrangement of tanks
The toilet flush tank includes the following main elements:
- Tank body;
- Complex of internal fittings;
- Sealing and fastening accessories.
The toilet body is made of ceramics and has various shapes, volumes and designs. Occasionally there are products made of plastic. Water supply is carried out in two ways - from the side and from below, and can be done from the left and right.
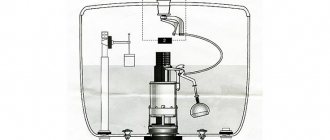
The internal fittings complex consists of the following elements:
- Fill shut-off valve;
- Drain valve;
- Float mechanism.
The tank is filled with water through the fill valve.
A flexible water line is connected to the external thread; the internal part serves as a locking device and is controlled by a float mechanism. When the float is raised to its highest position, the valve closes; when lowered, it opens.
The float mechanism has two types of design:
- Float on a metal spoke;
- Float on the lever drive rod.
The float is made of plastic, less often of metal (aluminum and so on).
The drain valve is equipped with a lower shut-off element (bulb, lining) made of plastic rubber. There is a hole in the center of the pear for overflow. The hollow overflow tube is attached to the bulb and rises into the upper third of the tank. When filled to its upper level (that is, the fill valve is not completely closed), water overflows into the toilet bowl.
The flush valve closes the hole through which water flows into the toilet. The valve can be opened in several ways:
- Push-button device – single or double;
- Exhaust drive with handle;
- Exhaust drive of a mounted tank with a chain and cord;
- Push float.
The push-button device, when pressed, raises the drain bulb using levers. A one-button device drains the entire volume of water, a two-button device drains two parts of different volumes.
The suction drive rod is connected directly to the drain actuator and, when pulled, opens the drain hole. A similar principle is used to drain water from a separate (wall-mounted) tank; the bulb is lifted by pulling out a chain or cord connected through a transmission mechanism.
Some models of plastic tanks are equipped with a push float; when pressed, the float opens the drain through a system of levers, and when filled with water, it closes the fill valve.
Important nuances when replacing the flush tank yourself
The step-by-step instructions for replacing a toilet cistern at home are quite simple, but in order for everything to go smoothly, we advise you to follow certain recommendations:
- Before buying a tank, find out the brand of the toilet or measure it. Otherwise, the new element may not fit into your toilet.
- It is better to contact trusted stores where experienced consultants work. They will select the optimal tank model and recommend the necessary components.
- The kit must contain all mounting bolts - pay attention to this. Otherwise, immediately purchase them separately.
- If water is supplied to the tank through a pipe, it is better to replace it with a flexible hose. It is more convenient and reliable.
- At the ends of the flexible hose, the nuts have internal threads, and if a water socket also comes out of the wall with internal threads, you will have to use an adapter.
- When purchasing a tank, evaluate the material of the fittings. If the parts are made of cheap and fragile plastic, they will quickly wear out and become unusable.
Now you know how to install a toilet flush tank at home and what you will need for this. Our guide will allow you to save money on the services of professional plumbers.
If you don’t want to waste your free time on a tedious process, you can always order a replacement toilet cistern from our company. San Remo employs plumbers with many years of experience - they will arrive on time and carry out the work carefully, competently and inexpensively.