Installing a separate shower stall in the house is not a luxury, but a fully justified move, since from time to time, instead of a bath, it is more ergonomic to quickly freshen up in the shower. When installing a shower stall, special attention must be paid to organizing the drain; many people undeservedly neglect this stage, which can result in problems with the drain or an unpleasant smell from the sewer. For example, an incorrectly selected drain for a shower stall with a low tray will require replacement soon enough.
The essence of the problem
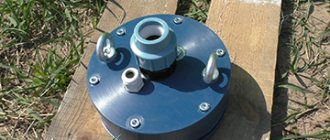
The drain for a shower stall is a standard plumbing device designed to quickly and completely remove water from the interior of the stall, which is simply necessary for the normal washing process. Who wants to take a shower when their feet are constantly in soapy, contaminated water?
A shower stall, as a rule, ends in its floor part with a tray, which is designed to collect falling water and prevent it from leaking onto the floor of the room. This element can be edged with a low or high side, which acts as a barrier.
The higher it is, the greater the likelihood of collecting all the water. However, an excessively high side makes it difficult to step over, especially for children and the elderly. This requires choosing the optimal height for the shower tray, taking into account the convenience of all family members.
The shower stall drains through a corresponding hole in the tray, and to direct water into it, its surface is made with the necessary slope. In principle, the drain hole can be located in different areas - in the center, in the corners or on the edge of the pan.
Drainer
When any waste water drainage system is installed, certain requirements arise: rapid direction of all flow into the sewer system, without stagnation inside the pan; eliminating the return of waste water to the pan; elimination of unpleasant odors from the sewer. In addition, the possibility of simple maintenance must be ensured, incl. when blockages occur.
In some cases (usually in our own homes) there is no tray in the shower. Then the drain is made directly into the floor covering, and the person taking a shower is located on a grate, through which water easily enters the drain hole without accumulating. The operating principle of the system is similar to the pallet version.
Choice
Parameters and characteristics that determine the choice:
- Geometric - dimensions of the shutter, height of the space under the shower stall, diameter of the drain hole;
- Technical – performance and throughput;
- Quality of material;
- Difficulty of installation;
- Operational features.
Shower cabins are often sold together with siphons. If you are satisfied with this cabin modification, you can purchase it. But just as often you have to select the siphon yourself. Therefore, you should pay attention to the following points.
Geometric parameters
The design of the tray and methods of its installation determine the choice of the mounting height of the shutter. Modifications of devices with a height of 8 to 20 cm are made. However, for a shower cabin that requires low installation, only those whose height does not exceed 10 cm are suitable. The lower the height of the device, the easier its installation will be. The most difficult thing is to select shutters for the cabin installed directly on the floor.
The market is increasingly selling shower cabins that have drain holes in Euro sizes - 52, 62 and 90 millimeters. The structural parts of the shutter must comply with them.
Technical specifications
The depth of the shower cabin sink is usually small, the water flow is large, therefore, the water must have time to come out without delay. The throughput capacity (CA) of a water seal determines the speed at which water will flow out, as well as how quickly the seal structure will become clogged and how often it will need to be cleaned. The average PS of shower cabins is 30 liters per minute. If hydromassage and other additional functions are available, water consumption increases. An indicator characterizing the SS is the height of the water layer above the level of the top of the drain. With a height h=12 cm - diameters are 5.2/6.2 cm, with h=15 cm - a diameter of 9 cm. Therefore, for low pallets there are siphons of small diameters - 50 mm, for high ones - large ones. The instructions for the shower cabin indicate the PS, which must be taken into account when choosing a shutter device.
GOST recommends a minimum flow rate of at least 15 liters per minute for shower cabins with outlet, at least 21 for siphons with overflow and for deep sinks.
Material quality
The parts located under the shower stall are not exposed to external physical stress, so they can fail due to aging of the plastic. Low-quality plastics begin to crack already in the second year of service. High-quality ones last a long time.
The grate covering the drain requires attention. The best option is when it is made of stainless steel. This is the most durable material used for gratings. There are gratings made of alloys. In this case, you should pay attention to the decorative coating. Two layers of chrome guarantee that the coating will not peel off and the grille will last a long time. Chrome is resistant to detergents, which is an additional advantage. Plastic nickel-plated grilles quickly remain without a coating that cannot be restored on your own.
To facilitate periodic maintenance of the valve device, as well as to protect against sewer odors, the valve devices are equipped with additional parts - dry or hydraulic valves, removable settling cups. The more additional parts there are, the lower the shutter reliability. The likelihood of breakdowns increases with the number of parts.
When buying cheap water seals, they waste large sums of money, since only lifting the pan will allow them to be replaced. In some cases, you will have to dismantle the entire shower cabin, then you cannot do without breaking its parts. Whether it is worth saving on the shutter device is up to the buyer to decide.
Performance
Drain fittings, according to regulations, must be easy to disassemble and assemble manually. This is an important condition, especially when the drain is clogged, or in other emergency situations. Therefore, installation of the shutter device is carried out with a minimum set of tools.
During operation, the main difficulty is cleaning the locking device. When choosing, you should think about this issue. Some modifications are made to be self-cleaning. Some can be cleaned through the drain hole. Such modifications of the bolt product have an outlet diameter of 90 mm, which allows you to disassemble the device, remove everything you need in sequence, and then reassemble what was removed in the reverse order.
When buying a siphon, it is better to choose products with click-clacks that can be removed with a cleaning basket
Structural elements
In general, the drainage system for a shower tray or a shower without a tray consists of the following elements: a device for receiving water, a line for discharging it into the sewer and the necessary connecting elements.
Drain system
The device for receiving waste liquid is mounted directly on the drain hole and must ensure that the following requirements are met: sealing the joint, preventing the return of water and eliminating odor. This role is assigned to siphons with different designs of water seals.
Video
We have prepared for you an interesting video on how to clear a blockage using a modern plumbing cable and drill.
To ensure that water flows normally into the drain and there is no unpleasant odor, clean the pipe using the method that suits you best. Don’t forget to clean your pipes four to six times a year as a preventative measure. To reduce problems with water drainage, buy a drain mesh. It blocks most of the debris that may end up in the siphon.
Types of pallets
The main element of the drainage system is the shower tray. It is he who ensures the collection of all wastewater and directs it into the sewer through its drain hole. The comfort of the entire washing procedure largely depends on the choice of this element.
Shower trays can be made of steel, stainless steel, cast iron, plastic, ceramics and artificial stone. Finished products have the required design and provide the required slope towards the drain hole.
Currently, the most popular are acrylic pallets - practical and quite durable. The disadvantage is the high risk of scratches. To increase reliability, plastic is reinforced with fiberglass or metal reinforcement.
Acrylic tray
Homemade pallets are made in the form of a concrete screed with reliable waterproofing. The sides are formed by pouring concrete, laying brick or stone elements. During the manufacturing process, a drainage system should be immediately installed, ensuring the required slope.
Steam generator and siphon
Sometimes the drain is used as a steam outlet. This is called a hammam. It is not necessary that the steam generator output is connected specifically to the drain, but this is often possible. The dealer may mean two different things by this:
- Possibility to keep the cork half-closed. Horizontal installation possible. Often the steam generator outlet is at a certain height relative to the bottom.
- A separate pipe located slightly above the sewer pipe. This serves as the input for the steam generator. Of course, in this case it is also possible to close the plug not completely.
In the first case, you need to make sure that the steam and drain do not overlap each other. For example, lay the generator pipes separately, and place the inlet at a certain height so that water does not flow into it. This is most difficult to implement in a design with a high pallet (since making holes in it is not the best option).
On the other hand, the steam in the hammam should come out from below. For obvious reasons. And the lower the pipes from the generator go, the better. Your feet won't be cold. The siphon with an additional pipe is higher, so it will not fit under every pallet. At the same time, it is necessary to separate the generator path from the sewerage system. Usually this can be done due to the difference in heights of the corresponding pipes (corrugation).
Tray and drain device
Required Tools
When installing and connecting a shower cabin to the sewer, you will need certain tools and consumables. The base is made by pouring a concrete screed, which means you should prepare a tool for preparing the solution, carrying out concrete work and applying waterproofing:
- construction mixer;
- shovel;
- measuring container;
- Master OK;
- grater;
- grater;
- putty knife;
- knife;
- scissors.
Tools for concrete screed
The cabin is connected using:
- Bulgarians;
- electric drills;
- hammer drill;
- screwdriver;
- grinding machine;
- hacksaws for metal;
- pipe bending device;
- screwdrivers;
- pliers;
- vice;
- wrenches, socket wrenches, plumbing wrenches, adjustable wrenches;
- chisels;
- chisels;
- hammer;
- mallets;
- paint brushes;
- spatula.
Cabin Connection Tools
Supplies you will need:
- polyurethane foam;
- silicone sealant;
- FUM tape;
- cuffs;
- hairpins.
Quality control and the necessary measurements are provided by a building level, tape measure, metal ruler, corner.
Connecting the sewerage system to the shower stall
First, you need to properly install the water drain pipe. To do this, follow the instructions.
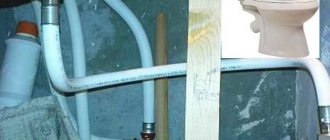
Remove all three apron pieces. Lift the rear part of the pallet. Place the drain hose on the cabin drain elbow at the bottom of the pan and insert the other end of the hose into the drain hole in the bathroom floor. Insert one of the ends of the hose, which is reinforced with fiber, into the nipple of the drain elbow, which is located on the side.
Place a building level next to you. Choose a location to install the shower stall. Place the pallet in the chosen location. Use a level to ensure the tray is in the correct position. To do this, you need to position the level parallel to the horizontal surface. In this case, you need to take the bathroom floor as a guide. If you notice any inaccuracies, then slightly unscrew the nuts of the screws on the legs and adjust their position. After the operation has been completed, you can tighten the locknuts back. Before installing the pallet, the floor should look something like this:
When installing a pallet, it is necessary to take into account all the details. For example, some models of pallets are additionally equipped with legs. With their help it is convenient to control the slope and height of the bottom.
When installing a shower stall, make sure that the wall angle is strictly 90 degrees and that the ceiling does not have any unevenness. Ignoring this advice can lead to serious problems, since the shower may leak due to loose parts.
Additional support will help give stability to the load-bearing parts of the plumbing fixture.
Some important tips for installing a shower cabin
When connecting a shower stall, try to carefully study the work process itself. This will help avoid unnecessary errors and save time.
Buy only high-quality plumbing pipes that fit the special connections in size. This unwritten rule mainly applies only to budget cabin models, since the included plumbing for such devices is not of high quality.
Be sure to check the length of the hoses and make sure they are not damaged. It is better to have a few tens of centimeters of hose in stock.
Try to install an additional waste pump that has magnetic valves. It will prevent accidental flooding.
Seal the drain thoroughly
Before final installation, make sure there are no leaks.
https://youtube.com/watch?v=QyXViwm1wJw
Installation stages
Its subsequent trouble-free operation depends on the correct connection of the shower stall to the sewerage system. If you are installing a purchased, fully equipped model yourself, you must strictly follow the instructions in the instructions. All joints must be carefully sealed using special silicone-based sealing compounds.
Sealing joints
At the first stage, the base for the pallet is prepared and entry into the sewer riser is ensured. It is best to use a ready-made sewer inlet from the bathtub, which has the appropriate slope to ensure gravity flow.
If the shower stall is installed in a completely unprepared place, then work begins with installing a tee in the sewer drain with an outlet to the shower, and its installation level should be below the floor surface.
Next, a special drain channel or pipe is laid at the base of the cabin, connecting the drain hole of the pan with the outlet of the sewer tee.
When laying, an appropriate slope must be provided for gravity flow of liquid. For the siphon, a recess is formed in the concrete screed of the base of the required size. It is important to correctly calculate the height of the siphon, taking into account possible adjustment of the height of the pallet legs.
The direct connection of the shower stall to the sewer system is carried out in the following order:
- The siphon is assembled according to the instructions.
- The shower tray is turned over, and the assembled siphon is fixed to the drain hole. A rubber gasket is placed at the joint.
- By adjusting the height of the legs, the tray is leveled. It must be positioned strictly horizontally.
- The flexible drain hose extending from the siphon is connected to the discharge system (channel or pipe). The joint is reliably sealed using silicone sealant.
The shower cabin is becoming increasingly popular, and therefore many people want to have it in their apartment. The installation can be done entirely with your own hands, following the instructions and recommendations of specialists. Correct and high-quality installation of the drainage system is a guarantee of long-term and comfortable operation of the shower.
Siphons according to GOST 23289
Many people on the Internet are looking for siphons in accordance with GOST 23289, realizing their superiority. Many unscrupulous people have taken advantage of this to create electronic resources where they not only offer to download a certain virus, but also ask for a phone number for this. Be carefull!
What is the difference between siphons according to GOST 23289? Steel grade, special qualities of polymers. The list of materials for the manufacture of high-quality sanitary drainage fittings is given in GOST 23289. It is not difficult to notice that it partially overlaps (by name) with what is laid out on the shelves:
- Stainless steel (GOST 5582).
- Brass (GOST 17711).
- Gray cast iron (GOST 1412).
- Carbon steel (GOST 380) with a protective coating (GOST 9.306).
- Ceramic glasses (TU 21-0284676).
In addition, the names of gaskets, including rubber ones, according to GOST 9833 and GOST 7338, and plastic products are given:
- Low pressure polyethylene (high density) with stabilizing additives (GOST 16338).
- High pressure polyethylene (low density) with stabilizing additives (according to GOST 16337).
- Molded polypropylene (GOST 26996).
- Sevilen.
Siphon for shower drain
We can conclude that the list of materials is, by and large, no different from what we see in everyday life. The difference lies in varieties, additives and impurities. Who will tell you what kind of steel or bronze is used by Chinese manufacturers? You don’t need to immediately think that it’s of poor quality, but this option cannot be ruled out. Products according to fig. 4 and 5 according to GOST 23289 can be found widely available. Although it is problematic to do this. Siphons SVPG are equipped with an overflow (for deep trays), and SPM - only with outlet. Dealers on the websites note the coincidence with GOST 23289 (real ship plumbing).