Pros and cons of toilets with bottom connection
The undoubted advantages include:
- neat, aesthetic appearance of the toilet, thanks to which sewer and water pipes are not visible;
- the bottom line is practically silent and economical - the water does not “run”, since the water flow comes from the bottom of the drain barrel;
- The lower line is reliable and rarely requires repairs.
- this type of liner is difficult to install;
- difficulties when replacing parts - it’s easier to completely replace the system.
The efficiency of sanitary equipment directly depends on the quality of cleaning sediment from the outlet pipe elbow; this function is performed by the fittings for the toilet flush cistern.
Methods for installing a toilet cistern
The toilet cistern can be attached in three different ways:
- The first method looks like this: the structure is installed directly under the water flow, and you need to combine it into a whole system with a toilet using tank fittings. The scheme may not look very nice, but it is capable of providing good water pressure at the time of its descent.
- The second installation method is that here the flush tank is mounted on the toilet itself. In most cases, this is done when you need to replace an old tank that was installed using the first method. The main advantage of this installation option is that the tank and lid are placed in plain sight, and maintenance and repairs can be carried out as simply as possible.
- The third method of installing a drain system tank is that the structure will be embedded in the wall. The main disadvantage of this installation scheme is the repair of the wall. The advantages of this method include: complete invisibility of the tank and space saving.
The toilet in every home is an element of everyday life that is simply impossible to do without. It is used much more often than all other plumbing fixtures. That is why it fails more often than other devices. And its most vulnerable component is the tank, which consists of several internal components. Their mechanical damage, as well as careless handling of the tank, are the reasons for this device to lose its functionality. In this article we will look at how to repair a toilet flush cistern with a button yourself, without calling a team of plumbers.
General information. Types of drain containers
The following types of drainage tank are distinguished. Flush models differ in the type of installation with the toilet bowl and the requirements for installation work.
Types of drains:
- 1. Compact type drain. The tank is sold as a set, bolted to the shelf of the toilet bowl, and after completion of installation work it forms a single plumbing device. Assembly of this type is considered the simplest and is an economical option.
- 2.Autonomous, hinged type of tank. The container is attached to the wall above the bowl, and the toilet is connected to the cistern using a drain pipe leading from the cistern. Flushing is carried out not by pressing a button, but by using a rope or lever.
- 3. Built-in view of the drain tank. This type of cistern was designed specifically for toilets that have a wall-hung bowl. The toilet is built into the wall of the toilet, the flush tank is located behind it on a frame, which is installed behind a false wall, the flush button is placed outside. This plumbing fixture is equipped with a dosed drain.
Common faults
Drainage malfunctions may well lead to the toilet losing its functionality. For many, such a sudden breakdown can be a real natural disaster. In addition, no one will like increased water consumption either.
Read about what a hygienic shower for a toilet with a mixer is and what types it comes in in a separate article.
We described how to choose a pump to increase water pressure and in what situations it is needed in another article on the site.
What kind of breakdowns are typical for drain tanks? We list them in order of frequency of occurrence:
1. Water leaking from the toilet onto the floor . Most often, water leaks through the o-ring located between the bottom of the tank and the toilet shelf. If the ring is cracked or warped, water will leak through it. Also, the place of leakage may be the gaskets of the mounting bolts that secure the tank to the shelf. They will have to be replaced if tightening the bolts does not work. And it doesn’t matter whether an old-style toilet cistern is being repaired or a modern system is being repaired. After all, they all have the same fastenings.
A high-quality sealing ring of the drain tank is the key to its good sealing
Tip: When replacing gaskets and seals, it is recommended to lubricate them with liquid silicone to extend their service life and prevent cracking.
2. There is a constant flow of water in the toilet . Most often this is due to the tank overflowing, in which water flows out through the overflow tube. This can happen due to a change in the height of the overflow, a loose fit of the float to the shut-off valve, or the float losing its tightness. The rubber seal on the drain fitting may also be worn out. Most often, the malfunction can be corrected through adjustment. If the locking gasket is worn out, it is advisable to replace the entire drain mechanism.
3. Malfunction of the starting mechanism . If you are using a push-button water supply mechanism, when you press the button, water may not flow into the drain. You can repair the fittings of the drain tank yourself, since, most often, the lever mechanism connecting the button with the drain breaks. This also applies to tanks with a handle or chain.
4. Noisy filling of the tank . This happens due to the disconnection of the tube through which water is poured into the tank. This is typical for tanks into which water is supplied from the side. If the tube falls off, the noise of incoming water will be clearly audible. To fix the problem, remove the top cover and install the tube on the fitting.
Installing a toilet cistern
For ideal operation of the toilet, it is necessary to follow the technology for assembling the flush cistern. Therefore, before starting work, you should familiarize yourself with all types of drain tanks and methods of their installation.
According to the method of draining water, tanks are divided:
- Side with float valve. Characteristic design details are a float valve with a water seal, a chain and a drain handle. So, when flushing, as the drain tank empties, the valve gradually rises above the water level, and when the required amount of water is collected, the supply is stopped using a water seal, which blocks the access of water;
- Top with non-float valve. This type of valve has a cylindrical shape that should protrude above the surface to drain water and lower when pressed manually.
toilet cistern flush design
The installation of a toilet cistern itself is divided into several stages:
The first thing to do is assemble the bleed valve. To do this, an oval-shaped rubber ring is placed on the bottom of the valve, then this valve is inserted directly into the tank and secured with a special nut and washer.
To ensure maximum tightness, an additional O-ring is installed.
After all the preparatory work, we install the flush tank on the toilet, while paying attention to the fact that all the holes must match. We insert fastening bolts with sealed gaskets into these holes, carefully and evenly tighten the bolts, pulling the tank to the toilet; We unscrew the drain button from the drain mechanism, then install it on the push-button mechanism in the bracket on the valve, then attach the chain to one of the holes. The next step is to install the inlet and shut-off valve
Next, a rubber gasket is put on the threads of this valve, and this entire structure is inserted into the hole of the tank. At the bottom of the tank we secure the valve with a special nut, screw on the adapter and supply water. By turning on the water, you can adjust the level of incoming water in the tank. To do this, you need to loosen the thumb that is on the rocker arm of the bulb, lift the bulb up until the water stops flowing and tighten the nut. In the final stage, connect the drain tank to the water supply system; to do this, install a special hose designed to supply water.
Depending on the height of their location, flush cisterns are divided into three groups:
- Low-mounted cisterns are attached directly to the toilet.
- Low-lying tanks are often used in residential and office buildings; Mid-mounted tanks are mounted into the wall to a height of up to 1 m, through a supply pipe;
- High-mounted cisterns are mounted into the wall to a height of no more than 2 m; such cisterns are often installed in public toilets.
Also, toilet flush tanks are divided depending on how the water is flushed:
- The direct flush mechanism is characterized by the flow of water into the toilet directly from the flush tank, without changing the direction of water movement;
- The reverse flush mechanism allows the water to constantly change direction as it flushes. The reverse flush mechanism is the most effective, but is accompanied by a lot of noise.
Installation of mid- and high-position flush cisterns is carried out in the following sequence:
Installation of flush cisterns is carried out after installing the toilet
One end of the flush hose of the tank is supplied to the already fixed toilet and connected through a coupling and special seals; We install the tank to the wall at the required height and connect it to the second end with a flush pipe; it is also important, in order to avoid water leaks, do not forget to use rubber gaskets. Low-lying flush cisterns are mounted using the following technology:
Low-lying flush cisterns are installed using the following technology:
- First of all, a rubber gasket is laid, pre-treated with silicone glue;
- The tank is attached to the toilet shelves with special fastening bolts with cone-shaped gaskets;
- To ensure the necessary tightness and avoid water leakage, insulating gaskets are inserted into all holes;
- The tank is securely attached to the toilet;
Internal organization
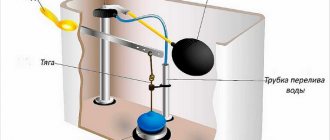
The toilet cistern consists of two simple systems: collecting water and draining it. To troubleshoot possible problems, you need to understand how everything works and works. First, let's look at what parts the old-style toilet cistern consists of. Their system is more understandable and visual, and the operation of more modern devices will be clear by analogy.
The internal fittings of this type of tank are very simple. The water supply system is an inlet valve with a float mechanism. The drain system is a lever and a bulb with a drain valve inside. There is also an overflow tube - it drains excess water from the tank, bypassing the drain hole.
Old design cistern design
The main thing in this design is the correct operation of the water supply system. A more detailed diagram of its device is shown in the figure below. The inlet valve is connected to the float using a curved lever. This lever presses on the piston, which opens/closes the water supply.
When filling the tank, the float is in the lower position. Its lever does not press on the piston and it is pressed out by water pressure, opening the outlet to the pipe. The water is gradually filling up. As the water level rises, the float rises. Gradually it presses the piston, cutting off the water supply.
The device of the float mechanism in the toilet tank
The system is simple and effective; the filling level of the tank can be changed by bending the lever slightly. The disadvantage of this system is the noticeable noise when filling.
Now let's look at how draining water in a tank works. In the version shown in the figure above, the drain hole is blocked by the drain valve bulb. There is a chain attached to the bulb, which is connected to the drain lever. We press the lever, lift the bulb, the water drains into the hole. When the level drops, the float moves down, opening the water supply. This is how this type of cistern works.
Modern models with lever flush
There is less noise when filling toilet tanks with bottom water supply. This is a more modern version of the device described above. Here the tap/inlet valve is hidden inside the tank - in a tube (in the photo there is a gray tube to which the float is connected).
Drain tank device with water supply from below
The operating mechanism is the same - the float is lowered - the valve is open, water flows. The tank filled, the float rose, and the valve shut off the water. The drainage system remained almost unchanged in this version. The same valve that rises when you press the lever. The water overflow system has hardly changed either. This is also a tube, but it goes into the same drain.
You can clearly see the operation of the drain tank of such a system in the video.
With button
Models of toilet tanks with a button have similar water inlet fittings (some with side water supply, some from the bottom). Their drain fittings are of a different type.
Tank device with push-button drain
The system shown in the photo is most often found in domestically produced toilets. It is inexpensive and reliable. The design of imported units is different. They basically have a bottom water supply and another drain and overflow device (pictured below).
Imported fittings for the cistern
There are different such systems:
- with one button the water is drained while the button is pressed;
- draining starts when pressed, stops when pressed again;
The working mechanism here is slightly different, although the principle remains the same. In this fitting, when you press the button, the glass rises, blocking the drain. The stand remains motionless. In short, this is all the difference. The drain is adjusted using a rotary nut or a special lever.
Installing a hidden toilet cistern
Installing a toilet with a hidden cistern will make the design and interior of the bathroom more modern and unique. A flush cistern hidden in the wall not only saves significant space, but also minimizes the risk of accidentally breaking or damaging it. If you are wondering how you can camouflage a cistern into a wall, then you will learn everything by reading these instructions.
toilets with covered cistern
There are two options for installing a toilet with a hidden cistern.
Cistern for floor-standing toilets
The first option is characterized by installing a floor-standing toilet with a hidden cistern; in this option, the toilet will be placed on the floor, and the cistern will be hidden in the wall. In this case, it is appropriate to talk about installing an attached toilet. The cistern of such a toilet bowl itself is a solid plastic body with special fasteners. This body has “ears” with which the tank is screwed to the wall. First, a niche is made in the wall where the tank will be placed, then a pipe is connected to the toilet, and a cuff with a socket is attached to it, which allows you to hide the connections. Finally, flush keys are installed on the wall at a convenient height for you, and when pressed, the water will drain.
Cistern for wall-hung toilets
This design is divided depending on the location of its attachment
If the cistern needs to be attached to a load-bearing wall, then the product is installed in a mounting frame; you should also note that such a wall must be made of concrete or brick. In order to give the structure more strength, the lower part of the frame is covered with bricks, and then tiles are laid
Upon completion of the work, mounting pins will appear from the wall on which the toilet will be installed.
The second option provides a method for mounting the tank on a frame resting on the floor. So, having retreated a short distance from the wall, the lower frame is attached to the floor, and the upper frame is attached to the wall. In this position, all the main loads will be directed precisely to the floor. The second method of fastening is considered the most practical, since the process itself does not take much time, and a wall made of any material is suitable for fastening.
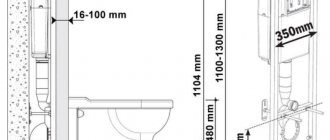
It is important to note that the installation height of the hanging tank should be equal to:
- The mounting height of the toilet should be 40 -45 cm from the floor level;
- The height of the water drain button should be within 100 cm;
- The mounting height of sewer pipes is 20 -25 cm;
- The gap between the wall and the cistern after installation of the installation is 1-2 cm.
It remains to be noted that, guided by all the above rules, you can not only do the work of installing a toilet flush barrel yourself, but also learn the first basics of any plumbing work, as well as completely replace the toilet yourself.
Adjustment, repair and replacement
Like any other structure, the drain tank can break. There are quite a few causes of breakdowns, but some of them can be eliminated yourself.
Malfunctions in the drain mechanism
If the drain mechanism has become unusable, this may be due to the following points:
- The intake valve is already very worn;
- The rocker arm has become warped;
- The buoy began to work incorrectly.
The buoy is constantly in water, which is why cracks begin to form in it during prolonged operation. This leads to water penetration inside. Accordingly, the float begins to sink. To rid yourself of this effect, the easiest way is to change this part.
If the lever is deformed, then it should be returned to the correct position, which should be approximately 2 cm below the hole from where water enters the tank.
The shut-off valve may simply not cope with the high water pressure, so you can just install a float valve.
Replacement
Replacing any part in the drain tank is not too difficult. Here it is only important to complete the preparatory work:
- Turn off the water;
- Empty the drain tank.
After this, you can begin to carry out work. Usually the float fails. It is held on the lever using a special clip. It will need to be unfastened and the float will separate from the structure. Instead, they install a new float and carefully turn on the water to determine whether it holds securely on the surface or not.
Changing the entire drain mechanism is also not too difficult - it is held in the tank by only two bolts that need to be unscrewed, and the mechanism will be easily removed. When installing a new structure, care is taken to ensure that it is as airtight as possible.
When installing the tank directly, it is best to first place all the relevant fittings in it and check that they do not touch the walls of the tank there. Only after this can you install the tank in place, not forgetting to place a special rubber sealing ring between it and the toilet to protect against leaks.
When installing a new structure, care is taken to ensure that it is as airtight as possible.
Adjustment
They usually regulate the volume of incoming water, making sure that it does not overflow through the system and does not go into the toilet. To do this, the float is placed so that it is about a couple of centimeters lower than the edge of the reinforcement.
Work process
How to attach a compact toilet cistern
First, a rubber cuff is applied. The service life increases with careful selection of this gasket; it protects against leakage from under the tank.
The surface of the special protrusion where the tank is attached should not contain any traces of defects. After installation work, the cuff should be in contact with the tank and shelf without gaps. To eliminate possible leaks, the cuffs must be lubricated with silicone sealant. It serves as a guarantee of additional fixation of the rubber gasket during fastening.
Once the plumbing installation work is completed, we perform a test flush
It is worth paying special attention to the process of filling the tank; if something is not satisfactory, you need to adjust the float device. If the flush tank is working properly and there are no leaks, then the job was done correctly
How to install a hinged type of tank
The flush tank is sold together with the toilet. The mounting height of the drain tank depends on the length of the pipe. A pipe with a cross-section of thirty-two millimeters can be made of plastic or metal and is connected to a water tank and toilet. Then holes are made in the wall according to the marks using a hammer drill. You can use fasteners from the kit or dowels; it is most reliable to mount them on brackets that you can buy yourself.
How to install a built-in tank
A hidden plastic tank is retracted into a special niche in the wall or installed behind a false wall made of plasterboard. Plumbing saves space in the toilet room and brightens up the modern interior. The installation process is not complicated; a support frame is used to fasten the elements - an installation; such a kit costs much more than a compact toilet. You can buy a bidet to go with the toilet.
The hidden design keeps the tank extra safe. It is worth noting such an advantage of the model as a dosed drainage system in the tank, which saves water. After installing the drain tank, only the drain button remains visible on the wall. Bolts and frame frame are included with the toilet upon purchase.
Before installing the frame, you need to remove the pipes from the water supply and sewer system to the tank and toilet. After completing the work on fixing the dimensions of the frame frame and preparing the installation system, mark the fastening points on the wall and floor. Using a hammer drill, holes are made; you need to take into account the material of the wall so as not to damage the drill. Using anchor bolts or dowels, the frame frame is screwed to the wall.
It is important to maintain clear verticality; it is measured by the building level; compliance with this requirement is conditioned by the guarantee of uninterrupted operation of the plumbing. All plumbing elements are installed on the frame, from the cistern with toilet to the siphon
The drainage tank is connected to water. A drain button is installed in the false wall in pre-prepared holes. The flush button is double, so the system is dosed and allows you to select a full or partial flush mode of three or six liters, or six and nine liters when flushing. The mounting frame is finished with decorative materials in the form of panels. During the entire installation process, it is necessary to monitor the tightness of each element.
All plumbing elements are installed on the frame, starting from the flush cistern with toilet bowl to the siphon. The drainage tank is connected to water. A drain button is installed in the false wall in pre-prepared holes. The flush button is double, so the system is dosed and allows you to select a full or partial flush mode of three or six liters, or six and nine liters when flushing. The mounting frame is finished with decorative materials in the form of panels. During the entire installation process, it is necessary to monitor the tightness of each element.
Which type of toilet is more profitable?
From a financial point of view, installing a compact toilet cistern is considered more economical and simpler; all fasteners are included in the kit; you need to check their availability when purchasing. If you install the tank in a mounted or hidden model, you will need to purchase additional fasteners yourself.
Equipment installation
It is not difficult to buy shut-off valves at any plumbing store, but it would be better to install the branded components included in the kit. Thus, there is a greater likelihood of matching all components.
To install the cistern yourself, you need the following tools:
- wrenches: adjustable and open-end;
- bendable hose;
- screwdriver;
- plumbing system;
- gaskets of the required size;
- fuma made of rubber.
The instructions for installing such equipment include several stages. Initially, you should install the lower part of the drain assembly in the tank, the main thing is to make a tight fit to the outlet hole. Install a rubber gasket between the bottom of the container and the base. Then install the tank on the toilet. A thick rubberized ring should be placed between them. This will prevent surfaces from touching. Using bolts, you should screw the flush and flush structure to the toilet.
If this is a drain tank device with a button with a bottom water supply, then before installing the structure, the elements that will supply the liquid should be correctly installed. In this system, rubber gaskets should be firmly secured. They will help avoid leakage. In a structure placed on top, these elements will not be needed, since they are above the water level. After fixing the tank, you can install such units. The same method is used for these types of installations. A tube is threaded into the hole in the tank and secured on both sides with nuts.
The next step will be to attach a bendable hose to the riser fitting and attach a water tap, allowing, if necessary, to carry out repairs and shut off the flow of water. Typically, hoses have nut-spacer elements in their design, which ensure fastening strength. However, craftsmen most often build in a fuma for greater reliability. After connecting the tank to the water supply system, the float should be adjusted. The liquid level should be 15 cm below the edge of the tank.
How does the drain mechanism work?
By pressing the release button, the tank system begins to operate. Such a device for drainage equipment is located in connection with its “filling”, located in the container itself. Before the button is pressed, the tank is waiting. It already contains water, which runs up to the set level. Using a special bulb, the liquid is held in the tank. It is made of rubber material, so it always fits quite tightly to the saddle. By pressing the button, a pull is performed, which in turn pushes the bulb away to open the drain. As a result, the seat will not be clogged, liquid will enter the hole in the tank and flow out into the toilet.
Toilet with a button on the cistern lid
After releasing the button located on the tank lid, the bulb does not immediately return to its original position. Otherwise, this would have meant that the drain was short-lived. In the right device, this is the process of slowly lowering the bulb, completely hollow inside. There is only air in it, pushing it out of the saddle.
The lifting force of this component of the system becomes less according to the degree of water collection into the tank. At the end, the pear is completely sucked to the saddle. Installation without a special guide tube would not bring a positive result. The secret here is that various forces act on the rubber shutter, leading it in the direction of minimum resistance. If there was no pipe in the structure, then this rubber element would not be able to return again to the saddle located in the center of the tank.
Adjusting the amount of water in the tank
The maximum amount of water in the tank is adjusted by changing the length of the lever to which the float is attached. If the role of such a lever is performed by a piece of thick wire (this is still found in older models), it can simply be bent up or down, depending on whether you need to make the amount of water in the tank more or less.
The higher the position of the float in the tank, the more water will flow into the tank.
But instead of wire, modern models increasingly use plastic elements, which, of course, cannot be bent. To change the position of the float, it is simply moved along the plastic arm, placing it closer to the water supply point or further from it.
The closer the float is to the valve, the less water will flow into the tank. To secure the float, a latch is usually used, which must then be pressed to move this element. Sometimes a threaded connection is used; it is usually not difficult to unscrew and then tighten it.
In toilets with bottom water supply, the shoulder is located vertically, and it is even easier to regulate the water level. The float is simply moved higher or lower along the lever. Its position will correspond to the required water level.
Such simple manipulations will help improve the performance of the tank, increase flushing efficiency and save a significant amount of water.