Fittings for the cistern: types, characteristics
Depending on the functions performed, fittings are divided into two types:
- I'll lock it. She is responsible for pouring water into the tank and locking it after filling.
- Drain. With its help, water is drained and the drain is blocked until the tank is filled.
Both of these types, despite their interconnectedness, work autonomously, but if one type of fittings fails, the result is the same - water leaks or uncontrolled leakage.
Features of shut-off valves
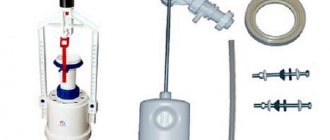
The shut-off valve set consists of:
- A drain mechanism, which in turn consists of a siphon with a lid and a gasket. The last part separates the drain pipe and the storage tank.
- Jet control lever. It is connected to the water pipe through a ball valve.
- A float that coordinates the filling of the tank. It is connected to the drainage device by a lever.
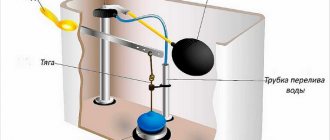
The shut-off valves operate according to the following scheme:
- water is supplied to the tank;
- the float rises to the set level;
- the lever acts on the shut-off valve and blocks the flow of liquid from the water supply.
When draining, the float takes the lower position, and the lever opens the way for water to enter the container from the water supply. Based on the method of water entry, a distinction is made between side and bottom shut-off valves.
Side fitting for cistern
Tanks with side inlet are equipped with two openings, one of which is closed with a plug. In some toilet models, flushing is carried out using the side lever, in others - using the top button.
The operation of the side fittings is accompanied by quite a lot of noise, which is eliminated by using an extended inlet hose.
Lateral fitting components
The drain design consists of the following elements:
- intake valve;
- trigger device;
- lever with float;
- filling container;
- lever controlling the trigger.
The fill container may be missing.
Then the float moves along the guide. The advantage of fittings with side connections is the simplicity of the design. It is easy to repair, there is no need to heavily seal the connection point of the inlet hose, and its cost is relatively low.
The drain mechanism works as follows:
- When the button is activated, a pull occurs. Under its influence, the drain valve opens.
- The entrance to the drain mechanism is blocked and the drain is carried out.
- When the lowest water level is reached, the drain in the tank is closed by closing the release mechanism.
- The float hole opens.
- After returning the vertical valve to its place, the drain passage is blocked.
- The water level drops and the float lowers, clearing the way for filling the drain tank.
- When the maximum liquid level is reached and the float rises, the tap is closed, stopping the flow of water.
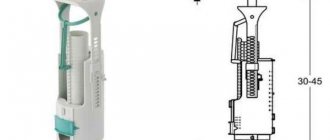
Fittings for toilet cistern with bottom connection
The lower fittings include the following elements:
- Float. Its role is to limit the water level in the tank.
- Guide. A float moves along it.
- Release device. It includes a glass into which, when flushing the toilet, a float and a rod connected at one end to the float and the other to an element for locking the liquid are lowered.
- Diaphragm valve.
Fittings for a toilet cistern with bottom water supply.
The advantages of this type of fittings include the absence of noise when filling the tank with water. The design of the lower fittings is extremely simple, therefore, it lasts a long time. Structurally, it is designed so that the inlet hose can be hidden.
The lower fittings work according to the following scheme:
- When water is drained from the tank, the float goes down along the guide.
- The thrust imparts a force that causes the valve to close. Water is not supplied to the storage tank.
A distinctive feature of this fittings is the direct dependence of the diaphragm valve on the quality of water entering the tank. Ideally, it should undergo pre-filtration, otherwise parts may become clogged. In this case, it becomes difficult to supply water to the tank.
The aesthetics of the design is an undoubted advantage of fittings for a toilet cistern with a bottom connection, but when repairing it you have to face some difficulties. They are associated with the inconvenient location of the fittings.
The shut-off elements fail due to the failure of the float seal, resulting in its flooding. Liquid constantly flows into the storage tank and flows through the overflow pipe into the toilet.
Leakage is possible in the connection area due to weak fixation of the nut or due to damage to the rubber gasket.
Toilet fittings: its main types and general plumbing design
The fittings installed in the cistern are designed to perform several functions. Some parts help fill the container, others are responsible for draining it, and others prevent it from overflowing.
The fittings in the drain tank consist of a float, a drain valve, a shut-off valve and a release lever
The unit that ensures that the tank is filled with water supplies liquid using a flexible tube. This type of fittings is equipped with a special valve, which operates at the right moment and blocks access. The operation of this element depends on the position of the foam float.
The main component of a toilet flush fitting is the valve installed at the drain hole. When the user presses the lever or release button, a thrust is generated that sets it in motion.
Protection against overflow or overfilling of the tank belongs to the category of safety devices. This part is a hollow plastic tube. In the tank it is installed in a vertical position.
A hollow plastic tube installed in a vertical position protects against overfilling of the tank
Basic equipment of the toilet: the insides of the cistern
Inside any tank there are fittings that control the operation of the plumbing. In many toilet models, the fittings are supplied with a set of necessary nuts and fasteners.
Based on the method of supplying liquid, the following types of fittings (connections) are distinguished:
The top line is installed in the side of the tank. In this case, a flexible tube that supplies liquid is connected from above.
Note! Before assembling the toilet, you need to make sure that the components and plumbing are compatible. Not all models of cisterns allow the installation of a top line. This mainly applies to foreign-made plumbing fixtures. Domestic companies produce toilets that provide the possibility of installing an overhead connection.
According to the method of supplying water to the tank, there are such types of fittings as lower, upper, universal
Foreign-made waste cisterns are equipped primarily with fittings with bottom connections. Despite the fact that the parts are made of plastic, the quality of all components is very high.
The universal water supply is very convenient because it allows you to organize the water supply both from below and from above. Having decided on the type of installation, the unused hole is simply closed with a special plug. It is supplied complete with fittings.
Based on the material used, the following types of fittings are distinguished:
- plastic;
- metal (an alloy of brass or bronze is used for production).
For the most part, tanks use plastic structures. If individual parts fail or wear out, then buying toilet fittings is not difficult. Plastic products are presented in a huge variety in all plumbing stores. Even if the desired option is not on sale, you can always replace the design with a new one. The cost of plastic parts is significantly lower than the price of metal elements.
As a rule, plastic fittings are used in drainage tanks
How to choose a toilet cistern separately from the base: types of plumbing fixtures
There are many types of toilets, which differ from each other in appearance, pressure, method of installing the tank, flush mechanism and other parameters. These designs may even have different drain directions. There are toilets with side flush, as well as vertical and horizontal.
Based on the nature of the placement of the tank in relation to the base, the following types of toilets are distinguished:
Unlike other varieties, separate plumbing fixtures do not have a rigid connection. In such models, the user can choose the type of tank for his toilet.
Toilet tanks are classified according to different criteria:
- installation method;
- material of manufacture;
- connection option to the water supply system;
- area where the release lever or button is located.
According to the method of placing the cistern, toilets are divided into monoblocks, compact, corner, separate
In addition, tanks vary in cost. In stores you can purchase budget models of domestic production or exclusive products with a unique design of the elite class.
According to the material of manufacture, tanks are:
At the same time, flush fittings for toilets are almost always made of plastic (even in expensive models). The most common are tanks made of earthenware. Plastic options have a flattened shape. This type of product is used in wall-hung toilets.
Note! Tanks that have a flattened shape take up much less space, which allows them to be built directly into the wall.
Cisterns are made of earthenware, cast iron or plastic
Plastic structures are quite reliable. They have a long service life and do not require complex care and maintenance.
Tanks made of cast iron are considered obsolete and are extremely rare. They are too bulky and heavy, and also look unpresentable. Cast iron tanks are still used in Russia, but the population is gradually switching from them to more modern options.
How to choose fittings for a toilet cistern
The main requirement for tank fittings is a long service life without repairs. When buying a toilet, you should look into the tank or ask the sales consultant to show the fittings separately.
Basic recommendations when buying a toilet
Experts advise adhering to the following rules:
- Do not choose complex mechanisms. They are more likely to malfunction and are not easy to repair. The design should be simple and extremely understandable.
- It is better to choose designs with fixation of the float and valve for dosing the liquid supply to the side wall. The lower supply is a weak point; leaks most often occur here.
- Choosing an exclusive fitting option is not a very good decision. A standard design is easier to repair; if necessary, it can simply be replaced.
- The quality of plastic parts is of great importance. The material must have sufficient strength, resistance to temperature fluctuations, and mechanical loads.
- You should pay attention to the brand. It happens that inexpensive models from an unknown manufacturer are defective.
Installation and replacement of drain fittings
Before you begin installing or replacing fittings, you need to prepare the necessary tools: pipe and other wrenches, pliers. Additional materials required include sealing tape, gaskets of different diameters, and flexible pipes. If the tank has two holes, a decorative plug will be needed to cover the unused hole.
Part of the fittings is installed before installing the tank, and then another part. The first stage involves installing the base of the drain mechanism. Secure it with a plastic nut. Next, put a rubber sealing gasket on the nut and attach the tank itself.
The next step is the installation of the device responsible for the flow of water and connecting the hoses from the water supply.
During installation, be sure to adjust the float, levers, and valve. Adjust the float so that it provides the volume of water required for draining. The foam float is easily adjusted - it is moved along the bar. Plastic - by changing the angle between the slats.
You can see what the installation of fittings looks like in the following video:
Types of fittings in the cistern: features and installation
Malfunctions of the internal fittings of the toilet cistern, whether floor-mounted or wall-mounted, can cause excessive consumption of cold water, increased noise during operation of the plumbing fixture, and if the installation site of the cistern or the place where the flexible hose is connected to it is depressurized, it can cause flooding of the neighbors below. To avoid such undesirable consequences, it is necessary, at the first sign of a plumbing problem, to repair the fittings of the drain tank.
Replacing the cistern fittings
In most cases, problems with the toilet cistern cannot be eliminated by adjusting the valve mechanism. Aggressive inclusions that may be in water over time have a negative effect on the rubber parts of the fittings.
Such parts are destroyed, which leads to leakage of the valve mechanism.
If the toilet is located in a private house in which water is supplied from a well or well, then if a fine water filter is not installed in the water supply system, destruction of the elements of the toilet cistern occurs most often.
To replace worn parts, it is enough to replace the valve mechanism and rubber gaskets at the point where the water supply connects to the drain tank.
Tools for replacing fittings
To replace the fittings, you need the following set of tools:
- Sliding key – 2 pcs.
- Ruler.
This set of tools is quite enough to carry out work on replacing fittings. You should also stock up on a sufficient amount of rags, which must be spread on the floor so that part of the liquid that remains in the tank even after draining the water from it is immediately absorbed into the fabric.
Removing toilet fittings
In order to replace the toilet fittings, it is necessary to remove the previously installed valve system.
Dismantling is carried out in the following sequence:
- In the part of the water supply that is connected to the toilet tank, it is necessary to turn off the water supply. If a special tap is not installed in front of the tank, then the water should be turned off at the central riser.
- The toilet tank is completely drained of water.
- Use a wrench to unscrew the flexible hose that supplies water to the toilet tank.
- The toilet lid is removed.
- The bolts holding the tank are unscrewed and the part is carefully removed from the toilet.
- The complete fittings are removed from the tank; to do this, simply unscrew the nut holding the fitting, which is fixed in the lower part of the tank or on the side.
- The fittings are removed from the tank.
At this point, the process of removing the old valve system is completed, you can proceed to installing serviceable fittings, but in order to avoid problems during replacement, you should purchase a valve mechanism model that will fit this toilet model.
Types of toilet fittings
The main difference in the design of the cistern fittings is the connection of water to the tank. The valve mechanism of the valve can be located vertically or horizontally. The location of the valve depends on how exactly the cold water is supplied to the tank.
With the lower method of water connection, the mechanism for regulating the filling of the tank has a more complex design, but the main advantage of this system, over a horizontal connection, is the silent filling of the tank with water. The bottom connection is also a more aesthetic option, due to the fact that the hose is almost completely hidden under the container of the drain tank.
In order to select replacement fittings with a bottom connection, you need to measure the diameter of the threaded fitting; this can be done using a ruler or caliper. When the measurements are made, you need to go to the store and select a model with the same diameter of the fitting for connecting the water hose, and the type of arrangement of the mechanism inside the tank.
If the water connection is made from the side, then you need to select fittings only of this type.
The diameter of the pipe should also be measured before going for a new valve mechanism.
Regardless of the model and design of the mechanism, when purchasing a new part, you should pay attention to the absence of mechanical damage. If transported or stored incorrectly, the plastic parts of the valve mechanism may become deformed. Such a change in geometry will lead to the inoperability of the mechanism at the time of installation or during a short period of operation.
The rubber parts of the toilet fittings should not have cracks. Even minor damage to the rubber can lead to leaks in the entire valve mechanism structure.
Installation of fittings
Before installing new shut-off valves, you should wash the tank in soapy water. During operation, deposits constantly form on the walls of the tank, which, when released back into the water, can cause a leak, even a new locking mechanism.
Installation of new fittings is carried out in three stages.
- Installation of a float locking mechanism and water drainage system.
- Installation of the tank.
- Installing the reservoir cap and push-button assembly.
To install the float mechanism, you need to insert the fitting with the locking system into the small bottom hole of the toilet and tighten the nut until it stops. Do not forget about the rubber gaskets that are included with the locking mechanism. To increase the reliability of this unit, the gaskets can be placed on silicone sealant. When tightening the nut, do not apply excessive force, otherwise there is a risk of deformation and breakage of the thread of the plastic nut.
If the water connection is made from the side, then all procedures for installing the valve are carried out in the manner described above, only the shut-off valve will be located in a horizontal position.
Installation of the central drain mechanism is carried out in a similar way. In order to make the connection between the drain pipe and the tank more reliable, it is necessary to install rubber gaskets on the sealant and immediately tighten the nut.
When installing the tank on the toilet, tighten the nuts evenly. If the tank is installed unevenly, then you should be wary of leaks at the junction with the toilet bowl.
The lid is installed on the toilet tank and screwed on with a flush button. When installing the button, you should keep in mind that the deeper this part is recessed into the recess, the less water will drain from the tank when it is pressed.
Repair of toilet fittings
It is not uncommon for a cistern to break down. In this case, it is not necessary to call a plumber; after studying the principle of operation of the fittings, you can fix the malfunctions yourself.
Basic faults
The most common possible defects are:
- high water consumption;
- leak;
- weak drain;
- production of gaskets.
Insufficient drainage may occur as a result of obstruction of the drainage channel.
A leak can be explained by the addition of water through an overflow or wear of the float. In case of overflow, the fittings are set to moderate water consumption. To do this, bend the lever or adjust the fastening screw. In the second case, the float is made heavier by adding metal hangers or replacing it with a new one.
Troubleshooting an inlet valve
In this unit, a violation of the quality of locking is most often observed. This happens due to the activation of an elastic cuff or rubber stopper. For repairs, the exhaust valve must be removed. Before this, turn off the tap and drain the water from the tank. Next, unscrew the drain button, remove the cover, unscrew the union nut, through which the valve is attached to the bushing.
The valve has a small rocker arm on the reverse side; it is connected to a float lever or rod. This is where the problem with any type of valve lies. To troubleshoot the problem, take the following steps:
- The drive lever is disengaged from this rocker arm.
- The rocker itself is removed. Typically, it is secured to the valve body with a pair of pins.
- Check the condition of the plug pressed into a plastic cup located on the opposite side of the rocker. It is taken out and turned to the water supply spout with the flat side. If this has already been done, the cork is cut, resulting in two even ends. The halves are folded and pressed back into the glass.
Diaphragm-type valves lose their tightness when the rubber disc is deformed, which may also be caused by insufficient float pressure on the valve. In this case, adjust the glass, placing it lower. There is another option - a foam cube is connected to the float from below. When these actions do not give the desired result, the membrane is changed.
Troubleshooting a button
Jamming, unsatisfactory movement, or complete disobedience to the influence may occur in this node. In older models, the button worked by acting on the rack. The latter transmitted movement to a gear on which a long lever was attached. At the end of the lever there is a chain, through which the membrane is lifted. The problem was resolved by tightening the chain more tightly. The teeth on the rack could also work together. To eliminate the malfunction, it was turned with its back side.
Modern drain valves are equipped with a lever mechanism, which is more reliable. The only possible thing is that it is not centered correctly. To avoid this, the threads on the drain valve body are positioned exactly along the central axis of the hole. If this condition is violated, the upper thrust plate of the microlift is shifted in the desired direction.
The cause of such a problem is failure of water to enter the tank, debris in the valve section in the narrowest place. In this case, the tank should be emptied, and the valve, together with the float and lever, should be unscrewed. Then, using a needle, clear the narrow passage through which the liquid enters the tank.
Toilet device
Even before repairing plumbing equipment, it is advisable to learn more about its structure. It's very simple. Each toilet model consists of two main parts:
- Bowl located on the wall or on the floor;
- A water reservoir attached to the top is a tank.
This device works like a water seal. By pressing a button, we set in motion a mechanism subject to the laws of gravity. The water rushes down into the bowl, washing away everything in its path.
Connected toilet
If you open the lid of the water tank, you can see the following parts, which form the drainage mechanism:
- Float;
- Seal;
- Levers.
This system supplies water inside the tank, where it accumulates and then is subsequently drained. The “heart” of the drain mechanism is the shut-off valve. It is he who shuts off the water supply when its level in the tank reaches a critical point.
Some models may have more than one flush button. Then water can be used more economically.
Adjustment and configuration of drain fittings
The lower fittings are adjusted by rotating the adjusting screw. It sets the position of the float relative to the thrust. To fill the container as much as possible, turn the screw counterclockwise. If minimal filling is required, adjust clockwise.
By moving the float chamber along the rod, the liquid level in the tank is adjusted. When the lever has an increased size, the level can be increased and vice versa. To do this, simply unscrew the fixing screw, install it in the desired position and lock it.
The float can be moved along a toothed plastic rod. The water level in models with a metal rod can be changed by bending the rod in the desired direction.
Having mastered the principle of constructing a drain tank, you can deal with all the problems on your own. Even if the breakdown is repaired by a plumber, you can evaluate and accept his work. When deciding which fittings to choose, you should remember that top-connected mechanisms are cheaper, simpler, and bottom connections can also be reliable if all installation rules are followed.
Source
Types of valves in drain fittings
Various types of float valves are used in toilet flush designs. They differ in their structure and operating principle. There are three varieties:
- Piston;
- Membrane;
- Croydon.
In piston systems, all the work is done by a lever, which is tightly connected to the piston, which initially seals the outlet, and when the lever opens, the water is flushed.
Membrane systems are used in new modifications of plumbing equipment and are considered the best option for flush tanks. In this design, instead of a piston gasket, a silicone or rubber membrane is installed, which moves simultaneously with the working piston and opens and closes the outlet;
The Croydon system is used in outdated modifications of drain fittings. The piston operation is controlled using the operating lever.
What does it represent?
It does not matter what design the fittings are built into the cistern. It should perform the function of maintaining water in it: when it fills, turn off the tap, and when it is empty, open it again. The fittings consist of a drain unit - a device that should regulate the water pressure and the location of the float. The latter is a kind of sensor that directly determines the need to open and close the tap.
Installing fittings for a drain tank with a bottom connection involves connecting an underwater tap. There are two types for the filler unit: push-button and rod. With a push-button device, water drains when pressed, that is, automatically. In the same mode, water descends from the stem. But in this case, the handle needs to be pulled up and then returned to its original position.
Nowadays, more modern tanks with a button are increasingly used. For such a mechanism, it is necessary that the button in no case protrudes above its surface; the opening must be at least 40 mm. This size is designed for round mechanisms. But there are both oval and rectangular models.
Features of drain fittings for a tank: installation technology and prices
The drain fittings consist of a drain lever and a drain siphon. The main function of the latter is to seal the hole hermetically when the liquid has drained. There are several structural models of siphons. The simplest products look like rubber cylinders.
Average prices for cistern fittings (flushing mechanisms):
| product name | price, rub. |
| Alcaplast toilet fittings | |
| For high tank | 325 |
| For installation "Ecolodge" (height 1000 and 1200 mm) | 450 |
| For low tank | 510 |
| With stop button | 725 |
| With extended stop button | 780 |
| With double button | 980 |
| Geberit fittings for toilets with installation | |
| Name of models with which the mechanism is compatible | price, rub. |
| "Delta" UP100, "Sigma" UP320, "Sigma" UP300 | 1350 |
| "Delta" UP172 | 1400 |
| "Kappa" UP 120 | 1455 |
| "Sigma" UP720 | 1555 |
| "Omega" 12 | 2200 |
| "Delta" UP182 | 2300 |
How to install and adjust a toilet flush
Before starting work, it is advisable to sort all the parts of the kit so that each bolt is accompanied by a gasket and washer. Fastening is carried out as follows: a washer is put on the back of the bolt, followed by a nut, which must be tightened tightly, but very carefully so as not to damage the ceramic coating.
Recommendations for the toilet flush device:
To ensure that the drain mechanism sits tightly, you need to use a rubber gasket.
- Install the drain mechanism in the tank in its designated place.
- In order for the part to fit tightly, you need to use a rubber gasket, which should be placed on the nut.
- Securely fix the mechanism using a plastic nut.
If the sealing part has already been in use, then the connection area must be additionally treated with a sealant (experts do not recommend reusing the sealant). New rings don't need this.
Note! If minor casting defects are found in joint areas and parts, a sealing compound must be used.
To adjust the toilet flush by adjusting its height, you must:
The drain intensity is adjusted by moving the damper or float
- Release the overflow tube.
- Carefully press out the element securing the glass.
- Move the stand vertically until it reaches the desired height.
- The glass should be moved along the guide so that its upper edge does not reach the edge of the drain tank by at least 4.5 cm.
- The placement of the overflow pipe is checked. In the correct position, this element is 7 cm lower than the top of the post and 2 cm above the surface of the water.
To adjust the intensity of the drain, you need to move the damper or float.
Constructions
Drain mechanisms often depend on the type of tank, for example, a suspended version. This type has been used for a very long time. It had advantages only because of its high location, which gave strong water pressure. The hidden tank is a more modern design, but with a complex installation scheme. Installation takes place on a metal frame, and then the drain button is brought out. The mounted tank has been used for a long time, so it is very popular.
The design and arrangement of the valves differ. Thus, the Croydon type valve is found in older products. When water is drawn in, the float in it rises and acts on it. When water fills the tank completely, the valve shuts off its supply.
Another type, a piston valve, is installed horizontally and is almost no different from the others. For a diaphragm valve, a rubber or volumetric diaphragm is used instead of a gasket.
Such devices do their job well - quickly shut off the water. But there is one drawback - they don’t last long. This is due to the quality of the water in the pipes - it is too dirty, filters have to be installed.
There are several options for controlling the mechanism. Rod systems are a structure on which a rubber valve is mounted. It can open or close the cistern. The design is considered outdated, and everyone is trying to change it. As the gasket wears out, water begins to leak. A locking mechanism is used to completely close the flow area; the locking element is a spool.
Operating principle of toilet valves
In this post, I will tell you the principle of operation of the drain fittings for a toilet cistern and the principle of operation of the filler fittings with side and bottom supply.
I’ll break it all down into small pieces so that you can understand the principle of operation. And when we know the principle of operation, we will be able to clean or repair this device, if necessary.
I will show the principle of operation of drain and fill valves using several examples.
The fittings of this manufacturer are installed on toilets, “Santeri”, “Santek”, “Rosa”, “Dela”, “Keramin” and others. This flush or fill fitting will fit toilets from other manufacturers. The most important thing is that the diameter of the filler hole is 1/2 inch thread,
and the diameter of the drain hole was around 61-65 mm.
Water enters the toilet tank through the fill valve. I'll start with the fill valve. And I’ll start with the oldest fill valve, which was installed on old Soviet toilet tanks.
He is the oldest and is gradually fading into oblivion.
I will show the operating principle of this valve so that people who already use it can disassemble it and repair it, clean it first. So that they are not afraid to take it apart. Well, if it’s time to change, I recommend changing to this one.
More compact and cheaper. But that doesn't mean he's worse.
What does it consist of?
Polymer float
metal rocker,
rocker holder,
holder axle,
retaining nut, gasket,
body nut,
threaded part of the body,
the body itself, the membrane,
the pusher on which the rocker arm holder presses
and filler tube.
The operating principle is simple. Water is gathering. The float floats up. This whole mechanism presses on the pusher.
The pusher presses on the membrane, and the membrane, in turn, blocks the passage of water.
You might wonder why such a long thread is needed? It's actually simple. The filter is hidden in this thread.
If water stops filling into the tank, here is what you can do in the case of this valve. First you need to make sure that water is already reaching the valve. Turn off the water. Remove the liner and check if the mesh filter is clogged. If it is not there, then you will have to remove the valve.
How to remove the valve, see the previous post.
Unscrew the housing nut.
Separate the valve.
There is a nozzle on the threaded part.
Clean it, for example, with a wire in the opposite direction of the water flow. Remove the membrane and wash it. Rinse all parts in water and reassemble everything in reverse order. If there is no serious damage, then the valve will continue to operate.
Please note that the valve cannot be assembled incorrectly.
At a certain place the valve has a joint between the parts. Align these grooves and tighten the connecting nut.
But this tube is needed so that water does not create too much noise when filling the tank. In my case, the tank is made much larger than it actually is. It was made specifically to fully demonstrate the operation of the fittings and methods of height adjustment.
The second type is a filler valve with side water supply.
As I said earlier, you can safely change this one to this one. It will also fit very well in an old Soviet toilet if anyone still has one.
What does it consist of? Float, pusher, nut, oblique washer.
Needed in case the wall of the tank is slightly tilted inward.
This washer can be used to align the supply valve to a vertical position. Now you can see that it can be tilted one way or the other in any direction.
Elastic sealing cone-shaped gasket with an angle of 120°C,
two successive levers, a rod along which the float moves and the same rod is a flow extender,
the filter, the body itself, which consists of a threaded part with a nozzle and the main part of the body in which the rod and elastic membrane lie.
There is a sealing gasket between the two parts of the housing. The operating principle is similar. The mechanism presses on the rod, the rod presses on the membrane, the membrane shuts off the water.
The principle of cleaning this valve is similar to the first. The only difference is that in order to disassemble the valve into two parts, you do not need to unscrew the nut. Because she's not here.
You need to grab the two parts of the body and disassemble it. Unscrew it a little, turn it about 30° and it will come apart.
The next valve is with bottom water supply.
Components: float, rod, rocker arm,
float holder or float guide. Guide extension.
The holder extension is needed in case my tank is too deep and I want to increase the water level. In this case, I move the float as high as possible. To prevent it from falling off, I install an extension cord. Valve body in two parts, threaded part with nozzle, second part with pusher and diaphragm, nut, filter, cone gasket, swash plate.
The principle of operation is similar to the first one with the only difference that it is not horizontal, but vertical.
The fourth type of fittings is with bottom water supply.
Float, pusher,
float guide, which is part of the valve body, guide extension if you have a deep reservoir, rocker arm, rocker arm axis, nut holding both parts of the body, pusher, elastic seal, membrane,
a return element that redirects water down for silent filling of the tank, the second part of the body with a metal thread inside of which a check valve is installed.
A check valve, in principle, is not needed, because when the valve is closed, water still does not flow out of it, but for some toilet manufacturers the issue is fundamental.
That's why it produces such valves.
The fifth type of valve is similar to the one I just talked about, with the only difference that there is no check valve inside it and it has a polymer thread rather than a metal one.
In terms of reliability, plastic threads are not inferior to metal threads in this case.
But for some manufacturers it is the metal thread that is important.
Perhaps it’s worth checking how long the valve with metal threads and with plastic threads holds. Not so much how long it holds, but to see what will burst faster, the valve will rupture, or the flexible line will come off the thread. I think we'll do it in the end. To clean this valve, you need to unscrew the nut and clean it with something like a wire in the opposite direction.
This is if there was no filter or if the filter was cleaned, but the water still does not fill. It is not necessary to remove the valve from the tank for this operation. Well, I think it’s time to check the valve for rupture now.
The first thing that came to hand was a valve with a metal thread.
I did not put it in a transparent tank, because... I was waiting for the valve to break and I was afraid of damaging the transparent tank. Installed a standard tank.
I poured water into it and waited for the valve to take off. But no, the flexible line did not break and the valve did not bang. The valve does not allow water to pass through in the closed position up to 20 bar.
Although the operating pressure is 2 times lower. After 20 bar, the valve began to let water through with a shock. Even after the breakdown, he holds his 12 bar.
The second valve with polymer threads showed a similar result. I took them both apart to look at the damage. At autopsy, no damage was found. Put it back together. I checked. Both valves are in working order. Then I tied the float in the closed position with wire and repeated the test. The result is the same on one and the second valve.
After failure, the valve allows water to pass at a pressure exceeding 12 bar. And it lasts until 12. As a result of the fact that no damage was found inside during disassembly, I can assume that the pressure simply displaces the gasket. After reassembly, the valve is ready for operation again.
It turns out that excess pressure with this valve is not as scary as it seemed to me at first glance. And you don’t have to worry about the valve popping out of the tank during operation.
I was asked a question: what pressure can the valve close? The official operating pressure of these fill valves is 10 bar. But the water filling starts from 0.5 bar or from 0.1 bar for such valves.
Externally, the fill valves seem unremarkable, but they have some engineering solutions that allow these valves to operate as quietly as possible and close quickly when water is filled into the tank.
The quality of valve operation depends little on the degree of water contamination. They can be installed in a tank with different wall curvatures. Due to the cone-shaped gasket with an angle of 120°C with an inclined washer.
Despite the fact that they have tried to make the valves as efficient as possible, they remain affordable. To make sure, you can go to a search engine and look for IncoEr valves and make sure that they are not expensive.
Now I will talk about the principle of operation of the drain valve.
All drain valves have the same basic structure. The functionality of the valves varies depending on what additional elements are installed on these valves.
The advantage of this design is that if you want to put another valve, for example, the valve where the handle was, you want to put a button or you want to put a double flush button. Or you wanted to install fittings with double automatic drainage. In all these cases, you do not need to remove the reservoir and change the socket or seat.
Simply unscrew and install a new valve. I wrote how to do this in a previous post.
The valve base includes: seat, nut, gasket,
retractable overflow tube,
extremely elastic gasket holding the pad under the washer,
guide, valve body bottom, automatic drain float,
red case cover or blue elite version. Engineers tried to make the most simple and reliable design for long-lasting operation of the valve. One of the engineering solutions is the edge of the valve seat.
It has a sharp shape. The valve seal is made of elastic material that is resistant to aggressive media that may be contained in tap water.
One way or another, the water is not perfectly clean and over time the valve and the tank itself become covered with a brown coating.
So this connection, the seat and the valve, are designed in such a way that under water pressure when the tank is filled, the valve sags, and the gasket is pressed deeper, thus cleaning itself and the edge of the seat.
As a result, the most important sealing spot - the elastic seal and the sharp edge of the valve seat - always remain clean.
However, if your drain valve starts leaking water, it doesn't necessarily have to be a valve, disassemble the valve and look at the condition of the rubber seal and the seat/seat where the gasket meets the plastic part. If necessary, clean in such a way as not to damage the socket or tear the elastic gasket.
According to the manufacturer, since the creation of this valve design, there has not been a single complaint from users about the leakage of the drain fittings.
Quite often people ask me the question: why does the water from the tank not drain well into the toilet? It seems that everything that can be adjusted has already been adjusted and the button is pressed all the way, and the filling of the tank is set to maximum, but when you flush the water, the water goes so-so? So, now I will tell you how this problem was solved by engineers.
The intensity of the water drainage flow in this fitting does not depend on whether the drain is small or full.
In both cases, when draining, the valve opens the drain hole completely. Water enters the hole from all sides. During descent, a vacuum is created in the tank, which prevents the free flow of water from the tank. Some manufacturers make holes in the rear of the tank to allow air to freely enter the tank, but not everyone is ready for this.
In my case, there is not a single hole in the walls of the tank. The manufacturer offers a button with a special breather, which ensures sufficient air penetration into the tank.
As a result of these two engineering solutions, an intensive drainage of close to two liters per second is ensured. Then, like other manufacturers, the drain rate can be 1.2 or 1.5 liters per second. Actually, this is the answer why in some toilets the water does not drain well, while in others it drains well. Everything very much depends on the design of the reinforcement.
I showed the base of the valve, and now I will show what is attached to them in order to get all the different things that I will talk about now. I'll start with the simplest release mechanism by lifting the handle up.
This mechanism is especially popular among older people. Due to the fact that pulling out the handle is easier than pressing a button with your finger. This valve consists of a base plus: an overflow extension tube, a clamp for this tube,
holding base and nut for cover.
Adjustable threaded rod, handle, drive rod holder, rod nut,
valve lift drive rod.
Installation is very easy. I installed the valve body, tightened the nuts holding the handle, and connected the valve and the stem with a rod. The rod was passed through the hole. All is ready.
Adjustment.
There are no problems in adjusting the fittings to the height of the tank. I loosen the nut that holds the overflow tube extension in place.
I lift it up to adjust the height so that I can fill it with more water than is currently installed.
Please note that when you install the overflow tube, do not install it too high. The overflow tube must be installed lower than the edges of the tank. Not edges, but additional holes. For example, there may be holes for air supply on the right or left and back. What I wrote about earlier. We adjusted it, lifted the overflow tube, and tightened the nut. After which the thrust that the valve itself pulls
It can be easily detached, moved to the side, raised to the desired height and snapped back into place. And the nut must be tightened so that it is close to the valve itself. Thanks to this nut, you can stop the flow during draining. The function is called stop flow. When you pull the handle, the handle remains in the raised position until all the water has drained from the tank. In order to stop the flow, let’s say you decided that you didn’t need to drain all the water, the fact that it was already glass was enough for you. In this case, you need to hit the handle and thus the valve will turn off the water back.
The next valve is a push-button valve. Consists of a base. Added to it:
slightly different overflow tube without thread, overflow extension tube,
spline nut,
two valve struts,
two clamps for adjusting valve risers, adjusting valve posts with numbers,
craving,
rocker arm, pusher with thread and return spring, white button, which is suitable for hidden installation in a tank with a 40 mm hole and for tanks with a 24 mm hole for the rod.
This button can be installed on a lid with valve diameters of 24 mm or 40 mm.
To adjust the drain fittings to the height of the tank, simply lift both red clamps up and raise or lower the adjusting posts so that the numbers match.
Move the lock to the down position. Close the lid. Tighten the button and you can use it. Please note that before raising or lowering the guides, you must release the rod. Because the rod will not allow you to adjust the height of the fittings to the desired position. To adjust the height of water rise with the filler valve, everything is very simple. I disconnect the float and move it higher or lower to increase or decrease the volume of water being filled.
Lately, designer tanks are increasingly appearing in which the outer part is slightly inclined towards the inside of the tank. In this case, reinforcement with a thick head may not be suitable for such tanks. In the case of this fitting, the head does not take up much space and thanks to these guides you can adjust the button to fit any tank.
If in this position it turns out that the amplitude is not enough, then you can take it and rotate it 90°. Then it moves more to one side. Please note that here you can fix the valve itself in 3 positions.
The third valve from the set is similar to the previous one with the only difference that this valve already has a shiny button. Just like in the previous one, when you press the button, the full volume of the tank is emptied. Before moving on to the next valves, I will show you the principle of operation of this valve.
So, what causes the water to drain? Look, when I press the button, the water should drain as long as I hold it, because as soon as I release it, the water pressure presses on it and, by all logic, it should close. The valve should have pressed down and closed the hole. But this doesn't happen. The question is why? And all because at the base of the valve there is a special float, which allows the user not to constantly hold the button until the tank is completely empty. Look, the water is gone. When she left, her space filled with air. When the water is filled back, then in this small float, which is located behind the red part of the body,
Air remains as a result of which the float is always at the top while the water is in the tank. And on the body of the overflow tube there are hooks for this float.
As soon as I press the button, the tube rises, hooks onto the float and the float holds the valve in the upper position until the water comes out completely and the float drops, releasing the valve behind it. This is such a simple design.
If I don’t need to drain the entire volume of the tank, but only need to drain part of the tank, in this case I will have to purchase another fitting, which is equipped with a different button. Double flush button. Look, when you press the small button, both are clamped, but not deeply.
In my case, the water drains while I hold the button. If I press the larger one, the button is pushed deeper and the water is completely drained. I can release the button as if it were a single button with the tank emptying completely. How it works? Remember, there is a float at the base, which is always at the top, and there are hooks on the overflow tube. When you press the small button, the valve rises, but does not reach the hooks and does not lock in the raised position. And if I press the big button, the valve rises higher, just the minimum distance that is necessary to catch the hook of the float. With fittings with a double flush button you can save your water.
The next type of valve is also a double flush valve, but here there are two automatic flushes in which the small flush is also adjustable. This means that by pressing the large button I can press it once and the water will drain completely from the tank until the valve closes. Same thing with the little one. I can press the little one once. Let it go and the water will flow until it reaches the level that I adjusted.
The components of such a valve are similar to the previous one. Adjustable drain body, rod rocker,
adjusting rod, float.
As soon as I pressed the trigger, the float rocker hooks onto the second release on the overflow tube and stays there until the water drops below the first float. After the water drops below this float, the rocker will release the valve and the valve will fall into place and shut off the water if the small release was activated.
Adjusting this valve is very simple. You need to remove the button and the reservoir cap. Using this little red handle, twist the rod that raises the float higher or lower. But if you have “diaye” fittings, then you need to twist the yellow rod.
Please note that, unlike other drain valves, the volume of the small drain in the fittings is not adjusted stepwise, but smoothly. All. The small drain has been adjusted; all that remains is to close the lid, tighten the button and you can use it.
The IncoEr campaign offers several types of buttons. The first simplest one is the white button. Universal for tanks with a hole of 24 or 40 mm.
The second has the same white border, but the button itself is shiny with a single flush. And two double flush buttons that differ from each other. This is a metallic button
and a plated button. Outwardly, at first glance, they are no different. Unless they are considered in more detail. The first is a metallized coating.
In short, metallized particles are attracted to the button and settle on it in the plasma environment of an anomalously glowing discharge in magnetic fields.
In fact, everything is much more complicated than I said. Next, the button is varnished. The advantage of this button is the price. But the disadvantage of such a coating is that if aggressive chemicals are used when cleaning and wiping the room, or fittings with such a button are installed in public places, then such a coating will wear out over time. But the second option is galvanic coating. This is a completely different type of coating. In short, metal sticks to the product under the influence of electric current. First comes copper plating. Then a nickel plating bath and finally chrome plating.
This coating no longer peels off either at home or in public places. The disadvantage of such coverage is the price. The price of this button is several times higher than the metallized one. Therefore, all Russian manufacturers of toilets in the economy segment are equipped with metallized buttons. These buttons differ in appearance. The metallized interior is not painted. Galvanic coating on all sides of the button. Even when I pick up the galvanic and metallized ones, one of them feels heavier and more pleasant to the touch. She's even a little cold. Almost metallic, and the other one is actually light.
It is clear that it is plastic. This one is completely plastic. If you don’t pick it up and try it by weight, you won’t be able to immediately tell whether it’s metal or plastic. This will be immediately clear. There is copper plating and more metal than on this button. This button is better. It is more durable, but at a price.
We have a separate type of fittings for the more expensive segment. This is a DUAL fitting.
Installed on products. The fittings have a different body color. Galvanized buttons. colorful guide,
original packaging, plastic wrench for tightening nuts
and a more expensive gasket between the tank and the toilet with a memory function.
In order to activate this function, before installing this gasket, bring your open palms to it and say:
“Remember, you toilet gasket remembers your shape. You are round, have an even edge along the outer and inner edges at the top and bottom. You can hold water and maintain its shape at any time after installation and be ready for a new installation.” Although, even if you don’t say the mantra, it will still remember its form. After reading this post, you know the working principle of the drain and fill valve. You will be able to disassemble and repair these valves.
I really hope you found this post helpful.
Filling systems
There are push-button filling systems, known as single-button ones, when pressed, all the water pours out. Two-button design ensures economy. One button is intended for a small flush - only part of the water flows out, the second is needed for a complete flush. Stop flush is a tank with one button, but when you press it once, the water pours out completely; if you press it a second time, it will stop flowing.
Water can come from different places, for example, with a side connection, the inlet water supply is on the side and on top. When the tank is filled, water falls from above and begins to make noise, which causes discomfort. With a bottom connection, water is supplied at the bottom of the tank and therefore does not cause noise. Such designs allow you to hide the supply hose, which makes the appearance of the toilet more aesthetically pleasing.
The principle of operation of the flush mechanism in the toilet cistern
The valve responsible for draining the water is much simpler than the water supply unit. here, due to unnecessary reasons, there is no locking mechanism. To control the drain valve, a rod in the form of a chain or rod is used.
Older model toilets had a lever on the side or top of the cistern. Modern models are equipped with a button, which makes control more convenient and the appearance of the product more attractive. The mechanism with a button requires that when it is pressed, the water from the tank is completely drained or half emptied. The mechanism works according to the following scheme: pressing a button or lever activates the flap, which closes the upper fitting, and the water drains into the toilet bowl. After this, under the influence of its weight, the damper returns to its original position and closes the drain valve.
Nuances of choice
The toilet cistern is provided with the necessary drain fittings from the very beginning. As long as everything works, no one thinks about repairing it. But, there comes a time when something breaks and there are problems with it: leakage or incomplete closure of the valve. This means that the fittings need repair.
There are no problems with purchasing, but you need to choose high-quality fittings so that they last for many years. The quality of the plastic components must be without defects, that is, without burrs or bent shape. Such parts should be rigid. It is worth asking about the material of manufacture; polyethylene is considered the best. The gaskets should be soft, to check this, carefully stretch the rubber and point it to the light, there should be no small cracks.
These are delicate parts and break easily due to contaminated water. Therefore, you should buy a set of water filters. The float lever should be movable and soft and should not stick. Fasteners should be made of plastic; steel parts are not suitable. The circuit must be strong and not loose, otherwise nothing will work. When purchasing, you should consider all these factors. Just in case, there should be a plumbing repair kit at home.
Installation Features
The fastening nut located in the lower part is unscrewed from the trigger device. There should be a rubber lining near the nut, which is needed to seal the installation. The ring is placed down the drain tank, and the trigger mechanism should be fixed on the prepared gasket. Next, you need to remove the retaining nut from the filling valve. If fittings with bottom connections are used, the nut should be located at the bottom of the device.
If side fittings are used, the nut is located on the side of the valve. Next, you need to install an o-ring; it should be located on the hole inside the tank. Adjust the inlet valve and tighten the nut. The inlet and outlet valves must not come into any contact with each other or with the walls of the cistern. This installation is carried out with a flexible liner, according to which water will flow into the tank. When connecting the liner, there is no need to leave the sealing gasket.
Check the performance of the fittings and, if necessary, adjust the float. If a float is used in the lever, for its normal operation it is enough to bend the motor up to the required location. If a movable float is used, the stroke limitation is secured with a special locking ring or clamps. At the very end, install the lid and attach the drain button.
Step by step instructions
The first step is filling the tank
A float and a shut-off valve are responsible for regulating the water level in the toilet flush tank. The float goes down as the water level decreases. Due to this, the shut-off valve opens. The water level rises, the valve shuts off the water supply.
Second step - draining the water
The flush mechanism is responsible for the flow of water from the tank into the toilet. Using the damper (at the bottom side of the drainage unit) we regulate the amount of water remaining after the maximum flush. The damper can have from two to six positions that set its level.
The drain siphon and the drain lever (button) are responsible for draining the water. A siphon, usually a rubber cylinder resembling a plunger, seals the drain hole. If the siphon is faulty, water will leak.
Installation of toilet cistern fittings
The kit includes: fill valve, release valve, push-button assembly, tank mounting kit and gaskets. Depending on the type of tank filler, the filler valve can have a side connection or a bottom connection. The release valve can be single-level or two-level.
The main parameter for setting up the reinforcement is its height.
If the fittings were purchased separately from the tank, we configure it.
We measure the distance from the bottom of the tank to the surface of the lid
The ruler must be on the inner surface of the tank!
In the adjustment table we find the resulting size and set it on the wall of the reinforcement rack.
We unfasten the rod, tighten the clamps and move the rack to the desired value and attach the rods.
We attach the rods so that there is a free movement of the frame of 3 mm.
Installation of fittings is carried out in three stages.
The first stage is installation of valves
We twist the fastening nut of the exhaust valve and install it in the tank. We tighten the fastening nut on the back of the tank until it stops completely.
We do the same with the filling valve.
When installing a barrel with a side water supply, the filling valve is installed as follows: twist the fastening nut and remove the oblique washer.
The damper tube must be present on the valve and not fly off during installation!
If the valve does not fit and the filling valve is in the way, then you need to loosen the nut (1.5 turns is enough) and turn the upper part of the valve in the desired direction, after which the nut is tightened. Then the oblique washer and fastening nut are put on. The valve is set in a horizontal position.
Possible problems
If water is regularly collected in the tank, then the mechanical valve requires replacement. When the float arm becomes deformed, try to align it, if not, replace it. If problems arise with the float, then this defect occurs from a loss of tightness, since water gets inside and the float stops doing its job.
If water flows at the bottom of the drain tank, then the cause of this breakdown is a crack or rotten bolts. To avoid this problem, change them. This procedure will require editing outdated fasteners and cleaning the landing spots, then installing new bolts. When choosing bolts, choose brass or bronze ones - they are not in danger of rusting.
When water flows into the toilet, you should pay attention to the membrane. Remove the siphon and change it. Often this situation occurs when the float adjustment is lost. The lever does not completely shut off the water, and it enters the toilet through the overflow tube. This problem can be eliminated by adjusting the float. When you adjust the system correctly, it will close the valve at a water level of 1-2 cm.
If it is leaking from the side inlet, then most likely the problem is in the hose. When little or no water is drawn in or the process is slow, the inlet valve mechanism has reached the end of its life. In the first case, you need to replace the valve, in the second you need to unscrew the hose and try to clean it. This, of course, is not always possible, since debris may get in, for example, during repairs. In such cases, it is most often changed.