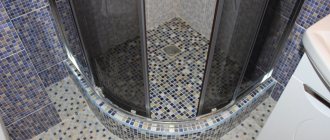
Instructions for assembling a shower enclosure
Together with experts, we tried to create the most detailed instructions that will help every potential owner of a shower enclosure assemble it correctly and quickly. For example, we use a design with a low tray. Remember that there are many types of shower enclosures and there is no universal instruction. Our goal was to provide the most practical and simple help possible.
Important! If your shower stall is structurally different and has additional details, then it’s quite easy to adapt to the individual characteristics of such a model. With the help of our instructions, you can easily understand the basic essence of installation.
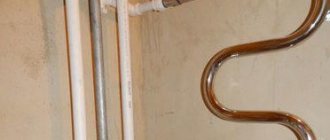
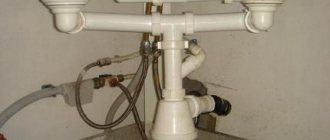
- So, it all starts with the full preparation of the siphon, as well as the drainage system. They will mount first, pay attention to this.
- The legs must be secured directly to the pallet, which is installed on the siphon itself. Next, its drainage system must connect to the sewer system. The legs allow you to adjust the tray and set the level that is necessary for the proper operation of the entire system.
- In those places where the pan meets the wall, you need to work well with sealant. Sometimes you can use analogues of this material. After proper insulation, you need to install a plastic border. The entire structure is simply covered with it, which prevents liquid from getting under the tray itself.
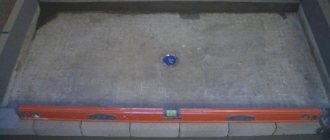
- Installation of the shower enclosure is a very important part of the entire installation. But just before this task you need to take a short timeout. At this point, it is better to check the drain connection for complete tightness. This is done very simply - pour a small amount of liquid into the tray itself and wait. Next, drain and inspect the connection point. If everything is dry, then the system is working correctly, if not, adjustments are needed. This approach guarantees the elimination of problems in the future; it is better to identify them at the very beginning of installation or before it.
- Assemble all mounting hardware together, check that it is fully functional and ready for future assembly.
- We take several fixed glasses, they should be solid, without holes inside the structure. We install several plastic seals on three sides, then they will be inserted into the profiles. We install the retainer, the next one, the decorative plug, and only then the glass surface itself.
- The stand and the top bar are connected. Horizontal profiles have a special stop in the form of rollers, and vertical ones have grooves. Both units must be connected so that the letter “G” is formed. We are talking about vertical and horizontal profiles, which in the end will be fastened with several screws directly into the end part.
- Each guide at the bottom should be combined with a similar element.
- The guide must be connected to the wall profile.
- The glass fence, which has already been assembled, must be placed in a frame and placed on a pallet.
- You need to secure the glass using a wall profile. Next, we press the resulting structure against the wall, level it and mark the installation location of the profile in the form of the letter P. We attach everything to the wall with self-tapping screws.
- The place where the profile will come into contact with another profile must be generously lubricated with sealant. The surface must be wiped dry before the actual process. Also, the place of future sealing can be degreased with a special agent, if possible.
- Now you need to assemble the sliding door. We start by installing eccentric-type guide rollers on the unit itself. Elements must be loosened on rollers before installation. The lower part of the door should contain single-type rollers in its design, the upper part should contain double-type rollers.
- A limiter must be mounted on the doors. To do this, carefully study the instructions; it should come complete with other components.
- We hang the door on the grooves, do it carefully.
- Each roller needs to be fixed in the correct position; you will hear a kind of click when they enter the guides.
- Adjust the position of the door with a screwdriver, use a building level to bring the position of the element to ideal.
- Using a magnetic seal, we insert it into the structure, the same applies to the door seal.
- Install the handle on the door.
- After the sealant has hardened, you can use the shower enclosure and consider the assembly complete.
Important!
Please
ensure that all rollers are mounted correctly. Constantly adjusting and monitoring the guides will help you avoid making mistakes. Otherwise, the doors may warp in the future, form gaps, jam and move with force. Many owners of such doors begin to complain about low-quality components, but in fact a serious mistake was made during assembly, which greatly complicated use and functionality.
We gave an example of a standard design, but it may differ dramatically in your case. Always follow the instructions, then you will not have any problems. Also, carry out a shower performance test afterwards. Try directing the jet at different parts of the structure to see if it is completely sealed. This should be done before actual use, which will save your time.
Pallet installation
The simplest type of structure for self-installation of a corner is a frame one, since many manufacturers bring already assembled models. Frameless corners will take more time, but this is justified by stability and aesthetic appearance.
The pallets, which come with adjustable stands, are leveled in height and secured with locking bolts. The model without legs is fixed on a base made of bricks or a frame made of pipes, after which the base is filled with cement mortar. The base level should be slightly higher than the drain. Then the pallet is attached to the pillow as follows:
- the product is attached to the wall with special glue;
- the seam between the wall and the pallet is filled with sealant;
- a mixer is connected to the drain;
- joints and parts are sealed with fum tape;
- after installation, the drainage system is checked by supplying water under low pressure;
- If a leak is detected, all joints and connections are resealed.
The cement pad is optimal for acrylic and steel products, since they are often produced without legs.
Features of installing acrylic pallets
Acrylic plumbing is considered the most fragile. Pallets made of this material are installed on a metal frame, which is most often included. The problem with such pallets is poor support for the central part of the bottom. To strengthen this area, additional installation of bricks under the structure or metal profile is required. For shock absorption, a sheet of rubber or thick linoleum is placed between the pallet and the reinforcement. Also, acrylic pallets tend to deform during use. Sealant does not save the wall in such a situation, so additional fixation of the product with bolts with a sealed lining is recommended.
Shower stall and damaged tray - what to do?
Sometimes the shower tray can become severely damaged during installation. No one is immune from this, so we have put together some tips on what to do in this case. Acrylic products have never been considered durable. Various chips, scratches, and sometimes very obvious damage constantly appear on the pallets. But don’t panic, as there are many options for how to restore the integrity of the pallet. The most popular of them is the purchase of a special composition. It works like glue and allows you to restore the acrylic coating or pallet even with very serious, almost through-to-through damage. At the same time, such compounds visually mask chips and no one will ever notice that there was some kind of hole in the pallet. We have written a small instruction that will help you quickly restore the pallet:
- First of all, go to a hardware store, where you buy a special composition for restoring an acrylic surface or pallet. Consult with the store manager to choose the best option.
- Next, all elements are removed from the pallet.
- He is inspected for the degree of damage. This can be either a small chip or serious damage to the pallet.
- Let's imagine that there is a crack in front of us. At each end you need to drill small holes that will be slightly wider than the damage itself. This helps prevent cracks from growing on the pallet in the future.
- If you have a through-hole sample, then you need to get fiberglass, which must be glued to the bottom of the pallet. Epoxy resin will be an excellent glue substitute in this situation and will restore the integrity of the pallet.
- You need to work well with a knife along the edge of the crack. We cut the chamfers so that the composition penetrates well into the hole.
- We pour the solution along the entire length of the crack on the pallet and wait. After some time it will dry well, we will use a small cloth to iron the restored area thoroughly. This will prevent the formation of sagging.
Important! If you do everything according to the instructions, you can completely restore the visual characteristics of the pallet. No one will ever even guess that it was damaged.
But the pallet can be made of different materials. Everything is clear with acrylic, but what about stone casting? A similar situation, you can use our instructions to restore the pallet. But if we are talking about ceramics, then everything is much more complicated. Even the best adhesives will not last long on the surface of the pallet. This does not solve the problem; any restoration will end with the appearance of a crack after some time. If the pan is cast iron and strong, then most often troubles occur with the enamel. It is easy to restore small, external injuries; you need to use liquid acrylic and a hardener. Epoxy resin is also suitable, and apply liquid enamel to the pan as a second layer.
Pallet selection
A well-chosen pallet largely determines the ease of installation and ease of further operation. Pallets differ in the following characteristics:
- form;
- dimensions;
- material.
The following materials are used to make such plumbing fixtures:
- cast iron;
- marble;
- ceramics;
- enameled steel;
- acrylic.
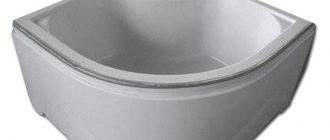
Products made from marble and marble chips are considered the most durable, but their price is quite high. Pallets made of acrylic and steel belong to the medium and budget category of goods. Square, rectangular and rounded (for installation in a corner) models are in great demand.
The dimensions of the pallet are selected based on the dimensions of the room. The smallest models are 70x70 cm. When purchasing, in addition to the above characteristics, you should pay attention to the complete set of the product with everything necessary: brackets, fittings, adjustable legs.
The main difference between a shower corner and a stall
Despite the limited space, shower stalls are in demand in the market.
This is a typical and functional unit to which we are accustomed. When a person is interested in installing a shower enclosure, an interesting question comes to mind - what is its difference from a stall? It may seem that there are practically none, but in fact, there are a lot of differences. The booths can be closed or open. In short, they represent a small section for full bathing procedures. The structure has walls, a floor and a ceiling. It turns out that the cabin is a full-fledged room, which is also equipped with additional functions in the form of various massage devices and so on.
Here it’s worth mentioning the important disadvantages of standard booths:
- They are difficult to install, especially if the design has additional functionality. Models can be disassembled and assembled. The second option is more attractive, but also not ideal. Since such booths are quite large and can only fit into really large doorways and rooms.
- A shower stall is a rather expensive pleasure, as anyone who has ever dealt with plumbing knows. Therefore, you will have to seriously spend money on such pleasure.
- The size of shower stalls is their main problem. Because, as we mentioned at the beginning of the list, this is a really serious problem. Given the configurations of modern homes, such a device simply does not fit in most bathrooms. And even if it can do this, it will take up a lot of space. And restrictions on movement have never brought anything good.
This is where the shower corner comes into play.
All the disadvantages of a shower stall are its advantages. It can easily be considered a budget purchase that is accessible to everyone. The corner is easy to install; this can be done without the help of special equipment or specialists. The design is not only easy to assemble and install, but also easy to maintain during constant use. The main advantage of a shower enclosure is its practicality. It has small dimensions and can fit in any bathroom. Often the design is used not because of limited space, but simply to save space and ease of movement. If you look at the equipment, it is minimal, because it consists of a tray and doors, that’s all, minimalism in its purest form.
This raises the question - how to assemble a shower enclosure tray? But more on that later. Where are the walls of the structure? They are the main walls of the bathroom itself. Basically, you simply need to install the tray in the very corner of your room, close it with a door and, to some extent, cover it with panels.
Where is the ceiling of the structure? It simply does not exist, and it is not needed. Of course, the unit loses many modern technologies and functions without such basic components in its configuration. But the very definition of budget plumbing excludes the possible installation of something additional in the future. If you want to get a comfortable and modern shower, you will have to spend a lot of money right away.
Shower corner and its components
To understand how to assemble a shower enclosure, you need to consider its design in more detail.
You can find a huge number of their varieties on the market. Different configurations and so on exclude the possibility of universal installation instructions. By the way, since shower enclosures are quite budget-friendly, their manufacturers don’t bother too much with the equipment. Instructions are often simply impossible to translate or understand correctly. For an assembly example, we take the Santeh company, model 9021F. We start the whole process with a full check of the components in the box. Be sure to make sure that every screw, screw, seal and piece of fittings is in place, this applies to rollers and handles. This approach will avoid major problems in the future. The lack of a simple roller will not allow you to assemble the structure and make it operational.
Important! Experts advise checking all components while still in the store. This will save your personal time, money, and nerve cells.
Materials and equipment
In order to install the corner with your own hands, you will need the following components:
- Pallet.
- Complete set of shower corner.
- Mixer.
- Drill with a set of drill bits for drilling tiles.
- Plumb.
- Trowel and sand-cement mortar.
- Roulette.
- Marker.
- Screwdrivers.
- Hammer.
- Silicone sealant with a gun.
- Self-tapping screws and dowels.
What tools will you need for future assembly of a shower enclosure?
Before assembling the structure, check that all components and necessary tools are available.
Some equipment may be too expensive, we recommend borrowing similar equipment from neighbors or friends. Especially if the assembly of the structure is a single action. So, remember or write down this list before you go searching for tools:
- The electric drill is complete, with drills of different sizes, which will allow you to assemble the shower enclosure in one go.
- A screwdriver, preferably two, one flat and the other Phillips.
- We will dismantle outdated coverings using a hammer and chisel. If a similar process awaits you in the future, be sure to acquire these tools.
- The construction level will have to measure the accuracy of the measurements taken and the correct tilt of the shower stall.
- A nut, dowel and dozens of other fasteners will be needed to create a complete structure.
- A pipe and fitting are elements that will allow you to connect the sewer system and make the system complete.
- A little waterproof sealant, usually the silicone variety.
- Cement and sand to create a screed. Also, experts often use various mixtures such as “liquid floor” and so on.
This is a basic list of tools that may be constantly updated. For example, you may want to make a design with certain intentions. The pallet may differ in its configuration and have features. The sides can be very varied, sometimes they change the walls and floor in the corner where the shower will be installed. All this contributes to the emergence of new tools in your list.
How to collect drain?
Screws are used to secure the drain to the frame. You need to take profile A1, which is equipped with special grooves for connecting to the roller system. Be sure to follow the arcs, one of them is lower, the other is upper. We need a small number of screws, which we will screw into a horizontal type arc with a vertical element. We place the profiles correctly, each groove should be exactly opposite the grooves for the glass.
Important! Initially, the instructions may seem complicated, but in fact, here you just need to thoroughly understand the whole process.
With or without a tray?
Many people do not suspect that a shower enclosure can be easily installed without its main part - the tray. For such an approach to be correct and reasonable, you will have to perform a certain number of actions
:
So how to properly install a shower tray? We will talk about this in the next subheading. We have put together scrupulous and precise instructions just for you. Follow the rules, so you can assemble a full-fledged shower enclosure in a matter of hours. Also, the performance characteristics of the future corner depend on proper installation.
What are the pros and cons of a shower enclosure?
Shower corners have a lot of advantages that make them popular and in demand among the modern city dweller. Let's look at them in more detail:
- Dimensions. Fits in the smallest bathrooms, taking up almost no space. They are installed less often even in medium-sized rooms simply to save space.
- They are very easy to install, as you already understood from the instructions, you can do without rare equipment and the help of professionals.
- This is a budget option for anyone who does not want to purchase expensive plumbing equipment for large sums.
- If the installation is done correctly and the shower enclosure is complemented with modern features, you will get a very functional part of your bathroom.
- Versatility and freedom of choice. Shower enclosures can be varied; you yourself are the builder and architect. Considering the huge number of components on the market, everyone can choose what they like. This allows you to create unique, special and highly functional shower enclosures.
And remember, what is good for one person may not be good for another. When choosing components for a shower enclosure, always consider only your taste. After all, it is you who will live with this plumbing in the future and take a shower in it. Try to create a corner that you personally like, both visually and physically. For a small investment, you can create a truly functional and inexpensive shower replacement.
Optimal shower sizes
The size of the shower depends on two factors: the size of the room in which the cabin will be installed and the height/weight of its visitors.
If the size of the room allows, the cabin can be fenced off by more than a meter in length and width. You can install two shower heads or a shower plus a sink there. It all depends on the needs and wishes.
For a large bathroom, you can install a shower cabin with several shower heads.
If the bathroom is small and the cabin is planned to be installed in place of the former bathtub, then there is not much choice here; they even install a glass corner cabin in order to save space.
A standard shower stall takes up little space.
In addition, in order to install a stack, you need to raise the floor in the shower area by at least 10 cm. At the same time, the cabin itself will rise, which is difficult in apartments with low ceilings.
The height of the cabin can be different - up to the ceiling or covering a person’s head.
The shower stall does not have to be up to the ceiling.