The design and operating principle of the drain tank are quite simple, so there are rarely any difficulties in repairing the device.
If the cistern breaks down, water does not flow onto the floor, and there is no threat of flooding to the neighbors below. Such malfunctions seem insignificant, but this is only until the bill for payment for water supply services arrives.
If a meter is installed, then any malfunction of the tank can become a problem! Therefore, the smartest solution is to eliminate it immediately, without waiting for trouble.
Design and operation of the cistern
Minor difficulties sometimes occur only with improved modern models; in such cases, it is worth contacting specialists. Basically, almost any repair of a toilet cistern can be done with your own hands.
The design of a toilet cistern is quite simple, and almost anyone can cope with its repair, because... you don't need any special skills for this
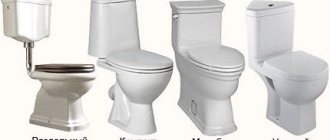
In many ways, cisterns of different designs are similar. The main difference is the installation method:
- Hanging tanks. Structures of this type are attached to the toilet bowl at a low height and connected using a pipe.
- Compact toilet cistern. The compact flush cistern is attached directly to the toilet bowl without connecting pipes.
- Built-in tank. Constructions of this type are installed in the wall and are used with wall-hung toilets.
Regardless of the model, the designs of the cisterns are very similar.
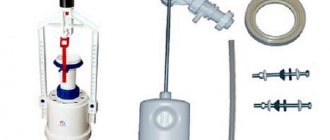
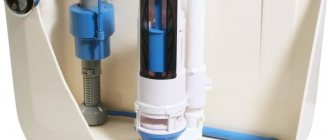
Modern devices are convenient because they can be repaired without disassembling the modules and replacing them entirely. Water is supplied to the drain tank either from below or from the side. The side feed device is most often found in domestically produced toilets. Its advantage is its relatively low price, which affects the cost of the entire toilet as a whole.
Bottom water supply is often found in modern domestic and imported designs. These are usually slightly more expensive models.
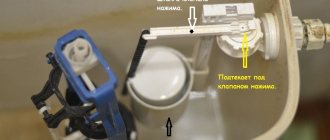
For draining, mechanisms of various types can be provided: buttons, rods, levers, chains. The most common option is a button.
It can be located in the upper part of the structure, and in models with a hidden tank - on the wall. To drain the water, just press on it.
Models with a push-button mechanism can only be disassembled after removing the button. How to remove the lid from a tank of this design is shown in detail in the video:
Buttons in which the water is completely drained after a short single press are called automatic.
Those in which water is drained only while the button is pressed are mechanical. The former are more convenient to use, while the latter allow you to save water when flushing the toilet.
There are single- and dual-mode push-button flush mechanisms. Models with two buttons provide the ability to drain only half the volume of the tank.
However, there are designs with one button, which in the same way can drain either the full volume of water or half. If the push-button mechanism is equipped with a special auger that forces the water to rotate when flushing, then the toilet bowl is washed more efficiently.
Mechanisms with two buttons are a little more expensive, but the overpayments pay off, because draining in economy mode can reduce water consumption by 20 cubic meters. in year
Common causes of breakdowns and ways to prevent them
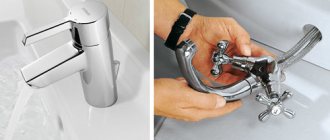
Repairing leaks in the water supply to the tank
The drain tank can break for several reasons. The most common of them are:
- Water leaking from the tank onto the floor. The problem arises against the background of a violation of the integrity of the sealing ring. It may crack due to stress. In this case, there is no need to repair it. It is best to replace the ring with a new one. Sometimes leakage can occur due to wear of the gaskets at the mounting bolts. In case of such a breakdown, they are tightened with an adjustable wrench. If the problem is not solved, then the bolts and gasket are replaced.
- Constant water flow in the toilet. The malfunction occurs when the tank is overfilled. This happens due to a change in the height of the overflow or when the seal of the float is broken. The problem is resolved by adjustment. Sometimes a violation occurs due to wear of the o-ring. In such a situation, it is recommended to replace the entire drain mechanism.
- Disturbances in the trigger mechanism. The reason is a break in the mechanism that connects the button to the drain. The problem occurs in tanks that have a chain or handle.
- Noise when filling the tank. Occurs due to the disconnection of the tube through which the tank is filled. The damage can be eliminated by connecting the tube back into the fitting.
- The tank does not fill with water. The malfunction is eliminated by cleaning the inlet, which, due to contamination, no longer allows water to pass through. To do this, use a needle or thin wire.
Repairs for all types of tanks are carried out according to a similar scheme. The difference is with tanks that have a lower water connection.
Adjusting the volume of collected water
If desired, you can easily regulate the amount of water drawn into the tank. This is necessary if the toilet does not flush well or there is too much water and there is a need to reduce its volume.
To change the filling volume, you need to remove the tank cap and follow simple steps. But before you start making adjustments, you first need to understand the structure of the tank.
The video below will help with this:
Option #1 – for side feed systems
Such mechanisms are equipped with a lever made of thick metal wire. It connects the valve and the float. To raise or lower the float, you need to bend the wire lever slightly.
After this, you should make sure that the required amount of water is filled into the tank. If not, bend the wire a little more. By lifting the lever, you can increase the volume of water; by lowering it, you can decrease it.
This option is only suitable for those tanks that use metal in the float system.
Many modern models use plastic parts instead of metal parts. Such levers cannot be bent, but the float itself can be moved along their axis using the fastening screw provided by the design.
The float can be secured with a thread or a latch. If a latch is used in the design, then it is pressed out. To increase the volume of water in the tank, the float is moved closer to the valve body.
As a result, the length of the lever decreases. If it is necessary to reduce the water level, the float is moved further from the body.
This is the simplest design of a flush tank with side water supply. Brass wire is used as a lever. By slightly changing the angle of its inclination, you can reduce the amount of water in the tank. If your home has a meter installed, this is a great way to save on utility bills.
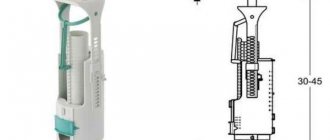
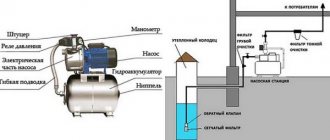
Option #2 - in tanks with bottom supply
If the design has a bottom water supply, it can be adjusted even more easily than a system with a side supply. The mechanism has a special water level limiter connecting the valve lever and the float. It can be lengthened or shortened.
The float on the limiter is secured with a thread. To adjust the water level in the tank, you need to change its height using a plastic nut.
The main advantage of bottom-feed designs is their ease of installation and maintenance. When repairing or replacing, problems arise extremely rarely
Toilet flush valve
In this case, experts recommend purchasing a new one and installing it. If you decide to repair the existing one, you should disassemble it and adjust the gap between the drain hatch and the pipe. To do this, the last one is filed down. To do this job well, you need to be patient. Otherwise, the breakdown will not be fixed. Therefore, it is recommended to replace the old toilet flush valve with a new one.
There is another situation. Very often, the cause of a leaking toilet tank is a crack in the valve body. In such cases, the easiest and most economical option would be to replace the old one with a new one. To do this, be sure to take the cracked part with you. Because the modern plumbing market offers a wide range of drainage mechanisms.
How to diagnose problems?
If the flush tank is faulty, it quickly becomes obvious: water either leaks into the toilet bowl or begins to drip onto the floor. Sometimes it happens that the container does not fill.
No matter how cutting-edge and complex the design of the tank, breakdowns occur in the same way in all models.
External leaks are not always immediately visible. It happens that water drips out for weeks, but its amount is so small that the damp areas are not noticeable. Then the leak can be identified by the appearance of red spots and streaks of rust.
If they are, it is worth disassembling the tank and establishing the cause of the breakdown.
If there is no coarse filter, dirt and rust particles constantly enter the tank. They accumulate in the container and can damage the internal mechanisms of the structure and cause breakdown
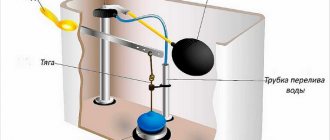
Normally, the tank is filled to a predetermined level, and the rubber bulb is pressed to the drain hole, reliably closes it and is held in this position by water pressure. When you press the release mechanism, this bulb rises and opens the drain hole.
The rubber bulb must be constantly filled with air. To prevent water from getting into it, the design includes a special guide tube. It ensures the correct position of the pear in the “saddle”.
If the integrity of the bulb or tube itself is compromised, the mechanism fails.
This is what the rubber bulb of the tank should look like if it is in working order. It should remain elastic and fit well to the saddle.
The first thing to do after disassembling the tank is to inspect the bulb. If it has lost its elasticity and cracked, then this is where the cause of the leak lies. Worn rubber cannot cover the drain hole well; water leaks into cracks and gaps.
Rubber products of this type cannot be repaired, so the bulb just needs to be replaced.
If everything is fine with it, you need to make sure that no particles of dirt and rust get under the rubber, which can also interfere with the normal operation of the pear.
There are cases when the leakage problem can be solved by simply cleaning the tank. If it turns out that dirt has accumulated under the rubber bulb, it can be removed with a regular sponge. Often this is enough to restore normal operation. For preventative purposes, it also makes sense to wipe the walls of the container with a rag and remove plaque.
If the bulb is in order, then you should continue to inspect the toilet tank in search of the cause of the leak.
The tank does not fill if:
- the supply hose is faulty;
- The inlet valve of the float mechanism is worn out.
Water may leak out if:
- the gasket between the tank and the toilet is worn out;
- A leak has appeared at the installation site of the connecting screws.
Internal leaks occur when:
- the overflow tube is not adjusted;
- valve is faulty;
- The float has failed.
All these components should be carefully checked and damaged parts repaired, adjusted or replaced. How to disassemble the tank and find these elements is shown in the video:
Installation and repair of a toilet lid with a microlift
Before installing the microlift cover on the toilet (wall-hung, floor-mounted, corner), you need to make sure that their fastenings match. The installation diagram for this product is similar to a regular toilet seat:
Four rubber inserts are inserted into molded recesses located on the underside of the seat. This ensures a soft fit of the seat to the ceramic body of the toilet.
- To ensure that the cover fits gently against the seat, two rubber inserts are inserted into it.
- The seat and the lid are connected to each other using a plastic sleeve, followed by the installation of a fastening bolt in it, connecting the fittings to the toilet body itself.
- An adjustment cup is screwed onto the mounting bolt, making it possible to adjust the height and uniform fit of the seat to the toilet. There is a rubber gasket on top that comes with the seat.
- The resulting structure is connected to the body of the plumbing fixture by inserting mounting bolts into the corresponding holes.
- Plastic nuts are screwed onto the mounting bolts on the underside of the toilet, which allows the seat to be firmly attached to the toilet. A tighter fit of the seat is achieved by metal adjustment cups.
In addition, there is a “demo version” of a seat with a microlift. It is represented by a removable seat with a lid with a “smooth lowering” mechanism. A lightweight option for attaching a toilet lid with a microlift is made using two adjustable hinges made of stainless steel, which is resistant to chemical and mechanical damage. Thanks to these hinges, it is possible to adjust and install the seat on the toilet. The “Click and Clack” fixation system makes cleaning the toilet easier and simpler. By pressing the button located on the inside of the hinge, you can release the seat from the attachment and remove it from the toilet. To return the seat to its original place, you must also press the hinge button located on the inside.
The microlift system is characterized by faster wear compared to conventional toilet systems. It works on the principle of a door closer, and if it is closed manually, the toilet lid microlift breaks. In this case, the microlift can retain the ability to move, but when lowered it creaks, although in normal condition this process occurs without noise. In addition, the lid may slam against the toilet, which can lead to chips and cracks in the plumbing fixture.
In order to know how to repair a toilet lid microlift, you need to correctly determine the cause of the breakdown. It is possible that the base with the lift mechanism has become detached and rotated from the toilet. The lift mechanism is connected to the back of the cover with two plastic bolts, screwed with nuts from below. These nuts must be unscrewed; if the bolts break, replace them. After which the toilet lid is reinstalled. When the nuts are tightly secured, the cover is well fixed and will not dangle. Complications of this process may be associated with the inability to reach the nuts without removing the toilet. To do this, you need to unscrew the device from the floor, disconnect it from the drain, replace the lid and reinstall the toilet. This process can contribute to problems with the tank.
To install and repair a toilet lid lift, it is advisable to use the services of professional plumbers. As practice shows, repairing such a device is almost impossible. It would be more advisable to replace the broken seat with a new one.
Problem #1: Water does not flow into the tank
How can you fix a toilet cistern if water stops flowing into it? It is not difficult. First of all, check the supply hose. It is disconnected from the tank and one end is lowered into a container.
If the water does not flow, you can simply buy and install a new hose.
Most often, the problem lies in a clogged narrow part of the valve. For repairs, it is enough to empty the tank, turn off the water and unscrew the assembly consisting of a valve, lever and float.
When the parts are removed, a hole will open through which the container is filled. It is very often clogged. You can clean it with a regular needle or wire.
To carry out complete cleaning, you need to remove the valve from the inlet pipe and wash off any remaining dirt with water.
Sometimes the cause of a breakdown is a tiny piece of scale caught in the hose or dirt. You can try rinsing or cleaning it
Types of toilets by release
In old buildings, Stalin buildings, models with direct or, as it is also called, vertical outlet are very common. It is located vertically, and the drain is located exactly under the seat. Used in America and Canada.
In Khrushchev and modern buildings, an oblique outlet is often used, located at an angle of up to 30 degrees. Such toilets are produced at domestic enterprises.
Rarely in the CIS countries, everywhere in Europe, models with horizontal outlets are installed; connections to the drain are located strictly parallel to the floor.
The most common is a toilet with a universal outlet, which is suitable for installation in almost all options. Such models occupy the main positions in the market.
Knowing the location of the drain pipe in your room, you should choose only products that are suitable for its type.
Problem #2: External leaks
If an external leak appears, you can repair the toilet yourself and not call a repairman. Typically, problems arise due to a loose seal between the toilet bowl and the tank, or if the seals under the screws are worn out.
In the first case, it is enough to remove the tank, check the gasket and, if it has become too hard or cracked, replace it.
It happens that the reason for such a leak is trivial - the gasket is installed incorrectly. Then it’s enough just to put it in place, or better yet, change it.
If a leak appears at the connecting screws, they need to be unscrewed and the rubber seals replaced. To do this, it is not even necessary to remove the tank itself.
When choosing new seals, it is better to give preference to cone-shaped ones rather than flat ones. They adhere much more tightly to surfaces.
When tightening the screws after replacing the seals, it is important to ensure an even distribution of forces to prevent distortions, otherwise a new leak may appear. To do this, tighten the screws little by little and one at a time.
Problem #3: eliminating internal leaks
How to fix the tank if water flows into the toilet bowl? First, you should check that the overflow tube is set correctly. You need to lift it a little and see if water flows into the tube.
If yes, then the float valve needs to be repaired. If not, you need to adjust the lever.
Valve problems can be caused by debris. You just need to remove it from under the gum.
If the rubber is worn out, you can simply turn it over to the other side, but it is better to change it immediately. If the valve is broken, you will have to replace it with a new one.
We offer video instructions for replacing the cistern fittings:
Button jamming
In case of such a breakdown, the drain is fixed in one position. That's why the toilet tank leaks. What to do in this situation? The cover is removed and it is checked why the mechanism is jammed. The drainage mechanism is often checked for the following reasons:
- System clogged. Cleaned from plaque.
- The rod is jammed. The cause of the jam is identified and eliminated. If necessary, replace with a new one.
- The return spring has weakened (the connecting ring on the lever has become deformed). To be replaced.
- The traction system is broken or deformed. It can be made from improvised means, for example, wire. But this will be a temporary solution to the problem. Because during subsequent use the wire will bend over time and you will have to repeat the procedure again.
Of course, before eliminating the breakdown, you should turn off the water supply system and drain the liquid from the drain tank.