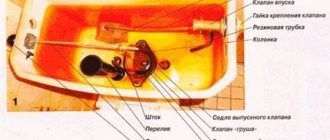
- Components of the cistern and their interaction
- We repair the float and eliminate all types of leaks
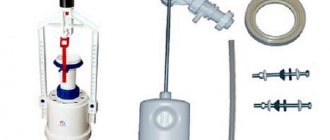
- We completely change the fittings
- Choosing the right fittings
When using any device, there is a need for its repair. The toilet is also no exception; it periodically requires replacement of the insides of the toilet cistern. The cause of the breakdown can be many factors: wear of parts and assemblies, structural damage, and more. Often, a problem needs to be fixed urgently, as this can threaten the home with flooding. Therefore, we will consider all types of repairs regarding malfunctions of the inside of the tank.
Toilet device
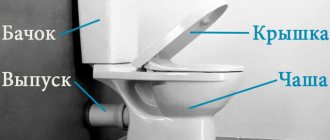
The toilet includes the following elements:
- A toilet bowl connected to a sewer pipe with a sealed cuff.
- Drainage tank with fittings that allow it to be filled with water and drained.
A water supply hose is connected to the tank. Depending on the design, it is connected from the side or from the bottom. The bowl and cistern are usually connected to each other using bolts and a seal.
Accessories components:
- rod release mechanism with drain button;
- a shut-off device (inlet valve) connected to a float;
- rubber sealing gaskets.
Components of the cistern and their interaction
Components of the cistern
Opening the tank lid reveals components and assemblies inside that ensure the operation of the water intake and drainage system. As a matter of fact, the insides of the tank consist of these two units. Let's take a closer look at how they work and interact with each other in order to learn how to fix all breakdowns yourself.
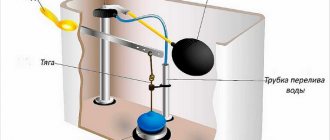
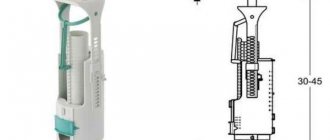
- The water intake system consists of five elements: a flexible hose, a water intake fitting, a shut-off valve of the locking mechanism, a twist and the float itself. The work occurs as follows: a flexible hose is connected to a water pipe on one side, and on the other side there is a connection to a fitting located inside the drain tank. Water flows through the fitting into the container. The valve of the fitting is “responsible” for the intake of water, the operation of which is based on the principle of a locking mechanism. When the valve is open, water flows; when the valve closes, it stops. The water intake level is adjusted by the “twist-float” unit. When the float is in a low position, the valve opens; when the float rises as water fills, it closes.
- The second unit that makes up the inside of the tank is the water drainage system. It consists of a button or chain that drives the mechanism for opening the bottom drain valve, the valve itself and the lever - a system through which the button and valve communicate. Everything is simpler here and no locking mechanism is required, since after the water has poured out of the tank, the valve will close automatically under the influence of gravity.
- Thus, the systems interact with each other at the moment the tank is emptied, when the drain valve closes and the float reaches its minimum level, opening the shut-off valve of the fitting.
How a toilet with a button works
A toilet tank with a button is a water seal that is filled with a portion of water, which is supplied to the bowl when the valve is opened. The flush is controlled by a button that needs to be pressed. At the same time, the valve opens and the water flows down under its own weight, washing the bowl. After the tank is released, the shut-off valve at the inlet opens, the tank is filled with the next portion to a certain level, regulated using a float. Access to the mechanism is provided by opening the top lid of the tank.
Device
Repairing an old-style toilet cistern with your own hands begins with studying its structure and features. The main difference lies in the fittings, in which the water supply is lateral, and in the design, in which the simplest physical laws are involved.
The main components are presented:
- A filling device, which includes a movable lever with a float and a valve for shutting off the water;
- Drain mechanism.
The design of the most “ancient” drainage devices includes a cast iron bell - a plug with a soft rubber gasket. After pressing the outer lever, the bell rises and the water moves down through the opened hole.
Important! This design is distinguished by great reliability, because the products last for half a century, while repair work only requires periodic replacement of the worn-out gasket.
Later designs are equipped with a rubber or plastic bulb instead of a bell. When the container is released, the float lowers, after which the valve opens, releasing water.
Let's look at the differences between old-style drain systems:
- Unattractive appearance. Previously, external attractiveness was not so important; more attention was paid to the reliability of components and their performance. Therefore, the appearance of old products is not very aesthetic, with a primitive shape and a roughly processed surface.
- Location of the tank. Most often, the location of the container is under the ceiling, and a pipe is intended for the passage of water - a riser. Due to this, the water flow develops a high speed, which leads to high-quality flushing, but at the same time a lot of noise is heard.
- Design features of shut-off valves. Such products are distinguished by a very unique flushing system. It is based on the principle of a rocker arm; to operate, you need to pull a rope or chain. The design is very simple; no instructions are required for assembly.
- High water consumption. Such designs do not use economical drainage modes; the water leaves in full.
- Intake system. Water is supplied only from the side, which makes it impossible to hide the hoses.
Important! In some cases, it is more advisable to replace the tank with a more modern product, for example, if the damage is too extensive.
Preparation for repair
Before you can repair the toilet cistern, you need to open it. It is only accessible from the top if you remove the cover. In many modifications it is attached using a ring around the button. This ring must be pressed and turned counterclockwise. After prolonged use, the ring may not turn. Then a few drops of oil are applied to the attachment point. After the ring has turned, unscrew it, and then release the button from the plastic clothespins and remove the cover.
USEFUL INFORMATION: Hood for toilet and bathroom: design and installation
Models are equipped with one or two buttons. In the second case, one of them is intended for a small flush, and the other for a large one. To dismantle the cover, press one button and remove both of them one by one through the technological groove. Then unscrew the fastening screw and remove the cover.
Toilet button malfunctions
All signs of a malfunction of the toilet flush mechanism button can be classified as follows:
- insufficient volume of water for flushing (full or partial);
- sticking;
- sinking (falling through).
In the first case, we are not talking about how to repair the button, but about adjustment.
Adjustment
The full flush volume is adjusted using a float - its position on the rod relative to the overflow tube ensures the water level in the fully filled tank. The standard recommendation is that the supply should be cut off when the water surface is 15-20 mm below the overflow edge:
- Setting the float. At the bottom feed valve, the rack rod is disengaged from the float, which is then moved up or down along the guide. The side feed valve is adjusted in a similar way - the only difference is in the relative position of the float and the shut-off valves of the water supply system.
- Adjusting the flush tank button comes down to moving the overflow tube relative to the “glass” of the push-button mechanism and adjusting its height. To do this, unscrew the fixing nut on the tube, disconnect the rod, move the tube to the required position and tighten the nut. Then, pressing the petals on the glass and moving the guides, the height of the entire mechanism is set. At the final stage, the rod is snapped back onto the overflow tube clamp.
The fittings of a two-level tank also have a small flush float, which must be moved along its own rack guide on the overflow tube. The position of this float determines the volume of water during incomplete flushing.
Note. Two-button fittings may have an additional option - setting the full reset volume to a minimum using a separate damper on the cup body.
But if a button gets stuck or sticks, then what to do - adjustment or repair - can only be decided after finding out the cause of the malfunction.
How to fix a toilet button?
If the toilet cistern valve button sticks or falls through, then we are not talking about adjustment, but about repair.
Removing sticking
Button sticking can have different causes and manifestation patterns. To eliminate sticking, you need to get to the fittings. For this:
- shut off the cold water supply to the tank (if there is no separate valve, close the common tap on the riser);
- unscrew the locking ring;
- remove the button from the seat;
- remove the tank lid;
- find out the cause of the sticking.
Note. There is another mechanism design with two buttons. The difference is in the dismantling method.
First you need to press the big button. This will open a groove on the small button into which you insert a screwdriver and remove it.
Then remove the large button, under which the screw will open, holding the button socket on the tank lid. By unscrewing this screw you can remove the cover.
If the tank, and therefore the fittings, are new, then sticking can occur when the button is pressed “excessively” hard. The reason is a rough surface or burrs on the plastic parts of the fittings, which stop the button and prevent it from returning to its original state. In this case, you just need to clean the problem area.
Another reason for a sticking button may be a misalignment or displacement of the push lever that moves the rod. To restore the operation of the tank, it is necessary to re-adjust and configure the mechanism.
The third reason is accumulated deposits in the button socket (dust, debris, plaque). The problem can be solved by simply cleaning and flushing this working unit.
If the drain stops working due to wear or breakage of any part, then you will need to completely replace the entire mechanism with a new one that matches the model of the tank.
Failure Elimination
One of the common reasons why the button in the toilet cistern sinks (falls through) is the incorrect setting of the mechanism.
For adjustment behavior you need:
- shut off the water supply;
- completely drain the water from the tank;
- remove the button and tank cover;
- dismantle the mechanism;
- adjust the height of the overflow edge relative to the water surface;
- adjust the height of the mechanism, taking into account that the fully pressed button should not touch the overflow tube;
- adjust the floats for full and partial drain.
Another reason for failure is a breakdown of the return spring of the pusher on which the button presses. And in cases where the button assembly is non-separable, the button will need to be replaced.
Replacing the button with a new one
If the push-button assembly fails, there is no need to replace the entire drain valve. The problem can be resolved by replacing the toilet cistern button. But it must be the same model as the broken part. The work is carried out in the following sequence:
- remove the faulty unit by disconnecting it from the tank lid;
- check the settings of the drain valve and the float of the shut-off valves on the water supply;
- install a new button, check the operation of the drain device.
If the toilet tank was produced a long time ago, or the model is so rare that it is not possible to find “spare parts” for it, then you will have to completely replace the entire flush valve with a new one that fits its installation dimensions.
Do-it-yourself methods for repairing the tank mechanism
Through the upper hole in the tank the entire mechanism of the drain fittings is visible. It may have the following faults:
- The tank is constantly leaking.
- There is no water pressure at the inlet.
- Uncontrolled drain mechanism.
The causes of these malfunctions can be different, and the method in which the toilet cistern will be repaired depends on them.
- The plug (bulb) does not fit tightly to the drain hole. To avoid this, you should purchase high quality plumbing fixtures. The possibility of repair can be checked by pressing the rod with slight force. If water does not flow, the plug can be slightly weighted with additional weight or the stem can be leveled. You also need to periodically clean the seal from rust and salts, due to which the seal is broken and liquid constantly flows into the bowl.
- The regulator does not shut off the water supply. At the same time, the tank will never overfill, thanks to the presence of an overflow tube. The serviceability of each element of the device is checked: float, intake valve, fasteners, rod. The failed part is replaced or the float mount is simply tightened.
- Leaking from the tank into the room. It may have a crack or the gasket seal may be broken. Particular attention should be paid to the quality of the connection between the current tank and the bowl. It needs to be tightened, and if this does not help, the rubber gasket is changed. Another cause of a leak may be wear of the cuff at the junction of the bowl drain with the sewer pipe. The seal is replaced with a new one, having cleaned the connection of contaminants and treated the surfaces with sealant.
- Weak pressure through the inlet valve. This usually happens if it becomes clogged. This can be prevented by cleaning or installing a filter in front of it.
USEFUL INFORMATION: Design of a small toilet in an apartment
We repair the float and eliminate all types of leaks
Let’s go directly to the guide “how to repair the insides of a toilet cistern.” There can be several consequences of malfunctions, depending on what exactly is broken.
- Water keeps flowing into the toilet. Here the breakdown lies in the float, twist or valve of the shut-off valve. After long-term use, the surface of the float may become covered with cracks or it may simply crack in one place, then when water is collected, it will float up with a delay, and water will constantly be collected. In this case, the float can simply be replaced. Another reason is that the metal twist is bent or the plastic ratchet is cracked, through which the impulse from the float is transmitted to the valve, then the metal can always be straightened, but the plastic will also have to be changed. If the valve does not close, then you can install an additional float valve, since most likely the valve cannot cope with the water pressure.
- The collection of water is accompanied by loud noise. There are two ways to eliminate this defect:
- change the diameter of the hole through which water is poured;
- insert a small tube about 35 cm long into the hole, then water will flow through it and the noise from filling the tank will be significantly reduced.
- The tank leaks directly onto the floor. This means your mounting bolts have rotted. It's very easy to find out.
- Turn off the water completely.
- It is better to scoop out the remaining liquid in the tank with something, or place a container in the place of the leak and flush the water down the toilet.
- Disconnect the flexible hose.
- We disassemble the fasteners that connect the tank and the toilet shelf.
- We remove the tank and put it aside.
- We remove rotten bolts, both of them, regardless of their condition.
- We carefully clean all connecting places from rust and lime deposits.
- Install new bolts.
Toilet cistern - It is also better to replace the rubber cuff for reliability.
- We put everything in its place.
- We check the functionality.
The malfunction may not always appear immediately, so watch for condensation and leaks over the course of a couple of days.
- A situation arises when water constantly flows into the tank. This means that the water drainage system is faulty in part of the drain valve or the lever itself. This will most likely require replacement. It's quite easy to do this with your own hands.
- remove water from the toilet;
- remove the entire system;
- we change it to a new one;
- fill the tank with water and check for functionality.
Since the entire system is sold assembled, both valve and lever will be replaced at the same time.
- If water does not flow into the drain tank, this means that the fluid collection system is faulty. There are three possible failure options.
- The flexible hose is clogged.
It is very simple to check: turn off the water, disconnect the flexible hose, placing it above any container, and slightly open the tap. If water does not flow, the hose is clogged and needs to be replaced. If water flows out, then the problem is not in the hose. We continue the search. Replacing elements of the flush cistern - The upward guide may clog the shut-off valve hole. It can be cleaned with a screwdriver.
- If the problem is not in the technical hole, then the valve itself may not work. It can only be replaced; it cannot be repaired.
Intake Valve Replacement
Before repairing the toilet, you should turn off the water supply valve. It is connected to the pipeline from the riser. Then the flexible hose is unscrewed from the inlet mechanism. It can be easily removed if the fastening is loosened. A new or repaired one is installed in its place. Assembly is carried out in reverse order. Plastic threads do not require sealing, and fluoroplastic tape is wound onto brass threads.
Self-replacement of the drain device
To replace the flush assembly in the tank, you need to prepare:
- pliers;
- adjustable wrench or wrench;
- spare parts or a completely new mechanism.
All work is carried out as carefully as possible, since individual parts are very fragile. If excessive force is applied, the kit may be damaged.
Easy replacement of the drain mechanism
As a rule, the mechanism for the toilet tank, which is responsible for flushing, can be easily adjusted or repaired, since it is a really simple and understandable design, as can be seen in the diagram. However, it also happens that the mechanism breaks down completely, then there is no way to do without its complete replacement, for which you must first deal with the dismantling of the old mechanism.
Remember
All work on replacing, adjusting or repairing the drain mechanism should only begin when you have completely cut off the water supply to it. The easiest way to do this is to turn off the common taps in your house or apartment. If these are not found, then you will have to contact the housing office with a request to close the riser for a certain time, which must be met.
Complete replacement of components
To begin with, it doesn’t hurt to go to the store and buy a new toilet cistern mechanism, otherwise all your efforts may go down the drain.
The easiest way, of course, is to disassemble the device and take the necessary parts with you, but this may not be possible, so it is best to take the accompanying documentation with the tank. Then there will be much fewer questions about how to remove the flush mechanism in the toilet cistern, because the diagram will easily explain many “misunderstandings”. Modern plumbing stores employ competent and experienced consultants who can simply describe the flush mechanism you need for an old-style toilet cistern, with a button or two buttons, so that they understand and advise exactly what you need.
- Turn off the water and press the tank drain button to release any remaining liquid from the system, which may leak onto the floor during disassembly, which is completely unacceptable.
- Unscrew the flush button and remove the toilet lid. There is already an article on our website on how exactly this can be done with different button options, it’s worth reading it in more detail.
- Carefully disconnect all visible hoses and remove the internal part of the drain mechanism with overflow and float.
- From the bottom of the toilet, unscrew the screws that securely fasten it to the tank.
- After removing the tank from the mount, we dismantle the lower part of the drain mechanism with the large main gasket on it.
- Into the hole in the tank thus freed, we begin to gradually and methodically insert the necessary parts one by one, repeating all the steps in reverse order.
If the tank's mounting screws have succumbed to corrosion, then they also need to be replaced, even if they are not included in the repair kit. Then you will have to purchase these elements additionally, fortunately, their cost is affordable for everyone. Next, all that remains is to complete the assembly, but not completely, since the first draining of the water must be done immediately, before you have screwed the tank cap into place. The flush mechanism of a toilet cistern with a double button is replaced in the same way as with a single button. The main thing is to purchase the right set of spare parts so as not to make a mistake.
With bottom water supply
When the inlet valve for introducing water into the tank is not located on the side, as in most cases, but from the bottom, then you will have to tinker a little longer. The thing is that there will definitely be not just a valve, but a special membrane, which will be quite difficult to “get close to” and unscrew due to the lack of free space. The tank is most often located close to the wall, so it will be really difficult to turn around.
Experts recommend either using special sockets, which not every home craftsman has, or cutting off part of an ordinary wrench with a grinder, or trying to do something like that. All other actions, except for unscrewing the intake fittings, must be repeated according to the proposed plan, and new parts must be installed in place of the old parts. Remember, such actions will have to be repeated every 5-7 years, if during this time it does not mean repairs to the bathroom and a complete replacement of the tank. So be prepared for such ups and downs, and experience usually comes with age.
Step-by-step instructions for replacing the flush mechanism in a toilet
The flushing mechanism is installed as follows:
- Close the valve through which water enters the tank and drain the remaining contents of the container.
- If the toilet has a button, dismantle this element.
- Remove the tank cover.
- Remove the release lever.
- Unscrew the drain valve with the seat.
- Disconnect the tank by unscrewing the fasteners that connect it to the toilet.
- They take out the plastic nut that held the mechanism.
- Remove the gasket located under the tank, wash it or replace it.
- The gasket is returned to its place.
- Install the mechanism in the drain tank, screw a new nut on the bottom.
- Secure the tank.
- Adjust the location of the drain lever according to the height of the container.
- Turn on the water and fill the tank.
- Adjust the settings of the drain mechanism.
- Place the cover in place.
- Screw the button.
This part is just one of the elements of the drainage device
Adjusting the water level in the tank
The water level can be easily adjusted with your own hands. To do this, the float is installed in a certain position.
The optimal level is considered to be when the water supply to the container has stopped, and a few centimeters remain to its upper edge.
The adjustment method depends on the design of the valve. The simplest one is bending a metal rod. If the float moves along a horizontal plastic guide, it is fixed using fastening elements in a certain position. With a vertical layout, it is moved with an adjusting screw.
When choosing the filling level, do not forget about the overflow tube. Its upper edge should be a couple of centimeters above the water level in the filled container. If it is located lower, water will constantly flow into the bowl through the overflow.
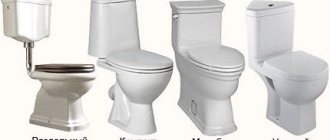
Types of flush cisterns
Flush cisterns are produced in the following types:
- Flush cistern installed on a toilet with side or top flush
- Flush cistern low, middle and high with side release
Flush cisterns are divided into three conditional groups according to the height of their location to the toilet:
- BN - low-mounted (shelf) flush cisterns - installed on toilets
- BS - mid-mounted (mounted) flush cisterns - mounted on the wall at a height of no more than 1 meter; through the supply pipe
- BV - high-mounted (mounted) flush cisterns - mounted on the wall through a supply pipe at a height of up to 2 meters
Low- and mid-flush cisterns are installed in residential and public toilets. High-mounted flush cisterns are installed mainly in public toilets.
Low- and mid-mounted flush cisterns consist of the following parts:
- housing (1) with cover (2)
- drain valve (11)
- float valve (7)
- drain fittings
High-mounted flush cisterns consist of the following parts:
- housing with lid;
- a lever, which at one end is connected to a flexible siphon, and the other to a release handle (chain).
The following terms are used in the design of flush cisterns:
Filling fittings are a device that automatically fills a flush tank with a certain amount of water after it is emptied and seals it hermetically. Drain fittings are a device, manually or automatically activated, that ensures the drainage of water from the flush tank into the toilet (floor bowl). Flush tank is a non-pressure, water-accumulating reservoir that is filled automatically from the water supply network and emptied manually or automatically to ensure flushing of the toilet (floor bowl).
An overflow device is a device that diverts water from the flush tank into the toilet in the event of an emergency failure of the filling fittings. Useful volume is the amount of water supplied for flushing from a tank filled to a level 20 mm below the overflow level, with a single impact on the trigger handle for no more than 2 seconds. with the filling valve closed.
The outer diameter of the end of the flush pipe connected to the toilet is no more than 50 mm. The dimensions of the holes in the tank body for connecting the filling fittings to the water supply pipe provide the possibility of attaching pipes Dy=15 mm or less. The useful volume of the tanks is at least 6.0 liters.
Tank Troubleshooting
The tank may leak water due to a crack in it. The same applies to the cup. In this case, the question of how to repair the flush tank or bowl does not arise: the entire toilet is usually replaced. A small crack in the top of the ceramic pieces can be repaired. To prevent it from spreading further and increasing water seepage, it is drilled at the ends and treated along the entire length with sandpaper. The work is done carefully.
If the crack progresses during operation, the toilet should be replaced.
The surface is degreased and the gap is filled with epoxy resin. After hardening, the seam is sanded.
USEFUL INFORMATION: Replacing a sewer pipe in an apartment: at whose expense, price
Choosing the right fittings
In order to change the insides of the tank as rarely as possible, you need to be able to choose them correctly. Let's consider the subtleties of choosing fittings for a toilet. When purchasing, you need to know that all the insides of the toilet are divided into two groups:
- Depending on the material from which the mechanisms are made, a distinction is made between plastic “filling” and metal alloys, mainly brass. Metal components ensure durability of parts and resistance to breakage. Plastic parts wear out faster and require replacement and repair more often. But there is also a gradation in plastic, very cheap plastic will break quickly, and a higher quality one will last longer, but it is difficult to determine its quality by yourself “by eye,” so you should be guided by price - the more expensive, the better.
- Based on the type of design itself, there are separate units for collecting and draining water and complex systems that combine these two units. With a separate system, everything is clear, the connection between them is carried out through third-party influence - pressing a button. This configuration is convenient in that it is possible to independently repair or replace a worn part. The general control system independently controls the processes as a whole. This system is installed only on modern tank models. It is quite difficult to install and operate, so its repair should be entrusted to a specialist. But such difficulties are justified by the impeccable operation of the cistern.
Also, the insides of the toilet differ in the way the fitting is installed: bottom or side, right, left. Therefore, if you are purchasing fittings to replace worn-out ones, then you need to buy them taking into account the design features. In addition, systems often differ from each other even in the diameter of the technological holes. Therefore, when choosing fittings, treat this process responsibly so that you do not have to purchase additional devices or change purchased items.
Features of repair of products with bottom water supply
Not so long ago, tanks with bottom water supply began to be used, which makes them more compact due to the absence of protruding tubes. Typical malfunctions and features of repairing a toilet flush cistern with a button with a bottom water supply:
- Weak water pressure. For normal operation of the diaphragm valve, a water pressure of 0.05 MPa is required. Otherwise, water will constantly flow into the tank. The increase in pressure is created by cleaning the intake valve and filter.
- Installation errors. The outlet fittings must not come into contact with the walls of the tank.
What to pay attention to when using the cistern
A toilet is a plumbing fixture that is used many times throughout the day. Therefore, during operation there may be some nuances that you should pay attention to.
- The plastic fittings of the drain tank tend to deform over time. This can happen from too much pressure when flushing or when trying to upgrade the system. So, some craftsmen connect a hot water supply to the flush tank to get rid of constant fogging of the container. However, they do not take into account that warm water causes plastic to fail very quickly;
- The use of imported fittings for the cistern. Membranes in such systems are designed for higher quality water, so their use in our tap water conditions significantly reduces the service life of the structure;
- Initial marriage. You should not chase too cheap elements for flush tanks. Such products are usually of low quality and therefore do not last long.
Operating principle of drain tank fittings
Repair of a built-in tank (with installation)
It is more difficult to get to the tank mechanism installed behind a false wall. First of all, you should purchase a device that is highly reliable and rarely requires repairs. There should be inspection hatches in the wall through which you can get to the tank and replace the gaskets if the seal is broken. It is not possible to repair the drain fittings yourself due to the complexity of the design.
A coarse filter is installed in front of the hidden tank, which captures solid particles, which in most cases cause leaks.
How to choose the right plumbing fixtures?
When choosing a toilet, pay attention to the following.
- Mounting method: monoblocks, compact and separate toilets. The choice is made taking into account the size of the room, design and labor intensity of servicing the tank.
- Accessories. Most parts that have low strength and reliability are made of plastic.
- The presence of positive reviews, a well-known manufacturer, a guarantee and a certificate.