Plumbing equipment is subject to intense operating loads and often fails. When the toilet tank constantly leaks, it causes great losses due to excessive water consumption. It is not advisable to call specialists because the device fails, since repairs mostly involve adjusting the tank mechanism. But to understand how to fix a toilet, you first need to know how it works. Let's figure out how to independently repair a toilet cistern with a button.
Toilet device
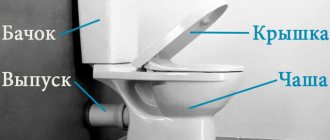
The toilet includes the following elements:
- A toilet bowl connected to a sewer pipe with a sealed cuff.
- Drainage tank with fittings that allow it to be filled with water and drained.
A water supply hose is connected to the tank. Depending on the design, it is connected from the side or from the bottom. The bowl and cistern are usually connected to each other using bolts and a seal.
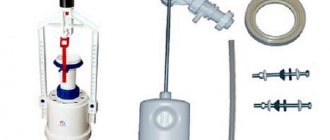
Accessories components:
- rod release mechanism with drain button;
- a shut-off device (inlet valve) connected to a float;
- rubber sealing gaskets.
Types of drain fitting design for toilet cistern
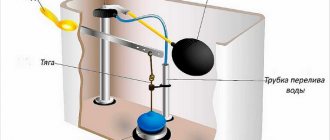
There are several options for the drainage system. The filling valve can be bottom or side mounted. In the first case, the pipe is located in the bottom of the drain container. This system includes a vertical rod float, a rod and a buoy. The last two elements are connected into a common structure, which acts as a water limiter.
When the tank is empty, the float lowers. At this moment, draft begins to act on the toilet valve, opening it. When the float reaches a certain level, the valve closes. Sealing of the system is ensured by a pair of gaskets.
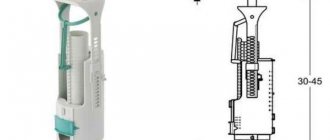
When placed on the side, the pipe with the valve is inserted into the tank through a side hole, which is located in the wall of the container under the lid. This gap is made conditionally sealed, since water does not reach it. In this design, the control mechanism of the flush tank is placed horizontally. It consists of a shut-off device, a float, a lever and a filling tube. When the tank is emptied, the float lowers, which moves a rod that opens the shut-off valve. When the tank is filled with water, the control mechanism gradually rises.
In a side-valve design, the mechanism is located horizontally
From the point of view of efficient and comfortable operation of the drainage device, it is better to choose models with a bottom connection, which are more reliable and make less noise when the container is filled with water. Systems with side connections are characterized by ease of installation and ease of adjustment and repair work.
Important! Tanks with bottom connections require close attention to the tightness of the connection.
The flush mechanism is activated by a trigger, which can be a lever, a rod or a toilet button. Older models were equipped with a lever to which a cord with a handle or a chain was attached. The drain system with a rod was activated by lifting the handle up. This option has also lost popularity and is rarely found in modern tanks.
Bottom-mounted designs are more reliable
Currently, models are most often controlled by pressing a button located in the tank lid. The push system, in turn, can be one-button or two-button. In the first case, the tank is completely emptied when you press the button. The second option involves two modes of operation of the tank drain mechanism with a button. The first ensures that half the volume of the container is drained, and the second ensures that the tank is completely emptied.
How a toilet with a button works
A toilet tank with a button is a water seal that is filled with a portion of water, which is supplied to the bowl when the valve is opened. The flush is controlled by a button that needs to be pressed. At the same time, the valve opens and the water flows down under its own weight, washing the bowl. After the tank is released, the shut-off valve at the inlet opens, the tank is filled with the next portion to a certain level, regulated using a float. Access to the mechanism is provided by opening the top lid of the tank.
Internal structure of the drain tank
When installing a new toilet with a flush cistern, the first thing you need to pay attention to is the completeness of the purchased equipment and its size .
If the condition of the bowl is determined purely visually to establish its integrity, then the drainage device is worthy of closer attention. It must not only be installed correctly, but also configured to work in optimal mode. This can result in significant savings in water consumption. Today, the building materials market is filled with a mass of different products based on material and internal filling. If desired, you can also find plumbing fixtures of outdated designs, if needed.
The designs of the internal structure of the drain tanks are almost the same with minor differences among different suppliers:
- Mechanisms that include a stop button. The water will be drained until it is pressed or the entire volume has flowed out. If you release the button earlier as the toilet bowl is being cleaned, liquid will stop flowing into it.
- Drain devices with two buttons. When one of them is pressed, the entire volume of water is poured out, and when using the second, part of the liquid is poured out depending on the flow rate adjustment. It is impossible to confuse the buttons - they are of different sizes. They appeared on the market relatively recently and this is due to the need to save water resources and, as a result, your own money.
- Two-mode drain mechanisms.
The tanks also differ in the nature of the flush:
- direct - in this case, water flows into the bowl directly from the tank, in one direction;
- reverse - when flushing, the water can change the direction of inflow, which cleans the toilet bowl more effectively, although this creates noise.
A typical design of a toilet cistern resembles an ordinary water seal, which includes a float and a system of levers. When using a button or rod (for rod mechanisms), water flows from top to bottom, cleaning the toilet bowl.
In this case, the float moves down and, through a system of levers, opens the inlet valve, through which water from the water supply network enters the container, filling it for subsequent use.
Internals for the cistern include:
- Inlet valve.
- Float.
- Siphon.
- A system of levers for moving parts and components of the mechanism.
Preparation for repair
Before you can repair the toilet cistern, you need to open it. It is only accessible from the top if you remove the cover. In many modifications it is attached using a ring around the button. This ring must be pressed and turned counterclockwise. After prolonged use, the ring may not turn. Then a few drops of oil are applied to the attachment point. After the ring has turned, unscrew it, and then release the button from the plastic clothespins and remove the cover.
USEFUL INFORMATION: Hood for toilet and bathroom: design and installation
Models are equipped with one or two buttons. In the second case, one of them is intended for a small flush, and the other for a large one. To dismantle the cover, press one button and remove both of them one by one through the technological groove. Then unscrew the fastening screw and remove the cover.
Installation and replacement of cistern fittings
A significant part of toilet problems can be solved by adjusting or replacing the tank fittings. In any case, you need to know how to disassemble and assemble the insides of the tank. This skill will definitely come in handy. When replacing, you first need to dismantle the old device and then install the new one. We will describe in detail the entire process, including the installation of new fittings.
How to remove the cap from the tank
If a flush tank with a button is being repaired, it is not always immediately clear how to remove the lid. This is easy to do: press the button and turn the ring.
How to remove the lid from a tank with a button
If you can’t press the button with your fingers, examine its inner rim. There are two special slots there. You can take a screwdriver with a narrow end and use it to turn the ring a little. Then you can unscrew it with your fingers.
After this, remove the button by pulling it up. That's it, the lid can be lifted.
Removing the tank
To replace the old cistern fittings, it must be removed from the toilet bowl. First of all, turn off the water supply, then drain the water from the tank. Then, using wrenches, remove the water supply hose (it is attached to the side or bottom).
When the water supply is located at the bottom, it is located next to the mounting studs
Next, you need to disconnect the tank from the toilet bowl. If you look underneath it, you can see bolts that are tightened with nuts. So we unscrew them using a set of open-end wrenches or an adjustable wrench. Before doing this, place a container or a rag near the toilet - a certain amount of water always remains in the tank, and when you unscrew the nuts, it will drain.
After unscrewing two nuts - on the right and on the left, we remove the tank. There is usually a gasket left on the bowl. If it has become deformed or dried out, it is also advisable to replace it.
Remove the drainage tank from the bowl
Place the tank on a flat surface. There is a large plastic nut at the bottom. It holds the drain mechanism, we unscrew it. Sometimes the first turns have to be made using an adjustable wrench, but do not over-tighten it - the plastic can be brittle.
Unscrew the nut holding the drain mechanism
Now the water drainage mechanism can be easily removed.
This is what the cistern fittings look like after several years of operation.
Similarly, remove the water supply mechanism. With bottom feed, the fastening nut is also located at the bottom (right or left of center).
Water supply mechanism fastening nut
This was the removal of the water supply device to the tank
After that, we look inside the drain tank. Usually, rusty sediment, small metal particles, sand, etc. accumulate at the bottom. All this must be removed and, if possible, washed. The inside must be clean - any debris caught under the gaskets can cause a leak. After this, we begin the installation of new fittings.
Installation of cistern fittings
Everything happens in reverse order. First, we install a new drain mechanism stand. We unscrew the plastic nut from it and put a rubber gasket on the pipe. It can be white (as in the photo) or black.
We put a rubber gasket on the thread
Place the device inside the container and screw the plastic nut on the outside. We twist it as far as possible with our fingers, then tighten it a little with a wrench. You can't overtighten it - it will burst.
Install and tighten the nut
Sealing
Now on the toilet bowl we replace the o-ring that seals its connection with the flush cistern. Dirt and rust often accumulate in this place - we wipe it off first, the seat should be dry and clean.
Install the O-ring
We install mounting bolts inside the tank, not forgetting to put gaskets. We put the drain tank in place until it can be leveled. The main thing is to get the screws and the outlet part into the seats. Take a washer and nut and screw them onto the screws.
Tighten the fastening
When both nuts are installed, but not yet tightened, level the container. Then, using a wrench, we begin to tighten the fastening. We turn it a few turns, first from the right, then from the left.
Install the exhaust valve
Lastly, install the inlet valve for the drain tank. It could have been installed earlier, but then it would be inconvenient to install the mounting bolts - there is too little space. We also put a gasket on the outlet pipe, then install it inside and secure it with a nut.
Tighten the intake valve mounting nut
The next step is to connect water to the same pipe. Before connecting the flexible water hose, open the water for a while, giving the opportunity to remove scale, which accumulates every time after closing the tap, even for a short time. After draining a certain amount of water (place a bucket so as not to wet the floor), connect the hose to the fitting (turn off the water again).
Connecting water to the toilet tank
Although the fitting is metal, there is no need to tighten this connection too much - first with your fingers, then one turn with a wrench. If you notice drops when you turn on the water, you can tighten it another half turn. After this, we check whether the system is working correctly. If everything is correct, install the cover and screw the button. You can test it again. This completes the installation of the drain tank fittings. As you can see, everything can be done with your own hands.
Do-it-yourself methods for repairing the tank mechanism
Through the upper hole in the tank the entire mechanism of the drain fittings is visible. It may have the following faults:
- The tank is constantly leaking.
- There is no water pressure at the inlet.
- Uncontrolled drain mechanism.
The causes of these malfunctions can be different, and the method in which the toilet cistern will be repaired depends on them.
- The plug (bulb) does not fit tightly to the drain hole. To avoid this, you should purchase high quality plumbing fixtures. The possibility of repair can be checked by pressing the rod with slight force. If water does not flow, the plug can be slightly weighted with additional weight or the stem can be leveled. You also need to periodically clean the seal from rust and salts, due to which the seal is broken and liquid constantly flows into the bowl.
- The regulator does not shut off the water supply. At the same time, the tank will never overfill, thanks to the presence of an overflow tube. The serviceability of each element of the device is checked: float, intake valve, fasteners, rod. The failed part is replaced or the float mount is simply tightened.
- Leaking from the tank into the room. It may have a crack or the gasket seal may be broken. Particular attention should be paid to the quality of the connection between the current tank and the bowl. It needs to be tightened, and if this does not help, the rubber gasket is changed. Another cause of a leak may be wear of the cuff at the junction of the bowl drain with the sewer pipe. The seal is replaced with a new one, having cleaned the connection of contaminants and treated the surfaces with sealant.
- Weak pressure through the inlet valve. This usually happens if it becomes clogged. This can be prevented by cleaning or installing a filter in front of it.
USEFUL INFORMATION: Design of a small toilet in an apartment
Design and installation of the drain mechanism
The corresponding mechanism is responsible for supplying liquid from the drainage section to the toilet bowl. Consists of the following devices:
- drain siphon;
- handle that controls the release lever.
The siphon fits tightly to the drain hole, which does not allow water to pass through unnecessarily . This device is divided into several types:
- Simplified. It is a cylindrical device made of dense rubber, commonly called a pear. The mechanism for lifting the pear is most often a lever, the location of which is determined on the side of the tank. In other cases - a handle located on the lid. To activate it, you need to lift the handle up.
- The button responsible for draining the liquid is installed in models that are developed using new technologies. Placed on the product panel located in the foreground. Most often found on products mounted directly into the wall.
Upon completion of the installation work on installing the toilet in the bathroom, they begin to install the flush cistern, or rather, to assemble the internal system.
How to assemble the tank? To perform this procedure, you must follow the following instructions:
- A rubber gasket is installed on the drain mechanism.
- Place the mechanism directly into the container and screw it with a plastic nut.
- Washers made of plastic or metal are put on the fasteners . This already depends on how the product is equipped. Don't forget about rubber gaskets. Then the bolts are inserted into the holes, and the nuts are mounted on the back side, after installing the washer.
- Rubberized rings are put on the plastic nut for sealing. In the case when a new element is used, there is no need to carry out sealing measures. Otherwise, it is necessary to carefully treat all connections with sealant.
Advice! Before installation, you must carefully inspect all parts in order to identify defects . If there are any at the joints, then they must be treated with sealant. The O-ring is also sealed. The assembly diagram included with each plumbing product will be of great help.
Prices for a toilet flush mechanism
Intake Valve Replacement
Before repairing the toilet, you should turn off the water supply valve. It is connected to the pipeline from the riser. Then the flexible hose is unscrewed from the inlet mechanism. It can be easily removed if the fastening is loosened. A new or repaired one is installed in its place. Assembly is carried out in reverse order. Plastic threads do not require sealing, and fluoroplastic tape is wound onto brass threads.
Replacing components yourself
The most reliable option for repairing fittings is a complete replacement of all components of the device. For this work, you will need a standard set of plumber's tools: it includes pliers, screwdrivers, an adjustable wrench, you will also need to purchase FUM tape for sealing connections, rubber gaskets and a tap. To replace it, it is recommended to purchase an original set of locking elements; in this case, it is guaranteed to fit the size and configuration of the container.
To install new fittings, you must do the following:
- Install a rubber seal between the drain hole and the base of the toilet. It prevents water leakage and provides a tight connection.
- The tank is bolted to the toilet and secured securely to prevent movement.
- After this, you can install new fittings inside to replace the existing ones. A flexible line is connected to the water riser, which will supply water to the tank. To shut it off if necessary, a ball valve is installed in the system. For maximum tightness of the connection, FUM tape should be used.
- The next step is to connect and configure the float mechanism in the drain tank. The float is adjusted so that the water level does not exceed 10 cm from the edge of the drain container.
- The last stage of installation is connecting the drain locking mechanism. The lower element closes the hole in the tank, the upper one is inserted into the hole in the lid and closed with a decorative button element.
If installing the kit into the toilet causes difficulties, it is better not to risk it and call a professional. Incorrect installation will shorten the life of the components and soon the fitting will have to be replaced again. To avoid unnecessary problems, call a qualified plumber to your home.
Adjusting the water level in the tank
The water level can be easily adjusted with your own hands. To do this, the float is installed in a certain position.
The optimal level is considered to be when the water supply to the container has stopped, and a few centimeters remain to its upper edge.
The adjustment method depends on the design of the valve. The simplest one is bending a metal rod. If the float moves along a horizontal plastic guide, it is fixed using fastening elements in a certain position. With a vertical layout, it is moved with an adjusting screw.
When choosing the filling level, do not forget about the overflow tube. Its upper edge should be a couple of centimeters above the water level in the filled container. If it is located lower, water will constantly flow into the bowl through the overflow.
Design and types of toilet cisterns
The flush cistern is an integral and one of the main elements of the toilet. This is a container with two or three technological holes for supplying/draining water and a lid.
First, water is drawn into this reservoir, and then, at the press of a button, it is discharged into the toilet bowl to flush the sewage down the drain.
There is nothing particularly interesting or complicated in the design of the toilet flush cistern. There are only a couple of mechanisms inside.
One ensures the supply and shut-off of the supplied water at the moment when it fills the container to the required level, and the second is designed to directly drain the accumulated moisture into the bowl.
Regardless of the design of the toilet, a flush tank must be present in it, since the direct supply of water from the cold water pipeline does not ensure the proper quality and cleanliness of the flush
Based on the material used, flush tanks are divided into three types:
- Ceramic (faience) - reliable and cheap classics.
- Metal - not very aesthetically pleasing in appearance, but a durable option.
- Plastic (polyethylene) - lightweight and easy to install blocks.
According to the method of fastening and location they are:
- low-lying - installed directly on the toilet bowl;
- high-mounted - hung on the wall or located inside it in the installation block.
Separate toilets, in which the tank is separated from the bowl, have a drain pipe for overflowing water. And the higher their storage tank is suspended, the more powerful the water pressure it produces.
Their only drawback is the not very presentable appearance of the tank, located high above the floor. Therefore, most often in domestic toilets you can see models of toilets with tanks placed directly on the edge of the bowl. They are more compact and aesthetically pleasing.
Water supply options
The internal mechanism for supplying water to the toilet flush cistern includes:
- tap (float valve);
- plastic float;
- levers.
Water is supplied to the storage tank through a hole in its body on the right, left or bottom. With the side method, the float is attached to the end of a horizontal lever, which is connected to the valve of the ball valve.
And in the bottom version, the float is connected to a vertical rod located in the supply pipe.
The bottom connection is considered more silent than the side connection - in this case the water does not fall from above, but enters from the side, which eliminates splashing
The basic principle of operation of the mechanism for supplying water to the toilet flush cistern is extremely simple. As a result of the emptying of the storage tank, the float, which floats on the water thanks to the air inside, drops following a decrease in the liquid level.
Once at the bottom, it opens the fitting valve on the water supply, and as the tank fills, it rises again and shuts off the water supply.
Everything in the operation of this mechanism is based on the laws of physics. There are no electronics in its design, which significantly reduces the risk of breakdown. It is possible that there is too little or too much water in the toilet tank.
Then the float only needs to be adjusted so that the filling of the tank corresponds to the required parameters. But if the levers are broken, then the float system will have to be changed.
Types of drain mechanisms
If you need to flush unnecessary things from the toilet, we simply press the button on the tank. Everything else happens by itself. The water release mechanism inside is activated, opening the drain valve.
As a result, the water flow rushes into the bowl and washes everything into the sewer system.
The filling and draining mechanisms are not structurally connected with each other, each of them functions independently, but these devices start/stop in combination simultaneously
The drainage device is activated by:
- by pressing a button;
- pressing the lever;
- pulling the chain (string).
Tanks are available in different shapes and designs. However, most of them are standardized for a volume of 6 or 4 liters and have standard hole sizes for drain valves.
There are a huge number of water drainage mechanisms themselves, different in design. But if the one in the tank breaks, it can be replaced with a new one without any problems.
Our other article contains information about the design of a drainage device - the fittings of a cistern.
The simplest type of drain siphon is a “pear”, shaped like a rubber plunger. Under the weight of water, it is pressed tightly against the drain hole and blocks it.
And when you press the lever, the “pear” rises due to mechanical force and releases water into the toilet bowl.
Then, as the tank fills, it becomes heavier and lowers back onto the seat, again closing the drain hole.
The overflow pipe is always open, its upper edge is above the set water level - if the tank begins to overflow, the liquid simply flows straight into the sewer system
In the event of a breakdown of the water supply device, an overflow is provided in the design of the flush mechanism of the toilet tank. When a certain level is exceeded, the water will flow into this tube and go straight through the bowl into the sewer.
The most common breakdowns of the cistern are discussed in our article: Repairing the toilet cistern with your own hands
Everything is designed in such a way that, by definition, it cannot spill out of the tank. If triggered, such a transfusion will lead to an increase in the readings of the cold water meter, but will avoid a flood.
Structurally, the flush of water in the toilet itself can be horizontal or circular. The first classic option involves supplying water in a continuous stream from one side of the bowl, and the second - forming jets in a circular pattern from its rim.
The horizontal descent is cheaper to implement, but is uneconomical and washes sanitaryware worse. The circular analogue is better in all operational parameters.
However, with a high degree of water hardness, its small holes may become clogged, which will lead to a decrease in the number of jets.
Tank Troubleshooting
The tank may leak water due to a crack in it. The same applies to the cup. In this case, the question of how to repair the flush tank or bowl does not arise: the entire toilet is usually replaced. A small crack in the top of the ceramic pieces can be repaired. To prevent it from spreading further and increasing water seepage, it is drilled at the ends and treated along the entire length with sandpaper. The work is done carefully.
If the crack progresses during operation, the toilet should be replaced.
The surface is degreased and the gap is filled with epoxy resin. After hardening, the seam is sanded.
USEFUL INFORMATION: Replacing a sewer pipe in an apartment: at whose expense, price
Adjustment and repair
When using the toilet, problems periodically arise - sometimes it flows, sometimes, on the contrary, water does not fill into it. Sometimes, tired of the inconvenience, people buy new toilets. But in vain. Most faults are resolved in 10-20 minutes. Moreover, everything is so simple that anyone can do it. You don't have to call a plumber. You can do everything yourself.
Adjusting the water level
We will talk about devices with bottom water supply. After installation, the toilet cistern must be adjusted. By default, they come from the factory set to the maximum amount of water in the container. This amount is often excessive. With the help of simple adjustments we can reduce the volume of water in the tank. For this:
- Turn off the water supply and drain the water.
- Unscrew the button.
- Remove the cover. Where is the adjustment screw located?
- There is a plastic screw on the float mechanism. By unscrewing/twisting it we change the amount of water. If you need to reduce the amount of water, tighten the screw, lowering the float down. The next time you fill (you can turn on the water), the water level should drop.
- Reinstall the cover and button.
The same procedure is necessary if water is constantly leaking from the tank. One of the reasons is that the float is raised too high. Because of this, water flows through the overflow system.
With a side water supply and a float mechanism, adjustment is even simpler - we change the position of the float by bending its lever. On the one hand it is simpler, but on the other hand it is more difficult. You have to bend it many times to achieve the required level.
By bending the float lever we change the water level in the drain tank
Toilet tank is leaking
If the water in the toilet constantly leaks and its level is normal, we move on. There are several reasons for this leak. And if so, then the methods of elimination will be different.
- The rubber seal under the drain valve in the tank has silted up, dirt has gotten under it, and a groove (or several) has appeared on its surface. The method of treatment is to clean the existing gasket or replace it with a new one. To resuscitate the old one, you need to: turn off the water, drain it,
- remove the drain mechanism by unscrewing the plastic nut from below;
- pull out the drain valve, remove and examine the gasket, clean it of settled particles, if necessary (there are grooves), sand it with very fine sandpaper until smooth;
- install it in place, connect everything and check operation.
- The trigger mechanism itself was demolished. To check whether this is the case, you can lightly press the mechanism with the cover removed. If the leak stops, that means this is the problem. If it still leaks, you should try cleaning the gasket (described above) or replacing it. If the flow stops when pressed, you can replace the fittings or make the glass heavier. Where to put the weighting agent
To do this, remove the release mechanism and place something heavy in its lower part. This could be several pieces of metal, a sock filled with pennies, sand, etc. We install the device in place and check the operation.
Features of repair of products with bottom water supply
Not so long ago, tanks with bottom water supply began to be used, which makes them more compact due to the absence of protruding tubes. Typical malfunctions and features of repairing a toilet flush cistern with a button with a bottom water supply:
- Weak water pressure. For normal operation of the diaphragm valve, a water pressure of 0.05 MPa is required. Otherwise, water will constantly flow into the tank. The increase in pressure is created by cleaning the intake valve and filter.
- Installation errors. The outlet fittings must not come into contact with the walls of the tank.
Possible faults
In the case when the installation of the fittings has been completed and put into operation, it is necessary to monitor their serviceability.
After some time, some malfunctions may arise that can be easily eliminated yourself. Let's look at the problems that arose with the water supply. The most common breakdown is that water does not enter the tank or, conversely, its supply does not stop. The cause of such breakdowns is the valve responsible for supplying the liquid , or the float itself. Floats are designed in the form of hollow cylinders or inverted glasses.
Floats of the first type cannot be repaired; they should be completely replaced. Sometimes you have to replace the entire valve. If we talk about a float in the form of an inverted glass, then the cause of the problem may be the formation of dirt and other deposits in it. The solution to the problem is to clean the float of deposited contaminants.
In the case when everything is fine with the float, but water still does not stop flowing, the cause of the breakdown may be a worn valve membrane. Most often, spare parts are included. Otherwise, the part is purchased and replaced. To do this, you need to remove the cap from the valve, and the worn membrane is removed. A new part is installed in its place. Then it is closed with a cap again. Don’t forget to clean the hole through which water enters the tank.
It happens that water begins to flow out through the overflow. In this case, again pay attention to the float and adjust it. If this does not help, then proceed to check the stud . If damaged, it must be replaced with a new one or simply with copper wire.
Important! If several breakdowns occur, you should carefully examine the fittings, identify the worn part and replace it. Very often it is necessary to completely change the mechanism if several parts are worn out.
As you can see, the toilet structure is not complicated. The design of the tank includes two working mechanisms. The first is for supplying and monitoring the level of liquid in the flush tank, and the second is for draining water into the toilet bowl.
Repair of a built-in tank (with installation)
It is more difficult to get to the tank mechanism installed behind a false wall. First of all, you should purchase a device that is highly reliable and rarely requires repairs. There should be inspection hatches in the wall through which you can get to the tank and replace the gaskets if the seal is broken. It is not possible to repair the drain fittings yourself due to the complexity of the design.
A coarse filter is installed in front of the hidden tank, which captures solid particles, which in most cases cause leaks.
How to disassemble and reassemble a toilet, its structure
The toilet is an integral part of any living space. The plumbing product is used regularly, which leads to breakdowns. Most faults can be fixed on your own without the help of professionals. To identify and fix the problem, you need to know the structure of the toilet.
Standard toilet set
How to choose the right plumbing fixtures?
When choosing a toilet, pay attention to the following.
- Mounting method: monoblocks, compact and separate toilets. The choice is made taking into account the size of the room, design and labor intensity of servicing the tank.
- Accessories. Most parts that have low strength and reliability are made of plastic.
- The presence of positive reviews, a well-known manufacturer, a guarantee and a certificate.
Drain tank - internal structure
In the process of improvement, many designs of these products were developed and used. Based on location, drain tanks can be classified as follows:
- Upper - located at a height of approximately one and a half meters above the toilet bowl, water is supplied through a pipe after acting on the hanging handle. By pulling it, the drain valve is opened, and a portion of water flows into the bowl.
- Hidden. The container is placed in a niche, which is arranged in the wall of the room. With this option, the start button is located on the vertical plane of the partition (door). They are usually made of plastic.
- The compact tank is attached directly to the toilet bowl. For this purpose, it has a special shelf with holes. Fastening is done with screw parts; for earthenware products they are made of plastic.
Toilet tanks can be made from various materials:
- Cast iron. Castings made from this material are the original method of manufacturing toilet cisterns. Currently, their use is not relevant, but the demand still remains, which is why they are still produced. Cast iron products are often decorated with decorative cast elements. The material itself is durable and reliable. (See photo 2.)
- Ceramics. The most popular material for the production of sanitary ware at present. The products are quite durable with a clean, smooth surface that is easy to wash and clean. It is not recommended to use powders and pastes with abrasives for this.
- Plastic. These plumbing fixtures are produced by stamping from various polymers. The advantage is high manufacturing precision, when mechanical modification is practically not required.
Products made from polymer materials are used, as a rule, for hidden installation, so their width is smaller than that of products from other materials.
Toilet flush mechanism: device, principle of operation, overview of various designs
Without a toilet in the bathroom, it’s hard to call a cottage or apartment comfortable. Agree, this statement is difficult to refute. There are a huge number of models of this plumbing fixture. But they do not differ in the particular complexity of their internal structure; the principle of operation is the same for all modifications.
If there is a breakdown with the water supply, then the flush mechanism for the toilet will most likely have to be repaired - it is the drainage system that most often fails in this plumbing fixture. We are ready to help you quickly deal with this problem.
In this material, we have collected and summarized information about the main types of toilet tanks, breakdowns that may occur, and ways to eliminate them. For clarity, the materials are accompanied by thematic photos and videos.
The drain tank is leaking, what should I do?
As the toilet is used, when the main parts of the locking mechanisms wear out, various leaks may occur that cause inconvenience.
Thanks to special technical measures, toilet manufacturers have eliminated the possibility of overflowing the toilet tank to prevent it from leaking onto the floor. Almost all toilets have special drainage holes where water gets in if one of the elements of the filling mechanism fails. In this case, the toilet seems to be in constant flushing mode, the water flows without stopping.
If the cistern leak is insignificant, then the main inconvenience will be only the sound of water and traces of leaks inside the toilet itself. In the case where the leak is significant, additional costs for water arise - water consumption becomes significant.
Repairing a toilet tank must begin with diagnostics to find out which unit of the flushing mechanism is causing the leak.
Tank shut-off valve. Most often, a tank shut-off valve is a plastic valve with a rubber surround that closes the neck of the tank and, using water pressure, stops the flow of water. Most often, it is the drain neck of the tank that begins to leak, and the problem must be looked for either in the neck gasket or in the valve surround.
Before replacing the shut-off valve or neck gasket, you need to check for dirt. Since tap water is not completely purified, the internal parts of the toilet and all mechanisms of the flush tank may become coated with rust or dirt. Sometimes it is enough to simply wipe the rubber gasket of the toilet, or the edge of the flush valve, and it will work again.
Another reason for the failure of the drain valve is the destruction of its rubber part due to physical wear. Then all rubber parts of the drain hole and tank valve must be replaced.
Water shut-off valve. This type of valve can also fail during active use of the toilet. Today there are several types of valves - direct type - when the mechanism for opening and closing the valve is directly connected to the float, or reverse type, when the valve opens due to a decrease in pressure inside the blocking membrane. When the water pressure inside the blocking membrane decreases, the second membrane opens - the inlet one.
It is in this block that wear of the rubber membrane most often occurs, due to which the valve either begins to leak or stops closing. This type of valve is most widespread due to the high filling speed of the toilet tank, but its repair is the most difficult. Most often, either the rubber membrane or the entire locking mechanism must be replaced.
Siphon operating principle
The operation of the siphon is based on the principle of changing atmospheric pressure and air pressure in the riser and sewer network. When the atmospheric pressure value is higher than the same air indicator in the sewer and riser, the volume of liquid in the water seal decreases, therefore, part of it enters the riser.
The opposite situation is also possible. Traditionally, the siphon entrance is made straight, and the exit can be either straight or inclined. It is worth remembering that when plumbing equipment is not used for a long time, the liquid from the water seal may evaporate completely or partially.
Operating principle of dual-mode drain
Modern models of flush cisterns are equipped with a double flush button. This is a tribute to the fashion for saving water.
Such devices are designed for two operating modes:
- standard – for dumping the entire tank into the bowl (4 or 6 liters);
- half - to pour out only part of the volume (2 or 3 liters).
Such a system is more economical in terms of water consumption. But it is also more capricious in terms of setup and repair. The number of internal elements in it is increased, which means the risk of failure of this device increases.
In addition to the dual option, the button for the dual-mode drain mechanism can be one. In this case, the volume of water released depends on the force of human pressure on the lever.
While the button is pressed, the drain hole remains open, and when released it returns up and at the same time the drain is blocked.
Assembly and disassembly
Floor-standing toilet disassembly diagram
How to disassemble a floor-standing toilet for routine repairs? The process of completing the work consists of going through the following stages:
- Before disassembling the toilet, you must shut off the water supply to the flush tank and remove all accumulated liquid from the container. The water is turned off using a separate tap, if such a device was installed during the installation of the toilet, or a tap that limits the entry of water into the living space. It is recommended to remove the water remaining in the container after draining with a rag (sponge);
- the next step is to disconnect the underwater water hose to free the tank for further action;
- The tank lid is held on by a button, which is connected to the drain mechanism by a threaded connection. If you unscrew the button, removing the cover will not be a problem. In this way you can gain access to the tank fittings;
- all fittings are attached to the tank using threads provided on each element. To remove any device, you must loosen the threaded connection;
- The flush tank is attached to the toilet bowl using fixing bolts located inside the tank. To remove the tank, you need to unscrew the fasteners with a screwdriver.
General instructions for disassembling a floor-standing toilet
Scheme for disassembling a wall-hung toilet
Dismantling the wall-hung toilet is carried out according to the following scheme:
- first of all, it is also necessary to shut off the flow of water into the drain tank;
- the toilet is disconnected from the sewer network and the supply line coming from the tank;
- Complete removal of the toilet is carried out after unscrewing the fixing bolts located on the installation.
To disassemble the drain tank you must:
- remove the drain button located on the front side of the wall;
- disconnect the water supply;
- remove the tank for repairs.
Scheme for disassembling a wall-hung toilet
How to reassemble the toilet after carrying out the necessary repair or maintenance work? You need to act in the reverse order specified in the instructions, that is, first install the tank, and then the toilet.
Thus, knowing the structure and operation of a plumbing product, you can repair the toilet yourself.
Source
Device
The mechanism of all toilets is based on the principle of a water seal. The device has its own system of levers, a float and a seal, which serve to redistribute water inside the structure. In other words, the device supplies water, the mechanism promotes its accumulation, and then flushes at the right time. The water supply is made using a hose, a shut-off valve reliably keeps water from flowing, and shuts off the supply when the tank is full. The float regulates the level of collected water. All this is called toilet fittings. She is the one responsible for its reliable operation.
The design of a typical toilet consists of two containers. The first is a drain tank, it is located at the top and serves to accumulate and subsequently splash out water into the second container - the bowl. It is located on the floor and secured to it. However, there are models that have side, wall mounting.
When you press the lever, it drains. The principle of gravity directs the flow downward, the water enters the bowl and washes away waste from it, carrying it into the sewer.
Toilet flush device