Hello! From time to time, plumbing fixtures in apartments and houses have to be replaced - they can break down or become aesthetically and functionally outdated. If it makes sense to call a specialist to install complex systems, then you can install a toilet with an oblique outlet on your own, and we’ll talk about how to do it correctly in this article.
What tools and materials are required
Before connecting the toilet to the sewer, you need to select the necessary building materials and auxiliary tools. The type of fittings used to form connecting parts depends largely on the connection method, product model and desired location.
Basic tools needed for installation:
- silicone;
- corrugation for sewerage;
- hammer, marker, construction tape;
- hacksaw for metal or plastic elements;
- plastic bends and special corners;
- eccentric cuff;
- sealing collar;
- rubber adapters;
- parts required to dismantle the components of the previous connection to the riser and firmly fix the plumbing.
If previously cast iron pipes were used to connect to the sewer system, then most likely you will need professional equipment (a special hammer drill and a grinder).
However, in such a situation, it is advisable not to carry out the dismantling procedure yourself; it is advisable to contact specialists who have the necessary equipment.
Toilet mounting
Wait until the cement is completely dry and make holes for the fasteners. You will later insert dowels into them that will hold the plumbing fixtures. Do not make the holes too wide, as this will prevent the toilet from being installed correctly and will allow moisture to penetrate into the substrate.
Additionally, it is worth replacing the metal pipe through which water is supplied to the toilet. Install a flexible hose that will last much longer and will not leak water.
Methods for connecting a toilet to a sewer system
How exactly the toilet will be connected to the sewer riser depends on the design of the system. It is important to note that you should select the shape of the toilet basing on the collector system.
There are three main types:
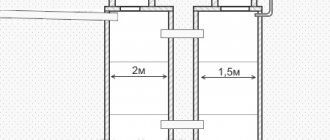
- vertical - similar models of plumbing are in most cases found in old buildings, where the socket of the sewer pipes in the floor passes into a riser located under the ceiling of the room below. Today, cottage owners also choose such a connection, because... thanks to this, you can completely hide the sewer pipeline;
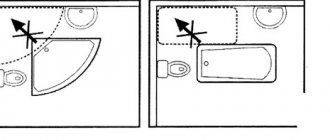
- direct – also allows you to remove communications from sight. The advantage of this approach is the possibility of installing the toilet at a short distance from the wall;
- an oblique connection option is used when it is important to ensure operation even in the event of damage or loss of tightness. Sometimes the owners of the premises decide to connect the toilet outlet directly to the riser, however, this increases the risk of leakage, so it is undesirable to implement this approach; it is better to use a special adapter.
Types and standards
The plumbing equipment market keeps up with the times, constantly offering customers new toilet configurations. This should not be alarmed, because, despite the wide variety, all equipment is manufactured on the basis of certain norms and standards. When dividing toilets into general groups, the following are distinguished:
- funnel-shaped design;
- toilets with shelf;
- toilets with a sloped back wall;
- equipment with horizontal drainage;
- equipment with a circular drain.
funnel-shaped
Funnel-shaped structures are considered one of the most common on the market, and their high demand is achieved due to the simplicity of the design and its hygiene.
With shelf
Toilets with a shelf are considered to be old designs that are gradually going out of use. The shelf prevents the formation of a splash during operation, but has low hygiene. Waste is washed away only under the influence of high water pressure.
With a sloped rear wall
Toilets with a sloped back wall are replacing similar products with a shelf due to a well-chosen ratio of hygiene and splash protection. Such designs are recommended for use by both professional plumbers and ordinary citizens.
Horizontal drain
Toilets with horizontal flush belong to the budget category of plumbing. In this modification, water washes only one wall, which reduces hygiene. The advantages include:
- durability;
- low cost.
The disadvantages include:
- noise during draining;
- strong splashing of water.
Circular drain
In toilets with a circular flush, water is directed in several directions of the bowl, which allows you to treat almost its entire area. The design is less noisy and more practical for horizontal models.
Dismantling old elements
Before connecting the toilet to the sewer pipe, the installation site should be cleared of elements of the previous structures. The procedure is carried out using a hammer, screwdriver and pry bar.
In most cases, the outlet of old products is built into a cast iron structure (“elbow”), which requires breaking the pipe with a hammer. When performing this procedure, be sure to wear safety glasses. Otherwise, sharp ceramic shards will get into your eyes, causing injury.
After the old plumbing fixture is dismantled, you need to knock on all sides of the cast iron pipe, then begin to remove the cement layer and other deposits from the walls.
To remove small parts, a screwdriver and a hammer are enough, but for large elements you will need to use a pry bar. When tapping with a hammer, it is important not to overdo it, because... strong impacts will lead to the splitting of the cast iron socket.
In this case, you will need to break the floor to get to the sewer riser. Then you will need to connect the new outlet to the riser.
When the main deposits have been removed, you can begin the final stage of cleaning the pipeline. To do this, you need to coat them with a special chemical for cleaning the toilet, and then scrape off the residue using a wire brush.
Finish cleaning with a rag. The first 5-6 cm of the cast iron socket must be completely smooth from the inside, because the absence of leaks in the future and the tightness of the joint depend on this. The entire procedure must be carried out wearing protective gloves.
Positive and negative aspects of installing a wall-hung toilet.
Before you decide to install a wall-hung toilet, you need to consider the main pros and cons regarding this issue.
Positive aspects of the installation include:
- saving space occupied by the device;
- lack of an impressively sized drain leg;
- faint noise from water draining;
- extremely easy to care for.
However, we must not forget that installing a toilet with the designated design also carries a number of disadvantages, among which the following points stand out:
- the need to mount the flush cistern inside a wall or niche (otherwise the size of the projection of a wall-hung toilet will not differ from that of a standard floor-standing device);
- the likelihood of movement of sewer and water pipes;
- the need to create a special recess for the cistern.
Types of connecting elements
If it is impossible to directly connect the toilet to the sewer due to the design features, auxiliary materials are used - connecting pipes. In most cases, the following types are used:
- corrugation;
- eccentric cuffs;
- corners and elbows made of plastic;
- pipes of various materials, but plastic is preferable.
Connecting the toilet to the sewer with corrugated pipes is used if the alignment of the pipes is not maintained. The advantage of this type is the ability to install the product at an arbitrary angle.
The disadvantages of using corrugations to connect the toilet to the sewer include the large minimum length. If the distance between the pipes is about 12 cm, it is better to opt for other connecting components.
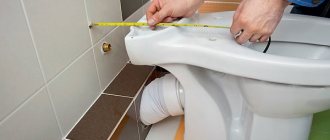
Eccentric cuffs outwardly look like 2 bends with shifted centers. Before purchasing the part, it is recommended to measure the offset between the sewer line and the toilet flush.
This data will allow you to choose the most suitable cuff model in the store. The disadvantage of the eccentric part is its short length, which implies the possibility of installation only with a small distance between the nozzles (up to 12 cm).
Bends and corners are installed in cases where the corrugation cannot be used for some reason. Their advantage compared to corrugation is that the wall is smooth on the inside, which significantly reduces the risk of blockages.
The main disadvantage is rigidity, which leads to leakage even with a slight misalignment. Plastic products can be cut to fit, unlike cast iron.
In most cases, steel pipes are used when there is a risk of failure of the water seal mechanism (find out what a water seal for sewerage is, its operating principles, what types there are, etc.). If the throughput of the riser is insufficient, liquid from the siphon will be drawn into it.
As a result, the water seal does not work, and the stench from the sewer enters the room. In such a situation, a pipe product with an automatic valve is connected to the riser or pipe connected to the toilet. When draining, a special valve opens and air enters, which prevents the water seal from breaking.
However, to implement such a function it is not necessary to use steel pipes. There are also eccentrics and adapters that give the pipeline similar properties. To ensure reliable connection, it is recommended to use sealant when using any type of connecting elements.
For these purposes, it is advisable to purchase a special waterproof product intended for plumbing fixtures. By loosening the rubber sealing collar, the sealant will prevent leakage.
Corrugated connection
As a rule, installation of a toilet with direct and oblique outlet is carried out using corrugation. It has an affordable price, can be bent in any direction and used as a temporary connecting element. When purchasing, you should focus on the length from the sewer outlet to the toilet outlet; the corrugation should be a third larger than this value.
Brief algorithm of actions:
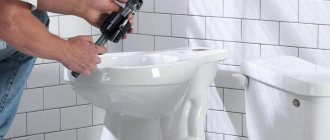
- Coat the joint with silicone and insert the corrugation with the seal into the hole in the pipeline. It is advisable not to move it until the silicone-based product has completely dried.
- Place the toilet and check its stability. If the product wobbles, it is necessary to level the floor or install special stands.
- Insert the corrugation into the toilet pipe; there is no need to lubricate the connection with anything.
- Pour in a few liters of liquid, wait 1 minute, then make sure there are no leaks. If the connection leaks, you need to disconnect the corrugation, check the correct location of the seals and carefully reinstall it.
- If there are no leaks, you can mark the mounting points of the plumbing fixture with a pencil or marker.
- Secure the product so that it does not swing.
- Connect to sewer.
- After 2 hours, carry out testing by performing several drains. Wait 5 minutes, if the pipe does not leak, you can begin installing the tank and other elements.
- Lubricate the joint with sealant from the outside to prevent future leaks.
If a small leak (a few drops) was detected during the last test, all liquid must be completely removed and the corrugation removed. Then apply silicone again to the elastic band of the product and install it on the toilet pipe.
Find out what you need to do if the toilet tank suddenly starts leaking: 9 reasons why it is leaking and video instructions for repair.
How to install a toilet with your own hands. Step-by-step instruction
The process of installing a floor-mounted toilet is not particularly difficult.
It’s just important to carry out all operations without unnecessary haste and with maximum care.
Work begins with unpacking the delivered toilet and assembling it. First of all, drain fittings are inserted into the opening of the tank. Don't forget to install a rubber seal under it. The fittings are secured in place with a washer, which is first tightened by hand and then with a wrench. The plastic can easily be broken by rough actions, so you need to tighten the connection very carefully, without getting carried away.
Next, fixing screws are inserted into the tank, which will attach it to the shelf. Rubber gaskets and washers are put on them, then nuts. A gasket is placed between the tank and the shelf. Everything is coated with sealant to prevent the development of leaks and the seepage of sewer odors. The tank is put in place, fixed with screws, controlling the verticality of its position.
Next, a float pipe is attached to the hole on the side of the water supply to the tank. The connection is sealed with linen winding and a special paste.
The assembled toilet is connected to the entrance to the sewer system. The easiest way is if the riser is made of polymer pipes. Then the corrugation is simply put on for connection. You will have to tinker with a cast iron pipe to clean it from layers to metal. Then the dried metal is coated with sealant, the corrugation is placed and, for reliability, it is also treated with sealing paste on the outside. Without this treatment, leaks due to small cracks in the metal are possible. The corrugation is stretched and placed over the toilet outlet.
Next, the assembled toilet is moved to the side, holes are drilled in the base for mounting screws and supplied with plastic plugs. The toilet is placed on a dust-free base, hardware is inserted and carefully tightened, making 2-3 turns on each edge. The toilet should stand in place strictly vertically and not wobble.
Installation is almost complete. All that remains is to connect the tank to the water supply. The liner is equipped with a union nut with a rubber seal, so it is easy to achieve a reliable tight connection. All that remains is to adjust the fittings, put the lid and release button in place. Do a test water supply and drain. If necessary, tighten the leaking connection or adjust the drain fittings.
Step-by-step installation instructions
After dismantling the previous structure and cleaning the sewer inlet, you can begin installing the toilet. The complexity of this procedure depends on the design of the plumbing fixture.
Watch the video
If the toilet outlet pipe and the sewer inlet perfectly match in shape, installation will be carried out in the shortest possible time. Before starting construction work, it is recommended to look at the connection diagram of the toilet to the sewer.
Toilet with vertical outlet
Watch the video
This type of plumbing fixtures is installed in old buildings and private homes. The toilet design includes a siphon and pipes; after the installation work is completed, you will not be able to see them. The installation of this type differs from the installation of other types of pipe shapes by the presence of flange connections. The joint between the sewer and the toilet is firmly sealed and the risk of leakage is reduced.
Due to the absence of the need to leave some free space behind the toilet to install pipeline fittings, the model can be mounted at a minimum distance from the wall. The procedure begins after dismantling the previous plumbing components and completely cleaning the area where the new product will be installed.
Stages of installing a toilet in a cast iron sewer:
- The entire platform and the bell, in particular, must be cleared of debris and foreign substances. If necessary, you will need to remove the remnants of the previous solution and elements of the previous product; for this, use a chisel, chisel or other similar tool.
- In a completely clean socket you need to install an adapter, which is a rubber sealing cuff.
- The device is installed by the outlet into the adapter installed at the previous stage and fixed in the floor using special fasteners (screws).
Sometimes it is necessary to carry out a horizontal displacement of a toilet of this type. This can be done without damaging the ceiling and moving the ladder in the room on the ground floor. However, you should understand that you will need to sacrifice 15-20 cm of height, because it is necessary to lift the product onto a small pedestal.
Important points to consider when performing the procedure:
- if a displacement of 4-8 cm is planned, an eccentric coupling can be used;
- if a larger displacement is required, additional materials will be required: bends and a plastic pipe. A structure in the shape of the letter Z is assembled from them; its connection to the socket of the cast iron pipeline is carried out using a rubber sealing coupling;
- After installing the coupling or pipe, formwork is built around it, then the elevation is mounted with cement. The surface of the podium should be brought to the same level as the bell, and the tiled finish should also be taken into account.
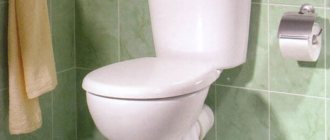
Toilet with direct release
Watch the video - how to connect a bathroom with a horizontal (direct) outlet at home
This type of product is connected to the pipeline using a corrugated product, an eccentric collar or a strong, rigid structure made from a steel pipe.
This structure should not move when inserting the toilet outlet; it should be held by hand when performing the procedure. It is quite difficult to do this on your own; it is better to ask for help to prevent the structure from moving.
If the plumbing outlet matches the shape and height of the socket, then connecting a toilet with a horizontal outlet to the sewer is quite simple. In such a situation, the joint should be sealed using a cuff and a waterproof product - sealant for plumbing fixtures.
It is recommended to seal the connection between the toilet and the sewer pipe, because... The horizontal connection method assumes that water will be located directly at the joint, so every crack can become a source of leakage.
To achieve a slight displacement, a cuff with an eccentric should be used; it is necessary to compensate for the vertical displacement of the toilet outlet.
The main disadvantage of a toilet with direct outlet is that such a model can only be connected to the sewer through a vertical riser. The main advantages of this model include simplicity and ease of installation (you can quickly do it yourself), as well as the possibility of installation with a cast iron or plastic pipeline.
Algorithm of actions:
- Place the toilet without fixing it, mark the attachment points on the floor.
- Remove the device and create mounting holes.
- Using dowels and screws, install the plumbing fixture. It is recommended to be as careful as possible when performing the procedure and not to tighten the screw all the way. Otherwise, the surface of the device may crack.
- Insert the pipe into the sewer hole, which was previously well lubricated with a silicone-based product. When performing this action, it is recommended to hold the sewer hole to prevent the parts from moving.
- If there is a need to slightly shift the product, an eccentric adapter is used. However, keep in mind that this will move the device forward a few centimeters, which will require re-drilling the holes to fix it to the floor.
- Using a sealing cuff, you need to connect the toilet outlet to the sewer. Check operation and make sure there are no leaks.
- Fix the product through the already prepared and made holes.
Classification of toilets with oblique outlet
It should be said that the release form is far from the only difference between the available models. That is, of course, when saying “oblique outlet toilet”, it is meant that the toilet pipe will connect to the sewer system at an angle of 45 or 30 degrees (the parameter may differ depending on the specific model). However, the design of plumbing fixtures itself can be very diverse. There are 4 main characteristics by which plumbing fixtures are classified.
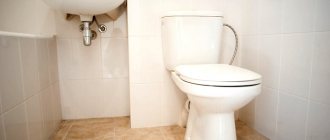
Toilet with oblique outlet
Presence and location of the tank. According to this criterion, products are divided into:
- compact models , in which the tank is combined with a bowl, can be prefabricated/dismountable or monolithic;
- separately installed - no longer produced today;
- hidden installation , otherwise called installation, that is, the tank is mounted in a special niche and is not visible from the outside.
Also gaining popularity are models in which there is no tank at all, and the water for flushing comes directly from the water supply through a special system. Each variety has its own positive qualities and certain disadvantages. For example, equipment with hidden installation is equipped with a more powerful drain, compact models have a lower cost, and products without a tank are ideal for small areas.
Installation options for various toilets
Material of manufacture . The most popular are models made of sanitary ware or porcelain. If the choice is made between these two varieties, then it is better to give preference to porcelain products, which are stronger and more durable, although more expensive. Earthenware is characterized by low moisture resistance, as a result of which the surface quickly acquires a yellowish tint. But these are not the only possible materials. Also today you can buy models made from steel, copper, stone, plastic, acrylic, glass and even from some noble metals, such as gold. Of course, the latter variety is made only to order and should not be seriously considered.
As for other materials, each variety has its fans. In particular, for lovers of everything exotic, a glass aquarium toilet will be of interest. A glass container is built into the front wall of the tank and the fish are launched. There are also all the necessary devices, such as a filter or backlight. However, this is still a toilet with an oblique outlet; the photos below will allow you to verify this.
Toilet with oblique outlet
Bowl shape. There are three main subtypes of design:
- funnel-shaped - characterized by a sharp descent of water and effective drainage, however, due to such an intense supply of liquid, splashes can form, and such a thicket becomes more actively polluted;
- visor - characterized by smooth drainage of water and is quite popular among many users, the only drawback is the high consumption of water resources;
- dish-shaped - its main advantage is the small amount of splashes, although the design is already an outdated type, as it does not retain odor well.
Type of installation or method of connection to the water supply system. To date, only two options for water supply have become widespread:
- lower - in which the supply hoses are practically invisible, and the process of operation of the equipment itself becomes less noisy; of course, it is more difficult to install it yourself;
- side - the water supply hose is mounted in the side hole of the tank, this connection is quite simple, however, a significant drawback is that the water supply is made with a lot of noise.
This list of classifications can be continued, dividing toilets by flushing method (metered, continuous), additional functions, design, color variations and other parameters. This also applies to manufacturing companies, except for Russian or “Cersanit”, imported toilets with oblique outlet, made in Germany (“Santek”) or Sweden (“IFO”), are popular.
Some tips
- When purchasing connecting elements, pay attention to their thickness. The larger it is, the less likely it is to damage the part during operation. Also, the thick walls of the corrugation extend its service life.
- Do not cover the sewer pipe with sealed elements. In case of blockage, the structure will have to be removed. Modern elements blend perfectly with the plumbing, so there's no need to do any extra work.
- If you install a toilet on a base with garbage, then such plumbing will not last long. After installation, you will notice unevenness, which looks unattractive. Be sure to remove all construction debris and vacuum the base to remove dust.
- If you decide to cement the toilet rather than secure it with additional elements, then be extremely careful. Do not put too much pressure on the bowl and, especially, do not make pushing movements. Quite fragile earthenware may not withstand this.
- According to the instructions given, you can install a toilet with an oblique outlet of any type, regardless of the material, type and size of the bowl.
You can install a toilet with an oblique outlet yourself, without the help of specialists. This way you will save money and make a personal contribution to the repair work. But if during the installation process you begin to realize that finishing the process is problematic, it is better to stop and ask for help from specialists.