The toilet in every home is an element of everyday life that is simply impossible to do without. It is used much more often than all other plumbing fixtures. That is why it fails more often than other devices. And its most vulnerable component is the tank, which consists of several internal components. Their mechanical damage, as well as careless handling of the tank, are the reasons for this device to lose its functionality. In this article we will look at how to repair a toilet flush cistern with a button yourself, without calling a team of plumbers.
Construction and operation of drain tanks
All flush tanks have a similar design. The only difference is in the water release mechanism.
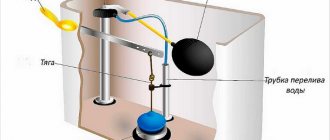
Structurally, a toilet cistern with a button or two buttons, as well as a flush lever, can be represented as a set of interacting nodes:
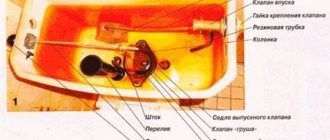
- Filling valve . It is responsible for maintaining the water level at a certain level. The operation of the valve is controlled by a hollow float. When the water rises to the desired level, the float closes the water supply channel to the tank;
- Plastic float attached to the filling valve. It works on the principle of a rocker arm, rising when the tank is filled;
- Drain valve having an overflow system. Modern versions of tanks involve controlling this valve by pressing a button. With the old-style manual flush control, it is enough to pull the lever or chain to release water into the toilet;
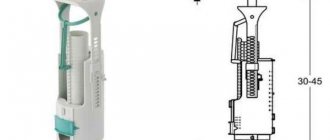
- The overflow is a mandatory component of the tank. It is height adjustable, allowing you to set the maximum water level. When this level is exceeded, water flows through the overflow tube into the sewer without spilling out through its walls.
The basic design elements and the principle of operation of the mechanism are the same for all types of flush tanks, only their execution differs.
A tank with a mechanical drain of water works very simply. Water enters it through the filling valve when the float is lowered. After reaching a strictly defined level, the float shuts off the water supply. The drainage is controlled manually. If the tank is equipped with buttons, then the water is drained after pressing them. In this case, the flush valve partially or completely opens, allowing water to flow into the toilet. The float lowers, opening the filling valve slightly.
The structure of a toilet cistern with two buttons is a little more complicated, but such a cistern can be used more economically. If you press one of the buttons, the water is partially drained. Complete drainage occurs when you press the second button.
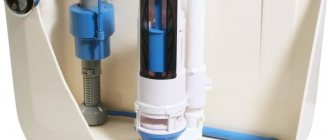
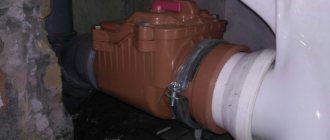
More and more often you can find new types of tanks that have a lower connection to the water main . It is advisable to install them if using a side connection is not possible due to lack of space. The main difference between such a tank is the presence of a membrane valve . Under the influence of water pressure in the pipeline, the valve opens slightly and lets water inside. As the water rises, the float presses on the piston rod, which gradually closes the diaphragm valve. When the set level is reached, the valve closes completely.
Fittings with bottom water supply and controlled by push button
The process of installing shut-off valves
It is best if you install the fittings that you purchased along with the toilet. In this case, there is no doubt that all the details will correspond to each other. If your tank has separate shut-off and drain mechanisms, then you can, of course, purchase them separately.
In order to install shut-off valves, you will need:
- Adjustable wrench.
- Pliers.
- Water tap.
- Open-end wrenches.
- Gaskets.
- Hose.
Installing a locking mechanism with your own hands is not so difficult. First, you need to install a drain unit in the tank, paying special attention to the tight connection. A spacer must be used between the base and the bottom of the tank. The tank should be placed on the toilet; there must be a rubber ring between them to eliminate friction. Now you can screw the tank on.
Installation of shut-off valves
If water is supplied from below, then it can be supplied even before installing the tank in its place. It is necessary to ensure that the gaskets are well secured; they can prevent leaks. There are no such difficulties for the top water supply, since everything is located above the water. Next, you need to insert the tube and tighten it well with nuts on both sides.
At the next stage of work, you need to attach the hose to the water supply fitting and install the tap. In case of necessary repairs, you can turn off the water supply. After the water is supplied, it is necessary to adjust the float. It is worth considering that the water should not reach the edges of the tank; from them it should be 15 centimeters lower.
At the last stage, the water drain is installed; to do this, you need to insert the structure into the hole in the tank lid and secure it. Decorative elements are often used for this. The instructions for performing all stages of the work are simple, so anyone can do it.
Common faults
Drainage malfunctions may well lead to the toilet losing its functionality. For many, such a sudden breakdown can be a real natural disaster. In addition, no one will like increased water consumption either.
Read about what a hygienic shower for a toilet with a mixer is and what types it comes in in a separate article.
We described how to choose a pump to increase water pressure and in what situations it is needed in another article on the site.
What kind of breakdowns are typical for drain tanks? We list them in order of frequency of occurrence:
1. Water leaking from the toilet onto the floor . Most often, water leaks through the o-ring located between the bottom of the tank and the toilet shelf. If the ring is cracked or warped, water will leak through it. Also, the place of leakage may be the gaskets of the mounting bolts that secure the tank to the shelf. They will have to be replaced if tightening the bolts does not work. And it doesn’t matter whether an old-style toilet cistern is being repaired or a modern system is being repaired. After all, they all have the same fastenings.
A high-quality sealing ring of the drain tank is the key to its good sealing
Tip: When replacing gaskets and seals, it is recommended to lubricate them with liquid silicone to extend their service life and prevent cracking.
2. There is a constant flow of water in the toilet . Most often this is due to the tank overflowing, in which water flows out through the overflow tube. This can happen due to a change in the height of the overflow, a loose fit of the float to the shut-off valve, or the float losing its tightness. The rubber seal on the drain fitting may also be worn out. Most often, the malfunction can be corrected through adjustment. If the locking gasket is worn out, it is advisable to replace the entire drain mechanism.
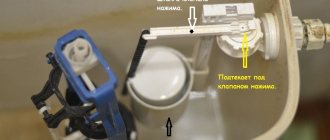
3. Malfunction of the starting mechanism . If you are using a push-button water supply mechanism, when you press the button, water may not flow into the drain. You can repair the fittings of the drain tank yourself, since, most often, the lever mechanism connecting the button with the drain breaks. This also applies to tanks with a handle or chain.
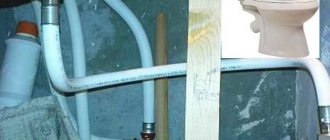
4. Noisy filling of the tank . This happens due to the disconnection of the tube through which water is poured into the tank. This is typical for tanks into which water is supplied from the side. If the tube falls off, the noise of incoming water will be clearly audible. To fix the problem, remove the top cover and install the tube on the fitting.
5. Water does not flow into the tank .
Repairing a toilet flush cistern with a button or with other flushing mechanisms when such a problem occurs comes down to checking the inlet hole into the cistern. You need to remove the valve from the tank and clean the inlet hole with a thin steel wire and rinse it with water.
Shut-off valve malfunction
Before you begin to troubleshoot any problems in the operation of the drain tank, you need to find out the mechanism for securing the lid. If you accidentally break it during removal, you will have to replace the entire tank.
The most common cause of ineffective operation is the float. There are the following shortcomings:
- Float misalignment.
- Membrane wear.
- The shut-off valve allows water to pass through.
- Hole in the float.
In order to adjust the float, you need to carefully examine its mounting. It is often enough to change the bend of the float or its fixation and the problems are solved.
If the problem is in the shut-off valve, then you will have to change it. This must be done in a certain sequence:
- Release all the water from the tank.
- Disconnect the valve from the water supply.
- Remove the lever.
- Remove the old valve.
- Install a new one and tighten it.
- Fill the tank with water.
- Adjust the float.
At this point, we can assume that the toilet shut-off valve has been installed and the problem has been resolved.
Tank repair with one button
Many people, accustomed to old-style cisterns, do not know how to fix a toilet flush cistern with a button. In fact, the differences between these systems are very minor. For many, the main problem is disassembling such a tank. Indeed, the button located on the tank lid requires careful handling during disassembly. But the device is very easy to disassemble.
The procedure will be as follows:
- turn off the water;
- empty the tank;
- carefully unscrew the plastic nut near the button;
- remove the cover.
Further actions depend on the nature of the breakdown. Failures of a tank with a button can be as follows:
- There is not enough water in the tank. Check the position of the float and adjust it.
- The water start button is stuck. This may occur due to clogging of the button shaft. It is necessary to clean it and return the button to its original position.
- Water does not flow into the toilet when the button is pressed. Most likely, the mechanism between the button and the drain valve has broken. You can restore it yourself. If this element of the fittings is broken, then to replace it you can use copper wire or replace the valve completely.
- Water flows through the overflow neck. The overflow height or float needs to be adjusted. The overflow is very easy to adjust. To do this, unscrew the union nut and set the required overflow level.
- Water leaks into the toilet from under the valve. The drain valve gasket may be worn out. It is best to replace the entire valve. To do this, unscrew the plastic nut at the bottom of the tank and remove the valve from its place. Install a new valve.
Note: It happens that the valve does not fit tightly into place due to misalignment. Opening and closing it again helps eliminate the leakage problem.
Water does not flow into the tank
Causes
- The fill valve nozzle is clogged . Water often carries sand, scale and slag. Especially often, problems of this kind arise after repair work to replace a section of the main line, bottling or riser of cold water supply.
- The area in front of the tank is clogged with the same debris or overgrown with lime deposits and rust . As a rule, the liner gets clogged at the bend.
Tip: installing a coarse filter after the valve at the entrance to the apartment will get rid of any debris that clogs the lines, and at the same time will significantly extend the life of your faucets.
Solutions
In the first case, the repair comes down to disassembling the fill valve and cleaning it.
- We turn off the water.
- Remove the plastic cap from the fill valve.
- Unbend the pin holding the rocker arm and pull it out.
- We remove the rocker arm and the brass barrel, which, when the float floats up, presses the rubber gasket against the nozzle.
- We clean the nozzle with a thin, stiff wire. Open the water for a second to let the remaining slag fly out.
The nozzle in this type of valve often becomes clogged. - We assemble the valve and turn on the water.
In the second case, we will need a rigid steel string (for example, from a curtain rod) with a hook bent at the end.
An improvised handle is bent at its second end, allowing the string to be rotated.
- We shut off the water to the apartment.
- Unscrew the flexible hose from the rigid connection.
- Rotating the string by the handle, feed it into the pipe until it passes the area with the greatest resistance.
- Again, turn on the water for a couple of seconds to remove any remaining clogs from the liner.
- We connect the tank with a flexible connection and turn on the water.
Warning: Doing this job alone is quite awkward. It is better to invite an assistant to help you rotate the handle of the improvised cable to clear the liner.
Repair of a two-button tank
Economical water consumption adds to the popularity of such a plumbing fixture. How to repair a toilet cistern with two buttons? The principle of disassembling such a tank remains the same, as with the one-button version.
Typical failures of a two-button tank:
- Buttons sticking. To install the buttons in place, remove the cover by unscrewing the locking ring near the button. Sometimes the buttons snap back into place if you press them again.
- If the water does not drain, check the integrity of the connecting fittings. Reinstall it or replace it with a piece of copper wire.
- Water flowing through the drain valve indicates that the valve is not positioned correctly relative to the drain hole. If water flows through the overflow neck, adjust the water level by changing the position of the float or the overflow height.
To adjust the float, just raise or lower it a little
Wondering how to choose a bathtub shower faucet? You will find the answer in our separate article.
And if you are interested in how to install a shower cabin with your own hands, then we also have material on this topic.
Before purchasing a water filter, we recommend that you read our tips for choosing them.
Leaking under the tank
Causes
- The notorious conical cuff leaked.
- Again, one of the bolts between the shelf and the tank was destroyed.
Elimination
How to repair the toilet cistern in each of these cases is described in detail above. Of course, to replace the conical gasket, there is no need to disconnect the flexible line: the tank simply moves back a few centimeters, within the length of the hose.
The cuff between the toilet and the shelf has heard the curses of many generations of plumbers.
The toilet is leaking: what to do?
First of all, don't panic. If we exclude mechanical damage to the toilet (various chips and cracks), then there will be two reasons for water pouring onto the floor:
- Poor-quality fastening of the toilet with bolts;
- Wear of the rubber seal, which is located between the flush cistern and the toilet bowl.
To eliminate this problem, first try simply tightening the mounting bolts a little more. However, be careful: if you use too much force, you risk damaging the tank and breaking it. Tighten them gradually, periodically checking whether there is a leak or not.
If, after tightening the fasteners, water continues to leak onto the floor, you will have to remove the tank and change the O-ring located on the drain channel. Don’t be lazy, and if you’ve already removed the tank, immediately change the washers that secure the mounting bolts and rubber gaskets, and it’s best to treat all joints with silicone - this will provide an additional guarantee against leakage.
For tanks with bottom wiring, the problem of water leakage may be associated with a worn seal where water is poured. In this case, you will also have to change the seal that has become unusable and secure everything with silicone sealant.
Tools for work
To fix the toilet, the best option would be to call a professional plumber. But if you prefer to carry out such work yourself, then you will need the following tools:
Toilet Repair Tools
- Pliers;
- Adjustable wrench;
- There are two types of screwdrivers: flat and Phillips;
- Various rubber gaskets;
- Silicone sealant.
To fix most cistern problems, your toilet cistern valve will need to be repaired. Now let's directly understand the malfunctions that arise and see how we can eliminate them.
How to open (remove the cover)?
Modifications are currently being made to allow the cover to be removed without any additional operations. The buttons in them are equipped with rods that transmit force to the control elements of the tank fittings.
But most plumbing manufacturers continue to produce models that require certain manipulations to remove the cover.
To remove the cover in single-button modifications, you need to moderately press the ring surrounding the button and turn it in the direction opposite to the clockwise movement.
If this operation does not succeed immediately, you should drop a couple of drops of any liquid oil or use a screwdriver, pressing its tip onto the ring and turning it. Once the ring comes off, it can usually be easily unscrewed by hand.
Next, you should carefully move the cover to a position perpendicular to its normal position, and carefully release the button block from the plastic clothespins. After this, you can remove the lid from the tank and set it aside.
How to disassemble (open) a toilet cistern with a button for subsequent repairs with your own hands - learn from a short video:
To dismantle a cover equipped with a two-button block, it is usually enough to press any button, after which the technological groove on the adjacent button will become accessible . All that remains is to pick out this button and remove it, and then dismantle the second one. Then unscrew the fixing screw and remove the cover.
Valves classification
The toilet inlet valve is divided into separate types depending on the following characteristics:
- material used for manufacturing;
- connection method.
Materials for making the valve
The fill valve for the toilet cistern can be made of the following materials:
- brass or bronze alloy. Metal products are durable and highly reliable, as they are practically resistant to corrosion. However, the cost of such products is quite high;
Toilet valve made of brass
It is strictly forbidden to install valves made of ordinary steel, since over time a corrosive coating forms on the device, which can harm the entire system.
- plastic. Plastic valves are the most popular among consumers, as they are inexpensive and have a long service life.
Fill valve made of polymer
Types of valves depending on the connection method
According to the connection method, the valves are divided into:
- devices with bottom output. The bottom valve is mounted on the bottom of the cistern. By choosing this connection method, you can avoid the noise produced by water when filling the container. A valve with a bottom connection also allows you to hide the inlet hose and not fill the space of the toilet with fittings;
Device for supplying water from the bottom of the tank
- devices with side exit. The side valve is respectively connected to the side surface of the tank. depending on the liner on the right or left side. Such fittings are the simplest in design, which has a positive effect on the service life of the products. In addition, the cost of side reinforcement is less than that of the bottom.
Filling device for side water supply
The choice of valve type depends on the design of the toilet tank. If the design provides for a bottom connection, then you need to purchase a valve with a bottom connection. If the design provides for a lateral connection, then the valve is selected accordingly with the possibility of lateral connection.
general information
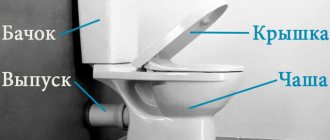
The most common design of a modern toilet is the “compact”, which involves installing the tank directly on the toilet. Control mechanisms were initially produced in two types : a ball attached to a retractable rod attached to a “pear” - a rubber plug that covers the drain hole and a lever located on the side surface of the container.
Today, almost all manufacturers have switched to producing push-button models of tanks.
There are two main types of these modifications:
- with one button;
- with two buttons or one button divided into segments.
The second variation involves a slightly more complex design of the valves for controlling the drainage processes , but it pays off quite quickly due to the possibility of choosing one of the modes:
- when you press one button, the tank is completely emptied;
- when the second is activated, it is partial, which allows you to significantly save on water consumption.
You can learn more about the operating principle and design diagram of toilet flush cisterns with a button from the materials on our website.
How to choose a valve
Additional criteria when choosing a valve are:
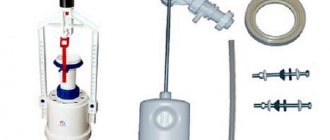
- completeness of fittings. The device includes not only the valve itself, but also such elements as a float, which is a water intake limiter, o-rings, and a locking nut;
Filler equipment
- The plastic elements of the device must not be deformed or jagged. A valve with visible defects will last a short period of time;
- The gaskets installed on the valve must also be free of defects. The O-rings are soft and elastic. In addition, all gaskets have the correct geometric shape;
- the float should move very smoothly. The movement of the float mechanism is not allowed to be sharp or jerky.