Connecting a heated towel rail: DHW or heating
Before installing a water heated towel rail in the bathroom, you need to decide on the method of connecting it.
Two options are available:
- Connection to the DHW system . The method guarantees year-round heating. The device heats up when hot water is consumed - the heated towel rail cools down overnight even when turned on directly through the riser.
- Connection to the heating system . This option is relevant in the absence of a centralized hot water supply network. Thanks to the forced circulation of the coolant, the coil remains warm around the clock. The disadvantage is that the dryer functions only in the cold season.
When replacing a heated towel rail in an apartment building with a change in the way it is connected, a project will need to be developed and approved by the housing and communal services department. It will take about a month to complete the package of documents.
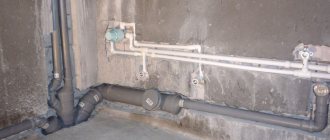
The insertion points of the water device into the heating or hot water riser can be hidden behind a screen or box constructed from plasterboard
Connecting an electric heater
Installing an electric dryer is the simplest solution for apartments or private houses where recirculation of the hot water supply line is not provided. A heated towel rail with a power of up to 500 W can be installed at any allocated electricity limit. The installation is carried out independently, fortunately, you don’t have to lay pipes and cut into risers.
To connect the heater with a plug, you will need additional components:
- three-core copper cable 2.5 mm² or another cross-section specified in the product passport;
- socket with built-in RCD (leakage current 30 mA), designed for a current of 10...25 amperes depending on the heater power;
- standard socket.
Reference. PUE standards clearly require connecting sockets in bathrooms through a residual current device - RCD. If the line is already connected and powered through a differential circuit breaker with a leakage current of 30 mA, then a regular socket is installed. Its amperage is calculated using Ohm's law: divide the dryer's power in watts by 220 volts.
Diagram for connecting the dryer to the electrical network without installing an outlet.
How to properly connect an electric heated towel rail in the bathroom:
- We draw a route on the wall from the distribution box to the point where the outlet is installed. An important point: placing the electrical box in the bathroom is prohibited, only in the adjacent room.
- We use a grinder to cut through the groove and the socket. We lay the cable and install the socket box.
- We connect the wires to the electrical network in the junction box. We remind you: the 3rd core of the yellow cable is grounding and must be connected.
- We close the furrow and install a socket. We hang the heated towel rail after laying the tiles.
If the walls of the bathroom are already tiled, conduct the wiring in a different way - from the next room. At the point where the socket is installed, drill through the partition and insert the cable laid in the wall of the adjacent room into the hole.
Some heater models are not equipped with a plug and are connected directly to the cable. There is no need to install a socket, but a 30 mA RCD is required. Step-by-step assembly of the heated towel rail with all fittings and installation of the heating element is shown in the video from:
Among electric heated towel rails with a power of 500 W (the maximum possible power at any power consumption limits), the most profitable is the Atlantic NA 500W, both in terms of purchase price and operating cost.
This model is produced by the French concern Atlantic. The design was developed by a division located in Italy. The average price of the top-end heated towel rail Atlantic NA 500W is 15,700 rubles. Russian analogues, equal in power, cost 2-3 times more, and the price of European ones starts from 50,000 rubles.
Atlantic NA 500W with a width of 40 cm is suitable for installation in a small bathroom and is able to quickly heat a room of 5 square meters. m. An ultra-precise electronic thermostat and five operating modes provide significant energy savings, thanks to which costs will not exceed 200 rubles per month.
General installation requirements
Installation of a heated towel rail with a “water” operating principle is carried out subject to a number of conditions:
№1. The diameter of the pipes of the device must correspond to the diameter of the riser; narrowing from the installed fittings is unacceptable.
№2. A jumper must be provided between the drying outlets. The bypass performs a number of tasks:
- maintaining the speed of water circulation throughout the riser;
- separation of coolant flows allows you to save heat for subsequent water intake points;
A significant advantage of turning on the closing sections, bypasses, is the ability to turn off the heated towel rail for repairs without stopping the operation of the system as a whole.
№3. It is prohibited to install shut-off valves on the pipeline section up to the bypass and directly on the jumper.
Failure to comply with the requirement entails:
- slowdown of water circulation through the riser and drop in coolant temperature;
- deterioration of pressure in apartments located in the direction of water supply.
The closing sections can be equipped with the usual ball valves on the bypass and supply line or with more functional three-way valves that allow the coolant to be directed either to the bypass or to the radiator.
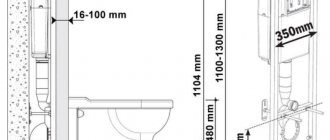
№4. The recommended height for placing towel dryers according to SNiP is 120 cm from the floor.
№5. Maximum distances between the heating device and wall cladding:
- 3.5-4 cm – if the coil diameter is 2.5 cm or less;
- 5-7 cm – for pipe cross-sections larger than 2.5 cm.
If a bypass is provided in the installation diagram, then it is permissible to install shut-off ball valves at the outlet and inlet of the device.
Using a bypass in a heating circuit allows you to divide the total coolant flow into two parts. One of the parts goes into the battery, the other is supplied to the following devices, due to which all radiators receive coolant at almost the same temperature as the first (+)
How to connect correctly
Even a high-quality and powerful model will not work if errors were made during connection. In addition, serious malfunctions in house systems are possible, which will lead to problems - a decrease in the flow of the riser, a decrease in temperature in the general network.
It is recommended to follow the installation rules:
- place the heated towel rail as close to the riser as possible;
- do not install shut-off valves on a common riser;
- with a lower water supply and natural circulation, do not allow the bends to become narrower, as this increases the hydraulic resistance in the branch and prevents the passage of water through the lumen of the dryer pipe;
- if necessary, install a bypass between the branches - a backup jumper to ensure the functioning of the main pipeline;
- do not allow loops or bends on bends;
- taps and supply pipes should not be smaller in diameter than the inlets of the heated towel rail.
When the bypass cross-section is shifted or narrowed, the volume and speed of water entering the dryer are reduced, which can only be compensated by installing a pump to create forced circulation.
Recommended and unacceptable insertion schemes
The operation of the coil is based on the principle of a “gravity pump”. Proper insertion ensures natural circulation and functionality of the radiator. The development of a do-it-yourself installation diagram for a water heated towel rail is carried out in accordance with the design of a specific model and the location of the riser in the bathroom.
Lateral and diagonal connection
For most devices, the optimal option is a connection with coolant supply through the top outlet and outlet from the bottom. This is achieved with universal connections, the diagrams of which are given below.
Lateral and diagonal connections without narrowing or shifting the bypass are equivalent options. The circuits function well with coils of different shapes (+)
Advantages of a universal insert:
- performance does not depend on the direction and speed of water supply in the riser;
- after turning off the circulation, bleeding of air is not required;
The universal insertion option allows you to place the heated towel rail at any convenient installation distance from the riser.
Conditions for the operation of the scheme:
- The lower insertion point is located below the connection pipe to the radiator, and the upper insertion, accordingly, is above the upper outlet. The slope of the supply pipes is 2-3 cm per meter. A horizontal connection is permissible for pipes with a cross-section of 32 mm, and also if the distance to the riser is less than 2 m.
- Supply pipes - without bends or humps. Otherwise, the system becomes airy and natural circulation stops.
- Optimal diameter of supply pipes: ¾ inch steel, 25 mm – reinforced polypropylene.
- It is advisable to insulate the pipes. This requirement is especially relevant for hidden installation of a plastic pipeline.
A completely workable side/diagonal insertion scheme with a narrowed bypass. Plumbers resort to this design on a previously installed heated towel rail if there is no need to completely change the design of the riser.
Between the leads to the device, the jumper is narrowed by one diameter size. The insertion option is only suitable for water circulation in the direction from top to bottom
Shifting the bypass is justified if you want to preserve the old connections to the riser. With this connection method, it is not recommended to use a narrowed jumper. The main requirement is the top supply of coolant.
Tolerances and installation requirements for tapping with an offset bypass are the same as for lateral or diagonal connection with a flat jumper (+)
Some dryer models are designed for bottom connection. The insertion is carried out according to three main schemes.
The circuits are operational in any direction of coolant flow. When the water is turned off, the system is aired out, so a drain valve must be located on the vertical manifold. As a rule, it is included with the device (+)
Requirements for implementing the bottom connection:
- The lower outlet must be located below the heated towel rail.
- It is advisable to insulate the supply pipes.
- The upper outlet of the riser when using an offset or narrowed bypass is located below the point of connection to the device.
The optimal slope is about 2 cm per meter of pipe. Fulfillment of this condition ensures that the circuit is independent of the direction of water flow.
Possible forced insertion options
When connecting laterally, some deviations from typical recommended circuits are allowed.
Pipe routing if a non-standard location of the liner is required. The operation of the device is equally effective in different directions of the coolant (+)
The basic conditions of the tie-in remain unchanged. The difference is in the connection points between the heated towel rail and the riser, as well as in the presence of vertical sections at the inlet and outlet of the device.
An alternative sidebar option is shown below. The top of the heated towel rail is located above the top outlet. After turning off the water, you will need to bleed the air from the coil.
The connection diagram requires the installation of an air vent on the device. Due to the design “step”, when the water supply is stopped, an air lock is formed in the system (+)
The lower inset may also be somewhat modified. The need to place pipes from the riser at a minimum distance to the floor forces us to increase both ascending connections. If all requirements for the lower connection are met, the system operates without failure.
The requirements for installation work when inserting with extended vertical sections of the lower line do not change. Different directions of water circulation are allowed (+)
Incorrect connection diagrams
Inexperienced craftsmen sometimes do not adhere to the recommended schemes. As a result, the dryer remains cold with an uninterrupted supply of hot water. Examples of possible omissions are displayed below.
Incorrect execution of the side and bottom inserts leads to a stop in the water circulation in the heated towel rail (+)
In both options, the device is located below the lower outlet from the riser. The coolant that sinks down cools and becomes trapped. The water is not pushed back, since there is pressure from the coolant flow from above.
Side cut with a loop at the top. The scheme is implemented by craftsmen in order to hide communications behind the suspended ceiling
Air accumulates in the resulting “hump.” Over time, the air lock blocks the circulation in the radiator and the heated towel rail cools down.
The option presented below combines two errors at the same time. The scheme is obviously not working.
The combination of the lower and upper threshold impedes natural circulation. This design is typical when craftsmen try to hide the upper supply behind the ceiling, and the lower one in the floor screed
Why doesn't the heated towel rail heat up? Let's look at the main reasons
So, the coil is installed and everything seems to be in order, but it completely refuses to heat up. Let's find out why this can happen and what should be done in this or that case.
- There is no hot water in the mains. If the line is a dead-end type (that is, the liquid moves only when the tap is open), then it is preferable to use an electric coil.
- The device is connected to the heating system and does not work. Everything here is quite simple: the coil heats up only during the heating season, and the rest of the time it is cold. Here it is recommended to either install an electrical product or transfer an existing one to the hot water supply system.
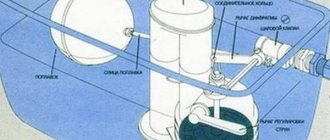
- Blockages and traffic jams have formed. This applies to heated towel rails that have been installed for a long time and at some point suddenly stopped heating. What to do? Turn off the tap, remove the coil and close the pipes with plugs. Next, using a soft wire brush, clean the pipes. To remove salt deposits on the walls, lightly tap them. Finally, rinse the equipment thoroughly under high pressure water. If you wish, you can also wash it with a solution of hydrochloric acid, for which you need to turn the product upside down and fill it with this solution. After some time, empty it and rinse with water. Thanks to the acid, solid sediments will soften. And if cleaning does not help, then you will have to change the heated towel rail.
- An air lock has formed. If there is air in the system, this may cause the dryer not to heat up. To bleed air, you can use a Mayevsky valve, which is available with both a manual and an automatic air bleed valve. After air is removed, the liquid will begin to move freely, and the dryer will quickly warm up to the required temperature.
- Incorrect installation. If a recently installed coil does not work, then perhaps the reason lies in the too large distance between it and the riser in the bathroom. As a result, too much resistance is formed, and the hot liquid simply does not get there.
- Old pipeline. As you know, over time, hot water pipes become clogged, causing pressure to drop and plumbing equipment to not work properly. To clean the pipeline, you need to close the tap and close the drain of the line with a plug. The second plug is screwed onto the circulation line. The tap opens, and water and sludge should come out through the drain. The greatest difficulties often arise with vertical sections of highways. To clean horizontal sections, you can use the method described above. After cleaning, check to see if the coil is clogged, then install it in place, remove the plugs and open the tap.
That's all. Now you know how to install a heated towel rail in the bathroom with your own hands. Good luck with your work!
Step-by-step installation of a water heated towel rail
The technology for installing a water heated towel rail with your own hands is the same for different connection schemes. The step-by-step progress of work includes dismantling the worn-out device, supplying pipes from the riser, installing taps and fastening the coil.
Preparation of tools and materials
The set of tools required to install and replace a heated towel rail depends on the type of water pipes in the room. For installation through polypropylene pipes you will need: ball valves; mounting brackets; polypropylene pipes; soldering iron and knife for cutting PP pipes.
The standard equipment of the heated towel rail includes:
- transition corners;
- silicone gaskets;
- locking units;
- telescopic brackets;
- Mayevsky crane.
It is advisable to use components from the same metal in the system to avoid electrolytic corrosion.
All connections are sealed with gaskets, threaded detachable units are sealed with plumbing tape (+)
Dismantling of old equipment
Before dismantling the outdated coil, it is necessary to coordinate the actions with the house management organization. Disconnecting the riser from the water requires special permission.
Following actions:
- If the towel dryer is not integral with the hot main, then the threaded connections must simply be unscrewed.
- If the device is welded to the riser, then it should be cut off with a grinder. The remaining portion of the pipe connection should be sufficient for threading.
- Remove the used device from the brackets.
The height of the cutout in the riser must exceed the distance between the pipes of the new device by the length of the couplings and bends required for inserting the bypass jumper
The size of the dismantled area must be determined with maximum accuracy. It’s better not to cut a little, and after “trying on” the device to the installation site, adjust it according to the fact
Installation of bypass and ball valves
The coil can be mounted without installing a bypass, but experts recommend providing a jumper in advance. Ball valves are installed at the ends of the heated towel rail. If necessary, the coolant supply to the device can be shut off, while water will circulate freely through the riser.
The bypass is inserted into a riser made of PP pipe using tees and couplings (+)
To install valves on pipe sections, cut a new thread using a die of the required diameter. If after dismantling the old device the thread has survived, then it is enough to “drive” it with a die to improve the connection. Install shut-off valves on the prepared pipes.
Installation of the jumper in the steel pipeline is carried out by welding. The bypass diameter is equal to the cross-section of the riser pipe
Attaching the heated towel rail coil
The procedure for “hanging” and connecting the device is as follows:
- Apply markings on the wall for the brackets - it is necessary to ensure that the placement of the coil is horizontal.
- Prepare the holes and insert dowels into them.
- Screw the brackets to the heated towel rail, place the device against the wall and secure with screws. It is important to adhere to the recommended distance between the radiator and the wall cladding.
- Connect the unit to the valves on the jumper using fittings, seal the connections with linen wrap.
Depending on the type of connection, straight or angled threaded fittings are used.
At the end of installation, inspect the tightness of the joints and smoothly open the taps to check the functionality of the device. There should be no leaks or drops
Types of heated towel rails
The retail chain sells a wide range of bathroom dryers (their standard diameter is 32 mm), which can be classified into the following groups:
According to the method of heating the working surface:
Mermen. The most common type of heated towel rails installed in all apartments of multi-storey buildings. They are usually connected to a separate hot water supply pipe running through all floors.
The coil can be installed in the pipeline gap in series or parallel to it through a bypass and shut-off ball valves. In individual houses, the dryer is connected to a common vertical riser with hot water.
Electrical. These are completely autonomous devices in the form of a coil or ladder, inside of which there is a tubular electric heater (TEH) and oil is filled.
The heater can be mounted on the wall anywhere (bathroom, kitchen, loggia); some models have a floor-mounted design. To heat the coolant, the device consumes an average of 60 watts of electricity. An important advantage of electric dryers is the ability to regulate the heating temperature using an external thermostat.
Combined. A type of heated towel rails that is not so common in the retail chain. The device has two separate, unconnected circuits. One of them is connected to the hot water supply, and the second, with the coolant oil, is connected to the electrical network.
Combined appliances are convenient because they can be efficiently connected to the heating circuit. When the heating system is operating, the room will be heated by hot water passing through the coil, and when the heating is turned off, by an oil radiator powered from the electrical network.
Rice. 2 Electric dryers
Based on the material used, the following types are distinguished:
Steel. These are budget types, for the production of which a metal pipe galvanized on both sides is used. Typically, dryers of this type are produced in a simple U-shaped or M-shaped form.
The coil has a gray, not very aesthetic appearance, but it can always be painted in a color suitable for the user.
Made of stainless steel. The vast majority of bathtub dryers are made from stainless steel. To give it a shiny, aesthetic appearance, the surface is usually chrome-plated.
Stainless steel can withstand temperatures up to 450 °C, has high corrosion resistance and strength, and a long service life. The disadvantages include much lower thermal conductivity than non-ferrous metals, as well as susceptibility to corrosion when used in the production of low-quality cheap alloys.
Made of brass. Brass with chrome, silver, gold or other plating is used in the production of expensive brands of heated towel rails. Its main advantages are excellent thermal conductivity, four times superior to conventional steel, as well as high corrosion resistance.
Bronze, copper. Dryers made from these materials are practically not found on the market; they are mainly used for the manufacture of exclusive models. Bronze and copper coils have the best thermal conductivity of all metals and favorably emphasize the design styles of retro, classic, and Italian interiors.
Rice. 3 Combined electric water dryers
Related article:
How to connect a heated towel rail to a heating and water supply system . It may be interesting to read an article on our website that describes in more detail how to connect a heated towel rail to the heating system.
Depending on the design of the heating pipeline, dryers are made in the form of:
Serpentines. These are S-shaped single-link and multi-link, U-shaped and M-shaped heated towel rails. Products of simple shapes have fairly low heat transfer and are typical for budget models. All these devices are designed for lateral connection to a water riser.
Combined type. These are models of more complex shapes, combining, for example, U-shaped and M-shaped, U and C-shaped contours. Many types of combined products include coils of a more complex design.
Ladders. The ladder dryer consists of two large-diameter vertical pipes with a number of smaller horizontal jumpers. The number of fragments in a heated towel rail-ladder can be as large as desired; in some cases, instead of straight horizontal jumpers, curved S and U-shaped ones are used.
Most ladder heated towel rails are equipped with an air vent and a plug in the upper part, which can be swapped.
The disadvantages of ladders include the possibility of accumulation of mud deposits in the lower part of vertically located pipes. To combat this phenomenon, some dryers are equipped with plugs that unscrew from the bottom.
In addition to the most common dryer options listed above, in the retail chain you can find more complex and original in terms of design models of various shapes and colors.
Also, some exclusive devices have rotating stands that are connected to the main structure using gland sealing units.
Rice. 4 Dryers of complex shapes
Features of installation of electric models
Unlike water models, electric dryers can be installed anywhere, since they do not depend on the location of heating pipes and hot water supply. In this case, special attention should be paid to the quality of the electrical wiring.
Requirements for installation of electric heated towel rails:
- The installation location is selected taking into account the level of protection of the device from moisture. The distance to the bathroom or washbasin is at least 60 cm.
- The minimum distance to the floor is 20 cm, to the wall – 30 cm, to the surface of furniture – 75 cm.
- The heating device must not be placed directly under the outlet.
Connection to the electrical network is carried out in accordance with the international standard NFC-15-100.
The optimal location is zone No. 3. When installed in zone No. 2, protection of the device from splashes is required (+)
Electrical wiring under the heated towel rail is carried out in compliance with electrical safety standards in rooms with high humidity:
- connection via a three-wire cable with grounding;
- Only hidden electrical wiring is allowed;
- the socket must have a rubber seal and a cover covering the contact holes;
- Copper wires of the VVGng and VVGng-LS brands are used for the electrical network.
A prerequisite for the installation and operation of electrical devices is the use of an RCD that turns off the device when the current operating characteristics are exceeded.
Oil heated towel rails require rigid fixation, while cable radiators can be installed in any position
Principle of operation
The heated towel rail has a tubular design, depending on the type of energy source it can be:
- water, heated by water from the hot water supply or heating system;
- electric, where the heat of an electric heating element is used.
In multi-storey buildings, water dryers are connected to a central pipeline and are strictly linked to the operation of the hot water supply or heating system. When hot water is turned off in summer, water devices do not work. In private housing construction, you can dry clothes in the bathroom only during the heating season, since the heating of the coolant directly depends on the boiler room mode.
Electric heated towel rails operate on a 220 V mains voltage. The devices have built-in heating elements:
- Tubular heating elements that transfer energy to circulating water or oil. Due to heat accumulation, such structures maintain the set temperature for a long time.
- Heating cables where thermal energy is generated by a high resistance conductor.
The convenience of an electric dryer lies in its autonomy - its operation does not depend on the presence of heating or hot water supply, or connection to a riser.
Materials and tools for installing a heated towel rail
In addition to the device itself, you will need:
- metal-plastic tubes for outlets and bypass;
- Ball Valves;
- crimp connections - “American”;
- transition couplings;
- sealing synthetic threads;
- clamps with dowel and pin;
- overlays for masking connection points;
- adjustable wrenches;
- level to control the position of the dryer.
In addition, water sockets may be needed if the heated towel rail is built into a system with natural circulation.
Installing a heated towel rail in a small bathroom with a side connection
This option is easier to implement than with a bottom connection.
Sequence of work when installing a small M-shaped heated towel rail on ready-made steel outlets:
- Wrap fum tape or thread around the threads of all connecting elements.
- Place decorative covers on the connection tubes in advance.
- Using an adjustable wrench and a gas wrench, install American couplings and nuts onto the dryer inlets, and screw their mating parts onto the riser outlets.
- The ends of the connections must be strictly vertical; check this with a building level.
- Connect the heated towel rail to the outlets, tighten the nuts until they stop.
If finishing has not yet been carried out, first fix the structure to the wall temporarily. Finally fix after finishing cladding.
Preparing hidden wiring for installing a heated towel rail
Step 1. If the wiring is hidden in the wall under the finishing, grooves are prepared for it - shallow channels. To cut them, use a wall chaser or a hammer drill. The work is labor-intensive and dusty, so preliminary marking must be done very accurately. Step 2. Install bends and shut-off valves according to the accepted connection diagram. The threads must be wrapped with sealing materials. FUM tape is the most convenient and technologically advanced. It is made of elastic fluoroplastic and reliably fills all gaps in the joint.
Step 3. Water outlets need to be deepened into the wall to the protruding thread. To do this, use a hammer drill with a round nozzle. If the mounting socket is too deep, the sockets are secured with dowels in the correct position, and the gaps are filled with brick chips and mortar. To prevent debris from getting into the tubes, install plugs. Step 4. Fill the grooves with a waterproof solution and level the surface. After hardening, you can hang the heated towel rail.
Connection diagram in an apartment building
The purpose of constructing the far-from-perfect “Khrushchev” buildings was mainly for ideological reasons - in this way it was possible to achieve the resettlement of barracks and communal apartments. To heat newly built residential areas, exclusively centralized heating was used. As a rule, in the bathroom the radiator was combined with a heated towel rail. This approach had both strengths and weaknesses.
Advantages:
- The heated towel rail provided additional heating for the room.
- It was turned on only in the winter, in parallel with the heating. When it got warm, the device turned off.
Flaws:
- Cumbersome design.
- You had to pay extra to use it.
This scheme for connecting the heated towel rail to the heating system provided for the presence of an additional pipeline in the basement. As a result, we had to sacrifice an elevator and a garbage chute.
Two options were used for connecting the heated towel rail to the heating circuit and placing it in the home:
- In separate bathrooms
. In this case, the installation site was the adjacent wall between the toilet and the bathroom. From the basement, the supply pipe was led into the apartment on the first floor. Then, having passed the entire entrance, through the apartment on the last 5th floor, she found herself in the next apartment. Having passed through all the floors, the pipe descended back to the basement. Shut-off valves in the apartments were not used in any form: only the basement sections of the supply and return pipes were equipped with valves. - In adjacent bathrooms
. Here the heated towel rail was placed on the wall near the washbasin. It is important to understand that this connection method was considered the most difficult due to the inconvenience of the combined room.
The most common series of “Khrushchev” buildings, where heated towel rails were connected not with hot water supply, but with the heating system, are:
- 1-434С – years of construction 1958-1964.
- 1-434 – years of construction 1958-1967.
- 1-335 – years of construction 1963-1967.
Criteria for choosing a heated towel rail for the bathroom
The durability of plumbing equipment depends on its initial characteristics and compliance with installation technology. An important role will be played by the compliance of the selected model with operating conditions.
When choosing a heated towel rail, special attention should be paid to the operating principle, material of manufacture and configuration of the heated towel rail.
When choosing plumbing equipment, special attention should be paid to the principle of operation, material of manufacture and configuration of the heated towel rail
Operating principle and technical characteristics
All models of “towel dryers” for the bathroom are divided into three types:
- water;
- electrical;
- combined.
Water units operate by circulating hot coolant. The connection is made through the heating or water supply system. The main advantage of such models is energy saving.
The disadvantage of a water heated towel rail is the difficulty of installation if the device is not initially included in the communication system of the apartment or house.
When choosing a water model, it is necessary to take into account the maximum pressure allowed for a particular device
When choosing a water heated towel rail, you need to take into account the pressure in the pipeline.
In modern apartment buildings, the pressure in the hot water system is about 8-10 atmospheres, and in older buildings - 5-7 atmospheres. Most imported models of heated towel rails are distinguished by low operating pressure, and the thickness of the pipe walls does not exceed 1.25 mm. The service life of the device in a typical high-rise building is 1-2 years.
The choice of coil for a private home is quite extensive, since the pressure in the autonomous heating system is low.
An electric heated towel rail operates autonomously, regardless of the operation of other systems. To operate, you will need an uninterrupted power supply.
The use of the device is advisable in the following cases:
- requires quick installation without interfering with the heating or water supply system;
- installation of a “backup” heated towel rail;
- the need to place the coil outside the bathroom - a portable electric drying model is optimal.
To avoid excessive energy consumption, you should choose an electric heated towel rail according to the volume of the room. It is optimal if per 1 sq. m accounts for 140 W of energy - under such conditions the bath warms up to 22-24°. If the unit is needed for the spring-summer period, then low-power models are suitable at the rate of 100 W per 1 sq. m.
You can install a heated towel rail not only in the bathroom. It is appropriate in the kitchen, hall or corridor. The heat generator for autonomous drying is a heated liquid (oil, antifreeze) or cable
The power of “wet” models reaches 2 kW, “dry” devices – 100-200 W.
Combined heated towel rails can operate in two modes: from the mains or from the DHW system. This is the most practical and effective heating option, but the high cost of a universal coil scares off many buyers.
Plumbing fixture material
Three metals are usually used in the manufacture of heated towel rail coils:
- stainless steel;
- copper and brass;
- black steel.
Stainless steel appliances are resistant to moisture, but are susceptible to impurities contained in water. Over time, sediment forms on the inside of the coil walls, limiting the path of water flow.
When choosing a stainless steel heated towel rail, preference should be given to chrome-plated models with a wall thickness of 2 mm or more.
Radiators made of brass and copper are characterized by high heat transfer, but have a limited service life. When purchasing, you need to check the product passport. It should indicate that the pipes are galvanized on the inside and that the heated towel rail is suitable for connection to a hot water supply system.
Black steel is capricious to the coolant. Models made from this material are recommended for installation in an autonomous heating system, where pressure drops are excluded. It is permissible to connect a coil with anti-corrosion internal protection to the central DHW system.
Different metals and alloys react differently to aggressive environments. When choosing, you need to take into account the water hardness and the method of connecting the heated towel rail (+)
Bottom connection circuits
Is the bathroom equipped with a pipe with a bottom connection? In this case, you can use alternative schemes to those described above. In most cases, the pipe is installed in a similar way for hidden installation of the liner, while the bathroom (more precisely, its interior) will not be damaged. With a bottom connection, the pipe is partially masked by accessories located along the walls.
Structurally, the pipe with a bottom connection is a mini-ladder and has a very stylish and impressive appearance. At the same time, this technology is called less effective compared to structures connected laterally or diagonally.
Installation in the presence of an old tie-in with a displaced bypass
In some cases, the pipe is cut in using the bottom method, but the previous cut with a displaced bypass remains on the riser itself. Most often, apartment owners do not see much practicality in remodeling. In this case, the upper outlet is usually located high, but according to the rules it must be located below the connection point itself. A way out of this situation is possible only if two basic conditions are met.
- The scheme itself implies an upper supply of water, since if the coolant flows from below through the pipe, the so-called “locking” of the internal circuit of the system is highly likely to occur. As a result, the bathroom will remain cold.
- The upper outlet of the riser is located below the upper edge of the coil itself. Otherwise, such a device will, in principle, not be able to function.
Connection diagrams
We have to look at three scenarios:
- Apartment building with dead-end hot water supply;
- Apartment building with circulating hot water supply;
- Private house or autonomous water heater in an apartment. In this case, we have complete freedom of action: hot water supply systems with heated towel rails can be designed from scratch.
Boiler room with a boiler in a private house
The video in this article will help you learn more about how heated towel rails are installed: a connection diagram, auxiliary fittings and a circuit diagram of the hot water supply will be presented to your attention.
Dead end DHW
The heated towel rail is connected between the riser and the hot water supply. A shut-off valve is installed at the water supply inlet to the dryer. For obvious reasons, the heating of the coil is only possible when water flows through your taps.
Bathroom in Khrushchev: the hot water supply is connected to the riser through a coil
Is it really impossible to realize continuous circulation through the coil - at least by creating a closed circuit and equipping it with a circulation pump?
This is possible, but it makes no sense.
There are two reasons:
- The circulation system must have a heat source to heat the water, compensating for heat loss through the pipes. An obvious candidate for the role of such a source is a hot water supply riser. Only - that's the problem! - it, like the coil itself, cools down in the absence of water supply;
- An inexpensive circulation pump costs about 2,000 rubles and consumes 50-70 watts. An inexpensive electric heated towel rail costs the same and has an energy consumption of 30-80 watts. The principle of Occam's razor, which does not recommend complicating the task unnecessarily, cuts off circulating hot water supply as an unjustifiably complex solution.
The electrical appliance in the photo consumes no more than 80 watts
Circulating hot water supply
Comprehensive instructions for connecting the dryer to the circulating water supply are contained in the already mentioned SP 30.13330.2012. According to the text of the document, heated towel rails must be connected to the DHW supply pipelines (read - placed in the gap of the hot water risers connected to the supply bottling). Connection to circulation risers (return) is permitted provided that shut-off valves and a bypass are installed.
Connecting the coil with bypass and taps
Please note: the author strongly advises that you adhere to this connection diagram even when installing the supply coil. Shut-off valves will make it possible to turn off the dryer in the summer heat, and a bypass will prevent the circulation in the group of risers from stopping when turned off.
Practical implementation of connection
Autonomous hot water system
How to implement hot water supply with a heated towel rail in a system with autonomous hot water preparation when installing it yourself?
The device is installed in the gap of a looped filling or hot water supply line. Circulation in them is ensured by a pump.
Circulation pump for domestic hot water
The connection of the circuit to the heat source is determined not so much by its type as by the presence or absence of an additional outlet for connecting the circulation pipeline.
Here are two examples of connection diagrams.
Circulating hot water in a system with a single-circuit boiler and an indirect heating boiler
The pump causes water to circulate in a closed circuit between the boiler taps. The boiler (in this case, indirect heating) must have three connections: two for connecting the DHW circuit and one for make-up.
Boiler in a system with DHW recirculation
Captain Obviousness suggests: connecting an electric boiler with a circulation pipe is completely identical to that shown in the diagram.
DHW with thermostatic mixer
If the boiler or any other device (gas water heater, double-circuit boiler, flow-through electric pressure heater) does not have a circulation connection, a scheme with a three-way thermostatic mixer is implemented: hot water circulates in a closed circuit and is heated to compensate for heat loss. As water is consumed, the circuit is fed from the cold water system.
Installation nuances
Pipelines
When planning the installation of a ladder-type heated towel rail, coordinate the position of the main connections with the installation location of the product:
- With a bottom connection, it is rational to arrange the supply and discharge taps closer to the floor.
- The horizontal one-sided connection is coordinated according to the interaxial dimensions with the riser tie-ins, taking into account the slopes.
Hidden lines are connected to the heated towel rail through water sockets.
Important! The installation of grooves in the ceilings and main walls of panel buildings is prohibited! Horizontal furrows are especially dangerous because they reduce the load-bearing capacity. Similar work in brick and monolithic houses is carried out on the basis of a conclusion from the designers.
Based on ergonomics and heating engineering, building codes limit the placement height: the top of the coil is no more than 1.7 m from the floor, the bottom is 0.9 m. The indicated values are indicative for ladders.
According to SNiP, hot water supply pipelines must withstand a pressure of at least 0.68 MPa at a water temperature of 75˚C. The conditions are met by pipes: water and gas pipes GOST 3262-75, metal-plastic, glass-fiber reinforced polypropylene. The latter are preferred due to the combination of their properties. Taking into account the reduction in the service life of plastic with increasing temperature, products of the PN 20 group are selected with a pressure reserve.
The greater the temperature gradient, the more intense the circulation, so heat losses are minimized by insulating the riser and connections. Shells made of foamed polypropylene are used, the standard minimum thickness is 10 mm.
The thermal expansion of the plastic is compensated by turning the route, at which sliding supports are installed. The elongation of polypropylene heated to 60˚C will be 8 mm / 1 m. With horizontal lateral connection without hinges, the radiator brackets should not prevent axial displacement.
Connections, fittings
With a lower hidden connection, it is necessary to install water sockets at the same height, with the same depth, so marking and installation are carried out according to the spirit level. To maintain the correct center-to-center dimension, holes for dowels are marked after screwing the dryer in place. Small errors are compensated by eccentrics.
Choose angles with internal threads ½ inch, screwed eccentric transitions from ½ to ¾ inches. If the water sockets are precisely fixed on the profile, or fixed together with the ladder, you can eliminate the adapters by using parts with external threads corresponding to the union nuts.
In practice, implementations with flexible connections are rarely encountered. If the towel is attached near the riser, the method is attractive in its simplicity. However, the cross-section of the sleeves is always reduced.
Tension, twisting, bending radius less than 5 diameters - reduce the service life and cause damage. The standard recommends replacing polymer or rubber-metal hoses after 3 years.
The tightness of joints with union nuts is ensured by a mechanical seal using silicone or paronite gaskets. The latter are preferable for heating circuits and are sensitive to distortions.
Non-parallelism of the mating ends causes excessive deformation of the gaskets during tightening, resulting in leaks. It is impossible to rewind or coat the threads with sealant in such connections; distortions are eliminated by resoldering the sections.
Inch threaded connections are sealed in one of the following ways:
- The old fashioned way - with a strand of flax impregnated with red lead or white on drying oil. Lay from the end clockwise.
- Flax fiber coated with plumbing paste. A workable option.
Flax fiber and sanitary paste. - Fluoroplastic sealing material (FUM tape). It is difficult to wind up the required number of layers; they are often additionally lubricated with sealant.
- Sealing thread wound crosswise. The material is impregnated with a special composition at the factory, does not dry out, does not swell, the best solution.
It is not advisable to use silicone for sealing. “Sandwiches” from FUM, threads are a dubious technique.
Tips for attaching water sockets:
Elegant and practical connection via kit:
You need to connect a ladder-type heated towel rail to the water riser through ball valves. The fittings will allow you to turn off the device when the water supply is cut off, in emergency situations. It is convenient to start the radiator after flushing or replacing.
Valves are not used due to high hydraulic resistance. For steel wiring, bronze or brass taps with a stainless sphere are used; cast iron fittings are prohibited.
It is impossible to install a tap on the bypass; blocking or removing the bypass will unbalance the system and leave neighbors’ bathrooms with cold dryers. Transferring or changing the cross-section of a jumper without calculations can lead to similar consequences.
Without jumpers and taps they are placed on the heating riser.
Procedure
First, a diagram is drawn on paper with linear, interaxial dimensions, height marks, and diameters of sections. Further repairs are divided into two stages.
In the preparatory cycle, the existing coil is dismantled, if necessary, the riser pipes are changed, and taps are moved. They finish by installing taps on the outlets so as not to cut off the water supply to adjacent apartments. Move on to the main operations:
- Mark the sketch using a pencil.
- The route is prepared: furrows are cut in the partitions, support profiles and supports are attached.
Mark the groove.
Cut with a diamond disc.
Knock out the rear sight with a chisel or chisel.
Mark the fastening centers.
Drill holes for dowels.
The dowels are driven in.
Screw the mounting plate. - Assemblies are assembled: sections are soldered, component fittings are attached to the device, transitions are screwed into the taps.
Fully equipped heated towel rail.
A model that allows you to choose the type of connection.
“American” for lateral connection.
Having connected at the riser, we check the location of the ends of the American women. - The route is soldered from blanks.
To avoid damage to the polishing, the packaging film is not removed until the final run.
- Install water sockets: drill mounting holes according to the markings, tighten them with dowel nails. Without relying on the accuracy of the markings, you can temporarily attach a heated towel rail by screwing eccentrics into the corners and marking the center of the dowels. You will need an assistant to hold the towel.
Recessed water sockets are secured with dowel nails to the wall or screws to the mounting plate.
Fastening with self-tapping screws to a plasterboard profile.
The coupling ends are fixed with a solution.
The length of the outlets is the same and must be overlapped by a decorative cup. - Fill the system, bleed air from the dryer, and leave it for testing.
Letting out the air. - Turn off the water and remove the radiator.
- After finishing the cladding, install the dryer completely, not forgetting to screw on the decorative trims. Secure the brackets with the supplied hardware. Do a control filling.
Marking the bracket fastenings
Protecting tiles from chipping when drilling
We drill and install dowels
Screwing the holders
Installing and connecting the dryer
Useful videos: