Currently, it is important to independently monitor the quality of drinking water. You shouldn’t rely on the water supply, since public utilities do not always maintain it at the proper level. A good owner will always take care of installing a filter to purify water intended for drinking and cooking. This device will ensure the removal of chemical compounds and mechanical impurities from it, improving taste and maintaining human health. We invite you to learn how to install a water filter yourself without contacting specialists.
The modification of the filter device is selected depending on the nature of the contaminants, the volume of water consumed, and the conditions of use.
Advice: before purchasing, you should find out whether it is possible to purchase replacement filter cartridges and the necessary spare parts in the future.
If you only need a little water, you can use a pitcher filter. It is also useful when traveling to the country or to nature, since it is compact, portable, does not require installation, and the filter element is installed in the jug in one motion.
Filter attachment installation
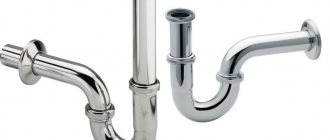
At home, you can install a filter attachment on the faucet, which cleans under pressure. At the same time, the quality of purified water is high, and it is quite enough for a small family. There is no need to assemble such a device, and installing a water filter yourself involves connecting the home water supply to the spout of the faucet. Most models allow the filter to be placed over the smooth spout of the faucet, which is held in place by friction. The tap may have a thread at the end of the spout. With its help, you can connect the filter directly or through adapter fittings.
The filter attachment installed on the faucet has low performance and a short resource.
Preparatory work
Before you start installing a water filter, you need to decide on its location. It is best to choose a spacious location with good access so that the system does not have to be turned off during maintenance. If the water filter needs to be installed on the wall, there should be at least 20 cm to the floor, depending on the size of the water purifier being mounted, thanks to this you can change the cartridge without removing the entire device. Do not install the cleaning filter near the battery or in a place where it will be exposed to direct sunlight.
To install the filter you will need:
- fasteners;
- keys of different sizes;
- fitting;
- hoses;
- faucet for purified water.
Once the location for the filtration system has been selected and the tools have been prepared, installation can begin.
Features of installing a stationary filter under the sink
You can install your water purifier under the sink, where there is always plenty of unused space. Accessories for filters are cartridges for different cleaning stages with cartridges, the number of which varies from 2 to 5. If the required number of cleaning stages does not fit under the sink, you can purchase a universal filter element that combines the functions of several stages. Some cartridges contain minerals that improve the composition of filtered water.
Important! Before installing the water filter, you should read the instructions. Each model has its own characteristics, which are taken into account when connecting to the water supply.
How to install the filter correctly? First you need to take into account some nuances:
- The assembled filter is hidden in a cabinet under the sink, where all the parts will be hidden.
- The placement of water filters is chosen so that the structure is convenient to maintain. It can be assembled on flexible hoses, with the ability to extend outward.
- The water purifier should be hidden from direct sunlight. To replace cartridges at each cleaning stage, it should be possible to freely unscrew and remove the flasks.
- Flexible hoses with metal braiding, connected to the main line and to the drinking water tap, are selected at a convenient length: not too long or short. If the connection is not suitable, an adapter is installed there.
- The kit includes an adapter (tee), the thread of which fits most water pipes. When the adapter included in the kit does not fit, you can select the necessary fittings.
USEFUL INFORMATION: Which water heaters are better: storage or instantaneous? Difference between models
Advice. If you are concerned that you will not be able to install the equipment correctly yourself, when purchasing, choose a company that provides free installation.
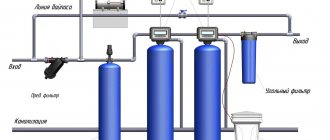
The order of cartridges in reverse osmosis systems
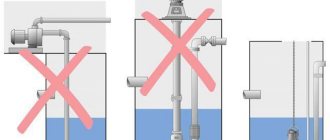
Reverse osmosis systems stand apart. Here the first violin is the purification stage with a reverse osmosis membrane. This is a thing that can hold back the pressure of any impurities. Another thing is how long it will last with this approach*. Therefore, the order here is as follows:
- Pre-filtration. The main task is to remove as many impurities as possible from the water in order to increase the life of the expensive membrane. If there are a lot of solid impurities, for example, rust, then the working scheme will be: mechanics 5 or 10 microns - coal - mechanics 1 or 5 microns. If there is a lot of chlorine, then it is better this way: mechanics - granular coal - carbon block coal.
- Reverse osmosis. This stage is designed to desalt liquid. Accordingly, it softens and deferrizes, and also removes bacteria and viruses. The result is almost distilled water, but not quite. The minimum amount of salts slips through.
- Post-filtering. Cartridge with granular activated carbon for post-treatment after the storage tank. This tank is also a breeding ground for germs!
- Additional steps. This includes a mineralizer, pH corrector, etc. marketing things that are designed for suspicious people who consider water after reverse osmosis to be “dead”.
* The reverse osmosis membrane is corroded by chlorine, and the presence of mechanical impurities reduces its throughput down to 0.
The procedure for installing cartridges in a household reverse osmosis system
conclusions
You can always use the instructions for your flow filter, reverse osmosis system or water treatment plant. It shows exactly what needs to be installed and in what order. My task was to explain in simple terms why the cartridges should be positioned this way and not otherwise. Everything so that you can change filter cartridges and materials at your discretion, without being tied to the manufacturer.
If nothing is clear, then I’m waiting for feedback in the comments!
Installation of a tap for purified water
For drinking water, a separate tap is installed or a combined tap is purchased - combined with the supply of domestic cold and hot water. In the first case, the tap is included in the accessories for the filters. If you don’t have one, you should purchase another one, and with it a suitable adapter and fittings for connection. The faucet is mounted on the sink or countertop, away from the mixer.
Crane installation procedure:
- A 12 mm hole is drilled for the tap. For this, an appropriate drill is selected. It is recommended to use a 5–6 mm drill first, and then larger ones.
- The faucet is installed into the finished hole through the seal at the top and secured with a nut screwed onto the hollow tube from below. Don't forget to check that all gaskets are in place.
Checking the water filter
After installing a water purification filter in your apartment, it is important to check it for leaks. To do this, you need to open the pressure in the pipes again and carefully inspect the connections of the pipes and hoses. If there are no wet places anywhere, it means that the system was connected correctly, all sealing gaskets are in place and the cleaning filter is sealed.
Then you need to open the tap for 5 minutes. This will allow you to thoroughly flush the system from dust and dirt; do not worry if cloudy liquid flows, this is normal. After 5-10 minutes, you can taste the water, but it may have an unpleasant aftertaste. It appears briefly if you install a hard water softener cartridge, but then disappears.
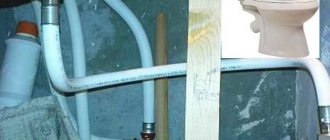
Installation
The first thing to do is to secure the filter housing under the sink on the wall or on the inside of the cabinet using dowels or self-tapping screws.
You can connect to the water supply by making a branch for the filter from the cold water supply pipe under the sink.
- The water supply is turned off.
- The flexible hose going to the mixer is unscrewed.
- An adapter with a branch is screwed into the gap. To prevent leakage, the threads are sealed with FUM tape.
- Then the hose and tap from the kit are connected to the tee.
The filter connection diagram and all components must be supplied with the water purifier.
- First, flexible hoses are connected to the filter inlet and outlet. The locking ring is removed from the moving part of the connection on the device, the tube is inserted until it stops, and the ring is returned to its place.
Most often, the incoming tube through which untreated water enters the filter is red, and the outgoing hose for purified liquid is blue.
- The free end of the supply hose is connected to the shut-off valve. To do this, remove the crimp nut from the end of the tap and put it on the hose. The end of the hose is put on the fitting, the nut is screwed into place and tightened until it stops.
- The end of the purified water tube is connected to the drinking faucet. To do this, put a crimp ring on it, then a plastic ring, and insert the plastic pipe all the way (these parts are included with the tap). The plastic ring is moved to the edge of the hose, which is inserted into the pipe on the faucet itself, and the crimp nut is tightened with a wrench.
USEFUL INFORMATION: Methods for attaching polypropylene pipes to the wall
- If the structure has a drainage outlet, a hole is drilled in the sewer pipe with a drill with a diameter of 7 mm (above the water seal), and a protective rubber band is glued around it. The drainage clamp is mounted on the pipe so that the holes on it and the pipe match, the screws are tightened, ensuring a tight fit.
- A storage tank is installed. Its thread is wrapped with sealing tape, and the plastic tap is attached to the tank manually, without overtightening.
Where to find a specialist?
The filter can be installed on your own or with the help of a specialist. Today, the service market is overflowing with offers for the installation of cleaning systems.
You can find a specialist via the Internet or through recommendations from friends. When choosing a specialist through an online resource, you should first study customer reviews.
The cost of equipment installation services depends on the type of filter device. The average price is shown in the table:
| Filter type | Average cost of installation work, rub. |
| Flow-through filter for sink with drinking tap | 2000 |
| Main filter | from 1000 to 2000 |
| Reverse osmosis | 2000-2500 |
| Dirt filter | From 250 |
| Complete treatment plant | from 10000 |
How to properly install a water filter on cold water in an apartment or private house with your own hands
Professionals recommend performing the following operations in turn:
- Do not remove the standard tap; it is useful for cleaning the room and washing dishes. To release drinking liquid, install the second jib, included in the kit, on the opposite side of the sink. Cut a circle of the appropriate diameter in stainless steel and secure the tap with iron nuts, plastic disks and fumig tape.
- Turn off the valve to the general water supply and wait until the residue drains out. Next, using an adapter in accordance with the schematic diagram indicated in the instructions, make a branch.
- Release the metal-propylene hoses for input and output from the closing devices. A hose is placed on the valve inserted into the pipe, through which filtered moisture will flow. To do this, the part must be rested against the wall and pressed on it so that the gap between the boundaries of the valve and the pipe is minimal.
- The drainage outlet must be connected to the sewer, having previously made a passage of the required parameter in it.
- Before starting operation, all connecting points should be checked for sealing.