Any person knows what a pump is and has used it at least once. But vacuum design is a completely different matter. Many people believe that such a device is used exclusively for production purposes, and is not suitable for personal use. But they are wrong. The device is great for home use, but its price is high. Therefore, many people are thinking about making a vacuum pump with their own hands.
What is a vacuum pump used for?
Before starting work on creating a vacuum dehumidifier, you need to think and understand for what purposes such a unit will be used, since a lot of effort, energy, money and time will be spent in the process. Also, some people are interested in how the vacuum sealer works.
As a rule, everyone knows what a vacuum chamber is. It looks like a plastic bag with a valve. Food is stored well in this container, it does not dry out and bacteria do not multiply inside. Vacuum sealing is the proper way to store food . The simplest vacuum packaging can be made by squeezing air out of it.
But a more professional method is to use a pump for similar purposes. The device will allow you to pump out air from any bag, but it is necessary to ensure tightness. You can store clothes this way. In a vacuum, it becomes much smaller in size, and this is especially important when it is necessary to fit a large number of things into a suitcase.
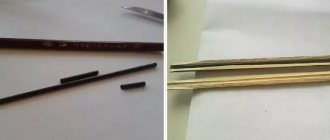
It's no secret that wood craftsmen, in order to make their products more beautiful, treat them with oil. To enhance this process, you need to put the oil in vacuum packaging. Thus, the wood will squeeze out air and draw in oil.
Modification of an aquarium compressor
If you need to ensure a higher vacuum level, you can use equipment based on a household compressor capable of pumping air under high pressure.
There are no difficulties in converting an aquarium compressor. The areas of use of such devices are quite multifaceted. For example, some owners use such pumps to eliminate the specific aroma that arises during the distillation of alcohol.
Also, this kind of vacuum pumps are suitable for performing various kinds of experiments, during which a certain vacuum must be created in distillation cubes and various fermentation tanks.
First step. Unscrew the fastenings from the housing of the compressor you are using. A screwdriver will help you with this.
Second step. Disassemble the assembly inside the compressor, which contains an element with valves.
Read also: What types of ice lamps are there?
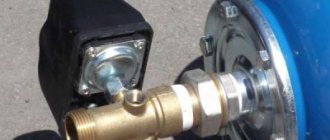
Third step. Saw off the corner of the housing in a place convenient for connecting the pump hose. Reassemble the compressor assembly mentioned in the reverse order and insert it into the housing in accordance with the prepared hole.
The part for modernization is marked in red
Fourth step. Prepare a hole in the bottom wall of the part to remove condensation and water that accidentally penetrates inside.
Fifth step. Set up a system for removing gases from the vacuum pump. To do this, use glue and a tube of suitable sizes.
As a result, a device assembled in reverse order will pump out air instead of pumping it in.
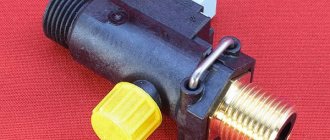
Replace valves
With the vacuum created by such equipment, it will be possible to reduce the boiling point of working fluids.
At the same time, be sure to take into account the fact that in the process of performing such work, the resulting vapors will pass through the unit, which is categorically undesirable. Therefore, the system must include a sump tank and a receiver - they will help dry the air.
Varieties of homemade structures
There can be many types of pumps. It depends on their intended purpose. The simplest vacuum sealer can rightfully be considered a medical syringe. But its disadvantage is that a vacuum can be created in small volumes. And even if you don’t have a medical syringe at home, you can easily buy one at the pharmacy, just pay attention to the size.
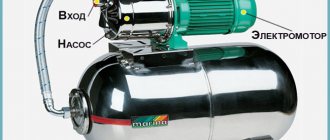
But in order to be able to pack large volumes, a car pump is well suited. It just needs to be reworked to the required parameters. Moreover, making a vacuum pump from a car compressor with your own hands is not difficult.
You can also construct a vacuum pump from a compressor from a refrigerator, or remake accessories from an aquarium.
Using a car pump
A homemade vacuum pump can be made from different raw materials. The most popular options are car and bicycle hand pumps.
10.8. Obtaining vacuum and excess pressure. Part 1
To create the necessary vacuum or excess pressure in laboratory reaction vessels or instruments, various types of vacuum pumps and small compressors are used. Instead of compressors, gas cylinders are often used, from which gas can enter the working space of the device or installation under pressure from 1 to 200 atm (0.1 - 20 MPa)
Sometimes small-sized laboratory fans and gas blowers are used to create low gas pressure (no more than 1 kPa). Their design and basic operating characteristics can be found in the brochures of the companies that produce them.
The main types of vacuum pumps and their main characteristics are given in table. 36.
Water jet pumps. To obtain a vacuum not exceeding 6*00 - 1300 Pa (5 - 10 Torr), water-jet pumps operating on the principle of an injector are used. They can be metal, glass and plastic.
Water-jet pumps operate under the pressure of tap water entering the pump through tube 1. Water, passing at high speed through nozzle 3 (Fig. 258, d-d) and diffuser 4, creates a vacuum in the small gap between the nozzle and diffuser. The air around the gap is entrained in the direction of the water jet and is discharged along with the water through tube 5 (Fig. 258, a, b) to the outside. The gap between the nozzle and the diffuser should not be more than 0.3 mm, otherwise the pump will not work.
To increase productivity, dual water-jet pumps are used (Fig. 258, a).
To obtain a deeper vacuum, close to 600 Pa (5 Torr), the pump nozzle is given a helical shape (Fig. 258, c), thanks to which a narrow stream of water enters a spiral movement and, leaving the hole of the nozzle 3, immediately expands in the diffuser 4, filling the entire lumen of the diffuser.
In some water-jet pumps (Fig. 258, d), a stream of water is directed from the side into the jacket through tube 7, and air is sucked in through tube 2. Such pumps easily choke, and the vacuum they create strongly depends on the distance of the lower edge of tube 2 from the inlet of the diffuser.
Water-jet pumps are known, the body of which is divided by a partition 6 (Fig. 258, d), which performs the functions of a nozzle. The section of the partition is always located in the center above the diffuser 4.
The tube through which water flows from the pump is made wide enough so that there is no unnecessary resistance to the flow of water. Otherwise, the pump begins to choke and operate unevenly.
The vacuum created by the pump depends on the design of the device, the pressure and temperature of the water in the water supply. As follows from the table. 37, the ultimate vacuum created by a water jet pump cannot exceed the vapor pressure of water at a given temperature. The lower the temperature of the water flowing through the pump, the greater the vacuum can be obtained, all other things being equal.
The water jet pump is connected to the water tap using a thick-walled rubber tube, which is secured to the tap and pump with metal clamps, but not with wire, which can cut the rubber hose.
Rice. 259. Wetzel (a) and Ostwald (b) water jet pumps. Sprengel pump(v)
To check the serviceability of the water-jet pump, water is slowly released, and tube 2, which sucks in air, is closed with a wet finger. If the finger is suctioned quickly, then the pump is suitable for operation.
Water jet pumps can create not only vacuum, but also excess pressure. The first design of a water-jet pump creating excess pressure was proposed by Wetzel. The design of the Wetzel pump is quite simple. Water enters the pump through tube 1 and nozzle 3 and, together with the air sucked in through tube 2, is discharged through the holes of the pear-shaped expansion of the diffuser 4, immersed in water, and removed through siphon 6, and the air exits through the side tube 5 to the valve, where it is necessary to create excess pressure. Such a pump creates a pressure of about 400 Pa (3 Torr).
A kind of blower is an Ostwald device, in which the lower end of a water-jet pump 1 is inserted into a bottle 3 with a capacity of 2 - 10 liters with a lower tube 5 for draining water. Using tap 6, the water discharge is adjusted so that when the water-jet pump is operating, bottle 3 remains approximately 1/3 filled with water. In bottle 3, the steam-air mixture ejected by the pump is separated and the air with a slight excess pressure exits through tube 2.
There must always be a safety seal between the water jet pump and the vessel from which air is being removed. For this purpose, the Salutso-Wulf three-tube flask with a capacity of 1 - 2 liters is best suited (Fig. 29). When the pressure in the water supply network drops, the water from the pump will begin to flow into the safety bottle, and not into the evacuated vessel. In the flask, one glass tube reaches almost to the bottom, and it is connected to a water-jet pump. Another glass tube protrudes from the stopper into the inside of the flask by only 1 - 2 cm. It is connected to a evacuated vessel, for example a Bunsen flask for filtering. The middle tube of the Salutso-Wulff bottle is closed with a stopper with a tube having a stopcock. If it is necessary to disconnect the vessel being evacuated without stopping the operation of the water-jet pump, then first open this tap and then disconnect the vessel. After this, you can close the water tap of the pump. Instead of safety bottles, shut-off valves are sometimes used.
The Sprengel mercury-drop pump can also be included in the category of pumps under consideration (Fig. 259, c). It consists of a reservoir 1 with mercury, the surface of which is covered with a small layer of water to reduce the evaporation of mercury, a capillary tube 4 about 1000 mm long, and a receiver 5. Mercury drips through tap 2 into capillary tube 4 and the drops, blocking the tube, flow down. Gas is captured into the gaps formed between the drops through valve 3. From receiver 5 it is either removed into the atmosphere or discharged into another vessel. In this case, the top of the receiver is hermetically sealed and has an outlet tube.
Each drop of mercury acts like a small piston, pushing the gas forward. Sometimes the Sprengel pump is called a mercury piston pump. The pumping speed of such a pump is naturally low. It is used in some special works.
Sprengel Karl (1787-1859) - German agrochemist, specialist in artificial fertilizers.
Rotary piston pumps are used mainly to create a preliminary vacuum (forevacuum) before diffusion pumps.
In the laboratory, a rotary vane oil pump is most often used (Fig. 260, a). It consists of a body 2, which has a machined cylindrical cavity 4, including an eccentrically rotating cylindrical rotor 3, ground to the inner wall of the cavity.
Along the entire length of the rotor and its diameter, two deep slots are made, in which there are metal plates 5, pressed by a spiral
spring to the inner wall of the cavity. The plates can move in and out and when the rotor rotates, they slide along the surface of the cylinder 4. They play the role of pistons that suck in and eject gas.
Pump housing 2 is immersed in an oil bath b. The outlet pipe is equipped with valve 1. Tube 7 connecting the pump and the vessel being evacuated must have a safety valve that prevents the release of oil when the pump suddenly stops. A trap is placed behind the valve to absorb the smallest droplets of oil, and absorption flasks and columns are placed behind the trap to extract from the gas or air being removed, first of all, water vapor and aggressive impurities, then highly volatile organic
substances that, when released into the oil, dramatically impair the operation of the pump.
The most important condition for good pump operation is the use of oil specified in the pump data sheet.
Compressor, machine, vaseline and turbine oils are usually used. They should not be too thick under normal conditions, otherwise starting the pump will be difficult.
The oil vapor pressure, measured at the inlet to the self-propelled pump, must exceed 5 • 104 torr (0.07 Pa) for a single-stage pump.
Before pouring into the pump, the oil is dried. To do this, it is poured into a thick-walled dry round-bottomed flask with a capacity of 1.5 - 2.5 liters per 1/3 of the volume.
The flask is closed with a ground glass stopper with an outlet tube connected through a vacuum rubber hose to an operating rotary vane pump. After this, the flask is heated in a water bath. The oil contains moisture and when heated it foams strongly. The extraction of water vapor is continued for 2 - 3 hours; After cooling, the dehydrated oil is poured into a bottle with a ground-in stopper for storage before being poured into the pump.
When pumping, an absorption flask with P4O10 is placed between the flask and the pump (Fig. 237, c).
A rotary vane oil pump can, during normal operation, create a vacuum of the order of 0.001 torr (0.13 Pa) with a flow rate of 0.5 - 7.0 l/s. The vacuum level depends significantly on the ability of the oil to dissolve air and other gases
At the first signs of deterioration in pump performance, you should immediately change the oil, and before that, after draining the old oil, you should rinse the pump with a mixture consisting of 1/3 fresh oil and 2/3 gasoline. If a well-functioning pump after an oil change begins to turn very tightly, then either the oil viscosity is too high or the temperature in the laboratory is low. In the latter case, to start the pump, the pump is heated with infrared emitters, and first the pump is turned by hand, having previously removed the textrope belts.
When starting the pump for the first time, oil may escape through valve 1 (see Fig. 260, a), especially if too much of it was poured. To avoid this, a piece of rubber hose is placed on the valve, the end of which is lowered into a bottle filled with glass or polymer wool to retain small droplets of oil.
Other parts:
10.8. Obtaining vacuum and excess pressure. Part 1
10.8. Obtaining vacuum and excess pressure. Part 2
10.8. Obtaining vacuum and excess pressure. Part 3
To contents
Home repairs
All people who were interested in how to create a vacuum at home, and those who have already made their first device, also need to know how to repair it, since it can break down often. In principle, any mechanism or motor can break down or start to work poorly:
- Incorrect motor connection or motor failure. This mainly happens when the required motor circuit is connected incorrectly. First, check the integrity of the wiring and whether it is well insulated. A trial indicator will help with this. If it lights up when connected, then the wiring is intact, and this is not the reason. Otherwise, the motor is broken and must be sent in for repair.
- Drive and shaft mismatch. Such difficulties in operation, as a rule, are solved by installing a gasket under the engine or discharge element. When this does not give the desired result, you need to look for the problem in the clutch. She could have moved. If the situation is confirmed, the part must be replaced.
- Motor jamming. As a rule, this problem is very common. It occurs due to pumping out dirty water. In this case, the motor must be disassembled and cleaned.
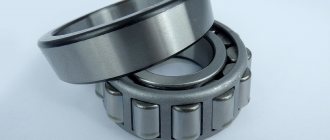
- Bearing failure. The motor begins to hum and vibrate strongly. The reason for this is a broken bearing that needs to be replaced.
- Scale in the engine. The problem often occurs on liquid ring pumps because they operate in a water environment. Repair is accompanied by cleaning using special solutions.
- Overheating of the structure, as well as wear of certain parts. Devices break due to lack of lubrication. Even materials such as Teflon are not able to compensate for the necessary lubrication. To avoid such breakdowns, you must maintain the correct temperature conditions. And when the motor overheats, the burnt parts will have to be replaced.
- Leakage of working fluid. If the design has reduced performance, the service fluid pressure is checked. The reason for this could be its leakage. In this case, it is necessary to replace the seal in the hole.
Air pumping process
With a detailed analysis of the process, you can understand that the difference in the technology of injection and pumping is insignificant, since as soon as you turn on the air flow, the injection pump will immediately become a vacuum pump. The peculiarity is that the device is more thoroughly sealed when pumping out air or liquid. An inlet valve filter may also be required to prevent debris from entering.
The general operation of the mechanism can be described by two process cycles:
- When air is sucked in, a vacuum is created in the chamber, which opens the inlet valve and seals the outlet. In the selection chamber, maximum air volume and low pressure are achieved.
- During the return phase of the mechanism, low pressure is maintained on the inlet stroke, the inlet valve closes, after which the outlet valve opens and air is displaced. The pressure in the sampling chamber is normalized.
Read also: What is made from nickel for the home
This type of process applies only to piston and membrane devices, and in rotary systems, air is moved by blades into the sampling chamber, while the inlet and outlet valves open in stages.
Training rules for beginners
The exercise must be performed on an empty stomach and bladder, so the most suitable option is to do it in the morning: wake up, empty your bladder, do not drink or eat anything. You also need to take care of comfortable clothes. It is better to bare your stomach or wear something that will not put pressure in the abdominal area.
Every day you can increase the duration of execution - both due to the number of repetitions and by increasing the time on exhalation. The effect may not be noticed immediately - it all depends on the intensity and correctness of execution.
If after a long period you do not observe the desired results, then first of all make sure that you are performing the exercise correctly. Re-read the correct order of the technique or watch visual video tutorials.
Initially, it may be difficult for you to maintain tension even for 10 seconds, let alone 20–30, so in the first stages it is recommended not to chase time, but to compensate for this by the number of repetitions. But you should not use this approach for a long time, since at 10 seconds the transverse muscle will not actively tense. So you need to get out for 15-20 seconds as soon as possible.
Abdominal vacuum technique
For results, it is important to develop a habit. Usually it comes after a week of regular exercise. After 7–10 days there is already a feeling that the stomach does not need to be specially retracted. After this you will want to work more and more.
Many people will find it uncomfortable to do the exercise while lying down, as recommended. In this case, you can try to train standing, with your hands on your knees.