Interaction of cistern components
Under the cistern lid there are components and important components that ensure proper operation of the toilet. Thanks to two design units, water is collected and drained.
A detailed overview of the mechanisms and operating principles will make it possible to independently service the units.
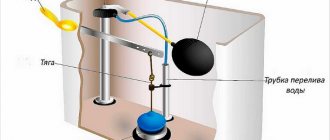
The unit responsible for collecting water consists of the following components:
- set fitting;
- flexible hose;
- locking mechanism;
- twist;
- float.
The water collection process is simple and starts with a flexible hose. It is connected to the water supply pipe and to a fitting that is built into the drain tank. The fitting valve regulates the water intake according to the principle of a shut-off device. Water is drawn in when the valve is in the open position, and stops being drawn in when the valve is closed.
The optimal water level in the tank is set by twisting and a float. If the float is in the lower position, the valve allows water to enter, and when the float is raised to a certain level, the flow process stops.
The drain mechanism has fewer components. The water is drained after pressing a button that activates the lever. When the button is pressed, the lever lifts the shut-off valve and water drains into the toilet.
The interaction of the components occurs during the process of draining the water. After closing the drain mechanism, the float activates the fitting valve.
What are the differences between drain structures?
Experts distinguish devices depending on the work process into single-mode and dual-mode. In the first, all the liquid inside the tank is drained once. The second option uses only half the water when pressed. Despite the differences, toilet varieties work the same. The valves are opened and closed using a chain. In its manufacture, plastic or metal is used.
The chain is installed on the side of the cistern. By pulling it, the person opens the flap, after which the feces are flushed into the toilet with water.
On modern devices, a special button is installed, mounted on the surface of the structure. Its operation is similar to the previous method.
Reasons for replacement
Common reasons for replacing the flush mechanism in a toilet cistern:
- continuous supply of water, which is caused by wear of the float or shut-off valve;
- bending of the twist, or failure of the ratchet;
- connection malfunction.
But there are situations when you can do without replacing elements. We are talking about cleaning the structural parts. For example, the reason for the lack of water may be a clogged flexible hose. To solve the problem, just turn off the water, disconnect the hose and point it towards the toilet. If water does not flow, you need to clean the part.
Step by step process
Work to replace the mechanism is carried out as follows:
- The valve responsible for supplying water to the drain is closed.
- Drain any water remaining in the system.
- The cover is dismantled.
- Use an adjustable wrench to remove the hose responsible for the water supply.
- The mechanism rotates 90 degrees and is removed. Then the mounting bolts are unscrewed.
- Pass liquid through the hose.
If you cannot solve the problem, seek the help of a plumber.
Preparation for repair
Before starting work, you need to prepare tools and purchase new parts that require replacement.
The next stage of preparation is removing the tank cap. There are two popular design options:
- with one button;
- with two buttons.
The dismantling process is different in each option. To open the lid, equipped with one button, you need to turn the ring counterclockwise. It is better to use a screwdriver for this. After removing the ring, you need to move the cover to the side and remove the clothespin. As a result, you can completely remove the cover and begin repairs.
Opening a design with two buttons occurs differently. First you need to press one button and find the hole located on the side of the second button. Use a screwdriver to carefully remove the second button. After this, begin to unscrew the slotted screw. The process then continues as in the first case.
General recommendations for handling the toilet
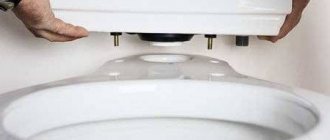
Since the drain system is located inside the tank, you need to remove the top part. Push-button models are similar to each other in external design. Old toilets are much easier to deal with. Their covers can be easily lifted up and quickly returned to their original place after repair.
Once the cover is removed, never remove the fitting in a hurry. It is important to remember in what order all its elements are located so as not to make mistakes during assembly. The tank lids are made of ceramic and can break if handled carelessly. Prepare a small container in advance. You will need to put all the fasteners, clamps and other spare parts into it.
When disassembling the fittings, do not use unnecessary force, do everything carefully. If the button does not give in at first, you should not hit it with a hammer or pliers: fragile parts may break, and it will be difficult or impossible to find the same ones. The best way is to try to unscrew it manually. If there are no manufacturing defects or serious damage inside, it can be easily unscrewed.
How to replace fittings in a toilet cistern
If minor problems arise in the operation of the mechanism, you can get by by adjusting the components and replacing small spare parts. However, if problems constantly arise during the operation of the toilet, it will be more effective to completely replace the insides of the tank.
Easy replacement of the drain mechanism
A common problem is constant drainage of water. This means the reason is in the drainage system. It is necessary to examine the locking element and lever. As a rule, the reservoir valve is the first to fail. The lever lasts longer, but problems can also arise with it. In both cases, it is necessary to replace key elements. To do this you need:
- drain the water from the tank;
- dismantle the system;
- replace with a new mechanism;
- fill the compartment with water and test the new system.
Drain systems are sold assembled, so you often have to replace the lever and valve at once.
Complete replacement of fittings
A simple way to solve toilet problems is to replace all internal parts.
Each type of tank with a unique fitting model. Therefore, you should not throw away the old mechanism. It will come in handy when choosing a new design - you just have to show the old design in the store. Dismantling and installation of the new system is carried out in strict sequence:
- shut off the water supply;
- unscrew the button in the drain tank;
- remove the cover;
- unscrew the fitting and dismantle the water supply system;
- disconnect the valve with the lever;
- after completely removing the insides of the tank, begin assembling new mechanisms;
- Install the tank cap and check that it fills and drains correctly.
We must not forget to check all seals during assembly of the structure.
Step-by-step instruction
A complete replacement of the entire drain system will save time searching for the cause of the malfunction and will allow you to avoid possible breakdowns of old parts in the future.
Several faults may be detected in the toilet flush system, so in order not to change several parts, it is more advisable to install completely new internal fittings of the tank. The replacement algorithm is as follows:
- Close the water supply valve to the tank and drain the remaining liquid.
- Remove the lid, if the toilet has a button, first dismantle it - unscrew it or remove the clips.
- Using an adjustable wrench, remove the water supply hose.
- Turn the upper part of the mechanism at an angle of 90° and remove it.
- Unscrew the fastening bolts that connect the tank and toilet bowl, and carefully lay the tank on the floor.
- Unscrew the fasteners from the drain and inlet valves, take out the old fittings and prepare a new one.
- The trigger mechanism is first placed in the washed, prepared tank; it is fixed at the bottom of the tank with a threaded cuff. Then a soft pad is placed under the hole and the tank is installed on the toilet.
- Align the position and screw the tank in place using the mounting bolts, doing this evenly so that there is no distortion.
- A rubber seal is placed on the supply valve, inserted into the tank and secured at the bottom with a threaded cuff.
- Before connecting the water hose, pass liquid through it (holding it over the basin) to avoid the ingress of scale particles.
- The water level is adjusted with a leash on the supply valve.
- Install the cover and screw on the bleed nut with the button.
When choosing new fittings for the drain tank, you should take into account the design features: the fitting can be installed on the side or bottom, on the left or on the right, the size of the technological holes may differ. You also need to pay attention to the quality of the material; it is better to buy parts from trusted manufacturers. If replacing drain fittings is difficult or you lack skills, then it is better to contact a plumbing service.
Important nuances when replacing the flush tank yourself
The step-by-step instructions for replacing a toilet cistern at home are quite simple, but in order for everything to go smoothly, we advise you to follow certain recommendations:
- Before buying a tank, find out the brand of the toilet or measure it. Otherwise, the new element may not fit into your toilet.
- It is better to contact trusted stores where experienced consultants work. They will select the optimal tank model and recommend the necessary components.
- The kit must contain all mounting bolts - pay attention to this. Otherwise, immediately purchase them separately.
- If water is supplied to the tank through a pipe, it is better to replace it with a flexible hose. It is more convenient and reliable.
- At the ends of the flexible hose, the nuts have internal threads, and if a water socket also comes out of the wall with internal threads, you will have to use an adapter.
- When purchasing a tank, evaluate the material of the fittings. If the parts are made of cheap and fragile plastic, they will quickly wear out and become unusable.
Forms of release in the drain system
You can change the location of the bell, but you should remember that this will take up some space. And, as you know, many rooms of this type are very small in area. If you change the location of the drain in a small room, there will be very little free space left. This is especially true for toilets that are combined with a bathroom. To do this, it is not necessary to call specialists, since you can replace the drain mold yourself.
First you need to note the release forms, there are only three of them:
- Horizontal;
- Oblique;
- Vertical.
Toilet with direct release
The horizontal release came to us from Europe. Sealing here is complicated, and there are no special advantages. It can allow you to place the toilet as close to the riser as possible. It is precisely because of this single advantage that buyers choose toilets with this particular form of release. More often, these are those buyers whose toilet space is very small, and this type of toilet can save some space, leaving more free space than other types of toilets.
Toilets with an oblique release form are the most popular type of plumbing fixtures. It should be noted that a toilet with a horizontal outlet can be easily connected to an inclined socket. There are corrugations specifically for this purpose.
The vertical type of drain is ideal for those houses in which the sewer pipe runs above the ceiling of the lower apartment.
As a rule, here you cannot choose the form of release that you like. Toilets are selected based on the location of the sewer pipe and the socket that goes into it. If it is located under the floor, then you need to take a toilet with a vertical outlet. If the bell is located horizontally, then a horizontal outlet is ideal.