The bathroom of a standard apartment most often has a small area, so the owners of the room have to make the most of every centimeter of free space. The result of design research quite often is the desire to move or expand the toilet. This is a responsible and difficult undertaking. You can invite specialists to carry it out, but you can also do it on your own. Let's figure out how to do all the work correctly.
- 2 Toilet transfer technology
2.1 Option #1 - transfer by 10-20 centimeters
- 2.2 Option #2 - long distance transfer
Simple case
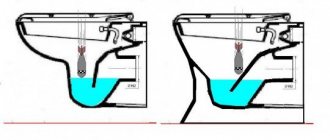
The toilet unfolds or is moved to a small distance, about a dozen or so centimeters.
Dismantling a toilet greatly depends on the installation method.
If the toilet was mounted on standard fasteners, and its outlet is connected to the sewer with a standard rubber cuff, everything is simple:
- Remove the screws securing the toilet to the floor;
- By pushing the toilet towards you strictly along the axis of the sewer pipe socket, pull the toilet outlet out of it.
In this case, it is not even necessary to turn off the water to the tank.
If the toilet is mounted on glue or cement, and its outlet is covered with the same cement in a cast iron pipe, you will have to tinker:
Armed with a strong screwdriver or a narrow chisel, carefully remove the putty from the space between the sewer pipe and the toilet outlet. Be very careful: a bad move and you'll have to go get a new toilet
https://kanalizaciyadoma.ru/wp-content/uploads/etu-zamazku-nam-predstoit-akkuratno-udalit-ne-raskolov-vypusk.jpg
We have to carefully remove this putty without splitting the release.
When the release is released we will need to loosen the toilet on the floor
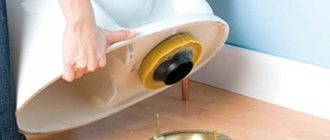
A wide chisel is carefully driven, with little force, one at a time from different sides under the base of the toilet. Sooner or later he will swing, announcing that the job is done
Then, again, we move the toilet towards ourselves, pulling its outlet out of the sewer socket strictly along its axis. If it gets stuck, do not pull harder, but slightly rock the toilet from side to side. Of course, before doing this, it is better to turn off the water to the tank and drain the water.
Since the distance to the sewerage system and water supply will be short, we will not need to either remodel the sewerage system or extend the water pipe.
If the old flexible liner is in good condition, we will not touch it. If it leaks or is not long enough, we simply replace it with an analogue one. The operation is simple and, I think, does not require a separate description.
We will connect the toilet to the sewer with corrugation. This corrugated pipe, in general, has rubber seals on both sides; but it's a good idea to stock up on silicone sewer pipe sealant.
In addition, you will need a toilet mounting kit.
Important: fasteners must be equipped with plastic washers. Steel screws should not be pressed directly onto the earthenware
This is what the whole set will look like.
- Clean the toilet outlet and sewer pipe from debris and wipe dry.
- Mark new holes in the floor for the toilet mountings and drill them. If there is a tile on top, first pass it with a drill through a tile of a slightly larger diameter.
- Place the corrugation on the toilet outlet, after applying sealant.
- Pull the toilet towards the floor. We need him to stop wobbling, nothing more. Seal the gaps between the base and the tiles with cement mortar - this will prevent the lateral force from splitting the base of the toilet, creating additional support for it.
- Insert the corrugation into the socket - again on the sealant.
- Use it.
As you can see, the result is quite satisfactory. Only the seat is askew
Tags for the article:
Dismantling
The simplest option is if the toilet is secured with conventional fasteners and connected to the cistern with a rubber cuff.
- The fastening is removed. If plumbing fixtures are screwed to the wall, care must be taken not to damage them. When fixing it to the wall, just unscrew it with a key or screwdriver.
- Carefully push it towards you, moving it in the direction of the bell. We pull out the release. You don’t have to turn off the water; the main thing is not to press the button to drain the water. When gluing or sitting on cement, it is more difficult to remove the toilet and it is important not to break it during dismantling.
- Use a screwdriver to remove the putty between the outlet and the socket. This is done slowly and carefully to avoid damage.
- We drive a chisel under the base of the equipment. After making several blows, we check whether the installed toilet will become loose.
- Carefully loosen it and pull it towards you, after which you need to pull the outlet out of the socket.
It might be interesting: How can you glue a cracked toilet or cistern together?
Moving the toilet from the center of the toilet room to the corner where the riser is located
In most standard apartments in multi-storey buildings built during the Soviet Union, the location of the bathrooms was not convenient enough. For example, it is almost impossible to install a washing machine in a small room. The solution to this problem is to move the toilet slightly, moving it at an angle of 45° to the riser located in the corner of the room.
Types of toilet connections: into the wall, into the floor and with an oblique outlet.
When thinking about such a rearrangement, the first important decision will be a mandatory replacement, which has already served for a considerable number of years. Now it’s not difficult, since there are a huge number of them in various plumbing stores and in various price categories. They differ not only in cost, but also in quality, shape and color, that is, the product is presented for every taste.
Despite the fact that the back wall of the toilet will be installed in the corner of the room (close to the riser), you should not buy a model that has a corner flush cistern, which seems to be specifically intended for installing the toilet in the corner of the toilet room. It is worth abandoning such models because the outlet of this toilet in a combined bathroom will rest against the wall and in this case it will be impossible to make a suitable connection to it.
To move the toilet to a new location, it is better to pay attention to compact options of medium size, the width of the tank is 35-38 cm. Moreover, the width and length of the toilet bowl will not depend on the size of the tank, so everyone has the right to choose it, guided only by their own wishes and room dimensions
How to move and unfold a toilet in a combined bathroom?
First of all, you need to purchase some materials. To reconstruct a bathroom with your own hands you will need:
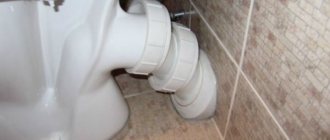
- 2 corner elbows made of polyvinyl chloride at 90°, diameter 110 mm.
- 1 45° toilet outlet with outlet seal.
- A section of a fan pipe with a socket, the diameter of which is 110 mm. It can be used as a transition elbow extension to move the toilet as close as possible to the corner of the room.
In parallel to this, the question needs to be resolved: what to do after moving the toilet with the floor that will remain in the former place? This space will stand out on a tiled floor. The best option, but by no means the most economical, would be to combine the work of moving and rotating the toilet with general renovation of the bathroom.
Assembly and installation work
Collect all the elements indicated in the list for subsequent installation of this structure. In order to adjust it to size, experts advise removing the rubber sealing gaskets not only from the corner bends, but also from the sockets. You need to try to ensure that the ends of the elbow exactly coincide with the outlet of the toilet, which is installed in a new place. Do the same with the connection to the fan pipe. This can be achieved by sliding the connecting elements in and out. As a result of such actions, it will be possible to select the correct length of the straight section.
After the fitting work is completed, you will need to mark the connection lines on the bends with a felt-tip pen or a simple pencil. This way it will be much easier to assemble a structure adjusted in advance to the existing dimensions. After this, disassemble the elbow and coat the rubber cuffs included in the joints with silicone grease. Then you should install them in their original place and reassemble the outlet structure. Now connect its outlet to the toilet outlet, and connect its opposite end to the drain pipe, which is located in the riser structure.
After these steps, all that remains is to adjust the outlet in height. Make sure that this structure evenly slopes from the toilet to the riser at an angle of more than 2°. Then, through the holes in the toilet pedestal, use a marker or pen to mark the points where your new toilet will be secured. Next, install the drain tank. At the same time, be sure to check whether it creates an obstacle against the wall. Then drill holes in the marks on the floor and insert dowels into them to secure the toilet in place. This completes the rearrangement work. All that remains is to bring all the plumbing into the room allocated for it.
How to install a toilet closer to the wall.
When carrying out renovations in small or combined bathrooms, when literally every centimeter of free space counts, the task of bringing the toilet bowl as close to the wall as possible often arises.
The tee or outlet is very rarely located or oriented well in relation to the toilet outlet, which in turn can be straight or oblique. For such tasks, it is impossible to use corrugation for connection and the entire connection is made on bends (angles), which are available at a wide variety of inclination angles. In addition to selecting the angles to bring the toilet as close as possible to the wall, they will also need to be adjusted and trimmed. Reducing the height is done by cutting off the tee socket and the outlet itself in half.
For the next stage of approach, the outlet socket is also cut off.
Accordingly, after this the toilet outlet will be a little long and should also be cut off.
After all such barbaric cuts, it is necessary to carefully and hermetically connect the cut tee and outlet. In such cases, black cotton insulating tape is ideal as a sealing seal, the rubberized adhesive base of which, in combination with silicone sealant, will create a reliable connection. This connection is no worse than with standard socket sealing rubber bands. Electrical tape wound in several turns (the quantity is selected experimentally) will perfectly seal such a connection, while the silicone will help make a tight connection and hermetically fill all possible voids.
This technology for bringing the toilet closer to the wall can be used on toilets with direct outlets, when it is also necessary to adjust the height of the outlet and shift the toilet by a couple of cm.
Relocating the toilet in more complex cases
If the toilet is installed near a dilapidated place, it will be easier to connect the water with a flexible hose. Reworking the drainage system will be useful if, after moving the toilet, it becomes clear that the length of the corrugation is shallow. In some cases, it is necessary to make a tie-in into the sewer riser, especially at a time when the entry needs to be made lower.
To install a new sewer system, a 110 mm plastic pipe will be useful.
When assembling the system, it is fundamentally important to think about what specific fittings and corners will be useful, and how many of them will be needed
Clamps will help secure the sewer pipe. In other cases, the sewage system is simply mounted directly on the floor, in the corner between it and the wall. Under such conditions, it will most likely be necessary to remove the outlet to the toilet from the tee to lower the sewer almost to the floor level.
If the riser pipe is made of cast iron, you need to heat it with a burner or blowtorch so that the old pipe can be removed. It goes without saying that with plastic there would be no such troubles, but alas, in dilapidated multi-story buildings, the risers are mostly made of cast iron.
When heating cast iron, you need to take care of a new seal - the old heel will burn out after this procedure is completed. Once the heating is completed, it is possible to remove the pipe from the socket. A fitting is used to insert a plastic tube into a cast iron one. For more reliable fixation, its edge, which will be inserted into the cast iron, is coated with sealant. The sealant is no less carefully applied to a cast iron pipe.
Advice! When installing a sewer system, you must maintain a slope to the riser from the toilet of 1–2 cm per 1 m.
Before inserting a new pipe into the socket, you need to do one unpleasant job - if there is dirt, it needs to be removed. A burner will help with this. You need to be prepared for an unpleasant odor. Indeed, it is worth it - after such cleaning is completed, the sewer will not be clogged for a long time. After making sure that there is ventilation for ventilation and a respiratory protection device - a respirator - is prepared, you can begin cleaning.
To make it easier to fit the plastic pipe to the outlet, you need a fitting that will provide a chance to connect to the toilet. Once the connection is complete, you can supply water to the tank and try to flush the toilet. The sewer pipe can be covered with a neat plasterboard box.
If everything works fine, it means that the installation went as expected, and the person who installed the toilet followed all the recommendations from this article exactly.
Technical features of the transfer
The second most popular option is to move the toilet and toilet from the riser to the side without additional redevelopment.
In this case, approval is not required. But there are technological nuances that must be paid attention to.
Increasing the length of the sewer pipe can provoke the formation of air jams and blockages. According to SNiP standards, the distance between the drainage device and the sewer outlet should not exceed 1.5 meters.
What should the sewer pipeline be like?
Optimal characteristics of fittings connected to the toilet:
- The length of the pipe - from the toilet to the riser - is no more than 1500 millimeters.
Longer fittings will provoke the formation of a plug from washed-off sewage. The cistern simply does not have enough power to push all the fecal waste through such a pipe. Some of the sewage will settle on the inner wall of the pipe, causing a blockage that grows after each drain. In addition, when wastewater moves through an excessively long pipe, areas of rarefaction appear in it. As a result, water from the hydraulic siphon seals connected to such a pipe goes into the sewer system, opening the way for the stench accumulated in the settling tanks. - Pipe diameter is 50-100 millimeters.
Moreover, the larger the diameter, the lower the risk of congestion or vacuum. Therefore, 100 mm pipes are connected to most toilets.
The slope of the pipe is 20-30 millimeters per linear meter.
That is, taking into account the maximum length of 1.5 meters, the slope of the pipe connecting the toilet and the riser should be 30-45 millimeters. Simply put: the toilet drain pipe will have to be raised 30-45 millimeters above the point where the pipe enters the riser. Otherwise, a blockage of sewage is guaranteed to appear in the pipes.
What should be the minimum slope of a sewer pipe - canalizator-pro.ru/uklon-kanalizacionnoj-truby-optimalnye-znacheniya.html
The above parameters guarantee drainage by gravity. Therefore, when installing a toilet in a new place, you will have to focus only on these dimensions.
How to move a toilet from a riser
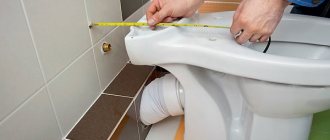
- Take a 1.5 meter piece of rope or twine. Tie one end to the sewer riser and secure a pencil or piece of chalk to the other. Draw an arc on the floor indicating the area where the toilet is as far away from the riser as possible.
- Choose the most convenient, from your point of view, place to place the toilet in the outlined area. Moreover, you better not go beyond the line. Otherwise, you will get problems with the passage of fecal drains and the operation of hydraulic valves.
- Install the toilet in your favorite place. Measure the height from the floor to the center of the drain pipe and compare this parameter with the height of the point where the sewer pipe inserts into the riser. The toilet pipe must be located above the insertion point. The optimal height difference is 30 millimeters. If the toilet is installed lower, build a podium that raises the drain pipe above the insertion point (riser tee).
- Having completed the preparation, secure the toilet to the floor or on a podium and install the fittings connecting the drain pipe to the riser tee. At the same time, remember that it is inadmissible to use 90-degree corners - it is better to replace them with bends with less sharp internal corners.
In addition, in addition to arranging the sewer water supply, you will have to deal with connecting the tank to the water supply. However, this problem can be solved much more simply by using one and a half meter hoses connected to the tapping point in the water supply and the cistern fitting of the new toilet.
Alternative solution
What to do if the best place to place the toilet is more than 1500 millimeters away from the riser? Or does a 100 mm pipe for draining fecal water interfere with the arrangement of the interior of a toilet room or a combined bathroom? In this case, you will have to purchase a special installation that provides forced drainage of fecal waste - a sololift.
The fecal pump is mounted behind the toilet cistern, and some models are placed directly in the cistern. The main task of the sololift is to crush solid inclusions and pump the resulting suspension to the riser.
Installed fecal pump behind the toilet
In this case, you can ignore all restrictions on the length and diameter of the pipes connecting the toilet and the riser. The first parameter - length - is limited not to one and a half, but to 100 meters. Well, the diameter of the pipe connected to the sololift can be 18 millimeters.
As a result, owners of toilets with fecal pumps can install their purchases literally anywhere, without paying attention to the distance to the riser. And the pipe for pumping sewage can simply be walled up in a floor screed 30-40 millimeters thick, cleaning the interior for more aesthetically attractive structures.
"Pitfalls" of these works
At first glance, moving plumbing equipment some distance from the riser seems to be a very simple and problem-free solution. But in reality this is not the case. Increasing the length of sewer pipes suitable for equipment can lead to trouble. When flushed, excessive vacuum will occur in them, which will cause a breakdown of the water seal in all nearby plumbing fixtures. This process will be accompanied by extremely unpleasant odors from the sewer and gurgling sounds.
Often, only moving plumbing equipment some distance from the sewer riser can solve the problem of optimizing space in the bathroom
Another problem is the increased likelihood of clogs. When moving equipment, the length of the pipe that connects the device to the sewer riser increases. Accordingly, the path of impurity lengthens. Theoretically, in any case, the wastewater will reach the sewer, but the likelihood of blockages increases many times over. Both problems can be solved with strict adherence to the requirements of the current SNiP. The document prohibits removing a plumbing fixture from the pipe further than 1.5 m.
Another important indicator is the slope of the pipeline. For parts with a diameter of 100 mm it should be at least 2 cm per meter. Parts with a diameter of 50 mm must be laid with a slope of no less than 3 cm per meter. This requirement must be strictly fulfilled. Reducing the slope reduces the speed of the drains, which can cause blockages. Too much slope is also undesirable. In this case, the water will pass through the pipes too quickly, leaving behind solid contaminants. They will gradually accumulate inside the pipes, preventing the free flow of liquid.
Very often, the owner of a bathroom realizes that in order to ensure a sufficient slope of the sewer pipe, the toilet will have to be raised, and the lifting height can be quite large. It all depends on the diameter of the pipe and the distance to which the device needs to be removed. There can be two options for solving the problem: either raise the floor in the bathroom and disguise the pipeline in it, or install a kind of podium under the toilet. Both options are quite viable, but in practice the second one is most often used. As the least labor-intensive and fairly convenient solution.
To ensure the pipeline slope prescribed by SNiP, the equipment can be placed on a special podium
There is one more thing to consider when planning your equipment move. The pipeline laid from the riser to the toilet must be a line without right angles. In cases where this is not possible, instead of a sharp 90° bend, two 45° turns should be arranged. This is necessary to minimize the risk of blockages.
SNiP sets fairly strict requirements for the transfer of plumbing fixtures and all of them must be complied with, otherwise problems with the operation of the equipment cannot be avoided. At the same time, you need to understand that if the toilet needs to be moved more than 1.5 m, the SNiP recommendations will not “work”. In this case, you need to either move the sewer riser itself, which is practically impossible, or install a forced sewer system. The latter option can also be used with a shorter distance from the riser to the toilet, provided that there is no possibility or desire to tinker with laying the pipe with the required slope and raising the floor level in the bathroom.
Installing a toilet in a new location
There is no need to replace the flexible line if the system is working well. If you still need to change it, this is done quite simply. First, you need a sealant for sewer pipes to get a better fastening. Connect the toilet to the riser with corrugation. The advantage of such corrugated pipes is the rubber seals located on both sides. Then we attach the toilet to the floor, preferably with screws. If the floor is not very level, it is possible to make a small layer of adhesive cement screed.
Advice! When installing the toilet on the screws, you should never press them without plastic washers, otherwise you may damage the base of the toilet.
Some recommendations will help you complete the installation correctly:
- The pipe socket to which the toilet outlet will be connected must be clean and dry.
- To install a toilet with screws, you need to drill holes in the floor for new fasteners; on a tiled floor, you need to drill holes with a larger drill.
A pre-purchased sealant is applied to the floor, after which the toilet is installed. In order to correctly make the holes and apply silicone where necessary, place the toilet on the dry floor, outline the contour of its base and mark the holes. After that, holes for screws are drilled along these marks, and silicone is applied along the contour. After this, it is possible to install a toilet, after installation of which a corrugation is put on its outlet. When placing the toilet in a new place, you need to make sure that it is stable.
Features and Benefits
In general, the corner toilet has no significant differences from the regular model. The difference lies mainly in the shape of the drain barrel, which is triangular in shape. This usually does not affect the volume of water that fits into it. The back of the toilet itself can be a standard shape or also wedge-shaped. In the first case, you can buy a regular toilet model and a special barrel.
The corner tank may well be built-in, so there are no disadvantages relative to the standard version. But the advantages are more than enough. Firstly, for small bathrooms it will really be the best option, since corners are usually difficult to use correctly, especially if the room is not a regular square or rectangular shape, which can be caused by a ventilation shaft.
Also, do not forget about the value of a corner toilet in terms of design. Installing a toilet in the corner of even a large room will fill an often empty corner. Also, this option will help round out the room, making it less square, but more calm. Using backlight will help to diversify the situation somewhat.
If your apartment has a separate bathroom, a corner toilet may not be of particular value, but in certain cases only it will help to use the space more efficiently.
Another important point is the fact that the design and method of fastening are more stable and can withstand more weight than conventional drain barrels. This will minimize the likelihood of installation errors and will allow you not to be afraid that you might flood your neighbors for similar reasons.
How to move a toilet from a riser: description of the process ↑
Recommendations for transfer in the technical part are very little different from instructions for connecting equipment. The only difference will be the installation process of a longer pipeline connecting the device to the sewer. But the installation of a grinder pump differs in some nuances that are worth considering in more detail. Purchase a device with an inlet pipe diameter that matches the toilet outlet diameter. Otherwise, installation will simply be impossible.
The diameter of the inlet pipe must match the size of the outlet
Proper installation of equipment is carried out according to the manufacturer's instructions. It includes the steps:
- We insert supply pipes or connecting elbows into the pipes.
- We install the pump behind the toilet and securely fasten it to the floor with screws. For this purpose, there are special holes on the device body.
- The pipes leading to the pump must be laid with a slope of 3 cm per meter. This will ensure the flow of wastewater by gravity.
- We connect the outlet sewer pipe to the outlet.
- Models with a separate ventilation outlet require the ventilation duct to be installed above the ridge of the building's roof. It is mounted after connecting the device. There are simpler options that ensure the absence of unpleasant odors using a carbon filter built into the housing.
Models with a built-in carbon filter are easier to install
- We connect the equipment to the network. If the model is equipped with a plug, it is connected to electricity. If not, then it is connected to the network through an RCD machine.
- We connect pipeline elements using welding, soldering or adhesive joints. All arranged bends of inlet and outlet pipe elements should be as smooth as possible.
- The device also drains wastewater in a vertical plane. If necessary, the vertical section of the pipe should be installed no further than 30 cm from the outlet. Otherwise, it will be impossible to ensure normal pressure inside the pipeline.
- We must install a check valve at the outlet pipe of the chopper, which is necessary to prevent the return flow of sewage in the event of an emergency.
We answer the question: how to raise the toilet higher above the floor
When it comes to bathroom renovations, many are faced with the problem of changing the level of the outlet and pipes for connecting plumbing. This mainly happens because the floor level changes and the plumbing is rearranged. In any case, the task arises of raising the toilet higher.
In order to cope with the problem of mismatched fittings, it is enough to purchase new adapters. If you have a problem with the mismatch of the pipeline axes, then it is better to use flexible hoses or arrange new gaskets for the pipes. The coincidence of these holes determines at what level from the floor your toilet will be located.
First you need to choose a place for installation and install the device on wooden beams in order to organize a new level.
Make sure that the horizontal position is maintained and that all axes and the drain pipe are aligned.
After this, remove the fixtures and measure the thickness of the pads that you installed to create a new level for the plumbing.
To replace the toilet lid so that the fasteners match. You will learn how to choose and install it correctly if you read our material:
In order to have an idea of how to make a toilet higher, you must think through all the details of the base in advance. You can use wood, but this will not be the best option, since wood rots under the influence of condensation. It would be best to use a concrete screed. In this case, screws and dowels will be needed for fastening. At the moment, attaching the device to the base with glue is widespread.
Why is this necessary?
There can be quite a few reasons for transfer:
- Changing the layout of the toilet . If the wall is moved, the old location of the toilet may be inconvenient - too close to the wall or, conversely, not optimal in terms of space utilization.
- Replacing the toilet with another one having different overall dimensions . If the old toilet was perfectly placed across the combined bathroom, and the new one can only be positioned along it, obviously, the sewer system will also have to be redone to accommodate it.
- Purchasing new furniture for the bathroom , washing machine, bathtub, and so on.
Regardless of the motivation, the conclusions in all cases are the same: the old toilet should be removed as intact as possible and, after redoing the sewerage system (and, sometimes, the water supply system), it should be reinstalled at another point in the room.
Advice: in general, it is rarely necessary to run a hard cold water supply to the point where the toilet is new. If the toilet is moved within the same room, it is often much easier to buy a long flexible hose.
But it is not advisable to do this. After completion of the repair, communications should be accessible.
The procedure for approval and composition of documents for moving a bathroom in an apartment
In Moscow, approval of redevelopment with the relocation of a toilet is carried out in the following order:
- Development of design documentation as part of a technical report and redevelopment project. (They must be developed by a design company with SRO approval).
- Formation of a set of documents for the housing inspection.
- Submitting documents to the Moscow Housing Inspectorate and obtaining permission for redevelopment.
- Carrying out repairs.
- Formation of a set of documents for delivery of redevelopment (Journal of repair and construction work, acts of hidden work, contract agreements, SRO construction permit, etc.)
- Submission of completed repairs to a commission from the housing inspection.
- Obtaining a certificate of completed redevelopment and/or reconstruction.
- Contact BTI for room measurements.
- Preparation of new technical documents for the apartment.
As we noted above, redevelopment with the relocation of the toilet includes hidden work, namely, work on waterproofing and soundproofing the floor. Upon their completion, reports are drawn up that must be submitted when the premises are inspected by the housing inspector.
The completed work is accepted by the housing inspection commission, which exercises control in the field of redevelopment. Redevelopment is considered to have fully completed the approval procedure only when, based on the results of a visual inspection of the work performed (and on the basis of the submitted acts and documents), the acceptance committee issues a certificate of completion of the redevelopment and/or reconstruction of the apartment.
Certificate of hidden work for floor waterproofing:
Devices for forced waste disposal ↑
It is a system designed to perform when traditional gravity-fed designs fail. To install it, a device called a fecal pump or sololift is used. The equipment is quite compactly located inside the tank or behind it. It is a pump equipped with special chopper blades. It pumps out wastewater, grinds solid contaminants, and sends the resulting mass where it should be.
It is very important that the diameter of the pipe used can be small - from 18 to 40 mm, which makes it possible to easily hide them, for example, behind a plasterboard wall. The power is quite high, which makes it possible to discharge wastewater to a distance of about 100 m horizontally and about 5-7 m vertically. The latter may be relevant if the level at which the bathroom is located is lower than required. Installation is quite simple, without the use of additional construction work.
Compact grinder pump located behind the toilet
The pump has temperature restrictions for waste water. Maximum values vary from +35C to +50C. This information should be found in your passport. It will only be relevant if, in addition to the toilet, a shower, bidet, washbasin, etc. are also connected to the pump. For this purpose, an additional inlet hole is provided on the body. If the requirements for the temperature of the pumped liquid are not met, the device fails. In some models you can find special short-term protection that allows you to pump hot wastewater for about 30 minutes, but this cannot be done constantly.
Types of fecal pumps.
The equipment is very easy to maintain. All that is required of the owner is periodic cleaning. To do this, a special solution is poured along with water to destroy deposits on the walls. It is important to ensure that no organic solvent gets in with the waste water; the substance can corrode the rubber seals. The main disadvantage is considered to be its volatility, which does not allow the mechanism to function during a power outage.
Why move the toilet
- increasing the usable space of the room;
- optimization of the bathroom area;
- implementation of design ideas;
- installation of plumbing equipment for a child.
The main reason for the transfer is to free up useful space in the plumbing room. The owners want to move the toilet so that they can install a washing machine, sink and other convenience items. And simply free space makes the room spacious and comfortable. This is especially true for panel houses, old “Khrushchev” buildings and similar buildings, where the bathroom area is small or combined with a bathroom.
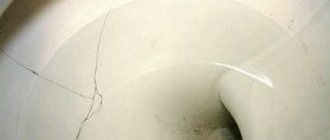
You will also need to move it when installing the toilet directly opposite the door. This is inconvenient for the use of the entire room and is dangerous for the equipment, since the door hits the toilet body. Ultimately, cracks appear on it, which gradually destroy the toilet. In this case, the owners may suffer additional losses.
A popular reason to move a toilet to another place is to implement design ideas. The ideas of famous designers involve moving equipment closer to the wall or to the opposite corner. This makes it possible to free up room space for the designer’s creative thoughts.
Particular attention should be paid to the children's toilet - a full-fledged plumbing equipment, which is characterized by smaller dimensions and smaller volumes of the flush barrel. It is best to move such a toilet to the opposite corner.
Is it possible to move the toilet in the apartment?
Moving a toilet to another location is a redevelopment, since such repairs require changes to the accounting and technical documentation of the BTI - apartment plan.
Like any other redevelopment, moving a toilet is an event that is regulated by current sanitary and construction standards, articles of the Housing Code of the Russian Federation, municipal legislative acts and regulations. If the apartment is located in Moscow, then this is regulated by Moscow Government Decree No. 508, clause 2.2.1. Construction (relocation) of restrooms and bathrooms. Accordingly, it is possible to carry out redevelopment by moving the toilet in the apartment, but subject to compliance with the requirements of current legislation.