How to install a sewer system in a bathroom with your own hands? This question arises when constructing residential premises or performing major renovations in an apartment. Therefore, it will be useful for any home craftsman to become familiar with the nuances that exist when laying a sewer network and direct installation of pipelines.
Undoubtedly, an integral part of the engineering networks of any home is the general sewerage system. Therefore, when carrying out this work, it is necessary to know and follow the installation rules and building codes.
Preparatory work
Before installing sewerage in a room:
- It is necessary to outline a scheme for laying sewer pipes. You can use a marker on the floor or wall to mark their placement locations;
- The brackets that are used to secure them are laid out. For long pipes, fasteners are used that are installed among themselves at a distance of no more than 40 cm;
- at the beginning of work, it is necessary to determine from what material it is planned to install the distribution channels;
- a set of tools is being prepared. You will need a pipe cutter. It will make the work easier;
- the water supply to the bathroom stops;
- old wiring in the room is removed.
Pipes prepared for installation are applied to the place where they are laid. But it is recommended to carry out cutting before joining them, so as not to make a mistake in choosing the length.
After completing these steps, you must begin installing a new sewer line.
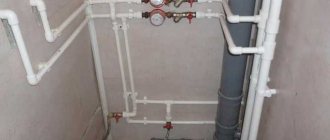
Development of an installation diagram for sewer pipe distribution
A schematic layout of the sewer system in the bathroom is being developed on a piece of paper. The location of all water consumers in the room and the piping to and from them are clearly indicated.
- Design is carried out taking into account the creation of an optimal path. The wiring is the installation of single collector channels. Such a system is capable of managing water flows simultaneously for all consumers. Pipes are connected in series using special tees. This option saves on consumables.
- Connecting points are created in smaller quantities. But such a scheme cannot be implemented if there are a large number of remote consumers in the bathroom. It is difficult to quickly switch the water flow due to the large number of tees. Therefore, a liquid flow switch is installed before the point of consumption.
- If the bathtub is not dismantled, then replacing the drain pipe in the bathtub will be difficult. Therefore, the drainage system is made up of several parts. Tightness is maintained at the joints of elements.
- It is recommended to connect the bathtub via a siphon. A nearby bathtub and washbasin are connected via a tee.
- When creating a sewerage installation project in a bathroom, kitchen, or toilet, it is recommended to provide an additional connection for a new plumbing fixture (for example, a dishwasher). For this purpose, additional riser outlets are installed.
By drawing a sewer laying diagram on a piece of paper and moving towards the main drain, the pipes increase in diameter, which will avoid clogging at the joints.
Purchasing the necessary material and tools
According to the requirements of building codes and regulations, the following types of pipes are allowed to be used for sewerage installations:
- cast iron;
- ceramic;
- asbestos-cement;
- ceramic;
- polyethylene, polypropylene, PVC or plastic.
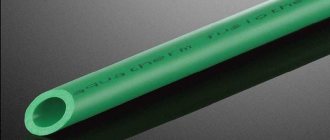
Sewer pipes
Today, in practice, pipes made of polyethylene are most often used (GOST 22689.0-89 and GOST 22689.2-89). The regulated diameter of sewer pipes is 40, 50, 90 and 110 mm; polypropylene pipes, as a rule, have a diameter of 32, 40, 50 or 100 mm. Made from polymer pipes, the DIY bathroom drainage system has excellent resistance to both aggressive environments and corrosion.
Choosing a pipe laying method
Wiring will be done in 3 ways:
- open pipe installation;
- hidden pipes in the wall - closed installation;
- The sewerage system is laid in a combined way.
The open method is characterized by free access to the pipes if it is necessary to repair or maintain the sewer pipe in the bathroom.
Installing pipes inside walls protects them from damage. The interior of the room is not disturbed by the picture of their installation. With this method of wiring, it is necessary to comply with the standards for the maximum thickness of the walls in the room. Therefore, such installation of a piping system is not possible in every bathroom or toilet room. The installation method is labor-intensive and is associated with the problem of removing additional construction waste.
With the combined method, the water supply and sewerage wiring is laid in special boxes or hidden behind finishing material.
Soldering and installation of plastic water pipes
We install the soldering iron, attach the necessary attachments to it and plug it into the network. Let the soldering iron warm up and start working.
The nozzle is assembled from two parts connected using a thread directly on the heater, the “tip” of the soldering iron. On one side, the nozzle has a socket corresponding to the outer diameter of the pipe, on the other, a protrusion (“mandrel”) corresponding to the mounting hole of the fittings.
The soldering iron for polypropylene has a stand on which it is installed
Welding of polypropylene pipes occurs as follows:
We put the fitting on the protrusion and at the same time insert the pipe into the cell. This should be done with little effort, smoothly. We make sure that the plastic melt bead is neat and uniform around its entire circumference.
After a short time (for a 20 mm pipe at room temperature, about 5-8 seconds), when the polypropylene softens under the influence of heat, we pull out both blanks and push the pipe into the fitting. This must be done without delay, so that the joint does not have time to cool, but also not in a hurry. You will have about 4-6 seconds, believe me, this is enough. After sliding the parts in, you need to hold the connection for another 3-4 seconds so that the plastic “sticks.”
Polypropylene soldering process
This must be done carefully, moving the parts as far as possible along the axis. You can wiggle it slightly, but you can't twist it.
Recommend: What to look for when buying stainless pipes
The length of the joint must exactly correspond to the depth of the nozzle, so take the time to mark the place on the risk pipe to which it needs to be pushed (at least at first).
Marks on the fittings and a line on the pipe will help to accurately orient the parts relative to each other in a plane perpendicular to the axis of the pipe.
We begin the work with the installation of → water meters, after which we move directly to the water supply.
It doesn’t matter which area to start soldering first; the main thing is to take accurate measurements before cutting the pipe. In this case, we focus on the installation locations of the devices.
It’s not worth measuring seven times, but a couple of times, yes. And if doubt arises, it’s not a sin to repeat it the third and fourth time.
Important!
When taking measurements, take into account the distance that the pipe will slide into the fitting. This is where the error leads to annoying situations when literally a few millimeters are missing to connect.
If, however, the section turns out to be shorter or longer, do not despair. You can always cut it, throw it away, or add the missing piece, and weld it using couplings. It is not advisable to make unnecessary connections, but sometimes it is necessary.
We cook the system in separate, possibly large sections. They usually end with transition fittings, which we connect to devices or attach to the wall.
There are also cases when it is necessary to solder two relatively large assemblies directly “in place”. In this case, the soldering iron will need to be placed as close as possible to the installation site, and sometimes held suspended.
In the most difficult and problematic places, we make the connection using a fitting with a union nut or, as it is also called, “American”.
Recommendations for laying sewer pipes in the bathroom
Sewage in the bathroom is installed with the calculated length and diameter of PVC pipes and sewer outlets. Bends perform the function of connecting pipes and parts of the sewer system to the plumbing unit.
- PVC products with a diameter of 50 mm for the shower cabin, bathtub, and washbasin are used. An option with a diameter from 32 to 40 mm is allowed.
- Suitable for toilets with a diameter of 110 mm.
- On short pipes it is recommended to avoid side branches. When drawing up a preliminary wiring plan, you must not forget this rule.
- Dirt and fatty deposits accumulate on the outlets. It is recommended to install two bends at 45 degrees, which in total will be a right angle.
- To be able to clean the sewer without much difficulty, it is recommended to lay smooth turns.
- The slope of the pipeline depends on the diameter of the product. Smaller diameter means higher pipe slope. The reason is that with a small slope, the liquid will slowly drain through the pipeline. This leads to the formation of a blockage.
- When the slope is large on a long pipe, another problem appears: solid waste fractions will not have time to be completely washed off. Most often this problem occurs on a product with a diameter of 110 mm. The liquid rolls over the lump of waste. You need a powerful stream of water draining at a certain angle. This will wash away contaminants from the walls of bends, connecting points and corners. Therefore, an unspoken rule is voiced: the larger the sewer pipe from the toilet, the larger in volume it is necessary to choose a flush cistern.
- If the sewer pipe is long and has many turns, a coupling with revision is installed. It is needed to clear sewer blockages.
- To connect siphons of different plumbing fixtures, the inlet hole is located at different heights. For example, for a sink, the recommended height is from 50 to 60 cm from the floor level; ideal for a shower stall when the entrance is on the floor (but a few centimeters above the floor is acceptable); for a bathtub, the entrance hole will be at a height of 5-15 cm from the floor level.
- If the central entrance to the sewerage system is installed high, then to create a standard slope of the main line, a podium is laid out for some plumbing units. This is done for shower cabins and boxes. Their distance from the pallet to the floor may be different. Taking this distance into account, a calculation is made for the correct possible connection at the end point of the shower enclosure.
- To reduce the likelihood of a problem associated with the appearance of an unpleasant sewer odor, it is not recommended to use corrugation to connect plumbing fixtures. The corrugation is susceptible to clogging due to its uneven surface. In addition, the length of the sewer should not be long.
Do not dispose of waste into the sewer system.
Sewage installation
Stage 1. Preparation
If you are not too lazy and draw a diagram of the future sewer system, its installation will not cause any difficulties.
Let's take a closer look at each stage of work:
- You need to calculate and buy the required number of fittings and adapters of different diameters.
- After this, cut the pipes into pieces of the required length. Unless you have extensive experience, it is best to do this before installation. This way you can try them on on the spot.
- Cutting is done using a hacksaw for metal. Before doing this, it is recommended to mark the cut so that the end is even and the angle is 90 degrees. Otherwise, there may be problems with joining individual parts. Carefully clean the edges of the pipe with a knife or sandpaper.
- All pipes must be installed at a slight slope. Sewage waste is removed not through pumps, but under the influence of gravity. It is possible to fix the slope of the pipe using special brackets sold in hardware stores.
Stage 2. Installation of the riser
Replacing the central pipe is the most important stage of the entire work. Before disassembling it, you should make sure whether this is really necessary. In cases where the cast iron riser is well preserved, it is better to leave everything in place.
A pipe with a size of 160 to 220 mm (depending on the diameter of the previously used cast iron drain) is suitable for replacement.
If your apartment is not on the top floor, you should provide additional fastenings. In another case, the plastic may not withstand the weight of the cast-iron riser located above the neighbors.
The replacement scheme is as follows:
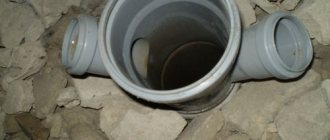
- a tee or cross is mounted in the lower part, secured with a rubber cuff lubricated with sealant;
- to hold the central sewer pipe, clamps supplied in the kit are used;
- do not forget to inspect the mounted riser for cracks and other damage;
- all bells must be directed along the flow of water.
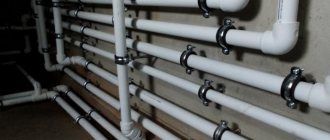
Stage 3. Pipe installation
At the end of the preparatory stage, it is possible to begin specifically assembling the finished system. Installing sewer pipes in a bathroom takes about 2 hours. Designing a complex waste disposal system in a huge private house may “persistently ask” for 2-3 days.
The assembly process does not require special skills or the use of special tools.
Start the work from the riser. After this, installing section by section, the pipes are brought to the plumbing fixtures.
Connections are made without the use of sealants, glue or soldering iron. It is enough just to insert the pipe all the way, avoiding distortions. The sealed rubber band with which the fittings are equipped will prevent leaks.
Note! The seal and pipe must be clean. Only in this case will the connection be reliable and durable. Otherwise, accidents are likely, the damage from which may be much greater than the cost of the entire repair performed.
Violation of the tightness can also lead to the appearance of an unpleasant odor. Therefore, be especially careful during installation. It is also possible to lubricate the rubber parts with soapy water or Vaseline, achieving a tighter connection.
When the entire system is assembled, devices need to be connected to it. Don’t forget that bathtubs and sinks must have siphons.
Stage 4. Testing
Upon completion of the work, be sent to ensure its quality and reliability.
To do this, you need to turn on all devices in the bathroom at full power. It is also possible to collect water in a bucket and quickly pour it into the bathtub, toilet or washbasin.
Only such actions can test the finished system for reliability. Carefully inspect all connections. If a leak is found, the problematic unit will need to be reassembled.
In extreme cases, it is possible to use special plumbing glue. It processes the rubber seal, after which the pipe is inserted into the fitting and left for some time until the composition hardens. Then the testing is repeated again.