DIY installation
Author: jk.335500Jul 25, 2019
Since changing a bathroom faucet is not too difficult, you can do the job yourself if you wish. To remove the old device and install a functioning one, you need to purchase tools in advance, as well as study the main stages of installation.
Faucet in the bathroom.
- 1 Required tools and consumables
- 2 Preparatory stage
- 3 Dismantling the old structure
- 4 Step-by-step instructions for installing the mixer 4.1 Wall mounting
- 4.2 Installation in the bath body
- 4.3 On a separate rack
In what cases is replacement required?
Poor operation of a faucet is not always a reason to replace it.
If water drips or flows in a thin stream from the tap, you just need to replace the filling in it:
- in semi-rotary or lever: ceramic cartridge;
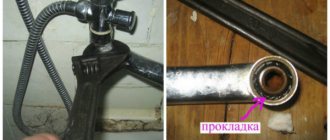
- in classic (valve): gasket.
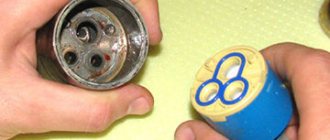
Some joystick faucets have a metal ball with holes instead of a cartridge. In such devices, the cause of leakage is usually wear of the seat—the soft polymer insert adjacent to the ball—by abrasive particles.
If the tap of a classic valve mixer breaks, replace the tap axle (valve head).
Replacement of the entire device is inevitable in the following cases:
- body cracked. This happens with cheap faucets;
- The inside of the body is covered with rust. Happens with cheap faucets or fakes made from corrosion-unresistant material;
- the nut for connecting to the water supply has burst or its thread has been torn off. This is possible due to careless installation or leaning on the mixer.
Which mixer should I buy?
A new device to replace the old one is chosen based on the design of the locking mechanism, material and design.
Locking mechanism type
Classic valve mixers are considered obsolete - they are inconvenient to use, most users change them to:
. They are also equipped with two thumbwheels, but to open completely, you only need to turn the tap 180 degrees. To do this, the tap of the valve analogue has to be turned several times. The locking mechanism of the semi-rotary mixer is a cartridge of two ceramic plates with holes. The pressure depends on how well the holes line up. Semi-rotary faucets are more convenient than classic ones, but have the same main disadvantages: each time you have to adjust the water temperature, which increases its consumption, and manipulation requires two hands;
semi-rotary- lever _ These faucets are most often installed in the bathroom. There is also a ceramic cartridge inside with holes that more or less coincide with the holes in the seat (water flows through them). The mixing of hot and cold flows occurs in a narrow gap inside the cartridge. There is only one control - a horizontal lever (sometimes a vertical joystick). Turning the lever left and right adjusts the temperature, and moving it up and down adjusts the pressure. It is enough to adjust the temperature once, after which the mixer only opens and closes: saving water. You can open the water by lightly tapping the lever with the back of your wrist: convenient if your hands are dirty.
Faucets with ceramic cartridges (lever and half-turn) are sensitive to water quality: solid mechanical impurities destroy the ceramics, leading to leaks. Therefore, their installation is justified only if there are mechanical cleaning filters on the water lines (called a mud filter or an oblique filter).
Due to very dirty water (it clogs quickly), it is advisable to install a classic valve mixer with gaskets - it is not afraid of mechanical pollutants.
Material
High-quality faucets are made from durable and non-corrosive materials - brass or stainless steel. You can distinguish them by their weight - the devices are quite heavy.
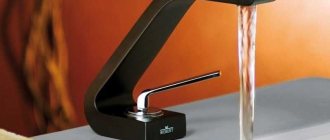
Brass lever mixer
Cheap faucets are made from silumin, an alloy of aluminum and silicon. The material is susceptible to intergranular corrosion, so the device may one day burst, which will lead to flooding. Because of this, it is not recommended to install silumin mixers. You can distinguish them by their weight - they are very light.
Execution
There are three varieties:
- wall- mounted Most in demand. Installed between the washbasin and the bathtub and serves both appliances;
- for mounting on the side of a bathtub or washbasin . They are used if, for example, instead of a bathtub there is a shower stall with its own mixer;
- floor . The mixer is mounted on a stand attached to the floor. They are rarely used and mainly as a designer accessory. They are more expensive than the first two varieties.
Removing the shower mixer
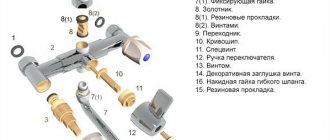
This procedure can also be considered relatively simple and completely doable with your own hands. Shower mixers consist of several basic structural elements:
- metal case coated with galvanic composition;
- a cartridge responsible for the actual water supply;
- holder - a fastening element connecting the faucet body to the facade of the shower cabin;
- handwheels;
- diverter, which is an intermediate element between the tap and the main cartridge.
Before dismantling such a mixer, as in all other cases, first shut off the water supply to the apartment. Next, drain the water from the pipes and disassemble the tap itself:
- remove the decorative plug located at the bottom of the faucet body;
- unscrew the holder screw using a screwdriver;
- remove the faucet handle;
- remove decorative trims from the mixer;
- below, under the mixer, move the plates towards you and put them aside;
- carefully unscrew the fasteners holding the panel;
- on the back panel of the shower cabin, unscrew the nut and remove the faucet along with the sealing collar.
At the next stage, the vacated space is cleaned, dried and treated with silicone sealant. Installation of a new faucet or a repaired old one in a shower stall is carried out as follows:
- insert the cartridge into special grooves;
- fix the device on the cabin wall.
After installing the tap, it must be checked for functionality and absence of leaks.
Tools and materials
To replace the mixer you will need:
- adjustable wrench (sometimes two);
- pliers;
- screwdriver.
The materials needed are:
- masking tape or electrical tape. They wrap the chrome nuts of the mixer so as not to scratch the coating with the key;
- sealing material for threaded connections.
The following materials are used as compacted material:
- tow or plumbing flax together with Unipak paste;
- fluoroplastic sealing material (FUM tape);
- linen thread "Tangit Unilok".
Experienced plumbers use tow or sanitary ware. It is difficult for a beginner to work with them: if there is an excess amount of sealant, the screw-on part (brass or thin-walled) may burst, but if the tow is not applied, the connection will leak and will have to be repacked. The danger is that the outer part (nut) may burst after some time when the seal absorbs water.
FUM tape
FUM tape is more convenient: if there is excess, the excess material will simply be squeezed out, so you can obviously wind a lot of it, but it has disadvantages:
- leaks after repeated expansion and contraction of the pipeline due to temperature changes. Therefore, it is advisable to use FUM tape only on cold water supplies;
- demanding on the quality of the thread: if there is rust or defects, it forms burrs on the threads and the connection leaks.
Flax thread "Tangit Unilok" is easy to work with and at the same time does not have the disadvantages of FUM tape. To select the correct quantity, no experience is required - the thread is simply wound onto the thread in accordance with the instructions given on the package. With a slight overdose, it does not cause damage to the part. The disadvantage is the high cost.
Sealing materials for plumbing threads
To seal the threads when connecting plumbing fixtures, 4 types of seals are used. In this case, the seal will only be required for the eccentric or adapter threads.
Flax and sealing paste
Flax with paste is still popular with plumbers. Sealing paste prevents flax from drying out on hot pipes and rotting in cold water supplies.
Advantages of using flax with paste:
- Lowest cost of consumables.
- Suitable for winding on dirty and wet pipes.
- Suitable for large diameter pipes.
- Possibility to loosen the connection up to 45° without loss of tightness.
Note! When working with flax, care must be taken, especially when winding on plastic and thin-walled fittings.
FUM tape
PTFE tape is suitable for winding thin-walled fasteners, plastic, wet and small threads. The main advantage of using this sealant is the speed and cleanliness of the work. The disadvantages include the increased cost of making the connection, so the use of FUM tape on large-diameter pipes is not economically feasible.
Advice! When choosing a winding, you need to check its elasticity. If the tape stretches, it is of high quality, and the connection will last a long time.
Sealing thread
Advantages of using thread to seal a joint:
- Possibility of adjusting the connection up to 90° for unscrewing.
- Suitable for winding on wet, cold and hot pipes, dirty threads.
- The microfibers included in the threads ensure high tightness of the connection under vibration loads, temperature fluctuations and minor thread movements.
Advice! The thread is considered an ideal option when you need to quickly make a large number of connections.
Anaerobic adhesive sealant
When choosing the type of sealant, you need to take into account the possibility or need to dismantle the equipment. Various types of anaerobic sealant are used for loose and non-unfastened joints.
The advantages include adjustability of the connection, speed of operation, and the fact that there is no need to tighten the thread with a wrench, which is especially convenient in hard-to-reach places. Disadvantages include high cost and the need to degrease fittings.
Important! Anaerobic sealant is used when assembling new systems, as it is suitable for application only to clean threads.
The instructions considered are of a general advisory nature, since when dismantling an old crane, especially a Soviet one, various nuances often arise that cannot be foreseen. And when installing a new faucet, you must follow the manufacturer’s recommendations, since each model may differ from the previous one, even for the same brand.
Advice! If you need bathroom renovation specialists, there is a very convenient service for selecting specialists from PROFI.RU. Just fill out the order details, the experts will respond and you can choose who to collaborate with. Each specialist in the system has a rating, reviews and examples of work, which will help with the choice. Looks like a mini tender. Placing an application is FREE and does not oblige you to anything. Works in almost all cities of Russia.
If you are a master, follow this link, register in the system and be able to accept orders.
Source
Dismantling the old tap
The mixer to be replaced is removed as follows:
- shut off the root valves at the entrance of the water supply to the apartment and open the taps on the mixer to relieve excess pressure;
- cover the bathtub and sink with rags so that accidentally falling parts do not damage the enamel or ceramics. It is important to close the drain holes so that small parts do not fall there;
- Use a wrench to unscrew the mixer nuts from the eccentrics. If it gets stuck due to lime deposits, add brake fluid or kerosene and after 15 minutes. try again. In particularly advanced situations, use WD-40 liquid. This composition effectively softens rust, paint, glue and all kinds of deposits, for which it is popularly nicknamed “liquid key”.
After unscrewing the nuts, the old mixer is placed in a basin so that the small amount of water remaining in it does not leak onto the floor.
How to remove a bathroom faucet
When replacing the mixer, it is important to pay attention between the centers of the eccentrics: it should be 150 mm.
Before starting work, you need to turn off the water. In ordinary city apartments, the corresponding valve is located under the sink or bathtub. In private houses there may be a separate box located in a corner or in another room altogether.
The drain hole in the bathroom must be closed with a stopper to prevent small parts from falling into the drain. You should put a large thick rag on the bottom in case you accidentally drop the tool from your hands.
To unscrew the nuts, use an adjustable wrench or a regular open-end wrench of the appropriate size. If they hold tight, then you will have to make an effort. You may need to spray the structure with liquid key.
It is not recommended to try to unscrew the nuts with sharp jerks. Movements should be strong, but smooth and accurate. If your hands are not strong enough, you can try tapping the key with a hammer.
If the eccentrics have not yet worn out, and the holes of the old and new mixers match, then they can be left.
After dismantling, you need to unscrew the decorative cups (“reflectors”).
Installation of a new mixer (wall and floor models)
When installing a new device, proceed as follows:
- inspect the eccentrics. These are bushings screwed onto pipes, one part of which is slightly offset relative to the other. They allow you to set the center distance to the size of the mixer (usually 15 cm), because it is quite difficult to give such an exact position to the pipes. Eccentrics in good condition are left in place; those in poor condition are replaced. If the mixer has been standing for a long time, it is useful to replace the seal in the pipe-eccentric connections. It could become dilapidated, and then particles of the material will pollute the water;
- if necessary, rotate the eccentrics, moving them to the desired position. Everything is done correctly if the distance between the centers of the eccentric holes exactly corresponds to the center-to-center distance for the mixer connecting pipes, and each eccentric is like a mirror image of the second: under this condition, the mixer is located horizontally;
- if necessary, clean the eccentric threads with a wire brush;
- put decorative washers on the eccentrics (wall-mounted mixer);
- wrap a sealant around the threads of the eccentrics. Taking into account the fact that when screwing on the nut it will be distributed further along the thread, slightly more material is placed on the first turns (winding begins from the end);
- wrap the nuts of the new faucet with electrical tape or masking tape so as not to scratch the shiny surface with the wrench;
- manually screw the nuts onto the eccentrics as long as possible;
- having reached the stop, tighten the nuts with an adjustable wrench, turning them a quarter turn;
- remove the masking tape from the nuts and check the operation of the mixer by opening the root valves.
If there are leaks in the connections, they are tightened or repacked after turning off the water.
How to choose a new faucet
When choosing a new faucet, it is important to consider the material: experts recommend choosing models made of brass or bronze.
When purchasing a bathroom faucet in a store, you need to pay attention to several factors:
- Design. It is not at all necessary to buy exactly the same mixer that you already have. The general design of most models is approximately the same, so if you choose another option, nothing will change significantly. It is only important to pay attention to the fact that the appearance of the device is in harmony with the overall interior design.
- If it was decided to choose a fundamentally different model, then it is very important that the connection points with the water pipes coincide. Before purchasing, you need to measure all the distances, or even better, take a photo or video of the old mixer and its position.
- If the bathtub is small, then the length of the gander matters.
- When purchasing, you need to pay attention to the presence of all parts (gaskets, eccentrics, nuts) in the kit.
- As for the general technical and functional quality of the device, only a specialist can objectively understand this. If it is not possible to consult with him, then you need to pay attention to the country of origin and the cost of the product. An old and familiar rule applies here: the better the quality of the product, the more expensive it is.
Installation on a bathtub or sink
The devices are connected to the water supply via a flexible connection and operate as follows:
- a hole with a diameter corresponding to the size of the mixer is drilled in the side of the bathtub or washbasin. To form such holes, crowns (cylindrical drill) are used, and if such a tool is not at hand, many holes are drilled along the contour with an ordinary drill and then the spaces between them are broken with pliers;
- Place the gasket on the side and install the mixer, threading the connecting pipes into the hole. The device is secured from below with a horseshoe washer and nut (a gasket must be put on first);
- connect the mixer pipes and pipes with a flexible liner. There is no need to seal the connections - the liner nuts already have gaskets. To avoid crushing them, excessive tightening is contraindicated.
If the flexible liner leaks, it is not necessary to completely change it: videos have been published on the Internet with instructions for installing a cracked polymer tube inside the braid. Repair is significantly cheaper than buying a new product.
How to unscrew a faucet with hoses from a sink
These types of faucets are also quite often installed in kitchens or bathroom sinks. Dismantling them is a slightly more complicated procedure than removing faucets simply attached to the pipes from the sink. To remove such a tap, you need:
- turn off the general valves and drain the water from the pipes;
- disconnect the sewer pipes and siphon;
- place a basin or a rag under the sink;
- unscrew the flexible wiring from the hot water and cold water pipes using a plumbing adjustable wrench;
- clean the fittings of the supply pipes from old sealant.
Next, you can begin to unscrew the lower faucet fasteners. This stage in the procedure for dismantling a mixer with hoses can be considered the most difficult. Unwinding in this case is usually performed as follows:
- lubricate the threads of the pins with the nuts screwed onto them with a rust-softening liquid;
- After some time, completely unscrew the nuts.
At the next stage:
- pull the faucet out of the sink as far as possible;
- in the lower part of the mixer body, unscrew the flexible connections from the outlet holes using pliers;
- pull up the entire tap;
- clean the area under the faucet from both the bottom and top of the sink from deposits.
It is better not to throw away the crane dismantled in this way, but to disassemble it for spare parts. Perhaps the parts of the old mixer will be useful in the future. Install a new faucet with hoses or an old one after repair in place simply by performing the steps in reverse order. The threads, of course, are sealed with sealing tape.