In many apartments, a heated towel rail not only serves to dry things, but is also responsible for maintaining the desired microclimate in the room. Over time, it becomes unusable or simply does not suit the owners with its appearance. But in old apartments it happens that it is simply poorly located. Then the question arises: how should a heated towel rail be replaced correctly and is it really possible to do it yourself?
The complexity of the work will depend on many factors. In the simplest case, the services of a locksmith will cost one and a half to two thousand rubles, and the work will not take more than two hours. But if you need to make changes to the hot water supply system, the cost of installing a heated towel rail will increase quite significantly. Even if you doubt your abilities and decide to hire professionals, it will be useful to know how to replace a heated towel rail in the bathroom. This will help control the quality of the work being carried out and avoid future problems, the primary source of which is illiterate installation.
Choosing a new heated towel rail
How to change a heated towel rail in the bathroom with your own hands in the fastest and easiest way? The replacement process will cause the least amount of complications if the new model is not very different from the old one. What should you pay attention to here?
The most important parameter can be considered the distance between the eyeliners. If it matches, then there is no need to modify the water supply system to the device, and this is the most difficult and costly part of the work when replacing a heated towel rail. All manufactured varieties fit into a standard range of sizes between supply pipes: 400, 500, 600, 700 and 800 mm. Having carefully measured the distance between the connections of the old heated towel rail, you can go to the store to buy a new one.
Another important point. There are two types of heated towel rails: the heating element can be in the form of a ladder or a coil. Changing one type to another is problematic: hot water is supplied to the coil from the side, and in the ladder model - from above or below.
The dimensions of the heated towel rail and the mounting location are not decisive. Even a mismatch in the diameter of the supply pipes is easily eliminated with the help of adapters.
USEFUL INFORMATION: Main filter for water purification in an apartment: how to choose a flow filter (video)
Easy replacement
First of all, it's a simple replacement. In this option, the old heated towel rail is immediately replaced with a new one without major work on the common hot water pipe. For this:
- Select a connection diagram depending on the type of new heated towel rail and the location of the outlets to it from the common hot water pipe;
- The hot water riser is turned off;
- The old device is removed;
- From the place of the old connection point, a new water supply is laid according to the diagram to the installation site of the new device;
- Install and connect a new heating device;
- Turn on the hot water supply.
These works are the simplest, although it is important to choose the right connection diagram and correctly route the pipes to the heating device.
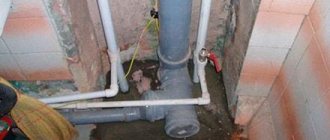
Removing the old heated towel rail
The heated towel rail can be connected to heating or hot water pipes. The second option is preferable - then the bathroom will be warm and dry all year round.
In any case, you will have to contact the housing office or a local service company. Only their plumber can turn off the hot water in the riser. Of course, no one will allow you to turn off the heating in winter. In this case, replacing the heated towel rail in the bathroom is carried out in the summer. But you still need to check whether the water has been drained from the heating system. We open the tap on any radiator, placing a convenient container under it. After checking, you can begin dismantling.
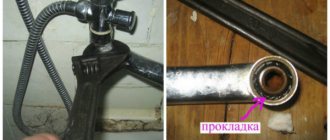
It would be good if the old structure was attached to the pipes using threaded connections. Then you can simply unscrew them after draining the water from the system. But what to do if it is no longer possible to unscrew the thread or the old heated towel rail was simply welded? You will have to cut the pipes with a grinder. It is important not to forget that these pipes will then have to be threaded. To do this, leave a piece of sufficient length.
It is better if the cuts on both pipes of the heated towel rail line are positioned strictly vertically. To do this, first mark the cutting line using a level. The cut itself should be perpendicular to the pipe. Having cut it off, we make small chamfers at the ends at an angle of 45˚, they will be needed for the free entry of the tool when cutting threads.
At least two people need to dismantle it: one works with an angle grinder, and the other supports the heated towel rail. Otherwise, it may fall or jam the disc in the grinder, which can lead to very sad consequences.
After disconnecting from the pipes, dismantle the fastenings and remove the old heated towel rail.
Decorating the installed device
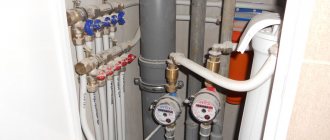
The pipes to the hot water supply can be decorated. You can use different options for this. One of which is the installation of a plasterboard or plastic box where the water supply and the riser itself will be hidden. The installation of the box is carried out taking into account the following features:
- small channels are made at the junction of the box and the floor, which will help to detect a possible leak in time;
- It is better to equip the box with a door, which will be located opposite the locking system.
the presence of a door will allow access to the taps. This is necessary in order to carry out repair work on time. Pipes can also be walled up in the wall; to do this, you need to make indentations using a hammer drill. The grooves are subsequently filled with gypsum mortar, and tiles are laid on top.
Threading and pipe fastening
To connect to the riser, the remaining parts of the pipe must be threaded. It is most convenient to use a lever mounted on a ratchet with a long handle. You must first apply any lubricant to the pipe. It is important to ensure that the leech goes in smoothly.
The thread is cut as follows: half a turn forward – a quarter turn back. There is no need to rush during this operation.
Which pipes are best to use?
- To supply water to the heated towel rail, it is more convenient to use reinforced plastic pipes. It is not necessary to buy a soldering iron for welding; you can borrow it from friends or rent it
- You can use steel pipes, but connecting them will require quite complex welding work. They weigh a lot and are susceptible to corrosion.
- Copper pipes do not rust, but they will have to be connected by soldering, and they cost a lot.
USEFUL INFORMATION: Bathroom design in white colors (24 photos)
Fittings are screwed onto the resulting threads on the pipes. For compaction, use flax tow and Unipak paste. There are recommendations to use waterproof sealants, but then the connection will be permanent.
Installation of polypropylene pipes is simple. To connect them, various fittings, angles and couplings are used. The welding soldering iron comes with instructions that describe in detail the entire process of pipe soldering. There are several important points:
- When soldering plastic pipes, it is strictly forbidden to rotate them.
- It is not recommended to use tow to seal polypropylene pipes.
- The supply line must be installed in such a way as to provide the heated towel rail with a distance of at least 35 mm from the wall. With a coil diameter exceeding 23 mm, the offset increases to 50 mm.
- Tightening plastic fittings should be done with special strap wrenches; using gas ones can lead to damage to the connecting element.
- It is imperative to install a Mayevsky valve into the system to bleed air.
- Shut-off valves on pipes must be reliable.
- During installation, it is better to use “American fittings” (fittings that allow you to connect system elements by tightening a union nut), so that later you can easily disassemble the entire system if necessary.
How to place taps (connection methods)
For lateral and diagonal connections, the outlets should be located at the same level as the heated towel rail inlets or slightly higher/lower. What definitely won’t work is installing a heated towel rail if the outlets are located at a distance less than the distance between the inputs. The photo below is an example of a non-working diagonal connection with closely spaced taps. The option for correcting it (top feed) is indicated in black.
With a side connection, the heated towel rail will only work if the outlets are located slightly above and slightly below its inputs or at least on the same level
When connecting, the taps must be positioned strictly horizontally or slightly at an angle. Slightly at an angle - this is from 2 cm per meter (2%) or maybe a little more. The direction of the slope depends on the connection diagram and which end this outlet will be connected to. To make it a little clearer, let’s look at several typical connection diagrams for heated towel rails.
Universal bottom connection for heated towel rail "ladder"
This circuit works regardless of the direction of hot water supply. Connection type - bottom, both outlets should be located lower than the bottom edge of the dryer. With top feed, an option is acceptable when the edge is located between the bends, but the work may not be so efficient (it may heat up worse).
Universal connection for heated towel rail (bottom)
In this scheme, you can install shut-off valves. For its normal operation you need:
- Mayevsky valves (air vents) installed on the upper outlets to release air accumulated in the upper part. They will need to be periodically opened and vented (as the heat begins to worsen). There is an option - install automatic air vents. They are also compact. This will make it easier to use.
- The bypass is straight and narrowed. The size of the narrowing is a pipe of one step smaller in diameter.
- Bends are made with a pipe of a step smaller in diameter than the main riser.
If this option suits your height, do it. The scheme works in any conditions, with ladder-type heated towel rails of any type.
Possible bottom connection for top supply
When pouring hot water from above, you can make the upper outlet higher than the bottom edge of the dryer. With the bypass displaced and narrowed, it should heat up normally. This method is not the best, but it works.
Working option for top spill of hot water
The presence of air vents and bleeding of air after the system is stopped are mandatory.
Universal side connection
You can connect the pipes from the side to the heated towel rail in any of the standard shapes - U-shaped, snake and ladder. The connection itself does not depend on the form. The standard version comes with a straight, unnarrowed bypass. Bends are either strictly horizontal or with a slight slope. There is a slope in the figure: the end of the upper branch is tilted slightly downwards (2 cm by 1 meter), the lower one is tilted slightly upwards. The diameter of the outlets is not less than the diameter of the heated towel rail.
Lateral universal connection for heated towel rail
This connection diagram is good because there is no need to install air vents on the “ladder” (they install plugs), since the air simply goes into the riser.
With the top supply on the bypass, you can narrow it and/or move the jumper towards the heated towel rail. This will improve circulation and the dryer will heat up better. But once again: such a scheme will only work with top water supply.
When supplying water from above, the bypass can be shifted and made into a pipe with a smaller diameter step
With this scheme, it is also possible to make bends at a slight angle or strictly horizontally.
Possible side connection option (not the best)
A lateral connection scheme with the top outlet located below the top edge of the heated towel rail is acceptable. But with such a connection, Mayevsky taps are needed, through which you will have to bleed the air after turning off the hot water supply for repairs/maintenance. It may also be necessary to periodically remove air during the process.
Not the best, but quite a workable option
Diagonal connection
There is no particular point in the diagonal connection of most heated towel rails: their efficiency is no different from the side one (in any case, there is no significant improvement), but the pipe consumption is greater, longer grooves are required, and this is labor-intensive. Although the scheme is workable.
The diagonal works fine if the water supply comes from above. Then the upper outlet is connected to the far edge of the “ladder”, and the lower one to the near one.
Diagonal connection with top feed
In this case, you can also make a narrowed and offset bypass, but even without this everything should work with a bang. With bottom supply, the bypass is not narrowed, exactly along the riser, connection
Heated towel rails with complex shapes: how to connect
In the case of connecting heated towel rails of complex shape, in addition to the usual means, it is also necessary to take into account the structural features of each specific model. They must be considered from the point of view of hydrodynamics - where water flows best, water is supplied there. For example, the popular model “Elegy” from Sunerge. This is not a ladder or a zig-zag.
A diagonal connection is chosen here, because anything else simply won’t work.
Installation of the Sunerzhi Elegy heated towel rail was chosen from the side, since with any other installation the circulation will be disrupted. There are no options at all.
Another model with a bottom connection and a complex design has three installation options. Provided water is supplied from above, the second one will work best, the first one will work a little worse, and the third one will be the most ineffective.
Bottom connection options with top spill
When feeding from below, options 1 and 3 remain, but only without narrowing the bypasses - it will interfere, not help. We exclude the second option completely.
Installing a bypass on a heated towel rail
This is a kind of jumper that will allow you not to shut off the water in the entire riser if, for example, you notice that the heated towel rail is leaking. Stopping the flow of water to the coil without a bypass can take quite a long time. There is no need to specify at whose expense in this case the flooded apartments will be repaired.
Installing a bypass allows you to quickly shut off the water supply to a damaged heated towel rail without disrupting its general circulation in the house. It is a bypass pipe that is installed at the junction of the coil and the riser, but before the ball valves that regulate the water supply.
It is not recommended to install a faucet on this pipe. It can impair the circulation of water throughout the riser, so a housing office representative may require its removal.
USEFUL INFORMATION: Proper installation of a cast iron bathtub
Attaching a new heated towel rail
Installation of the heated towel rail is carried out as follows:
- The American counterparts are screwed into the purchased heated towel rail. All joints are sealed.
- The coil is applied to the wall, and attachment points are marked.
- Holes are drilled in the wall for attaching brackets, which are usually mounted on dowels.
- The heated towel rail is connected to the riser, after which the fastenings are fixed to the wall. It is recommended to first level the coil. Connections must be tightened carefully so as not to damage the threads. But their insufficient compaction can lead to the system leaking.
- To check the tightness, we fill the coil with water. The taps must be opened smoothly to avoid water hammer.
- If leaks are detected in the pipes, we turn off the shut-off valves and eliminate any deficiencies.
Thus, knowing how to replace a heated towel rail, you can do the work yourself or supervise the work of professionals.
Sequence of actions during installation
The procedure for installing a dryer and the nuances of its operation are different for each type. Manufacturers produce:
- Water models - connection is made to heating and hot water supply pipes. Energy is saved. Installation requires skill and knowledge. It is important to consider the pressure in the pipeline.
- Electrical devices operate autonomously and are independent of the heating season and water supply. Correct operation of the power line will be required. Installed if installation of the dryer is urgently needed, and repairs to the room are not expected in the near future. There are portable electric dryers. The choice of model is made taking into account the area of the room.
- Combined - work in 2 modes. The connection is made from the electricity network and from the hot water supply system. The model is practical, but not affordable for the average buyer. The price for such drying is high.
Removing the old device
The first stage is removing the old device. You may have to deal with a Soviet-era model or dismantle a modern device.
- Removal of the Soviet-era “coil” model. Before installing a heated towel rail in the bathroom yourself, experts recommend replacing the riser. It is carried out either partially in the apartment, or the entire riser is changed. The connection is carried out with the consent of the neighbors on the floor above and below, since this is done in their bathrooms. Then the old pipes hidden in the ceiling will be removed.
- Removal of a modern model. If there are detachable connections, then dismantling will not be difficult. To make attaching the heated towel rail easy, purchase a replacement device with the same dimensions in the centers of the connecting pipes.
The outdated device is dismantled, a new one is attached to the mating parts of the connectors, and the heated towel rail is attached to the wall.
Obtaining permission to replace the riser
Having received permission to carry out work, the liquid supply in the common riser of the entrance is shut off. The Soviet coil is cut out together with the riser pipes. You will need skills in working with an angle grinder. The riser is cut off first in your bathroom, then in your neighbors. Threaded connections are cut into pieces of pipes from neighbors. New pipes are connected and brought into the apartment.