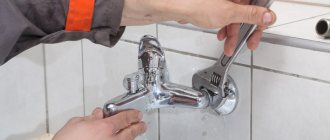
General recommendations
Bathroom plumbing fixtures require periodic inspection. To replace worn out, faulty components, you need to disassemble the faucet in the bathroom, following the algorithm of actions:
- Familiarize yourself with the design and disassembly sequence.
- Prepare your tools and clear the work area of foreign objects.
- Turn off the water supply.
- Open the tap and release any remaining pressure from the system.
- To avoid damage to the decorative coating, use protective covers on the jaws of the keys; wrap nuts and fittings caps with cloth. By placing a thick towel, you will protect the sink and bathtub from accidentally falling parts or the impact of a broken key.
- Before removing the handle, be sure to remove the mounting or locking screw hidden by the plug. Next, you should dismantle the shut-off and control unit. The type of mixer determines the nuances of operations.
- Limit yourself to a sufficient minimum: there is no need to disassemble unnecessary things, try to first establish the cause of the breakdown.
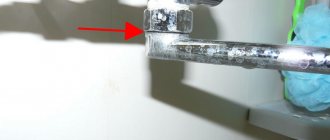
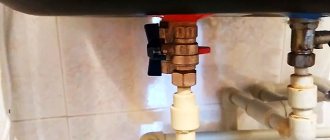
In most cases, it is more convenient to disassemble without removing the faucet. Sometimes it is impossible to unscrew the axle box, the cartridge is in place, then the body is disconnected from the eccentrics supplying water by unscrewing the union nuts.
Hold the housing with your hand or a second wrench by the union nut to compensate for the overturning moment if the head is difficult to unscrew. Otherwise, the tightness of the connections will be broken: eccentric - nut, fitting - body; there is a possibility of breaking off the tap along the thread of the fitting.
General information
The single-handle faucet replaced the outdated “herringbone” and other similar designs. This type of faucet is easy to use and maintain, durable and reliable.
The stylish appearance of the single-handle faucet will transform the interior of the bathroom. Even the most ordinary bathroom will take on an elegant and modern look if you install a single-lever faucet in it.
The water temperature and flow rate in the single-jaw mixer are adjusted using 1 handle. This allows you to create pressure from very weak to very powerful, depending on the case.
Washing and cleaning single lever faucets is easy. This can be done using regular cleaning products and a soft sponge. At the same time, the faucet will always have an elegant and shiny appearance.
Single-handle mixer device
Single-grip cranes also need minor repairs. To repair such a device yourself, you need to know how to disassemble a single-lever mixer, what elements it consists of, etc.
Single grip mixer
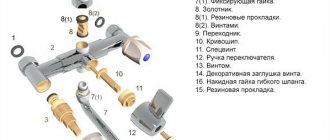
The main components of a single-jaw mixer are:
- control handle (lever);
- spout that regulates the stream;
- frame;
- fastening element;
- ball or cartridge element;
- gaskets made of rubber or silicone;
- circular nut;
- elastic tubes (hoses) for supplying water.
Single Lever Faucet Parts
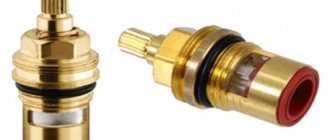
The main difference between single-lever taps of different designs is the mixing chamber. It can be a hollow ball made of stainless steel or a cartridge made of especially durable ceramics.
Through 2 holes, hot and cold water is supplied to the mixing chamber. There is an additional passage for the jet to exit. Water circulation, pressure and temperature adjustment of the stream inside the chamber are carried out using the working handle.
The ball mixing chamber is subject to minor repairs, cleaning, etc. during operation. The ceramic cartridge chamber must be replaced in case of malfunction. Special filters through which water will be supplied from the water supply will help extend the service life of such faucets.
Self-disassembly of single-lever taps is carried out to eliminate such malfunctions as:
- cartridge leakage;
- weak water supply when the ball mixer is turned on at full power;
- Push-button switch malfunction;
- simultaneous supply of water to the shower head and spout.
To eliminate more serious problems, it is better to invite a specialist. The faucet may need to be completely replaced. However, such situations occur infrequently when the device is used correctly.
Required tools, accessories
Mandatory repair kit:
- Open-end wrenches with jaw sizes (S) 12 – 30 mm.
- Set of hex keys. Typically, 3, 10 mm hexagons are needed - for the stopper of the cartridge of a single-lever faucet and the fuses of classic models, respectively.
Open-end and hex keys. - Screwdrivers with a flat, Phillips blade 3 - 4 mm wide for fastening wings.
Screwdrivers and pliers. - Pliers will come in handy to unscrew the handle caps.
- A utility knife for prying off the protective caps of the handles.
An adjustable tool has a slight backlash, so it is easy to crush edges, such as axle boxes, when tightened tightly. Where dimensions allow, tall socket heads can be used to ensure a more uniform application of force. A gas wrench, even number 1, is not recommended. If you don’t calculate the force, you risk crushing thin-walled elements, breaking threads, leaving scuff marks and dents on chrome with powerful jaws.
Foreign fittings are distinguished by a number of S, for example: 15, 16, 18 instead of 14, 17, 19 mm - according to domestic standards. It is not allowed to use keys that do not correspond to the size of the edges, in order to avoid “licking” the latter due to slipping.
Professional equipment:
- Adjustable plumbing (pipe) wrenches, overhead non-metallic jaws for them.
The keys are adjustable. - Tape (tension) samples that carefully clamp chrome-plated parts such as caps.
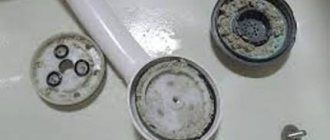
- Special keys: socket keys for securing the cartridge or ball to the threaded ring of products from some companies, plastic ones for replacing the aerator.
Keys for aerators.
Screwdriver and wrench for disassembling the ball mixer.
In problematic cases, the following is required:
- WD-40 or analogues that dissolve rust.
- Electric drill to drill out the screw securing the handle. The drill must be smaller than the bolt diameter by the thread pitch plus a margin for drilling the hole (0.1 - 0.2 mm). When planning to replace the axle box, remove the head with a drill larger than the diameter of the rod.
Drill out the locking screw. - A vice allows you to securely clamp the tap between the boards without damaging the coating.
Don’t forget to prepare soft, clean rags and wear cotton gloves – culture and quality of work begin with the little things.
Types of faucets
It is strictly not recommended to start disassembling any mechanism without first studying its structure. You must understand not only the sequence of dismantling certain parts, but also their purpose, strengths and weaknesses, operating principles, etc. In implementation, there are two fundamentally different types of single-lever mixers.
Table. Types of single lever mixers
| Construction type | Brief description of the device and performance characteristics |
With ball mechanism | Inside the body there is a movable ball with holes. During rotation, the holes with cold and hot water close/open, due to which the proportions and volume of supplied water and, accordingly, the outlet temperature change. Such designs are currently used very rarely due to technological shortcomings. The faucet has many sliding elements; the functionality and service life of the device depend on their tightness. There is an axiom in mechanics that the more parts a mechanism has, the lower its reliability. The explanation is simple - each of these parts can break, and as a result, the mechanism requires repair due to any of them. It is important to know that many types of ball mixers do not have the ability to replace the ball; there is no point in disassembling them; you need to buy a new faucet. |
With cartridge | The most common types of single-lever faucets today. The cartridges are all replaceable and can be easily replaced if they fail. But they also have one problem. Manufacturers are interested in increasing the number of sales of assembled products, rather than spare parts for them, as this greatly increases their profitability. In order to complicate repair work in various ways, very original measures are taken - each faucet model has its own individual cartridge, and they are not interchangeable. There are a huge number of models, they may differ only in the length of the spout or handle, but the cartridges installed are different. Finding exactly the same one is a great success. After a long search, consumers become impatient and purchase a completely new faucet. |
Prices for popular models of single-lever mixers
Single lever mixers
This is pure theory, now we need to get acquainted with practice.
Single lever
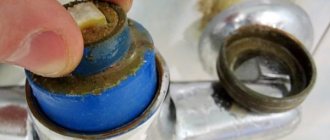
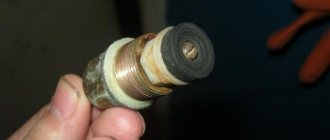
The reliability of a single-lever mixer is mainly determined by the condition of the cartridge. Repair comes down to cleaning, lubricating or installing a new cassette. To remove the cartridge:
- Remove the round plug covering the stopper.
- We loosen the stopper with a hexagon.
We take out the plug and unscrew the stopper. - We remove the lever.
We remove the lever. - We unscrew the decorative chrome-plated ring; threadless fastening is possible with interference due to the rubber seal.
We take out the ring. - Unscrew the nut holding the cartridge. They also produce products with the cassette attached with screws to the bottom of the case.
Unscrew the nut. - We remove the cartridge.
We remove the cartridge.
Tip: Fill the stuck fasteners with Vedashka or kerosene for a couple of hours.
Explanatory video from KOHLER:
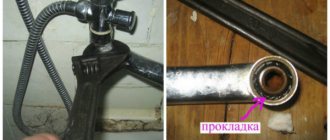
A common problem - leakage at the connection between the spout and the body - can be solved by replacing the O-rings. In most cases, access to them is gained by dismantling the lever, the chrome-plated ring, and then removing the spout upward using a rotational-forward movement.
There are designs for sinks in which the swivel jib is removed downwards, so in sequence:
- Unscrew the nuts on the housing studs (from the bottom of the sink).
Unscrew the nut securing the mixer. - Remove the figured washer and gasket.
- Raise the faucet over the sink and disconnect the supply pipes (sleeves) from the body.
Disconnect the supply hoses. - Remove the swivel spout.
Disconnect the spout.
Masters experience:
How to properly disassemble a disk mixer
If the plates in the faucet sleeve break, it is necessary to disassemble the mixer. To do this you will need the following tools : a screwdriver and a hex key.
Instructions:
- Using a screwdriver, you need to pull out the plugs. They are painted in two colors to indicate the direction of movement of the lever to regulate the water temperature.
- Using a hex wrench, unscrew the screw that connects the joystick and the adjustment rod.
- The handle is removed from the tap. The ceramic and then the clamping nut located on the top plate are unscrewed. If the clamping nut has small indentations, it must be carefully unscrewed so as not to damage the part. In other cases, the nut is unscrewed as usual. The ceramic one can be easily unscrewed by hand.
- The mixer disk is removed . The cartridge in the mixer needs to be replaced if it begins to leak or fails for other reasons.
- The new cartridge is installed in its original place. The nut holding the disk is tightened, then the lever is put on, the screw is mounted and finally the plugs are put on.
Tip: before buying a new cartridge for the mixer, you need to take with you the old disk that has already failed. The thing is that cartridges can have different hole diameters (3 or 4 cm) and clamps on the bottom plate of the cartridge. Therefore, there is a risk of purchasing a larger or smaller disk. Also, when choosing a new cartridge, you need to pay attention to the disk with a silicone gasket, since it is less susceptible to water.
Half-turn
The evolution of the two-valve design ended with the modernization of the shut-off and control mechanism. Instead of a valve with a rubber gasket, a half-turn ceramic disc valve was installed in the axle box. A modern shower distributor is made with a similar head.
The process of disassembling a half-turn valve is as follows:
- We unscrew the cap (some are plastic, with latches) on the lamb with your hand or pliers.
Remove the decorative plug. - Unscrew the screw securing the handle to the rod.
Unscrew the screw securing the wing. - We tighten the handle.
We tighten the handle. - Unscrew the decorative cap.
Unscrew the decorative cap. - Unscrew the head using the appropriate key.
We unscrew the head. - We remove the crane axle box.
We remove the crane axle box.
Video instruction:
Recommendations for care and use
In order for the crane to last longer, you must follow the rules for operation, care and maintenance:
- Repair immediately as soon as a malfunction is noticed.
- When disassembling the tap, parts must be cleaned of dirt.
- It is recommended to replace the rubber gasket with a silicone one, as it has better performance.
- Opening and closing valves during everyday use should be done carefully and smoothly.
- When unscrewing chrome elements, it is necessary to place a rag, masking tape or electrical tape between the wrench and the mixer body to prevent scratches on the surface.
The two-valve mixer has been used since Soviet times and is characterized by its simple design and maintainability. If you have the tools and detailed instructions, disassembling such a mixer will not be difficult.
Two-valve
Over time, any faucet begins to drip, no matter how hard you tighten the screw. The probable cause is wear of the valve (piston) gasket; you will have to unscrew the head for inspection. The operation is simple:
The device of a two-valve mixer.
- Remove the decorative cap of the lamb.
Remove the lamb plug. - Unscrew the screw securing the wing.
Unscrew the thumbscrew. - We remove the lamb.
We remove the lamb. - We unscrew the decorative cap, sometimes it has a hex key, sometimes it can be unscrewed by hand.
Unscrew the cap. - Unscrew and remove the valve axle.
We unscrew the head.
To disconnect the spout, unscrew the union nut, then pull it out of the body in which it is held by rubber rings. Old-style round jibs have seals directly in the grooves of the tube. For modern flat ones - on the transition fitting.
When water does not stop dripping from the shower head, check the ball switch. In addition to the gander, be sure to disconnect the upper shower outlet. Then:
- We remove the switch handle in the same way as the wing heads.
- We unscrew the central fitting through which the rod passes.
- Using a hex wrench, completely release the upper and lower fittings, in the fluoroplastic (ceramic) saddles of which the ball rotates. When assembling, to avoid jamming, screw them alternately with the same number of threads, adjusting the freedom of rotation with a clamp.
- A loose knot allows water to pass through, preferably a slight tension that allows the handle to be turned with your fingers.
- We take out the rod with the ball.
Practical tips:
Repair of a single lever faucet with swivel spout
Faucets with a swivel spout are installed on sinks in the kitchen or bathroom. Periodically it starts leaking from under it. In this case, the locking mechanism is not to blame; it’s just that the gaskets have lost their elasticity or the lubricant has dried out.
Repair of a single-lever mixer with a movable spout
In this case, disassemble the mixer as described above, then remove it by pulling the spout up. Remove all old gaskets. If they are stuck, you can use a flathead screwdriver or even a knife blade. You have to remove them, but they are still replaceable. Use the removed gaskets to select new ones. It is advisable that they be made of silicone, not rubber. Silicone is more elastic, retains its properties longer, and tolerates contact with water better.
Lubricate the new gaskets with plumbing silicone grease and install them in place. Reinstall the spout. It must be pressed down well so that it rests against the union nut on the mixer body. Next is the assembly of the rest of the mechanism.
Ball
A very repairable type of fittings. Rubber spring-loaded seats, springs, a cuff, and less often a ball must be replaced. Elementary disassembly:
- We remove the plug.
Remove the plug. - Let's release the stopper.
Let's release the stopper. - We remove the lever.
We remove the handle. - We unscrew the clamping ring with a special key or pliers.
Unscrew the ring. - Unscrew the cap.
Unscrew the cap. - We take out the leash, cuff, ball.
We take out the ball. - Use a screwdriver to remove the seats with springs.
We remove the saddles with springs. - By pulling up, we disconnect the gander; if there are no leaks at the connection when turning, the operation is unnecessary.
Visual aid from Canadian experts:
Shower switches
The outdated ball design is being replaced by piston (spool) switches: eccentric and push-button. The first ones are located in the central bore of the housing or in a separately attached diverter. The latter are typical for single-lever options and are located on the spout.
The plunger is removed from the central bore as follows:
- We disconnect the gander and remove the handle in the same way as a ball switch.
- Unscrew the rod fitting. We take it out together with the eccentric rod.
- Using a small hexagon, we remove the piston down.
Let's look at disassembling the push-button option using Grohe as an example:
Sequence of operations:
- Disconnect the shower hose.
- Use a screwdriver to keep the valve from rotating.
- Unscrew the button cap.
- Use a hexagon to unscrew the assembled mechanism.
KOHLER diverter replacement process:
Main causes of failure
The main cause of failure is physical wear of the sealing gaskets and rings. Because of this, they cease to perform their function. A leak forms in the connecting nodes of individual elements: in the place where the gander and shower hose are attached to the mixer body, from under the valves.
DIY Tools
To perform the repair you will need:
- wrenches or universal adjustable wrench;
- hex wrench;
- pliers;
- components to replace failed ones;
- flat and Phillips screwdrivers;
- FUM tape or linen winding.
A hex wrench may be needed.