A bidet is a small, low sink that is installed in the bathroom, not far from the toilet.
Sometimes you can find a bidet as an integral part of a toilet or washbasin. This article provides information on how to install a bidet, as well as detailed instructions for use. This sanitary device is designed to clean the skin after visiting the toilet by washing. In addition, the bidet can be used to wash feet or other parts of the body. Bidets are often convenient to use for people with disabilities, the elderly, people with injuries, and children.
Bidet: how to make the right choice?
Bidet in combination with other sanitary ware
It is highly advisable to buy a bidet together with the rest of the plumbing composition - a bathtub and/or shower, toilet and washbasin. This will create an optimal layout and ensure harmony in the interior.
The bidet is not a new invention, it is relatively inexpensive, and its benefits are more than obvious. However, this segment of plumbing products is not in high demand in the domestic market. This is all due to the modest size of the bathrooms, which for some reason are not given due attention by housing architects. In addition, many are quite rightly afraid of major renovations, and they are in no hurry to sacrifice the last free space in the bathroom for the sake of illusory comfort.
Bidet in separate and adjacent bathrooms in the photo
Meanwhile, it would be a stretch to call the installation of a bidet a major undertaking. As for small bathrooms, typical of multi-apartment residential buildings, more compact wall-hung models are much better suited for such cases than classic floor-mounted ones.
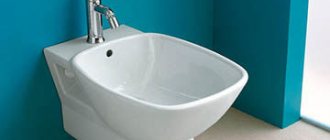
Hanging bidet
Structurally, a bidet resembles a small bathtub or low sink. This equipment is produced in three main modifications - with vertical, horizontal and oblique water discharge. Sometimes there are combined options - toilets equipped with a faucet with a retractable hose.
Combination bidet
When choosing a bidet, you need to take into account the position of the sewer pipe - it should match the one in your apartment and ensure the most comfortable placement of the equipment. Special attention should be paid to the mixer. Single-lever tap solutions are suitable for indoor water supply systems with a boiler. When supplying water from the city water supply, you will need a pair of separate taps - for hot and cold water.
Bidet with hot and cold water taps
By the way, about taps: they can be located in the same way as on a washbasin, or they can work like a fountain.
Bidet with floating faucet
Updraft Features
Tension bidets, which have an upward flow, called a “fountain,” have a more complex design. The main components are assembled at the factory. Since everything is already assembled, installation will not require much effort. You will need to secure the water supply tap, make a connection to the water supply and drain pipe, and attach the device to the floor.
One of the interesting parts of the bidet is the lid. It is heated by circulating hot water. If you need to use a bidet, just open the tap and warm water flows directly from the lid into the fountain.
Preparatory work
If you manage to find a model with satisfactory characteristics and a design that matches the interior of your bathroom, all that remains is to buy it and arrange delivery to your home. In the meantime, you need to prepare your workspace and resources.
To install a bidet yourself, you will need the following tool:
- drill with hammer function;
- concrete drills;
- adjustable or gas wrench;
- set of wrenches;
- Screwdriver Set.
Tool for installing a bidet
A bidet is a plumbing equipment, so for its installation and connection you need the following materials:
- silicone sealant;
- mounting tape;
- waterproofing tow.
Tow and plumbing sealant
Before starting work, you should carefully read the instructions that the manufacturer provided with the bidet you purchased. Violations of installation technology and operating conditions are not allowed - this will lead to premature failure of the equipment, as well as damage from water leaks and damage to the interior of the bathroom.
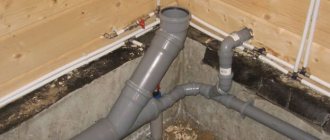
The bidet is connected to the water supply and sewerage system. To do this, it is necessary to make a tie-in in the pipelines of both systems in the place designated for installation of equipment.
The next step is fitting, which consists of the following:
- Installing the bidet bowl into the position in which it will subsequently be fixed.
- Checking the length and correct location of hoses, pipes and connection points.
- Adjustment of equipment location in accordance with actual installation and operating conditions.
- Marking mounting points.
Options for placing bidets in bathrooms of various layouts in the photo
If you are going to install a wall-mounted bidet, you need to take care of the installation. This is the supporting frame on which, in fact, the equipment rests. It is advisable to install the structure in a niche - this will save useful space in the bathroom. The frame is attached to both the wall and the floor. The mixer and control devices are mounted on it, after which it is covered with plasterboard.
Hanging bowls
The lid device is a bidet.
Installing a hanging bidet has certain difficulties, this is directly related to installation. Installation requires a niche, which is not always possible to create in the toilet due to the small size of the room.
The main frame, together with the mixer and control devices, is fixed in two places. It is simultaneously screwed to the floor and mounting points in the wall. Then it is covered with plasterboard. From the outside you will see:
- water supply tap;
- sewer pipes;
- water pipes;
- control buttons.
The bidet bowl is secured with long pins.
The bidet is mounted directly above the floor surface.
When installing this bidet yourself, you need to understand well that ease of installation is a deceptive phenomenon. The product is considered to be a rather complex design. It consists of many connections that must be completely sealed. Assembly reliability comes first. This nuance is considered the main principle of assembling a bidet. This mainly applies to any plumbing product.
Mixer assembly
The mixers that are equipped with bidets are designed not only for mixing hot and cold water, but also for aerating it, as well as adjusting the pressure and direction of the stream. Simple models have one elbow and are equipped with two valve heads. Some models are equipped with a divider, which is mounted at the bottom of the bowl. Hot water heats the porcelain, which makes these bidets more comfortable to use.
Single lever bidet mixer
The optimal material for making a faucet is brass, which, for practical and aesthetic reasons, is nickel-plated, chrome-plated or painted with special enamel. The sealing material in high-quality models is ceramic, while in budget models it is plastic. Stainless steel is ideal for the manufacture of ball regulators and fasteners.
The mixer is equipped with flexible hoses, tubes and other elements with which the bidet is connected to the water supply. The system must be assembled in accordance with the manufacturer's instructions. However, do not overtighten the connections, as this may damage the gaskets.
Bidet mixer parameters
The mixer is inserted into the hole in the bidet bowl and secured with pins. Rubber gaskets are installed under the nuts, and if the bidet is mounted, a metal profile stand is mounted between the porcelain surface of the bowl and the wall.
Installation of a double-lever bidet mixer
It is advisable to treat all mixer connections with sealant. When tightening threaded connections, it is important to check the alignment. Otherwise, the mixer will hang crookedly and irritate you not only with its appearance, but also with the stream of water that does not get where it should be. In most cases, when installing a mixer on a wall-mounted bidet, you need to make a hole in the wall. This should be done before the main installation work and strictly according to the ruler.
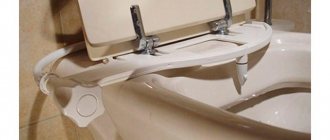
Hygienic shower for the toilet instead of a bidet
Many people would probably not refuse to have a bidet - a device for hygiene of intimate areas. But, unfortunately, not everyone can boast of a spacious bathroom that can easily accommodate this piece of plumbing. I hasten to please the owners of small toilets - there is an alternative! And you won’t need any extra space for this.
Instead of a bidet, you can successfully use a hygienic shower for the toilet. “What kind of hygienic shower is this?” - many people are probably thinking now.
I would not be surprised if most of you have not heard anything about a hygienic shower and do not know what it is and how it is used.
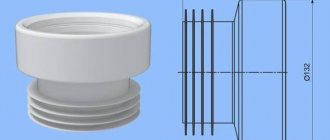
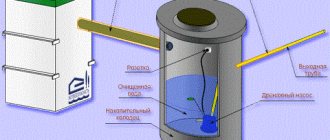
Siphon installation
The siphon serves to regulate the drainage of used water, but in addition it functions as a non-return pneumatic valve, thanks to which the smell from the sewer does not penetrate into the atmosphere of the room.
The main difference between a bidet siphon is the elongated drain tube. When purchasing this element, it is important to make sure that the threads of its head coincide with the threads of the mixer bottom valve. You also need the size of the siphon and its type - bottle or tubular.
It should be remembered that high-quality siphons for bidets are made from the same chrome-plated or nickel-plated brass or, at worst, high-strength polypropylene foam. There are models that can be cleaned when clogged without removing the entire structure. As for installation, it can be done openly, semi-openly, or hide the siphon in the technical space of the bidet bowl - the choice depends on the type of the latter, the method of its installation and the interior design of the bathroom.
Installation of a bidet mixer
After unscrewing the nut of the mixer bottom valve, treat its threads and the threads of the siphon head with sealant. Remember to do the same with all other connections if they are threaded. In a simple siphon there are at least two of them - they frame the bend. During assembly, all gaskets should be carefully installed, after which the siphon head nut is tightened, and the direction of the drain pipe is adjusted so that it fits into the sewer drain pipe as accurately as possible.
If you are installing a wall-mounted bidet, the siphon must be fixed to the installation. In the case of a floor-standing model, this element can be additionally fixed using sealant in the technical space of the bidet bowl.
Installation for a wall-mounted bidet
In some models of bidet siphons, instead of a drain tube that connects to the outlet pipe of the elbow, a corrugation is used. This option is not practical, since the latter tends to become clogged and sag.
Bidet drain
When using a bidet, water often gets on the floor. Therefore, it is very advisable to install a drain in the floor, similar to what is done in public showers.
There is a considerable amount of work to be done:
- The floor is knocked down to a concrete base.
- Waterproofing is laid on the base.
- A drain is installed and connected to the sewer - a drain funnel with a siphon.
- Sheets of extruded polystyrene foam are laid on the floor. The ladder and the pipe extending from it are lined with them, for which grooves need to be cut in the foam.
- A film is laid over the foam, and then a screed of such thickness is laid so that the drain is poured along the lower edge of the flange.
- The floor is covered with roofing felt. A hole is cut in it with a diameter corresponding to the internal diameter of the drain, so that the flange is covered (holes must be cut for the screws).
The upper part of the ladder is installed, after which the screed is laid with a slope and the tiles are laid.
If you have used a hygienic shower at least once, you have already appreciated its benefits. A hygienic shower head can have a different design.
Options for installing infrared heated floors under tiles are described in this publication.
Installation and connection of the bidet
After you have assembled the mixer and siphon, the bidet needs to be tried on at the installation site again. This time, with a pencil, you should mark the points of the bolted connections (if the bidet is floor-standing) or the points in the drywall for the holes into which the mounting pins will be threaded (if your model is wall-mounted).
Installation of a wall-mounted bidet on an installation
Some bidets are equipped with an ascending water flow function. It works according to the following principle:
- a stream of water enters the rim of the bidet seat, heating it;
- under the influence of the regulating mechanism, the water will rise upward like a fountain;
- The used water is poured onto the supply hole, which is equipped with a special bypass to ensure that the mixer supplies clean water.
The bidet adjustment mechanism is connected after the mixer and siphon before the main installation work begins.
If you have a floor-standing model, do not rush to tighten the mounting bolts. First you need to connect the system to the water supply and sewerage system. This is done using threaded connections and fittings with sealing gaskets.
Connecting the bidet to the water supply
After connecting, the system must be checked for leaks - in order to prevent them, the connection of the mixer pipes should be treated with tow and sealant.
In the case of a wall-mounted bidet, the situation is somewhat more complicated. Final installation before checking the system does not make sense, so it is advisable to cover the installation with plasterboard after connecting to utilities.
Connecting the bidet to the sewer
If you followed the manufacturer's instructions and used practicality and common sense when assembling and connecting the bidet, the process should go without a hitch. As a result, your bathroom will have another very useful device, with which personal hygiene procedures will gain additional comfort.
Which hygienic shower to choose
There is a huge selection of hygienic toilet showers that can be used instead of a bidet. They differ in designs, manufacturers, and equipment. Accordingly, the spread in their price levels is very large. But you can always find something to suit your wallet. You can get by with a very inexpensive kit. I will now share my experience, which path we took and what we chose as a result.
We started choosing from a hygienic shower head , since it is the key element of this sanitary design, and all ease of use depends on it. As I already wrote, all these watering cans are equipped with special buttons that need to be pressed and held with your finger. It seemed to us that this might not be very convenient, but we found a watering can in which this button has the ability to be fixed .
The sequence of actions is as follows:
- fix the button on the watering can
- open the water in the mixer
- do hygiene procedures
- turn off the water in the mixer
- remove the clamp from the watering can
- insert the watering can into the holder
In this short video I show how I do it.
It’s very convenient - you don’t need to hold the button with your finger while taking hygiene procedures.
If it is useful to anyone, the name of the company that produces such hygienic watering cans with a lock is Gro welle, model APF 932. We bought it for 490 rubles. The kit includes the watering can itself and a holder for it. The watering can provides a standard hose mount.
Since we bought the watering can separately, we also had to buy the mixer . We had the following requirements:
- faucet for shower only (that is, without spout);
- so that it is of high quality;
- with cartridge;
- so that the handle with which the water is regulated is located in a horizontal plane when closed (with our design this is more convenient).
As a result, the choice fell on the German Wasserkraft Oder 6302 mixer for 3,000 rubles. We simply connected our hygienic shower head to the hose of this mixer instead of a standard watering can.
This is the set we got. Everything has been tested, is convenient and works properly. That’s why I decided to share my own experience in such detail. You can also go the other way. Firstly, if desired, the components can be purchased either cheaper or more expensive. And, secondly, you can buy everything at once in one set.
Well, now you know that if there is no place for a bidet in the toilet, it’s not a problem at all! A hygienic toilet shower can perfectly replace it! Using a shower instead of a bidet is no worse, and in some ways even better!
I'd love to hear your feedback on the idea of using a toilet shower instead of a bidet. Have you already encountered such a device, what can you say about it? Did you like this idea? I'm waiting for your comments!
Previously, I already introduced you to my own experience of how we updated our kitchen set at minimal cost . Perhaps this experience will be useful to you too. Read here.
You can find other interesting ideas, useful tips and recipes for the whole family on the site map.
Author of the blog “Note to the Family” Ksenia Druzhkova
Photo gallery
Combined with toilet
If the size of the bathroom does not allow you to connect a hygienic device, you can buy a toilet combined with a shower, or purchase a bidet lid.
A special nozzle is built into the side of the shower toilet, and an electronically controlled device is installed into the tank.
Related article: Choosing wood siding: what is a block house
The nozzle extends when necessary without touching the walls of the bowl. It also cleans itself before starting work and afterward under water pressure for a few seconds. Water is supplied using buttons mounted on the outside of the bowl. It is very rare to supply water using pedals.
The functions of a bidet toilet are the same as those of a regular bidet: blowing, heating.
If you do not plan to replace the toilet, install a bidet cover. It is the easiest to install. It is enough to connect it to the water supply and electricity, and then attach it to the toilet, like a regular lid, according to the instructions.
When the siphon and mixer are assembled, the bidet itself is connected.
It is installed in the same way as a regular toilet. The plumbing fixture is placed in the required location, markings are made, holes are drilled with a drill, then bolted. Finally, water supply and sewerage are connected.