Installing a bathtub is an important and responsible task, especially if you live in an apartment building. Improper installation of plumbing will inevitably lead to flooding of neighbors living on the floor below, and, as a result, to scandals and showdowns. And if the neighbors demand compensation for damage, then there will also be financial losses on your part.
Therefore, if you want everything to go without a hitch, it is better to contact a specialist who will do everything as it should be.
But if you still decide to install the bathtub yourself, then first arm yourself with theory (for example, by reading our article), and then put your plans into practice. This will allow you to avoid many installation mistakes.
Selection of plumbing fixtures and fittings
A bathtub is a multifunctional product that can be used for washing, laundry and other needs that require the use of large amounts of water. The container is made of durable materials, a large mass of liquid and an adult. The connections of the fittings are sealed to prevent the possibility of leaks. Modern devices often have hydromassage, etc.
Acrylic bath.
Steel bath.
Cast iron bath.
It is recommended to choose bathroom fixtures based on the type of material. Each of them has its own advantages and disadvantages. Today they produce 3 types of bathtubs:
- Cast iron. Traditional products made from an alloy of carbon and iron coated with enamel. Strong and durable, they come in both standard versions (rectangular, 1.7 x 0.7 m in size) and decorative ones, with an unusually shaped bowl and beautiful “antique” legs, as well as sessile or enlarged (2 m long). The main disadvantage is the heavy weight (120-150 kg).
- Steel. They are characterized by lower weight (up to 50 kg) and wall thickness and, as a result, insufficient noise insulation when drawing water and taking a shower. Such baths retain heat less well, and the water in them cools quickly. It is better to install a steel container on a monolithic base so that the bottom does not deform.
- Acrylic. the material includes the advantages of both metal types: it does not make noise when water falls on the surface, it is light and durable, and retains heat well. Acrylic bathtubs are cast in the form of large-capacity corner bowls and in standard versions. The disadvantage of acrylic compared to metal is its low mechanical strength. If handled carelessly or used by people with heavy weight, the walls may crack and leak. But a lightweight container is easy to replace, and its cost is low (depending on complexity and configuration).
Preparing the premises for the upcoming installation
If the plumbing is replaced without repairing or removing the tiles, after dismantling the old bathtub, all that remains is to sweep out the debris and inspect the floor for defects. If the legs of a new bathtub get into potholes, it will wobble. Before installation, all irregularities must be removed, damaged tiles replaced, etc.
Before installing the bathtub, you need to prepare the room.
When to cover walls
If the bathtub is being installed at the time of renovation, then it is better to remove the old tiles and replace them with new ones.
When replacing a bathtub coincides with a major renovation, most often both the floor and wall coverings are replaced. In this case, the best option would be to install the cladding after installing and fixing the container. This will allow you to properly seal the gaps between the wall and the edge of the bowl.
If the tile is already in place and its dismantling is not planned, you can carefully remove the bottom row of elements to seal the joint between the wall and the bathtub, and then restore the coating. In a large room, where the bowl is installed in the center of the room, the sequence of work can be arbitrary.
How to prepare the floor
When replacing a screed or constructing a podium for a plumbing product, it is recommended to level the base. The bottom of the bathtub is already made with the necessary slope, so there is no need to tilt it towards the drain yourself.
The bathtub is installed on a finished base.
When installed on a tiled floor without a screen and podium (on decorative legs), all work on finishing the base must be completed before purchasing the bathtub. The container is installed on the finished coating and connected to communications.
When constructing a podium, screen or other base made of brick or concrete, first install and fasten the bathtub, connect it to communications, and then line it with ceramic tiles.
How to install a bathtub with your own hands (step-by-step instructions)
Let's look at the installation process.
DIY installation
To install an acrylic bathtub, you will need to follow these steps.
- install legs or support frame;
- attach guides for the legs to the product (this is done using self-tapping screws, which are usually included in the kit);
- bring it to the installation site, turn it on its side and install the drain pipes;
- install on legs or frame;
- fill the space between the product and the wall with sealant.
Instead of sealant, you can use a flexible waterproof baseboard. It is placed on the edge of the bath. However, this is only possible if the thickness of the product allows.
It is important to move the bathtub close to the wall. If this is not done, it may wobble slightly. This is critical for acrylic - the material is quite fragile, cracks or chips may appear.
The space under the bathtub is also filled with sealant. This is necessary to solve two problems.
- Compensation for bathtub deflection. Products made from acrylic have a certain elasticity and can bend under the influence of heavy weight. Such deflection can lead to a violation of the integrity of the structure (for example, the appearance of cracks). In this case, the sealant acts as a kind of shock absorber.
- Prevent leakage. If a leak occurs at the junction of the drain with the bathtub or if a crack appears, a layer of sealant will retain most of the water.
Due to the light weight of acrylic bathtubs, all manipulations can be done alone.
DIY cast iron bathtub installation
In general, the installation procedure for a cast iron bathtub is no different from the installation process for an acrylic one. However, there are some nuances.
- When installing a drain, it is better not to place a cast iron product on its side. Firstly, due to its weight, it can damage tiles, floors, and other plumbing equipment. Secondly, it is physically difficult. To connect the drain, the container can be raised and fixed by installing wooden supports under it.
- A bathtub made of cast iron must be very firmly fixed. There should not be even a hint of swaying or any other movement anywhere. Otherwise, it may slide off its legs or tip over under the influence of the mass of water placed in it and its own weight. Due to the large mass of the cast-iron bathtub, such an emergency will most likely lead to damage to the lining, drain and water pipes, and other plumbing fixtures.
The legs must be held securely. For installation it is best to use bolts. Some models allow installation on legs without bolting. But you shouldn't do that. This design is less reliable. Therefore, it is better to screw the legs to the body.
DIY steel bath installation
Installing a bathtub made of steel is no fundamentally different from installing an acrylic one. The only difference in fastening the legs is that it is carried out not with the help of screws, but with the help of studs, bolts, or wedges. When assembling, they need to be tightened evenly and do not immediately screw in all the way. You also need to remember that you may need to finely adjust the bolts to get the stop exactly on the leg.
Features of installing a plastic bath
Plastic bathtubs are as close in characteristics as acrylic bathtubs, but have less strength and bend more. Therefore, a layer of sealant under them will not be enough - something more reliable is needed. Use as support:
- wooden support;
- construction made of cement mixture;
- brickwork;
- foam block.
It is installed along the entire length of the bottom or in two or three places that will experience particularly intense loads during operation.
Otherwise, the installation procedure does not differ from that for acrylic products.
plastic bath
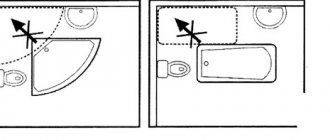
The nuances of installing a corner bath
In general, the installation of a corner bath is similar to the installation of a rectangular one. However, during work you need to remember some nuances.
- The walls at the installation site must form a right angle of 90 degrees. Otherwise, it will not be possible to install the bath evenly and one of its walls will come off. A right angle is achieved by applying a layer of plaster.
- You need to take a more careful approach to leveling the floor. Corner bathtubs have only three corners, so even a slight tilt in even one direction will result in water spilling out or splashing.
corner bath
Detailed Installation Guide
Depending on the type of bathtub and the material used to make it, the installation and fastening methods differ slightly. Installation on a podium is suitable for any type of bowl, and other methods for fixing the container are relatively individual.
Installation of an acrylic bathtub
For this type of product, there are 2 installation methods: on standard supports included in the delivery set or using reinforced fastening.
Installing an acrylic bathtub on a frame.
Step-by-step instructions will help you correctly assemble the bathtub base:
- Unpack the container and turn it upside down. To protect the front side from scratches, you should first lay cardboard or a blanket on the floor. Disassemble and arrange the parts.
- Insert plastic plugs into the ends of the legs. Screw the pins (for height adjustment) into the holes at the other end of each leg. Place 2 locknuts on the stud.
- Attach the prepared supports to the frame profiles. On the underside of each part there are standard holes for assembly. After this, place the pre-screwed locknuts in their extreme positions: one close to the horizontal profile, the other to the adjusting part of the legs.
- Screw the profiles with installed legs to the stiffening ribs on the bottom using standard self-tapping screws.
- Assembling the second profile involves installing 1 adjusting leg. A long pin is placed on the other end of the part, and supports with plugs are attached to both sides. During installation, one of them will rest against the underside of the side of the bathtub.
- After attaching the legs to the bathtub, you need to check the location of all plugs with a building level: they must be installed in the same plane and not dangle.
- Turn the bathtub over and place it in the chosen place. If it is uneven or sways, then you should unscrew the lock nut near the support, level the bowl by unscrewing the pin, and secure it again.
When using acrylic bathtubs, the body may crunch. It occurs when the load on the part located between the stiffeners and legs increases. This design flaw can be eliminated with the help of reinforced fastening. Algorithm of actions:
- After installation and connection of communications, several foam blocks are placed under the bottom of the tank. Their height is slightly less than the distance between the floor and the bottom.
- You can fill the gap and at the same time glue the bathtub to the support with any mounting foam. The material must be applied carefully, in small quantities, along the length of each foam block. After expanding and drying, the foam will reliably strengthen the bottom of the bathtub, and the blocks will prevent it from moving under the weight of a person.
Installation of steel container
Installation of a steel bath.
For steel bathtubs, special types of supports are produced that follow the contours of the bottom. The bathtub can be secured to the legs so that it does not rock, thanks to the elongated side parts, which during installation rest against the recess in the side. But any design of this type is assessed by consumers as unreliable. In addition to the components, you can immediately buy additional pairs of supports with an adhesive layer that will secure the container to the supports. This method is suitable if the bath is not covered with a screen.
When the base of the bowl is hidden behind a decorative facade, as shown in the photo, installation on brick supports is used. It is carried out as follows:
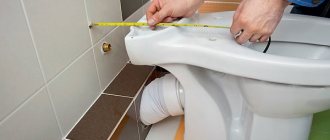
- determine the height of the side and bottom above the floor (do not raise the edges of the container above 70 cm);
- first, the bathtub is placed on legs and the level of its contact with the wall, the desired location of the stands are noted, their height is measured at several points across the bottom;
- the container is removed and 2 walls are built: their height is determined by the measurement of the lowest point of the bottom cross-section, the length should not exceed the dimensions along the outer edge of the side edging;
- It will take 2-3 days for the walls to dry, then work continues;
- a cement mortar cushion with a thickness of at least 2 cm in the center and with rollers along the edges is placed on the upper side of the brick supports;
- The bathtub must be placed on a prepared base.
If the base of the bathtub is completely hidden, then you can make a support from bricks.
If legs are used for installation, additional stability of the bowl can be ensured using simple techniques:
- Make a frame from a metal profile (for gypsum boards). The main racks are placed in the corners of the container, fixing them on a profile laid and screwed to the floor. They make the top trim by connecting the corner posts and attaching the ends of the trim to the walls. Along the length of the bathtub, 2-3 more verticals are installed, which serve as stiffeners when installing the screen.
- Install corners or other fasteners on the wall. Place the bathtub on its feet, mark the line where it meets the wall along the lower edge of the side. Remove the container, cut off 2 corners 5x5 cm (the length should not exceed the width of the side). Secure the steel strips to the wall using dowels. Purchased brackets of various types are mounted in a similar way. Invisible fasteners will make the bathroom motionless and stable and will not require the installation of a screen.
- Podium. A massive base is built at the selected location after all plumbing work has been completed. The dimensions of the base should allow all sides of the container to rest on the edges of a brick or block building, and there should be space under the bottom for a siphon. To connect the bathtub to communications, leave a window in one wall.
Cast iron bath installations
A cast iron product with decorative legs does not require a protective screen, and the mass makes the bath stable. If it wobbles a little due to the unevenness of the floor, place a pad made of a block or plastic under the raised leg.
To install a cast iron bathtub with legs, you do not need a protective screen.
It is convenient to fix the supports in a position when the container lies on its side. They immediately install a siphon so as not to turn the heavy product over again. After finishing fixing the racks, lift the bathtub and move it to the wall, connect the communications.
In addition to mounting on standard legs, the container can be placed on brick supports or on a podium in the same way as a steel product.
Installation of a plastic bath
Acrylic products are often called plastic. The bowl is installed on paired parts from the kit, on a base made of foam block and polyurethane foam. It is convenient to use a podium for plastic, supplementing it with supports under the bottom to eliminate crunching.
Screens
Using screens, communications are hidden; it is possible to make shelves for storing various household items. In addition, they significantly improve the interior. The screen can be brick with further cladding with ceramic tiles, MDF, plastic panels, plasterboard, OSB or in the form of an ordinary curtain made of thick fabric. We'll tell you how to do each option in turn.
Tiled screen
The photo shows a sliding screen on adjustable legs
Function screen
The structures must provide convenient access to the siphon for periodic routine cleaning of the system. It is advisable to have an opening for the feet only if the bathroom is used for washing. It is unprofitable and dangerous to install an expensive washing machine in it; summer residents, out of old habit, use the bathtub to wash clothes.
What types of frames are there for installing screens?
Any type of screen, except brick, is mounted on a frame. They are made from metal profiles, wooden slats or square pipes. The latter option is very expensive and labor-intensive, and has no operational advantages. Why do you need a frame that can withstand a load of hundreds of kilograms, if it actually does not exceed a few? We believe that there is no point in considering it. The installation of the structure must be approached very carefully; in any case, a crooked structure will have to be redone.
How to make a frame from metal profiles?
Step 1 : Count the number of profiles.
You need three vertical in height, two horizontal in length and two horizontal in width. To strengthen the structure, use jumpers; you need to make a separate small frame for the door. Three jumpers along the length are enough, but not necessarily across the width. Knowing the dimensions it is easy to find out the total amount of material. Immediately buy self-tapping screws for attaching profiles.
Step 2. Make markings.
This is a very important stage, don’t rush, check the measurements several times. To increase accuracy, use a plumb line; the level does not indicate vertical planes accurately.
How to make markup?
- Apply the plumb line to the wall and corner of the bathtub, wait until it calms down. Make a mark of the upper and lower position of the thread, draw a line between the marks. Using the same algorithm, draw a vertical line at all free corners of the bathtub; there can be two or three of them depending on the size of the bathtub and the room. This way the junction of the screen with the walls is indicated.
- At a distance of about 3-4 centimeters, draw parallel lines next to them outside the perimeter of the bath. The specific distance depends on the frame material and finishing materials: plasterboard, OSB, MDF or glue and ceramic tiles.
- Draw the same parallel lines on the floor of the shower room. Check all dimensions again to avoid mistakes.
Further work depends on the frame material. A metal profile is optimal, but you can also work with wooden slats.
Metal profile frame
Step 1. Cut the metal profile to size, we have already described how to determine them above. Don’t work on jumpers yet; make blanks only around the perimeter of the frame.
Step 2. Lay the long profile on the floor, one side should be exactly adjacent to the marked line. Carefully use a marker to mark the locations for drilling holes for the dowels. It's not good to work with a pencil, use a marker.
Laying metal profiles
Step 3. Remove the profile, drill holes with a drill, put the profile in place and fix it. Do not immediately tighten the dowels; the strips have perforated holes, with the help of which the element can be slightly moved in different directions and achieved an exact position.
Step 4 . Now fix the planks to the walls. The algorithm of actions is the same. If you plan to use a heavy OSB board for cladding, then the vertical and horizontal profiles at the corners are connected to each other with hardware.
Step 5. Close to the top side, fasten the profiles along the length and width, you should have a strong frame. If necessary, make additional jumpers to strengthen the structure. They can have a vertical or horizontal position.
Profile racks
Step 6. Decide which doors are suitable for you to inspect the siphon, make a small frame for it in the right place. Constantly check the position of all frame elements with a level. The door dimensions are at least 30 cm around the perimeter, otherwise it is inconvenient to clean the siphon.
The frame is ready, check its stability, apply multidirectional efforts from all sides. The structure is wobbly - add jumpers in problem areas, achieve high stability.
Screen covered with plasterboard
After tiling
Frame made of wooden blocks
Its performance is similar to that of a metal profile. Do not be afraid that rot will appear on the tree. If there are any concerns, soak it with antiseptics.
For the frame you can use slats of various sizes. When choosing, take into account the load of the finishing sheathing. A universal option can be considered to be the dimensions of the slats five by five centimeters. Make markings on the floor and wall as always. One feature - take into account the width of the slats; they should fit under the side shelves and not interfere with the finishing. To fix the frame, use metal corners and dowels; the width of the corners is slightly less than the width of the slats. This will make it possible to adjust the position of the frame without fear. In addition, possible errors when drilling holes for dowels can be easily corrected.
Step 1 . Place a long block on the floor and estimate the position of the corners. Make marks for drilling holes for dowels.
Practical advice. In order to completely prevent the corner from going beyond the line, it is better to move it slightly inward. It’s not scary that it will be screwed to the block off-center, but nothing will interfere with the finishing.
Step 2. Drill holes, secure the corners with dowels and the block to them with self-tapping screws. Adjust its position. Install the short block in the same way.
Step 3. Measure the height of the vertical elements. Make a gap of about 1 cm to the bottom of the sides. Using corners, fasten the segments into a single structure with the bottom one.
Installing racks
Step 4. Prepare two more long and two short ones for fixing in the upper part of the frame. Why two and not one? We recommend installing the first one at a distance of approximately 10 cm from the side; these bars are needed to control the size and verticality of the frame. On an already stable structure, it is recommended to fix one more one close to the side. It’s much easier to do this, and the frame is more accurate. In addition, the strength of the structure increases.
Step 5. Make a frame for the door in the right places; if heavy materials will be used, then install several jumpers. To increase strength, you can fix several spacers in the corners.
The frame is ready, you can begin the finishing cladding, fastening is carried out with wood screws.
Brick screens
In terms of time, they do not take much time, and in terms of strength, reliability and durability they are much superior to the previously described options. Prepare materials and tools. You can use bricks or concrete blocks. The quantity is calculated in this way.
- Calculate the side and end area of the space you are going to cover.
- Divide the resulting amount by the area of one brick or block. Round the quantity to a whole number. For reserve, you can take one block or two bricks.
One bath will require two buckets of sand and a third of a bucket of cement. In the future, the surface needs to be finished with ceramic tiles; we will give a step-by-step design in the next section.
Step 1. Place the first row of bricks on the edge, constantly checking its position with a level. You need to know that after laying on an edge, the wall can “float”. First feature. The solution should be slightly thicker than when laying flat. To increase the adhesion of the mortar to the side edge of the brick, it should be moistened with a spray bottle. Do not overdo it. The optimal degree of wetting will be determined practically. Second feature. After three rows you need to give the solution time to harden a little. Take a break for two or three hours.
The bricks are laid in a checkerboard pattern, the joints of the lower row are covered with whole bricks of the upper one.
Step 2. Continue working until the entire space is covered. It will be difficult to push the mortar into the gap between the masonry and the sides. It is advisable to make such an emphasis, it significantly increases the strength of the installation. Use any small means at hand for these purposes; such work cannot be done with a trowel.
Masonry brick screen
Important. Don't forget to leave a hole for siphon inspection. Check the structure, remove any remaining mortar that has emerged. Give it time to harden at least 24 hours.
Ceramic tile finishing
If the wall already has tiles, then the work becomes somewhat more complicated. The fact is that you need to take measures to match the seam between the tiles on the wall and the screen. Sometimes it happens when it is impossible to lay a whole tile, you have to cut it into pieces. If you have no practical experience in cutting tiles, use plastic inserts. They can even out jambs up to a centimeter, but the appearance, of course, will suffer a little. Real professionals do not use inserts for joints; their cuts fit tightly to surfaces without gaps.
Step 1. Count the number of tiles, the method is the same as for bricks. And you can buy one or two tiles as a spare; you won’t need any more, the surface area to be finished is very small. You need to buy about 10 kg of glue.
Step 2. Start laying tiles from the bottom row. Check the position with a level or a level lath, and check several tiles at the same time. They must lie strictly in the same plane.
Applying adhesive to tiles
Step 3. The tile is placed on an uneven surface; it is impossible to use a comb. Apply the glue with a spatula along the edges and in the center of the tile, about one centimeter thick. Next, the tile must be pressed and moved left and right until the position is leveled. The final adjustment is made with a level. Don't forget to use crosses. Some beginners install crosses flat on the four corners of the joint. This should not be done for several reasons. Firstly, it is much more difficult to level the tile; the cross will constantly move the nearby one. Secondly, there will be problems with removing the cross; you will have to pick out each one with a knife.
Gluing tiles
Step 4. No experience - use plastic elements in corners and joints, they make the work much easier.
Step 5 . After about two hours, you can start grouting the joints. The color of the material should be in harmony with the tiles and the overall design of the room. Excess grout is removed with a damp cloth or sponge. Do not wait until it is completely dry; dry material is difficult to clean.
Finishing with OSB boards or plasterboard
The boards must be moisture resistant. We recommend using more durable OSB boards; plasterboard boards are easier to work with, but in terms of load resistance they are far from ideal. Under force they begin to sag and the ceramic tiles fall off.
Finishing with slabs is much simpler than laying ceramic tiles. How is it done?
Step 1. Take the frame dimensions and mark the slab. As a rule, the length exceeds the length of the slab; it will have to be joined. This possibility must be foreseen during the manufacture of the frame and a vertical stand must be installed at the joining point.
Cut off all the blanks. Drywall is easily cut with a mounting knife; for OSB you will need a hand-held electric saw or jigsaw.
Step 2 . Fix the elements one by one with self-tapping screws, and work carefully with the drywall. When the self-tapping screws are tightened with great force, their heads fall inside the plaster, and new ones have to be screwed in.
Fastening drywall
Step 3. Screw small hinges where the door is installed. Check the functionality of the door.
Covering the frame with plasterboard
Inspection hatch door installed
Step 4. Proceed to finishing the surfaces. You can use ceramic tiles - it takes a long time and is expensive. There is a simpler option - cover the surfaces with self-adhesive decorative film; today there is a huge selection on sale - cheap and beautiful. In addition, you can easily change the pattern or repair the coating in case of mechanical damage. But the film also has a drawback - the surface must be perfectly flat.
Practical advice. Do not try to immediately glue the film without air pockets, it is almost impossible to do. Removing air is simple - pierce the pocket in several places with a needle and remove the air by smoothing the pocket.
Plastic lining
The option is not the best. It is recommended to use if the walls of the shower room are lined with clapboard. The installation process is standard. The problem arises with the technological hole and the door. Practitioners recommend making them from OSB from plasterboard.
DIY screen made of PVC panels
How to make sliding doors
A very simple and functional screen option. For manufacturing you will need two guides and an MDF board. The disadvantage of this material is that there is a possibility of spontaneous deformation. You can get rid of it only by making a separate small frame for the doors. It is advisable to use thin wooden slats; MDF is glued to them with special glue.
Step 1. Make a frame from a metal profile; we have described the algorithm for making such structures. Check the position of all elements.
Important. For a sliding screen, it is especially important to maintain the parameters; the racks must be strictly vertical.
Step 2. Attach the guides to the frame. They can be aluminum or plastic.
Plastic guides
Top guide
Step 3. Measure the exact distance between the guides; the spread in parallelism cannot exceed 1–2 mm. Otherwise, the doors will jam when opening/closing.
Step 4. Cut out the doors of the required size from the MDF board. For overlap, 2–3 cm is enough. You can cut the slab with an electric jigsaw or a hacksaw. Work carefully, place emphasis on the bottom - this will reduce the hairiness of the cut.
Step 5: Bevel the cut. Use sandpaper or a cylindrical sander. Install handles.
Plastic homemade screen doors
Step 6 . Install the doors into the guides. To do this, they need to be inserted into the lower guide, slightly bent and inserted into the upper guide. The thickness of MDF is approximately 5 mm.
Sliding screen
A guide profile is fixed to the floor. The cutout in the door is made to lead out the hoses from the washing machine.
The front surface can be finished in any way, taking into account the interior of the bathroom.
Tiles for facing
Installation under tiles is the optimal solution to the question of how to make a bathtub stable. This material is more hygienic and practical. To tile the bathtub itself, you cannot do without installing a screen. Moreover, you can surround any bathtub with tiles. Such cladding will be very harmonious in the interior. And, most importantly, it has maximum stability due to its special connection with the floor. The screen under the tiles can be built from brick or cement.
Subtleties of installing bathtubs on different floor coverings
The material from which the bathtub is made affects the process of laying the tiles. If you decide to install an acrylic bathtub, which has a relatively light weight, then the tiles should be placed first on the floor and then on the wall.
If you are installing a cast iron structure, the order of laying the tiles changes slightly. First of all, the tiles are laid on the floor, then the bathtub is installed, and from the line of contact between the bathtub and the wall, you need to start laying tiles on the walls.
If your bathroom already has tile floors, then you need to ensure that the installed bathtub is stable and does not slip on the floor. To do this, you need to secure the base with waterproof polymer glue, and “dress” the legs themselves with plastic tips that will protect your tiles from scratches.
You can read more about the procedure for renovating a bathroom here.