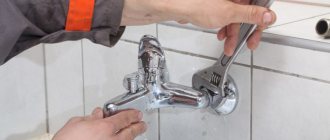
Probably each of us should know how to fix a water tap. Moreover, in most cases, the malfunction can be eliminated quite quickly and without extra costs, but you need to wait for more than one hour to call a specialist, and he will charge a lot of money for the work.
In our article we will talk about the most common breakdowns of water taps, after which we will provide repair algorithms for most models.
If you have experience and skills, you can quickly fix any malfunction
Basic faults
Before repairing a water faucet, you should take the time to analyze the situation. This way we can understand exactly what actions should be taken, thereby saving a lot of time.
Leakage is the most common problem
The list of breakdowns includes the following items:
| Breaking | Description |
| When the valve is closed, drops of water flow out of the tap | The locking mechanism becomes unusable. To fix the problem, it is necessary to either replace the element responsible for blocking the pipe clearance, or install new sealing gaskets. |
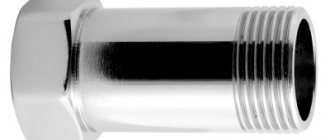
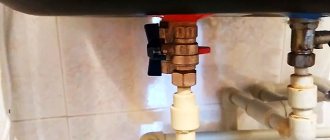
| Water drips at the connection point of the spout, hose or valve | The tightness of the connection is broken. It can be restored either by replacing the gasket or by installing a plumbing tap on the thread. |
| The flywheel turns | The flywheel housing has come off the rod or the rod has failed. In the first case, it is enough to install the part in place, in the second, you will have to replace the locking element. |
| The faucet makes a humming sound when operating | The gasket has worn out and its edges begin to vibrate under water pressure. Usually, to eliminate extraneous sounds, it is enough to replace the gasket. |
| Leak on body or spout | The integrity of the product has been compromised. It can be temporarily sealed using “cold welding”, but it is worth replacing the faucet as soon as possible. |
| Splashes fly from the aerator, water flow is obstructed. | The aerator grille is clogged and requires cleaning. |
In principle, this table describes the main faults. Other situations that may arise during the operation of the crane are derivatives of those already analyzed, and therefore they need to be repaired using a similar algorithm.
But such cracks cannot be repaired
Also, before starting work, you should carefully familiarize yourself with the design features of the model you have installed. As a rule, the assembly drawing of the water tap comes complete with the product itself, so when installing a new mixer, this document should be kept.
Note! If you can’t find a diagram, then you should enter the query “assembly drawing method for indicating a water tap” into a search engine and select your model. Most manufacturers post technical documentation online, so the chance of finding what you need is very high.
Now we will try to figure out what to do in each specific case. And let's start with the most common situation, namely, eliminating the causes of leakage of the shut-off element.
Drawing of a water tap body and a schematic representation of shut-off elements
Disassembling the mixer with thermostat
First, remove the cover and take out the screw. Then we disconnect the handle and the locking ring. The screw is located on the bottom of the thermostatic block. It fits easily in the palm of your hand and can easily get lost, so we take out the part carefully and immediately find a place where it can be placed. A key is also sold complete with the thermostatic mixer, which is used to unscrew the screw. Then we take out the block. At this stage, disassembly can be considered complete.
The reverse process, we carry out the assembly with a clear algorithm. We insert the block into the body, bringing the hole to the threaded recess. We screw the screw in there. It wouldn’t hurt to treat the seals with plumbing Vaseline. After this, we set the handle on the “temperature” side of the mixer so that the temperature corresponds to the set one. Turn the rod and align the mark on it with the mark on the body. We put on the retaining ring so that this value remains visible.
Axlebox models
Replacing axlebox
Cranes that use an axle box as a shut-off valve are the easiest to repair.
The algorithm of actions here is as follows:
- Before disassembling the water tap, be sure to turn off the water on the riser.
- Remove the cover from the flywheel , under which the fixing screw is located.
- We unscrew the screw using a screwdriver, and then remove the flywheel from the guides.
- We dismantle the decorative cones covering the place where the axle box is attached.
- Using an adjustable wrench, unscrew the axlebox that has become unusable from its socket . We clean the cavity from sediment and blot it with a rag, removing any remaining water.
Photo of the removed axle box
- We install the new axle box in place , screwing it along the threads. In this case, there is no need to exert excessive force so as not to damage the structure.
- Next we need to check the faucet for leaks . We turn on the water on the riser and inspect the installation site of the axle box.
- Grabbing the rod with pliers, turn it several times . The water flow should turn on and off quickly and clearly.
- We perform the assembly in reverse order , installing decorative cones and securing the flywheel to the tap.
Axlebox repair
In some cases, crane axle boxes can be repaired. It all depends on their design.
Remove the gasket from the end of the axle box
Products with a rubber gasket are more repairable:
- Using a screwdriver, unscrew the screw that secures the gasket at the end.
- We dismantle the sealing element and install a new one of the appropriate size in its place.
- We secure the gasket with a screw, clamping it firmly enough, but without deformation.
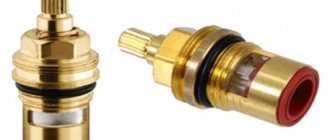
With ceramic axle boxes it will be a little more complicated:
- Remove the rubber sealing gasket from the end, and then remove the end plug.
- We dismantle the ceramic plates, if necessary, unscrewing the element that fixes them.
- We clean the internal cavity of the axlebox, removing contaminants that can lead to leaks.
Completely disassembled ceramic axle box
- We return the plates to their place, observing the correct position: when turning the rod, they should completely block the hole, interrupting the flow of water.
- We complete the assembly by replacing the dismantled elements.
Note! Often the cause of leakage is wear and tear on the ceramic plates themselves, so they may need to be completely replaced. But finding these parts is quite difficult, and the price of the repair kit will not be much less than the cost of a new axlebox.
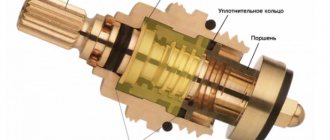
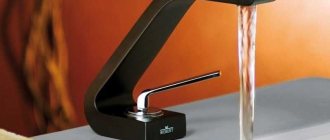
Design of single lever mixers
Today, single-lever (cartridge) faucets are the leaders in prevalence among similar types; they are distinguished by their simplicity of design and ease of use. The water temperature in a single-lever faucet is controlled by one handle, the pressure is regulated by raising it, and the temperature by turning it in different directions.
There are two main types of single-lever mixers, which have significant design differences and operating principles.
Cartridge mixing devices
In cartridge-type mixers, the main control element is a sealed barrel-shaped cartridge with a rectangular cross-section rod placed at the top. The main executive parts of the cartridge are two tightly fitted ceramic plates, one of which is fixedly fixed in the body and has three through holes - through two of them cold and hot water is supplied, and the third is used to drain the mixed water flow. The second ceramic plate contains a shaped oval channel, and it is connected through a system of mechanical parts to the handle.
The cartridge works in such a way that when the handle is lifted, the shaped depression of the control plate slides over the slots for cold and hot water, after which the mixed flow enters the mixer through the resulting channel. When you turn the knob to the right or left, the area of the open holes of cold or hot water changes - thus regulating the temperature of the water flow.
Cartridge types are convenient and easy to use; compared to previous types, they save more water resources. If the system has clean water and a high-quality cartridge, its service life can reach up to 10 years. The disadvantages include the need to completely replace the cartridge in case of any breakdowns, as well as high requirements for the purity of the water - if there are hard grains of sand in it, they can damage the surface of the ceramic plates and cause leaks, so a filter must be present in the water supply.
Operating principle of the cartridge
Ball mixers
The operating principle of a single-lever kitchen faucet resembles a joystick; in it, a one-armed lever is welded to a hollow ball that has three holes - one each for supplying hot and cold water and a third for discharging the mixed flow. The ball, held on top by a dome seal and a conical cap, rotates in a spherical seat that has three round holes with spring-loaded sealed gaskets - cold and hot water is supplied through two, and the water flow mixed in the ball enters the third.
When the ball with a lever welded to it rotates, different areas of the openings of cold and hot water and their ratio are obtained - this allows you to simultaneously regulate the volume of the drained water flow and its temperature.
In addition to ease of use, the advantage of ball models compared to cartridges is a longer service life and inexpensive replacement of consumables - when rubber seals wear out, the price of new rings is much lower than replacing an entire cartridge.
Note: However, ball valves require too frequent replacement of the gaskets worn out by the ball and are therefore a rare guest on the domestic market of mixing equipment.
Ball mixer - design
Ball and cartridge models
Dismantling the crane
The design of the water tap and mixer, which is controlled by one lever, differs from the axle-box design.
Accordingly, the dismantling of such a product for repair must be performed according to a different scheme:
Unscrew the screw
- First, lift up the red and blue trim on the front panel.
- Under the cover there is usually a screw for a Phillips screwdriver or hexagon - unscrew it.
- Next, remove the handle, carefully disconnecting it from the rod of the ball or cartridge locking mechanism.
- The next stage is to provide access to the fittings themselves. To do this, you need to unscrew one or two nuts.
Note! Very often, manufacturers make an internal locking nut with grooves for a special tool. You can either purchase a similar wrench, or try to unscrew the part yourself, using improvised tools.
Unscrewing the nut with a special tool
By removing the nut, we gain access to either the cartridge or the ball valve. They are dismantled quite simply, and replacement will not cause difficulties.
Replacing locking and sealing elements
Repair kit for ball mixer
To restore the functionality of a single-lever mixer, most often you need to completely change the functional element.
The instructions recommend doing this:
- We remove the cartridge from the socket by pulling it vertically up along the guides. If a part is skewed, you can correct its position with a slight side impact.
- We clean the cavity under the cartridge from rust and debris, which may cause seal failure.
- We install a new cartridge, secure it with one nut and check how well it shuts off the water. If there are no leaks and the adjustment works properly, we assemble the mixer.
Cartridge removed from slot
Ball valves have their own characteristics. Their main advantage is that the ball itself breaks extremely rarely, so repairs usually involve replacing the gaskets. We proceed like this:
- Holding the rod, remove the ball from the socket.
- Using tweezers or small pliers, remove the spring-loaded gaskets that press the ball to the body.
Removing the sealing elements
- We replace the gaskets, and then install the ball in place.
- We place a new sealing ring on top and clamp the valve with a union nut for the mixer.
- As in previous cases, it is better to check the tightness of the structure before complete assembly.
Lever mixer repair
Kitchen faucets with one handle are subject to the most intense load, so their internal parts are made of metal and polymer plastic. But even this reliable fitting breaks over time. To eliminate the malfunction, the ball valve must be disassembled to identify the cause of the failure.
Repairs are carried out in the following sequence:
- Detaching the decorative cap and unscrewing the screw.
- Removing the single lever regulator. This must be done carefully so as not to bend its body.
- Unscrew the threaded connection clockwise.
- Removing the faucet dome, removing the plastic part underneath it.
- Cleaning the seal. If it is badly worn, then replace it.
- Removing the ball from the niche. Inspect and clean the part. If there are signs of wear or mechanical damage, replace the ball.
- Cleaning the ball seals from dirt and deposits.
- Lubricate all parts of the mixer with silicone.
- Assembling the crane and checking its functionality.
Advice! When you discover a faucet leak for the first time in your practice, it is advisable to call a professional plumber and observe his work. This will be a good object lesson that will help you repair water taps yourself in the future.
Other renovations
Troubleshooting minor problems
In addition to actually repairing the locking mechanism, to restore the functionality of the faucet, it is sometimes necessary to carry out other measures.
For example, in case of problems with the aerator, we proceed as follows:
Dismantling the aerator
- Using an adjustable wrench with plastic pads, carefully grab the aerator and unscrew it from the spout.
- We take out the installed mesh and rinse it thoroughly, removing all dirt.
- At the same time, we clean the mixer spout with a flexible brush, trying to remove as much deposits as possible from the inner walls.
- We screw the aerator onto the spout, making sure that the thread is not skewed.
If a leak occurs in the place where the swivel spout is fixed, proceed as follows:
- Carefully tighten the union nut using an adjustable wrench. We remove the “gander”.
- Remove the rubber gasket from the socket.
- We install a new one in its place. The diameter and thickness of both elements must match.
- We return the spout to its place, securing it with a union nut.
It is this gasket that needs replacing
Coating restoration
Some problems do not affect the operation of the mixer, but significantly worsen its appearance. As a rule, these include scratches, chipped coating, abrasions, etc. And although complete restoration of chrome or nickel plating by galvanic means is quite expensive, it is not at all necessary to throw away the faucet and buy a new one.
You can restore the attractive appearance of the product by painting:
- We dismantle the mixer by completely disassembling it and removing all non-metallic parts.
- We grind metal surfaces, removing scratches, and then thoroughly degrease them.
Silver metallic in aerosol - Apply metallic paint to the grease-free mixer. For application, you can use either an aerosol can (cheap, but not very high quality) or an airbrush (quite expensive and complicated, but the coating is more even).
- When the paint has dried, we treat the surfaces with a special protective polish for metallics. You can buy it at any automotive chemical store.
Note! If the scratches are minor, then this polishing can be used without painting: it well restores the factory chrome/nickel plating.
- After polishing is completed, we assemble the tap and install it in place.
How to properly repair and replace gaskets?
To clean the ceramic pair of the valve head from limescale, you will need a flat screwdriver and a solution of citric acid (2 tablespoons per 0.5 liters of warm water). Disassembly of this part begins by removing the rubber sealing cover.
Further:
Ceramic plates can be easily removed and lowered into the solution for 2-3 hours.- Heavily contaminated areas are first rubbed with citric acid slurry or soda with a drop of vinegar.
- If necessary, the same procedure is repeated with all remaining parts of the tap.
- Cleaned parts are washed with running water and dried well.
Attention! To replace the gaskets on the spout (this is important when it becomes loose), you should use a pen or pencil.
The diameter of the rings is selected in advance; the tensioned rubber bands must be lubricated with silicone or Teflon grease before reinstallation. If there are no problems with the valve head, the spout simply returns to its place; in other cases, it is installed last.
The rubber bands are tightened onto the rod manually , after checking the operation of the ceramic pair and provided that there are no other defects. Correctly installed plates click slightly and completely block the water supply channel.
Deviations of the inner diameter of the gaskets in a smaller direction are allowed, but in a larger direction - no, with the right approach they fit tightly on the rod.
The tensioned gaskets on the rod must also be lubricated before reinstallation.
If you do not have suitable materials (gaskets of the required size are rarely found in standard kits) or confidence in your actions, you should buy a new crane axle box. In any case, this part is cheaper than new plumbing, but it takes time to find it and compare sizes.
Step-by-step instruction
To disassemble the mixer you need to do the following:
- Before starting plumbing work, it is necessary to shut off the shut-off valves in the form of ball valves on the supply pipelines, and also prepare several rags or sponges that absorb moisture well.
- If leaks or any other damage is detected, it is necessary to pry the cover with the end of a screwdriver and remove the plug from the body, then unscrew the fastening washer.
- To prevent scratches, it is recommended to protect all chrome-plated elements with a cloth or insulating tape.
- Then, using an adjustable wrench, unscrew the valve axle and remove limescale deposits from the threaded part. Worn gaskets need to be replaced.
Heavy mud and lime deposits can significantly complicate the unscrewing of many elements of a two-valve faucet. In this case, a kind of “boiling” of parts occurs in the areas of threaded connections, so it is recommended to use special solutions. The standard WD-40 composition has proven itself to work very well, easily and quickly removing rust or paint.