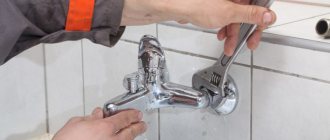
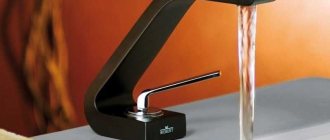
The problem of faucet leaks is relevant for bathrooms that we use several times a day. Small droplets dripping slowly and continuously from the faucet are the first signal that urgent repairs are needed.
It is not difficult to fix a breakdown if you have an understanding of the structure of the device mechanism. As they say, repairing a faucet with your own hands is an everyday matter. In this material we will talk about the most common causes of faucet breakdowns and consider in detail how to eliminate them.
Ways to solve shower problems
Sometimes troubles happen with the shower hose and watering can, more often due to wear of individual elements or poor water quality.
Poor water supply through the shower screen
Typically, water does not pass through the mesh very well if the holes in the mesh are clogged. Here, after removing the mesh, it is easy to clean it with an ordinary awl or needle.
One of the main enemies of faucets and shower heads is lime, which is found in large quantities in tap water. You can only get rid of it using a fine filter.
After screwing the mesh back, the water supply and direction of the streams are restored. Both the plastic panel with holes and the remaining parts of the shower and faucet can be wiped with a vinegar solution to remove plaque and stains.
Leaking shower hose and drain
If the leak appears due to wear of the internal part or winding, there is no point in repairing the hose; it is easier to buy a new one. Its cost is low, and the service life of new modifications is much longer.
During the replacement process, the mixer handle is moved to the position for supplying water to the spout, then with light movements I unscrew the old hose and fix the new one
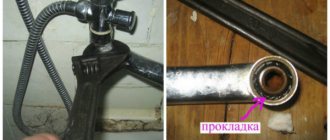
If both the drain and the shower are leaking at the same time, the problem is a loose joint between the plug and the body. To correct the situation, first remove the locking screw. The next step is to tighten the union nut. This reduces leakage, but switching water from the drain to the shower is a bit difficult.
To completely eliminate the leak, you need to grind the plug onto the mixer body using special grinding pastes. They are sold in many stores.
We also recommend reading our article about other common faucet failures in a bathroom with a shower.
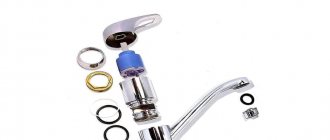
Second life of the crane axle box. DIY repair
Good day, dear DIYers! In this article, the author of the channel 1000 DIY CRAFTS AND TIPS will repair a dripping faucet, or rather, repair a faucet axle box.
Someone will say that it is easier to buy a new one, and in their own way they will be right.
The author values time more, because repairing a crane axle box will take less than five minutes, and a trip to the store will take more than an hour.
In addition, to go to the store you will have to dismantle the non-working crane axle box, otherwise you will not be able to find the one you need. After spending a couple of minutes reading the article, you can fix your faucet without outside help. Materials and tools. A Phillips or hex screwdriver depends on your faucet. An adjustable wrench or pliers. Vinegar or citric acid. Copper wire 1.6mm Rubber pad, or rubber 6mm thick
Just a little theory for those who are repairing a faucet for the first time, and the author will begin to practice. How can you find out which crane axle boxes you have?
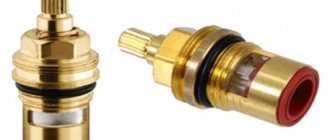
By the number of valve revolutions. A ceramic crane axlebox, unlike a worm gear, makes only a quarter of a turn.
It stops dripping if you press on the valve from above.
A worm-type valve can make more than one full revolution around its axis, and stops dripping when the valve is closed with force.
For a ceramic one, the author will replace the fluoroplastic ring with a homemade one made from copper wire.
The gasket of the worm gear valve is changed.
The gasket can be bought or cut from rubber 6-7 millimeters thick.
The cheapest and fastest repair can be done by simply turning over the old gasket.
If it is not cracked, it will work.
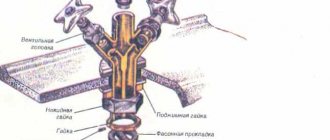
To begin with, the author turns off the water. The procedure for dismantling ceramic and worm-type crane axle boxes is similar.
Unscrews and removes the valve. The bolt will be hidden on top or on the side. You may have a bolt for a screwdriver. The author has a hex key.
After that, he unscrews the decorative skirt. Do not press too hard or scratch it; it may be made of plastic.
Under the skirt there will be edges for a wrench.
If you don't have such a wrench, grab the edges with pliers and twist counterclockwise.
Then everything is simple, if you have a worm-gear axle box, change the gasket as mentioned above. If it is ceramic, you will need a small piece of copper wire with a diameter of at least 1.6 millimeters.
Takes out the silicone gasket.
Then two ceramic plates.
Next, use something sharp to remove the retaining ring.
Sometimes they rot and break, that's not a big deal.
And pushes out the inside. It went easily.
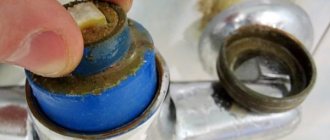
Ceramic crane axle boxes are very reliable, but they have one weak point.
This is the fluoroplastic washer.
Over time, it wears out and becomes thinner, as a result of which the pressure weakens and the tap begins to leak. The author will make a new washer from copper wire. The wire he found is almost two millimeters in diameter. And about 1.6mm is required. 3-4 tens can be removed with sandpaper or a regular knife.
He bites off a piece of wire and bends the ring, right on the crane box.
It is difficult to bend short pieces of wire, take extra wire.
This is how the ring turns out.
Now he takes the wire cutters and bites off both ends in one motion.
Then he shortens the ring by another one to two millimeters, so it will fit better.
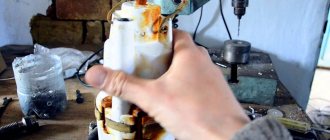
If there is a lot of lime on your faucet box, disassemble and boil everything in citric acid.
Or soak them in vinegar and they will be as good as new. If the author puts the ring on here and starts assembling, it will not go in.
Therefore, first lowers the ring inside the sleeve.
Everything that will come into contact with the ring is lubricated with lubricant. The author has some lithol.
Trying to put it on. Doesn't work, the ring rests on the elastic bands.
Unbends the ring a little and lubricates the rubber bands.
He tries again. Happened.
Replaces the locking ring. If the ring is broken, assemble without it. The tap will not leak.
Now installs the ceramic plates in place. The first to hit the grooves at point-blank range.
And into the slot for the second one.
fixes them with a silicone gasket.
That's all the repairs. The valve axle will no longer leak!
Thanks to the channel 1000 CRAFTS AND TIPS for the detailed instructions. I also repaired the axle boxes myself, but a little differently. I made a lining between the first plate and the stop from 2-3 layers of electrical tape, cutting it figuratively. This is also a working method, but it lasts up to a year, then you need to change the electrical tape again. Happy crafts to everyone!
The question/topic is automatically published on social media. site network - keep an eye on the answers there:
Source
Become the author of the site, publish your own articles, descriptions of homemade products and pay for the text. Read more here.
Faucet care: how to extend its service life
A little about how to postpone faucet repair for a long time. One of the simple solutions is to monitor the quality of water supplied to the mixer using modern mechanical filters. Solid particles of sand and pebbles will not spoil the parts, and they will work much longer.
It is recommended to install coarse filters at the beginning of a fork in the residential water supply. Today, a self-cleaning filter is available to consumers. All filtered sediments from it are sent directly to the sewer.
It is not always possible to install a large filter. Where it is not available, the mixer itself is connected to connecting taps, where cleaning filters are already built-in.
There are filters that help reduce water hardness. This is important for ceramic faucets, since they suffer more than others due to the presence of salt deposits in the water.
And finally, advice from experienced plumbers. If the pipes hum when you turn on the mixer, you need to check how well they are fixed and, if necessary, secure them with clamps.
In some cases, the humming is caused by high pressure in the pipes, then it will be necessary to install a special reducer to reduce the pressure. Often this noise is caused by worn valve gaskets; after replacement it disappears.
On our website there is a whole article devoted to the problem of humming pipes, we recommend you read it.
Causes of leaks
- Thinning of gaskets.
- Seal wear.
- Breakage of the crane axle box.
- Cartridge failure.
Instagram @designplan.online
Instagram @designplan.online