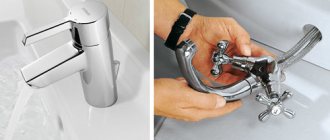
Today, faucets of various designs are installed in apartments, including ball-type taps. They are more reliable than simple gasket faucets, but they do break down from time to time. It is quite possible to repair a ball valve with your own hands, although the design of such a mixer is noticeably different from the usual design of a valve with rubber gaskets. Let's consider the order in which repairs should be carried out.
Almost every home craftsman with minimal plumbing experience knows how to change faucet gaskets. There is nothing difficult in performing this work; just unscrew a couple of nuts, remove the old gasket and install a new one in its place.
If there is a ball valve installed in the kitchen sink or bathroom, then you will have to work hard when repairing this device yourself. But if the master is well prepared and understands the design of the mechanism in advance, then performing the work will not require significant effort.
Types of faucets
Mixers come in three modifications:
- single lever,
- valve,
- ball
In this article we will talk about the most common type - the spherical type of construction. The mechanism itself is quite simple - just a single rotary lever.
When positioned up or down, the water pressure is regulated, and turning the knob to the left or right coordinates the water temperature.
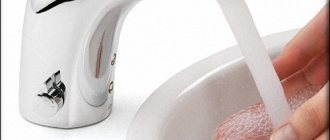
If you hear the annoying, monotonous sound of dripping water from a faucet every day, this means that the faucet has become unusable and needs to be repaired or replaced.
What do you know about bioseptics for cesspools and septic tanks? Read information from experts about the use and selection of drugs for high-quality waste disposal in this useful article.
How to make a water-heated floor under a laminate with your own hands is written on this page.
The faucet is considered such an important element of plumbing equipment that its damage requires your immediate attention.
The following reasons may cause breakdowns:
- faucet leaks,
- reducing the volume of water flow,
- leakage of liquid from under the valve.
If you find at least one of the above signs, the product must be disassembled.
Do you want to not only dismantle the faucet yourself, but also try to fix the problem, and then also assemble it correctly?
To do this, you need to thoroughly know the structure of the mixer..
If you have information about what components this device consists of, you can insure yourself against errors and significantly reduce the time for its repair.
Mixer diagnostics and repair
A crane may fail for several reasons.
- Critical wear or complete failure of the cartridge. This situation happens with cheap elements made of plastic. Cartridges cannot be repaired; they must be replaced with new ones.
Most often, the mixer fails due to a broken cartridge.
Wear of the clamping nut also leads to faucet leakage
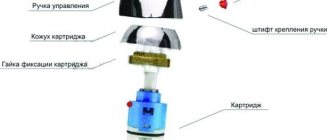
Product structure
Ball mixers are characterized as reliable and durable devices due to the non-separable cartridge included in their mechanism.
All its constituent elements are carefully ground in relation to each other.
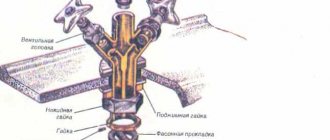
The basic basis of these designs is a highly polished hollow ball located in the faucet body with holes and a pin for attaching it to the handle, which ensures rotation of the ball.
Cold and hot water enters this ball through two brass tubes and flexible hoses.
After that, it mixes there and flows out through a tap at a certain temperature.
Tightness is achieved thanks to the presence of gaskets.
As a preventive measure to prevent the user from getting burns, faucet cartridges are equipped with a special ring that limits the angle at which the handle can be turned in the direction of hot water.
The cartridge inside can be made of stainless steel or ceramic.
Ceramic consists of two plates , high-quality polished using ultrasound and ideally ground to each other.
This surface polishing prevents droplets of liquid from seeping between the plates.
If you disassemble the cartridge, remove the washers from it and place them on top of each other, the elements should attract each other as if magnetized.
Using this elementary method, the quality of the cartridge is determined. In a single-lever device, no additional seals are provided in the mixer mechanism.
Due to the lack of seals and the strict compatibility of all parts, there is nothing to wash in ball-type mixers.
Do you know which heating cable for water supply is self-regulating? Read the description and methods of connecting a water pipe heater in this article.
About the installation of water supply pipes in an apartment with your own hands is written here.
The page: https://ru-canalizator.com/vodosnabzhenie/truby-i-furnitura/kak-gnut.html describes how to bend a chrome pipe at home.
If you disassemble the faucet and see that there are ceramic plates inside, then you will need to completely change the entire core.
Do-it-yourself repair of a single-lever mixer with a cartridge for the kitchen or bathroom
Repairing leaks
| Illustration | How to disassemble a single-lever bathroom faucet and restore the tightness of the cartridge mounting assembly |
| A leak from under the adjustment handle appears over time, even when using a high-quality plumbing product. | |
| Remove the plug. If difficulties arise, use a screwdriver. The operation is performed carefully so as not to damage the chrome plating. Next, use a hex wrench of a suitable size to loosen the screw by 1.5–2 turns. Remove the handle. | |
| After removing the decorative ring trim, access to the leak site is freed. In this example, you can see that water comes from the threaded connection. To fix the problem, you need to tighten the nut that holds the cartridge inside the housing. | |
| Despite maintaining the functionality of the mixer shut-off device, it is necessary to turn off the main taps. | |
| The nut is tightened with an adjustable wrench by 20-25°. Limit efforts so as not to damage the threads, body, and cartridge cores. In some cases, you have to unscrew the part to remove dirt. | |
| Next, open the water supply taps and make sure there are no leaks. Repeat the sequence of actions if you need a stronger tightening of the connection. If water passes through damaged parts (nut, cartridge), they are replaced intact. If cracks are found in the housing, you will have to purchase and install a new faucet. | |
| At this stage, the functionality of the cartridge is checked. It should move freely without using a standard handle. If you tighten the nut too much, you will have to apply excessive force. They will damage the mount or the rod itself. | |
| Assembly is performed in reverse order. After installing the handle, check the functionality of the device and the tightness of the unit. |
Troubleshooting a Shower Diverter
| Illustration | Sequence of actions with comments |
| This button doesn't work. Vodka flows simultaneously through two working channels. Restoring the switch requires disassembly. | |
| The shut-off system of the faucet is functioning normally, so it is not necessary to shut off the main supply. After loosening the fastening with a tool, you can unscrew the flexible shower hose manually. | |
| A screwdriver is inserted into the vacated hole and the assembly is fixed. This allows you to unscrew the button. | |
| In the next step you will need a hex wrench (12). | |
| After removing the top of the spool, it becomes clear that the rubber seal ring is missing. It was not possible to find an analogue in the retail chain, so I had to purchase the entire assembly. | |
| It is inserted through the lower hole. Holding it with your hand, tighten the bottom nut. | |
| Install the top part. Fix it from below with a screwdriver. Clamp the connection with a wrench (11). At this stage, you can verify that the device is functioning normally. | |
| Mount the button and perform a final check. If everything is in order, connect the flexible shower hose. |
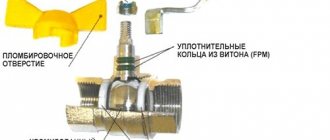
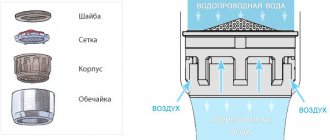
To figure out how to fix a faucet, you need to study the design. The following list highlights important nuances:
- special inserts (4, 15) reduce noise levels during operation;
- the collapsible aerator (1) can be removed to remove dirt;
- there are no fiber seals like in older designs;
- This rubber ring (14) could not be found, so the assembly was purchased;
- a special valve (18) prevents fluid from moving in the opposite direction.
Ball valve repair
If the ball mixer fails, you should not immediately run to the store for a new product.
You need to find out the cause of the breakdown and try to fix it yourself so that the tabletop does not deteriorate (how to install it yourself).
Moreover, this work is not very difficult, and almost any man who has the following tools in his household can handle it:
- hex key,
- flat screwdriver,
- small hammer,
- pliers.
Before you start disassembling the tap, you need to turn off the water supply in the house or apartment (read where the connection to the water supply network is located here).
The main reasons for faucet breakdowns
Faucet breakdowns are not uncommon because:
- The quality of water supplied to residential premises from the public water supply system is quite low. The water may also contain some impurities that negatively affect the internal structure of the mixer;
- the use of low-quality consumables: sealing gaskets or rings, clamping nuts, and so on, which also leads to rapid wear and, accordingly, leakage;
Leakage due to worn O-ring
- poor quality of the mixer itself. Often the cheapest models with a small amount of functionality are installed in the bathroom, which leads to a decrease in service life;
- incorrect installation of the device;
- manufacturing defects leading to the formation of cracks on the body of plumbing equipment.
To reduce the frequency of repair work, it is recommended to purchase faucets from reliable manufacturers such as GROHE, JACOB DELAFON, ROCA, LEMARK or WasserKRAFT.
Step-by-step instruction
- From a single-lever mixer with a ceramic or metal valve, you need to carefully remove the handle to control the supply of liquid substance.
You should know that such a lever is usually secured with a reliable screw, which is located under the decorative trim. In order to remove it you will need some sharp object. The inside of the faucet can only be accessed after the screw has been unscrewed. - Find out how to attach it. In each model of this plumbing fixture, it is different. There are models in which the lever is simply mounted on a rod. In this case, in order to remove the handle, you need to pull it up and, without unscrewing any bolts, carefully remove it (since this design does not have them).
When the small fastener is on the side of the ball mixer, you need to unscrew the finishing stop, which coordinates the supply of cold or hot liquid to the faucet.After removing the lever, it is necessary to unscrew the cover of the mixer frame.
- Basically, this cover is attached using grooves. Therefore, this element should be unscrewed manually, without using any tools.
But, if it is attached with a fixing bolt located on the side, then the screw must be unscrewed with a suitable screwdriver.Then use a sharp knife to pry up the upper casing and remove it by hand.
- Under the cover there is a large clamping nut. In order to unscrew it, you will need an adjustable or gas wrench. Only after this can you removecartridge in need of replacement.
Do not forget that there is a gasket under it and it is most likely compacted and stuck there. So removing it may not be as easy as you expected.Then, you need to turn on the water and see where there is a leak - in this way you can accurately find out the cause of the faucet failure.
After this, it will be possible to carry out repair work to replace the gasket or the cartridge as a whole. To change a worn-out part, you will have to get to the “unfavorable” place.
Using this diagram, you can disassemble the ball valve. As you can see, there is nothing complicated about this. If you follow the instructions above, there should be no problems with disassembly.
If your kitchen or bathroom has a mixer with two valves, then disassembly will need to be done using a slightly different method.
Ball mixer: the main invention for plumbing
Despite the fact that the ball mixer has been in operation in our country for some two decades, this design was developed a very long time ago. It was created by engineer Alex Manukyan. In 1929, Manukyan created a small company that manufactured various parts for cars and Ford. In 1940, from a small company, this company turned into a large production with a turnover of millions of dollars.
In 1940, a certain inventor from California approached Manukyan and offered to purchase the right to produce a revolutionary crane. The innovation was that instead of the traditional two taps, one was used for hot and cold water. Using it, it was possible to simultaneously adjust both pressure and temperature. The innovation was poorly received and they even laughed at the inventor. But Manukyan looked at one small perspective that everyone else simply missed. The design of the ball mixer is such that it has only one moving element. There are no gaskets or parts subject to rapid wear.
After some time it became clear that, despite the lack of gaskets, the mixer was working fully. And now Alex Manukyan, together with experienced engineers, begins work on finalizing the design. In 1954, the work was completed and a new revolutionary product was released, which is now installed in most bathrooms. By the way, Manukyan made a huge fortune for himself from this.
How to properly disassemble a 2-valve mixer
This job is also quite easy to do.
To accomplish this goal, you will need a screwdriver and an adjustable wrench.
- First of all, we shut off the water supply to the apartment (about a storage tank for water supply of 500 liters is written here).
- Remove the blue and red plugs from the taps. Having dismantled them, you will find screws that need to be unscrewed with a screwdriver.
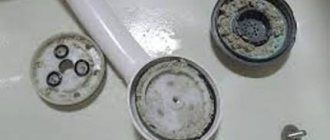
- After this you will be able to see what condition the rubber gaskets are in. By their appearance, you will understand whether they need to be replaced or whether the poor operation of the mixer is due to the fact that deposits have appeared (read about equipment for deferrizing water in this article) or the connections have become loose.
- There is another reason for the disgusting operation of the faucet - limescale deposits accumulated inside it. To remove it, take a long, flat screwdriver and use it to try to remove all the dirt.
Removing the valve body
If the valve body is damaged (wear, corrosion or manufacturing defects), it will have to be removed. They do it this way.
- Unscrew the nut of the flexible line going from the water fitting to the mixer.
- Loosen and unscrew the nut securing the faucet to the sink or countertop.
- If the nut cannot be unscrewed or you cannot get to it with a wrench, you can use a flat screwdriver to unscrew the fastening stud. For this purpose it is equipped with a slot.
- After removing the mixer body, you need to remove the gaskets from the sink and clean the mounting area from dirt and mineral deposits.
If the flexible hose has already worked for several years, it is better to replace it at the same time.
Preventive measures
By following simple handling rules, you can significantly increase the trouble-free operation life of single-lever mixers. The following measures will help you avoid breakdowns and other troubles:
- purchasing a device from a reputable manufacturer and at a reliable retail outlet;
- purchasing a heavy brass faucet;
- correct installation of the mixer;
- mandatory use of filters for supply openings;
- regular use of a single-lever faucet to avoid coking and drying out of rubber or silicone seals;
- timely elimination of leaks and other minor problems;
- mandatory preliminary study of instructions, video material and/or consultation with a specialist;
- treating all connecting parts with sealant;
- fastening threaded connections using fum tape;
- regular preventive inspection of the device;
- Immediate replacement of seals as they wear out.
If you do not have sufficient skill and/or experience in handling the working tool, it is better to invite a knowledgeable specialist.
Effective recommendations on how to unscrew a stuck axlebox tap
You can dismantle the axlebox crane using one of several options. This variety makes it possible to choose the most wonderful option based on a specific situation: Chemical. The implementation is as simple as the world. The part is well lubricated with an acid-containing solution (WD-40, Cilit plumbing product or vinegar), and after a couple of hours you can try to dismantle it. In problematic situations, you should try to pour the chemical into the problematic compound (for example, with a syringe). Moreover, experts advise trying to boil the completely removed device for 20 minutes in a soda solution - this often helps to turn on a stuck valve. WD-40 Thermal. It is worth using when the method described above did not bring the desired result. It is based on the fact that the valve head and the parts of the water tap with which it touches are, in most cases, different. Based on this, they have different degrees of magnification. The treatment is carried out with a hairdryer for construction work, with which the thread is thoroughly heated until the bolt moves. Tapping. In most cases, it helps when dismantling an alloy grand axlebox that is leaking. It is performed with light repeated blows of a hammer or a mallet on the body along the fastening connection in the form of a thread. Lime deposits and corrosion should go away, and the jammed part should be easily dismantled. Rocking the bolt. Used in situations where the edges of the bolt have become “slipped.” You need to tightly grasp the bolt with a pipe wrench and try to break it by swinging it
At the same time, it is important not to use excessive force - this is dangerous due to thread breakage and part malfunction. Drilling out a stuck grand axle box Drilling out. Is the most drastic way; used when others have not helped
The protruding part of the bolt is cut off with a metal file, after which the remaining parts in the middle are drilled with a suitable drill. Instead of a drill, you can use a cutter. Then the thread will have to be cut anew.