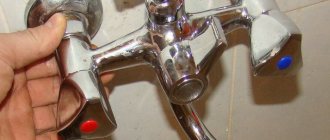
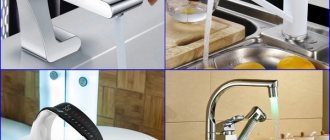
Leak at the connection point of the gooseneck to the mixer body
One of the common places for leaks is the connection between the gander and the mixer. This connection is sealed with a ring made of dense rubber, which is placed on the body of the gander. When turning the gooseneck, the gasket gradually wears out and a leak forms. To eliminate this problem, you need to replace the gooseneck O-ring. This is done in this order:
- Use an adjustable wrench or Swedish screws to unscrew the gander fastening nut.
To replace the gasket on the gooseneck, you need to unscrew the mounting nut.
The worn gasket is picked out and a new one is installed in the groove. It is convenient to do this with tweezers, since the fastening nut is non-removable and remains in place.- After changing the gasket, the gooseneck is put in place and the nut is tightened.
Advice! In order for the gib with the new ring seal to easily fit into the mixer body, the ring must be lightly lubricated with silicone grease or sealant, which will ensure easy sliding.
Leak at the connection point of the shower hose and shower head
Even during the operation of the mixer, leaks often form at the connection points of the flexible hose to the mixer and shower head. Gaskets are installed in these places, which become deformed and fall in over time. If a leak occurs, disconnect the hose and replace the gaskets.
The hose is connected to the mixer using a hex nut. You need to unscrew it and change the gasket.
To replace the gasket where the shower hose connects to the faucet, you will need a wrench.
The connection between the hose and the shower head is made using a conical relief nut, which can be unscrewed without a tool and even a girl can do it. There is a gasket on the pressure hose that needs to be replaced with a new one.
Note! The hex and flare nuts for connecting the shower hose are very thin, so you should not use much force when tightening them, as they may burst.
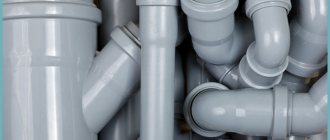
Preparing plumbing
If the faucet is leaking, you can fix it yourself. First you need to prepare everything. If you still have the packaging from the mixer, it’s worth finding it. As a rule, it will contain detailed instructions describing the structure of the accessory and some recommendations for its repair. In addition, the package may contain the tools necessary to repair the faucet.
Before starting repairs, turn off the water. To do this, close the valve. In this case, you need to turn off the supply of not only cold, but also hot water. To collect the liquid you will need a deep container, such as a basin. During repairs, you should have dry cloths or sponges on hand to wipe away splashes.
Leaks where the faucet connects to the water supply
There are situations when the tap begins to leak at the points of connection to the water supply. The procedure for eliminating a leak depends on the installation location and the method of connecting the mixer.
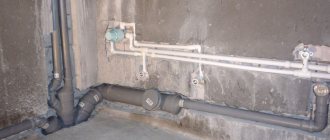
Leakage at the junction of supply pipes
The cause of leakage at the connection point of the wall-mounted mixer at the connection points to the pipes coming out of the wall is the sealing or misalignment of the gasket. To eliminate this malfunction, you need to unscrew the fixing nuts, disconnect the mixer and replace the gaskets with new ones.
Leakage of supply flexible hoses
Faucets installed on the side of a bathtub or sink are connected to the water supply using flexible hoses. The formation of a leak at the connection point is the result of wear or chafing of the seals placed on the thinned end of the hose.
The O-rings on the thin end of the hose can wear out, causing a leak.
To replace the rings, you need to remove the faucet from the sink, since doing this from the bottom of the plumbing fixture is difficult and sometimes impossible. Having removed the mixer, unscrew the hoses one by one with a wrench, replace the rubber rings on them, after which all the elements are installed in place.
To replace the O-rings on the flexible hose, you need to dismantle the mixer.
If the water pressure drops
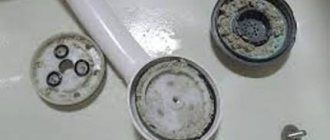
There are situations when the water pressure in one of the taps decreases significantly. The reason for this problem is an aerator clogged with scale and other debris - a mesh filter screwed into the end of the gander. To fix this problem, just unscrew the aerator, rinse with water and clean the filter mesh with a needle or thin awl, and then screw it into place.
A clogged strainer is the cause of reduced water pressure.
The considered malfunctions and methods for eliminating various leaks will allow you to repair faucets yourself without calling a plumber. As practice shows, many types of leaks and breakdowns can be avoided if you take good care of your plumbing. The quality of mixers and the degree of mechanical purification of water also play an important role, so installing coarse and fine filters is sometimes simply necessary.
What is needed for repairs
After the preparatory work, you can begin troubleshooting the mixer. If a closed faucet is leaking, you will need special tools to fix it. They need to be prepared in advance. To troubleshoot you will need:
- Wrench.
- Flathead screwdriver.
- Adjustable wrench.
- Crosshead screwdriver.
- Replacement part.
- Sealing tape or linen.
- Soft material.
- Dry cloths.
- Deep capacity.
This simple set of tools is usually enough to fix a leak. If you don’t have time to run out for new gaskets, they can be made from leather or rubber. Usually the faucet leaks due to wear of this part. Soft material is required to protect the sink from damage. After all, the tool can slip out of your hands. As a result, ceramic products may break, and the enamel of metal ones may crack.
What to do if the new faucet is dripping?
Sometimes even a faucet that was purchased and installed relatively recently begins to leak. In such situations, the reason, as a rule, is simple to the point of banality - the device has a manufacturing defect, which is difficult to identify during external inspection.
Important information! Cracks and chips inside the structure can hardly be eliminated on your own - even an experienced plumber will not be able to do this. That is why the only correct solution is to return the faucet to the store and ask the seller to replace the defective model.
New faucet
Finally, we note that the faucet in the kitchen or bathroom can start dripping at any moment. To solve this kind of problem, you can go one of two possible ways - to involve a qualified specialist in the work or to try to do everything yourself. However, if you know the exact cause of the leak and how to properly eliminate it, then no difficulties should arise.
Note! To prevent a leak from appearing at the most inopportune moment, regularly carry out preventive measures - change gaskets in a timely manner, check the condition of locking mechanisms. All this will significantly extend the life of the crane!
Possible breakdowns and their elimination
There are several reasons why a two-valve faucet may leak. One of the most common causes of leaks is wear of the rubber gasket.
Replacing the gasket
If the faucet is dripping, it may be due to the wear of the rubber gasket. The main sign that the faucet requires replacing the rubber gasket will be the appearance of a leak from the mixer jib.
The rubber gasket should be replaced as soon as possible, otherwise leaking water will gradually destroy the inner surface of the housing. If you do not disassemble the mixer in time and do not replace the old part, then holes will appear on important components. In these cases, only a complete replacement of the mixer will be required.
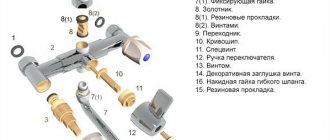
Gasket replacement features:
- The first step is to remove the flywheel from the spindle. Next, the core is unscrewed with an open-end wrench;
- The old spacer is usually located at the back end of the core and is attached there in the area of the special protrusion. The old gasket element is removed;
- a new sealing element must be cut out of a piece of dense rubber base, while it is necessary to be guided by the shapes of the old worn-out gasket element;
- the cut out part must be installed in the original place of the old sealing element;
- the whole assembly comes together.
If the problem with a leaking single-lever faucet is a worn gasket, then you can repair your faucet in a few minutes. But it is important not to tighten it, otherwise it may lead to complete wear of the entire faucet.
Replacing the oil seal
If the faucet in the bathroom is leaking, then it may all be due to the wear of the seal. Typically, a leak occurs when the tap is opened. In these cases, water will leak in the area between the gland clamp nut and the valve stem.
If the faucet drips due to wear of the seal, then how to fix the leaking faucet yourself? You can use the repair scheme:
- use a screwdriver to unscrew the oil seal nut;
- you can make the seal yourself from sealing tape;
- the old oil seal, which has become unusable, must be removed;
- you need to wrap a sealing tape around the valve, which will subsequently replace the old seal and prevent leaks from the tap;
- you need to tighten the nut in place.
If everything is done correctly, then water leakage will not occur after turning on the tap again.
Stages of replacing the oil seal
Replacing the liner
The cause of failure of the mixer with axle box is wear of the rubber gasket. Usually in a mixer it is located at the junction between the faucet axle and the mixer. More often, the faucet leaks because the gasket wears out, loses its elasticity or completely collapses. You can fix a leaking faucet in the bathroom quite quickly; the main thing is that you must strictly follow the instructions.
How to disassemble the faucet in the bathroom and how to repair it:
- use a knife or screwdriver to remove the decorative plastic plug, which is used to indicate the cold or hot tap;
- you need to unscrew the screw located under the plug. The screw is unscrewed using a screwdriver. If the screw does not unscrew, then it needs to be warmed up by dousing it with hot water. After this, the screw can be easily unscrewed using pliers;
- after this you need to remove the flywheel;
- unscrew the nut that secures the axle box. Remove the nut from the housing;
- thoroughly clean the surface of the rod and sealing elements;
- It is imperative to inspect all the parts; there should be no hidden defects or damage;
- then the old liner is removed and a new one is installed in its place;
- the whole structure is assembled.
Features of different types of mixers
In kitchens, it is more common and more practical to use traditional taps, with one or two levers. Common parts include the body, spout, aerator and sealing gaskets. The remaining parts are significantly different.
Double valves
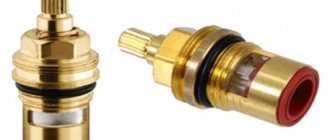
This technique is classic and made very simply. Under the flywheel, which rotates when the water is turned on, there is a valve axle that performs a shut-off function. In devices where flywheels must be turned to stop and supply water, worm-type axle boxes are installed. They are based on rotating movements; the more you unscrew the valve, the more water will come out through the spout.
There are axle boxes with ceramic panels, with which you only need to make half a turn in the tap to supply water. When opened, the holes align and water flows through the spout. The cost of the axle box is low, you can always find it in a plumbing store and make a replacement.
Single lever types
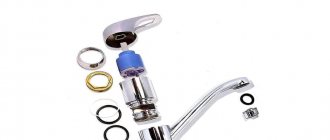
A single-lever kitchen faucet is considered more fashionable and modern. With its help, pressure and temperature are regulated with only one lever. Water is mixed using a hollow ball or cartridge.
When using ball cutters, please note that they will have 3 holes. 2 inputs, where hot and cold water flows, 1 output - needed for draining into the sink. The mechanism itself rests on 2 rubber “saddles”, and by moving the lever you can set the desired water pressure and temperature. Fixation is carried out with a sealing collar and a nut for the stopper.
The main problem with seal failures is small specks and debris that are in the water pipes. To fix the problem, you need to disassemble the faucet and remove dirt.
Cartridge devices work in a similar way, but there is no ball mechanism inside. The internal design is significantly different. There are 3 holes, as in the first case, but inside the cartridge there are small ceramic disks, with the help of which the water supply can be adjusted. If such a device leaks, then the repair is almost no different from the ball type.