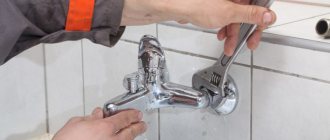
The faucet is an integral element of every bathroom that has a hot and cold water supply. Thanks to it, the temperature of the water coming out of the tap and its pressure are regulated. In addition, the faucet has a switch that allows you to redirect water from the tap to the shower. Like any mechanical device, the mixer is not immune to all kinds of breakdowns. Fortunately, its design is not too complicated, allowing you to fix problems yourself in most cases. In this article we will look at the design of a bathroom faucet with a shower, repair the faucet if any breakdowns occur, and list the causes of malfunctions.
Main types and design of mixers
To find out how to repair a bathroom faucet, you need to understand what type of mechanism this is. And in order to understand the principle of its operation, you need to study the design of a bathroom faucet with a shower in order to carry out the repair correctly. Thus, all bathroom faucets are divided into: valve, lever and sensor.
The design and repair of the valve mechanism is very simple. This device consists of the following elements:
- frame;
- valves for controlling the device;
- spout (gander);
- faucet axleboxes for regulating water supply.
The lever model is more complex, so repairing a regular single-lever bathroom faucet will take a little more time. A typical lever device consists of the following elements:
- frame;
- spout;
- ball or ceramic cartridge for mixing water. A broken ceramic cartridge must be completely replaced;
- nut for fixing the cartridge in the housing;
- handle for controlling the device and adjusting the temperature and pressure of the water flow. Attached to the cartridge lever;
- case cover.
The sensor faucet has the most complex device. The main element of such a mechanism is a photocell that controls the operation of the device. In the event of a breakdown, it is almost impossible to independently restore the photocell, so it is better to entrust the repair of touch-sensitive faucets for a bathroom with a shower to specialists.
If you carefully study how the mechanism of each device works, then repairing a bathroom faucet will not cause much difficulty.
Types of bathroom faucets
As a rule, models of three categories are used in bathrooms:
- traditional two-valve taps;
- common single-lever devices;
- innovative sensor faucets.
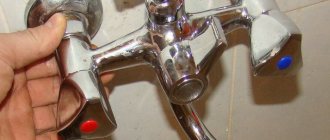
For many decades, homes have been equipped with two-handle faucets . Such devices are equipped with two handwheel handles, one of which is intended for hot water, and the second for cold water.
As a locking mechanism, older models used a system of a seat and a valve on a stem equipped with a rubber gasket. When the valve was tightened, the valve closed off the seat, which provided a path for the water to flow.
The stem with the valve had to be screwed in, then unscrewed - this was time-consuming and inconvenient. Instead, they now use a metal valve axle box or a device made of a pair of ceramic disks.
Although two-valve models with a ceramic block are more expensive than devices with rubber gaskets, they have a number of important advantages. They are easier to operate, more durable and reliable
Single-lever options have now become very popular. Lever or joystick mixers have one shut-off and control mechanism that controls mixing, supply, and pressure of hot/cold water.
Based on the locking unit, the range of such mixers can be divided into two categories:
- with ball block;
- with disk cartridge.
The second option looks preferable due to its lower cost and maintainability. Its locking mechanism, similar to valve devices, includes two ceramic discs with holes for mixing and shutting off water flows. If it fails, replacing the cartridge is quite simple.
Single-lever ball faucets are more expensive, and they cannot be repaired due to the difficulty of finding the locking mechanism. Plumbing stores rarely offer it.
If the ball mixer fails, you will most likely have to throw it away and buy a new one instead. Our recommended article will introduce you to the selection criteria.
But ball valves, installed on hot water and cold water pipes in front of plumbing to shut off the flow in case of repairs, have almost completely replaced obsolete valves.
It is almost impossible to distinguish a ball mixer from a cartridge mixer by appearance. In order not to make a mistake when purchasing, it is important to pay attention to the internal structure of the model indicated in the technical data sheet, or ask the seller
The control element of a touch-sensitive faucet for a kitchen or bath with shower is a photocell, which turns on a stream of water when you bring your hands to the tap and turns it off when you remove them. Repairing such plumbing requires experience and knowledge not only in the field of plumbing.
An exception to the rule is a clogged aerator, which manifests itself in a weakening of water flow. This problem, which we will discuss in detail below, can be easily fixed by yourself.
Why the device fails: causes of breakdowns
The process of restoring a faucet with your own hands will be much easier if you know the reason that led to the breakdown of the product. Let's highlight the main ones:
- low quality of products - typical for cheap Chinese counterfeits and products from little-known unscrupulous manufacturers using low-quality consumables and components;
- dirty water in the pipeline;
- the use of outdated consumables on new devices - modern silicone or paronite gaskets are much stronger and more reliable than old-style rubber products;
- a high degree of water hardness provokes cracking of seals and the formation of deposits inside the device;
- mechanical wear of equipment, sensors, cartridges and other consumables.
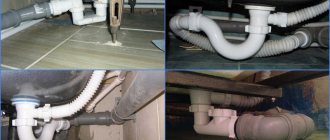
We will analyze in detail what malfunctions can arise when using a faucet with a shower, as well as how to repair a faucet in a bathroom with your own hands.
The main causes of faucet breakdowns
If you carefully study the design of a bathroom faucet with a shower, its repair will not be difficult. It is only important to know the causes of breakdowns:
- Unsatisfactory product quality. This is typical for products from little-known manufacturers who use low-quality components and consumables in their work;
- Use of old-style consumables. For example, paronite or silicone gaskets last much longer than rubber products. In addition, they are less deformed and do not collapse from drying out;
- Dirty water in pipes;
- Increased water hardness affects the internal parts of the device, causing the formation of deposits and cracking of seals.
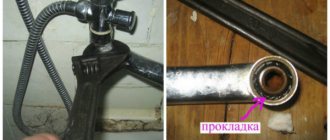
Leakage at the junction of the spout and the body
This is the most common breakdown, since the spout constantly moves to the sides, which wears out the round rubber gasket, which is located in the groove of the spout. To replace the rubber gasket, the gooseneck must be disconnected from the body. In this case, the crane repair is carried out as follows:
- unscrew the fastening nut;
- remove the spout;
- remove the old damaged gasket from the spout groove;
- install a new gasket in the groove;
- install the spout into the body;
- wrap 2-3 layers of FUM tape around the thread for the fixing nut;
- tighten the spout securing nut.
After this, the leak at the junction of the body and the gander will disappear.
Repair of valve type tap
The model consists of a spout, a body, and fasteners. In the mixer, one part regulates the supply of hot water, the second - cold.
In such a device, the locking part is a rubber gasket. If it bursts or wears away, a leak appears.
A new part can be purchased at any building materials market.
Many craftsmen prefer to make a puck with their own hands, using a piece of rubber of the required thickness.
You can fix the problem by following the instructions:
- Shut off the water supply to the bathroom. If this is not possible, you will have to block the entire apartment.
- Remove the two-color plugs from both valves.
- Using a screwdriver, remove the bolts located in the handles.
- Remove each tap.
- Remove the cover and begin disassembling the middle part. Remove it using a spanner.
- Unscrew the housing. To do this, you need to rotate the nut that presses the spout.
- There is a damaged gasket in the hole; it should be carefully removed.
- All elements must be checked for the presence of mineral and salt deposits. If there are any, they must be removed with special means.
- The new part should be inserted into place.
- The fluoroplastic tape must be wound under the thrust edge. It is important to monitor the sealant layer. It shouldn't be too thick.
- The gander is inserted into the body and aligned.
- It is necessary to return the valves and clamping fasteners to their place and tighten them. Experts recommend monitoring the thread so as not to tear it off.
- After this, you should turn on the water and check if the tap is leaking. If the problem is not resolved, the work will have to be done again. The main reason for repeated leakage is the incorrect installation of the gasket or its inappropriate size.
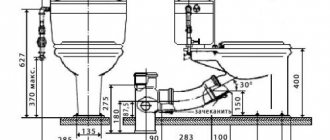
Also interesting: Toilet cistern flush mechanism: device, replacement features
In some cases, after replacement, water starts dripping again. This indicates wear of the saddle assembly, on which nicks and cracks appear along the edge.
It is necessary to disassemble the tap and process the area with a disk or shaped cutter. As a result, the plane will become even and smooth, and the equipment will no longer flow.
Leaking from under the control lever
This type of failure is typical for single-lever mechanisms and is caused by cartridge failure. You need to disassemble the device and replace the cartridge. There are several other signs of failure of this part:
- resistance occurs when operating the lever;
- spontaneous change in the temperature of the supplied water flow;
- no supply of cold or hot water;
- The tap does not close or open completely.
Do-it-yourself repair of a single-lever bathroom faucet is carried out in the following order:
- Remove the red and blue plug from the housing.
- Loosen or unscrew the fixing screw using a Phillips screwdriver.
- Remove the lever and unscrew the decorative cover.
- Then, using an adjustable wrench, unscrew the nut that holds the cartridge in the housing.
- Remove the faulty cartridge.
- Place the new part into the housing and reassemble the device in reverse order.
Keep in mind that the protrusions on the cartridge must line up with the indentations in the housing, otherwise the leak will not be eliminated.
Other faults
Specialists also encounter other types of breakdowns:
- Continuous water flow indicates a broken brass valve or a clogged space between it and the gasket. The mixer can be restored if it is disassembled, the insides are cleaned and, if necessary, the valve is replaced.
- If no water comes out when the valve is open, it means the rubber gasket has dried out. To make sure of this, hit the open tap with a hard object.
Pad - A scrolling valve indicates that the rod thread has broken. Depending on the degree of wear, you will either have to wrap the thread with thread or change the rod.
Faulty valve - Turbulent noise is usually caused by damage to the rubber gasket. They can be eliminated by cutting off the edge with abrasions.
Repairing a bathroom faucet with your own hands does not require special skills. This craft can be mastered not only by men, but also by women. Regardless of the type of faucet in the bathroom, repairing and replacing parts is not difficult.
Valve leak repair
A two-valve mixer may leak due to mechanical wear or breakage of the sealing washer located on the faucet box. Also, the cause of valve leakage can be wear and tear of the valve axle itself. There is nothing difficult about replacing a washer or axle box.
First, shut off the water in the pipeline, and then perform the following sequential actions:
- remove the leakage valve plug;
- unscrew the screw securing the valve to the body;
- unscrew the valve axle using an open-end or adjustable wrench;
- replace the sealing washer or the valve axle itself;
- Reinstall the repaired or new part, secure with a screw, and install the plug.
Now the two-valve bathtub faucet will not leak!
Spool switch
The main and most common problem with a spool-type device is the appearance of leakage from under the handle, which is located between the shower and the spout. Leakage can occur for several reasons:
- wear of the rubber base rings, which are located in the area of the crank rod;
- wear or absence of the sealing element made of rubber base, which is located on the switch box;
- weak fixation of the crank screw or mixer axle box.
To find out the type of breakdown, unscrew the switch handle and turn on the water supply. Where the water will flow from is where the repair work should be done.
If liquid leakage is observed at the place where a special screw or axlebox is attached to the housing, then a sealing gasket element made of a rubber base will need to be installed for the axlebox, and a sealing type will need to be wound for the screw.
If leakage is observed at the outlet of the rotary rod from the screw or axlebox, then you need to completely remove them using wrenches or gas-type wrenches. Then the rubber sealing elements in the rotary rod are replaced.
Fixing a leak in the faucet-shower switch
The shower switch also fails very often. The switch in the bathroom may leak due to a damaged gasket, which is located between it and the body of the product. Repairing the shower switch in the mixer can only be done by disassembling this part:
- holding the rod in a stationary position with pliers, remove the switch button;
- remove the valve with the stem;
- then remove the faulty oil seal from the housing;
- install the new part in place;
- Reassemble the shower switch in reverse order.
The most common failure with spool switches is the failure of the nut that secures the shower switch. Repair of the spool switch occurs as follows:
- Remove the mixer.
- Unscrew the shower hose, switch handle and spool nut.
- Then unscrew the lower switch mounting nut.
- Replace the nut with a new part.
- Use sandpaper to clean the threads and the internal cavity of the nut.
- Lubricate all parts with grease.
- Reassemble and install the mixer in its original place.
Watch the video on how to repair a faucet with a flag switch:
Types of breakdowns and methods for fixing them
We list the most common problems with sanitary water faucets with detailed instructions on how to fix the problem.
Failure No. 1 – low water pressure
Using water that comes out of a tap in a thin stream instead of a rapid stream is inconvenient and not very pleasant. If the neighbors on the landing have the same pressure, the reason is most likely that the aerator is clogged.
This element is often included in the design of modern faucets. The mixer aerator saturates the water with air bubbles, reducing its consumption and reducing splashing. Fixing a clogged aerator will not take much time or effort.
If the metal aerator is covered with rust, it is better to replace it with a new one, especially since the cost of this part is not too high
To do this, you will need to grab the aerator with pliers and unscrew it. Remove the mesh filter from the device, then rinse the parts thoroughly, clearing them of small debris and deposits. After cleaning, the device is assembled and inserted back into the tap.
Failure No. 2 – valve leakage
A common cause of water constantly dripping from a faucet is a worn gasket. This minor part plays a dominant role in old-style valve mixers, where it ensures the tight fit of the shut-off valve to the seat - the hole intended for water flow.
This type of problem can be easily corrected. You just need to stock up on a new high-quality gasket, as well as wrenches and lever wrenches.
You need to proceed according to the following instructions:
- Securely shut off the water supply system.
- Using a wrench, carefully release the bolt securing the wing.
- Move the adjustable wrench counterclockwise to unscrew the leaking housing.
- Remove the worn gasket and insert a new one in its place.
- Take the sealant - FUM tape, and wind it clockwise under the stop edge.
- Reinstall the housing and tighten the bolt, after which you can turn on the water.
If, even after replacing the gasket, the faucet continues to flow, you need to pay attention to the “saddle”. With long-term and frequent use of the mixer, this part begins to deform, become covered with scratches, cracks, which can lead to leakage.
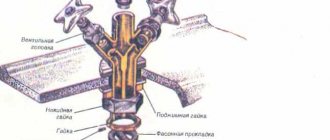
Detailed diagram showing the structure of a traditional valve mixer with two taps, identifying all components and consumables
To solve the problem, you need to identify the damaged area, and then use a cutter to turn the found area with a little effort. This way you can level the plane of the “saddle”, thanks to which the mixer will easily fall into place and the leak will stop.
Failure No. 3 – the locking mechanism is faulty
A leak from under the lever is usually associated with a breakdown of the locking mechanism, which must be replaced with a similar element.
The following signs will help you verify this:
- it is difficult to operate the lever due to unexpected resistance;
- the supply of cold/hot water stops;
- the flowing stream spontaneously changes temperature;
- it is impossible to close or open the valve all the way.
To replace the cartridge you need to use the following instructions:
- Remove the plug from the housing.
- Use a Phillips screwdriver to loosen the mounting screw.
- Remove the lever, and then remove the decorative nozzle.
- Using an adjustable wrench, unscrew the nut that secures the position of the cartridge in the housing.
- Remove the faulty unit.
- Place a new element in its place.
The final stage is to assemble the device in the reverse order and install it in its original place. Then the mixing fittings are reconnected to the water supply lines, after which the water is turned on and the work done is checked.
When replacing the cartridge, pay attention to the tabs that are on this part. They must coincide with the recesses located inside the housing. If this condition is not met, the mixer will leak
Please note that cartridges vary significantly in size and configuration. In order not to make a mistake when buying a new part, it is better to come to the store taking the old unit.
Breakdown No. 4 – problem with the ball mixer
If the ball joint is leaking, which may be caused by a worn gasket, you can try to repair it. To repair a ball mixer, you must first turn off the valves on the water supply system. After this, you need to unscrew the bolt on which the mixer is mounted and remove the device lever.
Next, you will need to unscrew the threaded connection and dismantle the faucet dome. After this, you need to find the sealing gasket and clean it of dirt. If there are any defects on it, this part must be replaced. It is also better to inspect the ball for damage. If they are found, you will have to change the tap.
The mixer lever must be removed carefully and accurately. It is necessary to perform loosening movements until the resistance weakens. After this, you need to pull the lever up and pull it out
You should also consider the sleeve in which the ball is installed. If necessary, worn out seals around the moving parts of the device should be replaced. After this, you can assemble the reinforcement by performing the operations described above in reverse order, and the parts should be sealed with a special compound or FUM tape.
Failure No. 5 – the housing gasket is worn out
One of the most common failures of lever faucets in the bathroom is caused by the fact that the spout is constantly in motion. Because of this, the rubber gasket located in the groove quickly wears out. To change it, you need to separate the gander from the body by unscrewing the fixing nut.
The damaged gasket is removed from the spout groove, after which a new part is installed there, and the gib is mounted in the body. The thread of the fastening nut is wrapped in 2-3 layers of FUM tape, after which the part that secures the spout is screwed in.
Breakdown No. 6 – repair of the faucet-shower switch
Problems with the shower switch are also common sources of leaks. This is mainly caused by a damaged gasket that is placed between the housing and the switch.
For repairs, you will need to disassemble the mixer, which is done as follows:
- the switch button is removed from the rod, which is held in a stationary position;
- you get the valve and stem;
- the oil seal is removed from the housing;
- a similar new part is installed in the intended place;
Next, you need to perform the manipulations in reverse order so that the shower switch is completely assembled. After this, you can turn on the water and check the quality of work.
The cause of malfunctions of spool switches is often a broken nut that holds this part. To cope with the situation, you should dismantle the tap, remembering to turn off the water. Remove the shower hose and switch handle.
Modern faucets may have a built-in or specially installed switch. The latter has a collapsible design, which greatly facilitates repairs. If the built-in unit breaks down, in most cases you have to replace the entire accessory
Unscrew the nuts that secure the spool and switch. Replace the broken part with a new one. Clean the threads, as well as the internal cavity of the nut, with sandpaper. After lubricating all parts with grease or a similar compound, install the mixer in its original place, and then turn on the water.
If the button that turns off the shower does not return to its place, then the spring has failed. To correct the situation, you need to disassemble the switch, as described above, and replace the broken element.
When water flows simultaneously from the shower and from the tap, without the ability to switch, the reason is a faulty oil seal, which is located on the switch rod.
In this case, the following operations are required:
- purchase a new oil seal, turn off the water;
- remove the button and remove the rod;
- remove the old one and insert a new oil seal;
- assemble the switch.
After repairing the mixer, you can turn on the water to check the correctness of the work.
Failure No. 7 – leaking shower hose
Sometimes water leaks at the connection between the faucet/hose or the hose/shower head. In such a situation, the gaskets will need to be replaced. After turning off the water, the hose clamping nut is unscrewed with pliers, and then the old gasket is removed.
Instead, a new part is inserted, and it is better to give preference to a more reliable paronite or silicone product.
The design of the shower head and shower hose does not imply the possibility of disassembling them. If these elements malfunction, it is impractical to carry out repairs, so it is better to replace them with new products
To seal, 2-3 layers of FUM tape are wound onto the thread, after which the clamping nut is tightened. Finally, the water is turned on and the operation is checked.
Failure No. 8 – other faults
We list a number of other faucet breakdowns that users may encounter:
- A continuous stream of water may be caused by a broken cartridge or a blockage that has formed between it and the gasket. In this case, you need to disassemble the tap, clean all the parts, and if necessary, change the valve.
- A dry rubber gasket can cause water to refuse to flow when the valve is open. To verify this, just tap the open device with some hard object.
- When the rod thread is torn off, the valve begins to rotate. To solve this problem, you can try wrapping the thread with thread, but only replacing the part will provide significant help.
- A damaged rubber gasket can cause constant noise in the faucet. To fix the problem, it is recommended to change the gasket or cut off the worn edge.
As we can see, many faucet malfunctions can be easily corrected with your own hands using simple tools.
Before starting all work, it is important to carefully read and, if possible, watch the instructions, and perform all actions clearly and carefully.
Faucet-shower button failure
If after turning off the button does not return to its place, then the reason is a malfunction of its spring. You need to disassemble the switch in the same sequence as described above, and then replace the faulty part.
And if the switching does not occur at all, and water pours out of the tap and shower head at the same time, then the reason is a breakdown of the oil seal, which is located on the switch rod. It is necessary to repair the push-button switch in the following sequence:
- remove the button;
- remove the rod;
- replace the old oil seal with a new one;
- assemble the switch.
Turn on the water and check the operation of the device!
Repair and replacement of crane axlebox
This element is the main locking mechanism of the mixer. The internal core responsible for the operation of the faucet needs to be replaced if any of two “symptoms” appear:
- when constant leaks occur when closed;
- when uncharacteristic sounds appear in the form of a grinding sound when turning the mixer.
The sequence of actions when replacing a crane axle box depends on what type of device: with a worm mechanism or a disk version.
Devices with worm gear
Worm-mounted crane axle boxes are equipped with a retractable rod with a rubber cuff. Due to 2-4 turns of the rod, the water supply is completely shut off. Mechanisms of this type are famous for their low price and ease of use. But they have a short service life.
The limited service life is due to loss of smooth operation, which occurs due to a large number of closing/opening valve revolutions
Devices with a worm mechanism must be replaced if cracks or chips are detected on the seat.
Replacing the crane axle box is carried out in several stages:
- Remove the top cap from the flywheel. To remove the tap valve, unscrew the bolt located under the flywheel cap. If this process causes difficulty, use pliers.
- With a little effort, unscrew the valve. The threads and inner surface of the flywheel are cleaned from operational debris accumulated in the cavity.
- Using sliding pliers, the “hardened” faucet fittings are unscrewed, opening access to the core installed in the mixer.
- Carefully remove the axle box. To ensure a tight fit of the new core, thereby preventing liquid leakage, the mixing thread is cleaned before deepening the valve axle. Using a card brush, the flywheel base and the nose of the gander are also cleaned.
- After making sure that the new axle box is compatible with the threaded connection, screw the new element into place of the removed one.
- Reassemble the tap in the reverse order.
To prevent damage to the glossy surface, before fixing the instrument, it is recommended to build a layer by placing a thick piece of fabric under it.
When screwing in a new axle box, to seal the thread, it is necessary to wind it in several layers using FUM tape
When installing an inexpensive mixer model, it is advisable to check at the installation stage that there is a sufficient amount of lubricant. If necessary, the seals should be lubricated with silicone or any other waterproof lubricant.
Disc-type crane axle boxes
The main working unit of the crane axleboxes, made of ceramics, are two tightly pressed plates with symmetrical holes. When displaced at the moment the handle is turned, they block the flow of water.
Faucet boxes made of ceramics most often become unusable due to interaction with water, which contains various types of impurities.
Ceramic faucet axle boxes are famous for their long service life, but less resistance to contaminated water. The main reason for their failure is the entry of foreign objects into the interplate space.
If the integrity of the ceramic inserts responsible for controlling water flows is damaged, they cannot be repaired. In this case, the defect can be eliminated only by completely replacing the old core with a new one.
The technology for disassembling a disk structure is not much different from that used for worm mechanisms. It includes five main stages:
- Using a screwdriver, lift the top plastic valve cover.
- Unscrew the fixing screw.
- Remove the flywheel.
- Remove the upper part of the axlebox from the saddle.
- By separating the upper and lower parts, you gain access to the ceramic discs.
When installing a new ceramic core, it is important to control the degree of tension. The easiest way to ensure that the faucet axle is tightly screwed and pressed into the mixer is by installing a lock nut.
In the future, in order to prevent damage to the disk core, experts recommend installing coarse filters at the apartment entrance. They will protect ceramic elements from the harmful effects of water impurities.
Video tip: how to repair a disc crane axle:
Repair of shower hose and watering can
It is not uncommon for a bathroom faucet with a shower to break down. As a result of wear or destruction of the gaskets, leaks appear at the junction of the shower hose and the body or the hose and the shower head. Accordingly, the repair will consist of replacing the gaskets:
- Unscrew the clamping nut of the shower hose using pliers.
- Remove the old gasket (washer).
- Install a new, better paronite gasket.
- Wind 2-3 layers of FUM tape onto the thread.
- Tighten the clamping nut.
If a leak has formed in the hose itself, then it must be completely replaced.
Shower switch repair
Almost all bathroom faucets have a built-in shower switch; it can be made in the form of a button or a lever. The reason for the breakdown is the same as for other faucet components - bad water and severe wear.
If water leaks from under the switch itself, then most likely the sealing gasket has worn out or there is leakage along the threads. The repair will consist of wrapping fum tape on the threads and replacing the gasket with a new one. Sometimes it is enough to tighten the sealing nut a little to stop the leak.
Another case is when the water flow from the tap to the shower does not switch, or we see it not turning on completely. Repair will require replacing the spool gasket or replacing the entire switch if its design is non-separable.
The design of the push-button switch is slightly different. A rod with a spool at the end moves inside the axle box, which shuts off the water supply. Fixation in the extreme position occurs with the help of a lock, and the reverse movement is set by a spring. If the rod does not lock in the extreme position, then the lock is worn out and the entire axlebox needs to be replaced. If the spring breaks, the button will not return to its original position on its own; such axle box is also replaced entirely. Repairing the spring itself or replacing it with another is possible, but impractical.
You may encounter a problem such as a leaking shower hose. The first step is to replace the sealing gaskets at the junction with the mixer and watering can. If this procedure does not help and the leak persists, then you will have to replace the entire hose with a new one - it cannot be repaired.
The water pressure has become weak
If the pressure of the water stream in your bathroom has become weak, but the volume in your neighbors remains the same, then the reason is that the aerator is clogged. This is a special metal or plastic filter in the form of a mesh at the end of the spout. This part saturates the water with oxygen, filters it and prevents strong splashing. Repairing the aerator is very simple and consists of cleaning it.
To return the stream of water to its previous pressure, you must:
- Using pliers, unscrew the aerator.
- Rinse it from rust, salt deposits and small debris.
- Place the mesh in place.
It is better to replace a rusty filter with a new one.
You can fix the bathroom faucet yourself, since DIY repairs are no longer a problem for you. Keep in mind that by using high-quality products and consumables, many such problems can be avoided in the future.
Plug type switch
The main malfunction of this type of device is poor fit of the plug to the switch. To eliminate the malfunction, the switch is completely disassembled, so it is important to know how to disassemble the mixer:
- First, the screw is unscrewed;
- the handle is removed;
- the cap handle is unscrewed;
- the lock washer is removed;
- the plug is pulled out.
Nowadays, cork switches can be found in retro-styled plumbing fixtures
Then you can wipe the plug with gasoline or kerosene; you can also wipe the inside of the body with the same substances. If the plugs are damaged, you can use an abrasive paste. Troubleshooting shower switches in faucets is a rather complicated process that requires care and experience. It’s better to start by fully learning how to repair a faucet depending on the type, and only then can you begin further repairs. If you have never had to repair switches, then it is better to use the help of professionals.
Two-valve mixer malfunction
Classic faucets have two working units in their body - a core with a ceramic or rubber gasket. The core is also called axle box. Failure of this unit leads to leakage. It is better to replace the core with a ceramic gasket completely, since it is very difficult to find a suitable gasket. You can cut the rubber gasket yourself from a suitable piece of rubber or buy it in a store.
Crane axle device
- Unscrew the plug on the valve.
- Carefully unscrew the screw from the valve.
- Remove the valve handle.
- We remove the decorative trim.
- We unscrew the core with a key.
- Replace the core or rubber gasket.
- We assemble the structure.
Advice. Rubber and ceramic cores are often interchangeable, so you can choose one of the options that you like.
Classic two-valve bathroom faucets often have a flat or round movable spout. Due to the hardness of the water and wear of the rubber gasket located under the clamping nut, a leak occurs in this place over time.
Diagram: two-valve mixer device
To replace the gasket you will need an adjustable wrench and FUM tape.
- Unscrew the spout clamp nut.
- Inspect the spout, remove the old gasket and insert a new one.
- Place some sealing tape around the threads of the spout.
- Secure the gooseneck with a clamping nut.
- In a flat spout, after unscrewing the clamping nut, it is necessary to unscrew the inner spout sleeve to get to the sealing gasket. You will need a hex wrench. After unscrewing, the sleeve is removed together with the nut. Now you can replace the gaskets and install the jib in its original place.
Replacing the gasket
Identifying the problem with the spout
To determine the malfunction of such a water supply mechanism unit, you must:
- Before checking, turn off the water supply to the mixer;
- After stopping the water supply, wipe the mixer dry;
- Once everything is dry, you need to run water to the faucet (without feeding it through the gander) to see if the leak is caused by another component of the device;
- Then, after making sure that the leak is not caused by other mechanisms of the water mixer, you can proceed to the next step;
- After checking that the gander is not leaking, it is necessary to gradually increase the flow of water flowing through the spout. To make sure that it is from it that water is flowing.
- Once you have verified that the leak is caused by the gander, you can begin to repair or replace the faucet assembly.
The faucet is leaking at the connection between the spout and the mixer body
It’s easy to block a critical condition - just replace the gasket:
- unscrew the fastening nut;
- get the spout (spout, gander);
- gasket replacement;
- install the spout in place;
- wrap the thread on which the fastening nut is screwed with fluoroplastic sealing material, in 2 layers;
- fix the spout fastening nut.
It is worth considering a model of a ball mixer with one handle:
- fastening valve;
- rotary handle;
- case cover;
- screw;
- mechanical cleaning cartridge;
- rubber ring;
- frame.
How to change the gasket in a ball faucet model:
- carefully remove the head;
- remove the worn ring from the spindle protrusion;
- replace with a new one;
- reverse assembly.
Troubleshooting a single-lever faucet with your own hands is essentially a simple task.
Types of taps and causes of malfunction
The main reason for the malfunction may be the poor quality of the mixer. On the plumbing market today you can inexpensively buy low-quality Chinese or Turkish plumbing fixtures with a short service life. When choosing a new faucet, it is better to forget about saving and buy a quality product, because repairing a faucet also costs money.
The second reason for faucet failure is short-lived consumables. For example, if you buy a cheap rubber gasket that does not work well with hard water, the faucet will quickly fail. If you fork out money and buy a ceramic insert, then repairing the mixer tap will be postponed until the distant future.
If the product is not installed correctly, this can also cause various breakdowns and significantly reduce its service life. Installation and repair of cranes must be carried out in accordance with their design features.
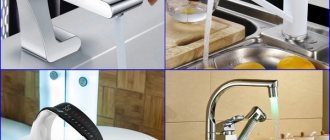
Mixers can be:
- single lever;
- two-valve;
- contactless.
Each type of product has its own individual installation characteristics; the cost of replacing the mixer is also determined individually.
The most common problem encountered with single-lever faucets is a decrease in water flow. This malfunction is caused by a clogged aerator - a small nozzle that is attached to the end of the gander. Thanks to the aerator, small debris, pebbles and other troubles do not get into the water we drink. The problem of a clogged aerator is not difficult to eliminate - you just need to unscrew the aerator and rinse it with water or blow it with air and screw it back on. Even a high school student can do this kind of drinking water tap repair.
Another common cause of faucet failure is a worn gasket, which is a small circle of rubber with a hole in the center. Old faucets were equipped exclusively with rubber gaskets. Currently, gaskets are made from more reliable paronite.
You can try to fix this breakdown yourself, but without the appropriate skills, there is a high probability of causing a flood in the apartment not only in your own home, but also in your neighbors’. Therefore, it is better to entrust such faucet repairs, for which the price from the master will be small, to a specialist who will do:
- removing the metal ring with which the spout pipe is attached to the tap;
— removing the spout pipe and removing the worn-out gasket;
— installation of a new one;
— winding the threads of the spout pipe with sealing material to more tightly fix the parts together;
- fixing the spout pipe with a metal ring.