Modern kitchen faucets come in several types; they differ in design, ease of use and cost. Over time, any model needs preventive maintenance related to updating parts; to carry out the work yourself, you need to know the structure of a kitchen faucet.
In order to save a considerable amount of money on calling a plumber by repairing the faucet yourself, you need to study the internal structure and operating principle of a specific type of faucet. The task is greatly facilitated by the fact that all mixing plumbing fixtures are unified, their parts are interchangeable, and the design can be divided into several groups.
Modern kitchen faucets
Causes of leaks
Repairing system problems usually begins with determining the location of the leak and finding out the cause.
The main reasons why a faucet drips include:
- Purchasing a device made of low-quality material. When buying a product, you need to pay attention to the price of the product and the material used. However, there is no guarantee that the brand indication is not a fake.
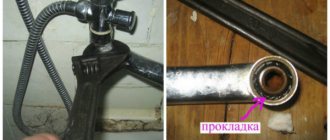
- The cause of a leak from the tap can be incorrectly followed installation rules: poor-quality processing of joints, incorrectly selected sealing gaskets.
- Violation of technique when using equipment. For example, the tap was opened with great effort, or without observing the angle of rotation.
- The main reason is considered to be the expiration of the service life of small components of the mixing device: breakage of axleboxes or cartridges, thinning of gaskets and other malfunctions.
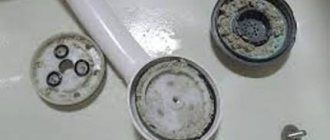
- Dripping water from the faucet while turning the handle will cause the filter in the aerator outlet to become clogged.
Attention! To eliminate leaks due to a clogged filter, remove the device and wash it with a brush and water. In other cases, it is necessary to change elements of the device.
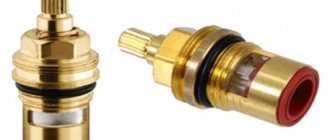
With ceramic faucet axle box
This is an analogue of the previous model, which has a longer service life. The reliability of the design is ensured by replacing the rubber gasket and ceramic plates. However, such faucet axle boxes are sensitive to water quality: the presence of sand or small debris has a detrimental effect on the ceramics. In particular, the plates are ground off, which leads to a violation of the tightness of the connections. If you use a faucet with ceramic faucet axle boxes, be sure to install a filter to purify the water.
Disassembling a model with a ceramic faucet axle box occurs according to the scheme described above, but you can repair the mixer differently. If the plates are worn, they must be replaced. You can purchase the necessary elements at a plumbing store, taking the faucet box with you. The problem may also lie in the wear of the gasket: it presses the plates, blocking the water. If the faucet is dripping, you can extend the gasket by gluing a layer of rubber on top or wrapping several turns of electrical tape. Don't forget to make holes for water! The valve axle box in the mixer is replaced if routine repairs are not possible.
USEFUL INFORMATION: Ultraviolet filters for water purification
Types of repairs depending on the location of the leak
- Leak under the sink. If it drips under the kitchen sink, it means the hose leading to the plumbing is damaged, or the cause is a worn gasket where the hose connects to the sink bowl. Repairing this leak will require replacing the hose or sealing gasket at the outlet of the sink.
- Leaks where the spout connects. The junction of the body and the spout leaks if it is worn out or the gasket is outdated. It is necessary to install new gaskets on the replaced seal.
- The gander is leaking. The gander leaks if the housing is damaged. This can happen because the outlet filter is clogged, the water pressure, which passes through with difficulty, puts pressure on the walls of the mixer and cracks appear. Single-lever models, which have a built-in body with a monolithic casting, require a complete replacement of the device except for the cartridge. If the mixer has two valves, then the gander is replaced with a new one.
- Other places of leakage. Often the faucet starts dripping, but there is no obvious reason for this. It is possible that the formation of limescale on the elements of the device leads to a malfunction.
It is necessary to clean the faucet with household solutions designed to remove rust and lime.
How to Fix a Current Single Lever Faucet
First you need to find the location of the leak and determine its cause. Then turn off the water flow using the shut-off valves on the supply pipes. And after that, disassembling the crane begins, identifying faulty parts, and replacing them. Most likely, the cause of leakage is aged gaskets. Perhaps a grain of sand has gotten under the regulating ceramic disc, and therefore the flow of mixed water is not tightly blocked.
If it is no longer possible to repair the faucet, for example, if a crack appears in the body, then it will need to be removed and a new one installed.
What do you need for work?
For any work you need to prepare a workplace and tools. In this case, you need to put the removed parts somewhere in a certain order so as not to lose or mix up anything. The tools you will need are a pair of screwdrivers of different sizes, pliers, hex keys, an adjustable wrench, silicone grease, and rags to isolate the decorative coatings from damage and to wipe the removed parts. Just in case, you should prepare gloves for work. There should be a set of various gaskets and seals nearby.
How to disassemble the mixer
To disassemble the crane, you need to understand its design. First, the decorative trim on the body is removed. Underneath there is a screw connecting the lever and the adjusting rod. The screw is unscrewed with a hexagon. Now it is possible to remove the lever from the body and unscrew the protective casing, and unscrew the clamping nut from under it. In the ball version, a rubber sealing collar and the ball itself will be found under the lever. They need to be pulled out, inspected and cleaned. In the cartridge version, for inspection you need to remove the cartridge. Sometimes water leaks into the gap between the parts of the faucet body or between the body and the sink. In this case, you also need to change the gaskets.
All damaged parts must be replaced.
Leaking from under the lever
Leakage from under the lever is eliminated by checking the rotating mechanism, gaskets and replacing them.
Leak in the turning mechanism
A leak in the turning mechanism can be caused by a loose fit of the plates to one another. Perhaps a grain of sand got between them, or one of them cracked. You can try to remove the grain of sand, but if the plate is cracked, you need to change the cartridge.
Cartridges for single lever mixer
Leaking from under the stand
Leakage from under the stand is eliminated by replacing the gasket.
Leaking from under the base of the faucet Related article:
How to change a faucet in the kitchen with your own hands : detailed step-by-step instructions, choosing a faucet model, what the type of product depends on, advice and recommendations from experts.
Types of faucets in the kitchen
Varieties of mixer designs are divided into three types:
- Single lever mixer refers to ball devices. The mechanism regulates the pressure and temperature of the water supply, operating with one lever. To supply water, inside the structure there are cartridges in the shape of a ball with holes, or cartridges in the form of a cylinder with ceramic plates inside. You can simply replace the cartridge yourself
Attention! The downside of a ceramic cartridge is its susceptibility to lime deposits.
- A two-handle mixer is a standard device in the kitchen. There are two valves for supplying cold and hot water. Valves can be worm-type, having a rubber shut-off valve, or ceramic, having a sealing cylinder made of ceramic material.
- Ceramic valve It’s better to use; to open or close the water, you only need to make a half or quarter turn.
Ceramics have a longer wear resistance period and can only be damaged if hard sand gets into the water supply system.
- The sensor model of the mixer is the latest development; water is supplied from the tap without contact; a special sensor reacts to the movement of hands or other objects. Faucets are configured to automatically supply water at a certain flow and temperature, which makes using these devices in the kitchen inconvenient.
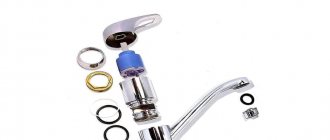
Single lever
This is the most common design found in most kitchens. This is a rotary mechanism where the water pressure and temperature are regulated by lifting or turning the handle.
A faucet of this design leaks for three reasons:
- Deformation or damage to the rubber gasket.
- Mechanical damage to the housing.
- Cartridge failure.
What to do in these situations? First, visually inspect the housing for chips or cracks. A detected crack clearly indicates that the mixer needs to be replaced. You can briefly cover the chip with sealant or “cold welding,” but this is a temporary measure. If the outer shell is in order, the faucet needs to be disassembled. This is done as follows:
- Remove the decorative plug. This is a small plastic circle that is located under the rotary handle. It can be picked up with a flat screwdriver or a knife blade.
- Unscrew the fixing bolt. To do this, you will need a hexagon of the appropriate diameter. It is not recommended to use a screwdriver: you can grind off the edges of the retainer.
- Remove the swing arm.
- Unscrew the control washer.
Having completed these manipulations, we gain access to the internal filling of the mixer. In particular, you can see the O-ring and the cartridge that is located under it. If the faucet leaks due to wear of the seal, we replace it. The new ring must be larger in diameter than the allocated connector and fit into place with noticeable effort.
If upon visual inspection the wear of the o-ring is not noticeable, the problem lies in the cartridge. This element cannot be repaired and must be replaced entirely. To ensure that the faucet is repaired and the leak is eliminated, you need to clean all the components from any deposits that have formed. The mixer is assembled in reverse order.
USEFUL INFORMATION: Advantages of a touch-sensitive water tap: choosing an electronic mixer
Kitchen renovation work
To repair a sink, you will need a set of tools and a little knowledge about the structure. The easiest way to repair a single lever mechanism is to replace a broken cartridge.
A set of tools that you need to have with you:
- Availability of an adjustable wrench for plumbing fixtures. Using a wrench, the two-valve model is dismantled; to do this, unscrew the nut with the lining that secures the cartridge.
- Availability of screwdriver and hexagon. For disassembling valves while unscrewing handles and mixer heads.
- The presence of a knife is determined by the need to adjust seals to size, remove plugs, and cut linen thread or FUM tape.
Before starting work, you need to make sure that the necessary elements for repair are prepared, this is a new cartridge, rubber seals, silicone sealant, flax thread. You may need a limescale remover; all parts must be cleaned of it before installing new ones.
Repairing a single lever faucet model
In a single-lever faucet model, the element that regulates the operation is the cartridge. The cartridge mechanism is usually collapsible.
Attention! The signal for repair is weak pressure from the tap or a leak when the tap is turned off. If the tap flows when it is closed, it means that the locking mechanisms have worn out.
The faucet repair scheme is typical, but sometimes it differs depending on the brand of the faucet. General
The mechanism for all devices is considered to be a nut that secures the cartridge and is held in place by a functional lever. The decorative overlay of the case covers the fastening elements. Pry off the cover with a screwdriver, remove the cartridge and install a new one. If there is a leak at the junction of the faucet with the sink, you must replace the sealing ring that is inserted between them. Remove the housing and replace the old ring. Instructions for using any type of crane will allow you to carry out repair work, observing the nuances of individual manufacturers.
Ball mechanism repair
Locking mechanisms with a ball device occupy second place in household consumption, because they are considered durable and easy to use. The elements are made of very durable material.
Impurities in the water of various salts and oxides that clog the elements have a negative effect on the ball mechanism. Water must be purified using filters. One of the filters performs rough cleaning; it is a housing with a brass mesh, that is, it is designed to retain solid components of flowing water. The filter is cleaned of deposits, since sediment can completely block the passage.
Attention! All plumbing fixtures that are sensitive to dirty water should be equipped with filters to clean out coarse components.
Instructions for repairing a ball valve:
- Unscrew the screw holding the handle.
- Remove the handle from the shaft.
- Using a screwdriver, remove the threaded screw.
- Remove the plastic seal and cover.
- Clean the gasket from dirt deposits and replace it with a new one if necessary.
- Remove the ball-shaped locking part, inspect it, and if there is severe wear, replace the device.
- Replace the ball seals by removing them using a thin screwdriver or tweezers.
When assembling the device, coat all connections with sealant.
Attention! If the ball mechanism breaks, it is worth replacing with a new one, since the device requires precise assembly, which is difficult for a non-professional to perform.
How to Replace a Seal Gasket
A common cause of malfunction is a worn gasket for sealing connections. In this case, the seals require replacement. Most often, the gasket needs to be changed on the axle box that serves for constipation, also at the junction of the spout with the sink. To work, you need to have a plumbing wrench and gaskets.
How to correctly replace a two-valve device in the axle box:
- Remove the plastic plug and unscrew the screw using a Phillips screwdriver that secures the rotary flywheel.
- Unscrew the axle box using an adjustable wrench.
- Install a new gasket on the washer body and axlebox valve, not forgetting to lubricate the seals with sealant.
When installing the seal in the drain mechanism, care must be taken not to damage the fixing head. It is necessary to put material under the key to insulate the adjustable wrench, for example, electrical tape or paper. After removing the ebb, replace the gaskets.
When replacing the ceramic mixer axle seal, you need to purchase a replacement set of gaskets and ceramics. The work is carried out according to the instructions outlined above. If the gasket in a cartridge-type device that connects the body plates is worn out, they are not replaced, since the mechanism is non-separable.
Repair work in gander
In a two-valve type faucet, the old part is unscrewed and a new one is installed. In a single-lever type faucet, the jib is fused with the body and cannot be replaced; you will have to change the mixer or repair the drain. Using cold welding, epoxy resin can repair cracks in the casting.
As a rule, the casting device is made of copper or brass, so it can be easily soldered. Before soldering the cracks, it is necessary to remove the layer of chrome coating on top using sandpaper. Next, solder the cracks using a high-power soldering iron.
DIY valve repair
Valve taps are also called classics in water supply. And, despite the fact that such cranes are gradually replacing newer designs, there are still enough of them. Over several decades, their structure has not changed, only the design, which has become many times better, more diverse, and more refined.
At the moment, you can find both the simplest models and quite unusual ones. Taps for water taps of this type are also used, as they are reliable and simple, and can last not just a few years, but several decades. If all the “insides” of the structure are made in accordance with all the requirements and GOSTs, then the only thing that can fail during all this time is the gaskets. Replacing rubber seals is the main way to repair a valve tap.
Replacing the rubber seal
If the valve is completely closed, but water continues to drip in the bathroom or kitchen, then the whole problem is in the gasket on the valve, which has lost its elasticity. The fact is that over time it ceases to press tightly against the saddle, which is why water continues to flow, and because of this the faucet can not only drip, but even leak. In this case, fixing the faucet means changing the gasket. This will require a wrench, but it will be more convenient to use an adjustable wrench and a set of rubber gaskets.
Before you begin to repair a dripping faucet, you should turn off the water supply (if possible, turn off the water only in this branch). After this, check that the water is turned off, and if nothing is leaking, you can begin repairs. You will need an adjustable wrench or wrench to unscrew the head housing, i.e. upper part of the body.
Ideally, when repairing, you need to work with an adjustable wrench, and in order not to spoil the surface during the process, you should wrap it with a soft cloth, and then apply the wrench. When the head is unscrewed, remove the valve, and now you can change the gasket or install a new valve. The old valve should be pryed off with any sharp object - a screwdriver with a spatula, for example, or an awl.
When selecting a gasket, it is important to ensure that the edges are beveled at approximately 45 degrees, otherwise the water supply will begin to make noise. If you don’t have this in your arsenal, you can trim the edge with something sharp - scissors or a knife. So, to fix a dripping faucet in the absence of a suitable gasket, you can cut this element out of dense rubber (porous material is not suitable). The thickness of the rubber sheet should be 3.5 mm, and the internal diameter is slightly smaller than the diameter of the rod, please note that the outer edge should not protrude. Remember to bevel the edges at 45 degrees.
Once the gasket is installed, the valve can be put back in place and the head screwed back on. Newer models of taps do not require winding onto threads. Even more, winding is contraindicated, since it is precisely this that often causes cracks to form in the body. If you are repairing a USSR tap, you should lay tow on the threads and then tighten it. After this, turn on the water, but not at full pressure, but gradually.
Sometimes with such a gasket on the valve a completely different story can happen - the water barely flows or does not flow at all. In this case, it is obvious that the gasket flew off the rod and simply blocked the flow of water. To begin with, you can try closing and opening the tap several times, and if this does not help, then repeat the operation described above, i.e. change the rubber gasket. The main thing is that you do not forget to remove the old element that is stuck to the saddle.
Water leaking from under the stem
If water drips from under the valve, then the seals are worn out. A leaking faucet can be repaired using two methods. First, try to tighten the head housing harder. This all needs to be done using the same adjustable wrench. It is not advisable to use pliers as they leave marks. Tighten the head as much as possible, but not too much. If the threads are tightened perfectly, but water still oozes out, then you should also change the gaskets on the oil seal. To do this, you need to tighten the tap to the limit, and then remove the tap head again, remove it with a sharp object and remove both rubber rings, replacing them with new ones.
Can't turn off the water
If you have already changed the gasket, but you still cannot turn off the water, the thread breaks off when the tap rotates, you should change the stem, as the thread on it has worn off. There are two options here - change the stem or change the entire valve head.
If the thread has not been worn out, the rubber seal is new, and the faucet is leaking, you should definitely check the seat, as there is a possibility that there is a hole in it. It will not form immediately - it will be washed away by water supplied under high pressure. If in some place the gasket is not pressed tightly, then a sink will form in this place.
Occasionally, water begins to undermine the circumference completely, which causes sharp edges to appear, on which the rubber seal is quickly damaged. In this case, the sharp edge and gap should be removed. To do this, take a regular screwdriver and dull the sharp edge by running it along the edge. Carry out a similar operation using natfil or fine-grained sandpaper. The main thing is to get a smooth and non-sharp edge (as far as possible).
How to avoid faucet leaks
In order for the faucet in the kitchen to serve for a long time without leaks, it is necessary to install products made of high-quality material, for example, stainless steel, brass, copper. Provide water pipes with filters.
If you need to repair a mixer that has two valves, then you need to disassemble the locking box and install new rubber and ceramic gaskets. For repair work on single-lever mechanisms, it consists of replacing the cartridge. To work, you will need an adjustable wrench and new sealing gaskets with a set of structural elements that must be replaced.
To quickly make repairs, you need to:
- Know how to quickly shut off the water from the riser.
- A set of necessary tools for repairs.
- Have a stock of new faucet parts that are installed in the house.
- Know the rules for carrying out repairs.
Preparing for work
Before disassembling the faucet in the kitchen, you need to carry out preparatory work. In particular, shut off the water supply: we close the shut-off elements on the main house pipes leading into the apartment. Considering that shut-off valves are rarely closed, the procedure can cause certain difficulties. Lubricant applied to the threads will help turn the tap. You should not use hammers or other impact tools: you can break the threaded connection and flood the neighbors below.
USEFUL INFORMATION: How to connect a gas stove in an apartment
The right thing to do is to prepare your tools in advance. In particular:
- Screwdriver: flat and Phillips.
- Pliers.
- Set of hexagons.
- A set of wrenches, including an adjustable one.
In addition, you may need FUM tape, rubber for making seals, or flax thread.
So, how to properly repair a faucet?
How to repair a dripping two-valve faucet
Two-valve taps have been widely used in everyday life for a long time. They come in two types - worm and with a ceramic axle box. Usually the same ones are installed in pairs on one mixer, although both versions are interchangeable.
Required tools and supplies
The necessary tools are the same as for repairing a single lever faucet. In addition to this list, you need to prepare a piece of rubber sheet 2 - 3 mm thick in order to be able to cut out the locking gasket if you don’t have a branded one at hand.
Preparatory work
Before starting work, you should carefully review the instructions with a drawing of the crane, talk with knowledgeable people, this is especially important for those who are going to do repairs for the first time, determine the procedure for yourself, prepare the necessary plumbing and plumbing tools and instill in yourself confidence in success.
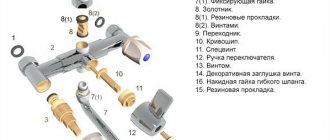
Design of a crane axle box with a worm gear
Instructions for fixing leaks
Basically, you need to use common sense and basic tool skills.
First, you need to remove the decorative plug with a red or blue pattern on the handwheel, then unscrew the screw found underneath it. The handwheel can be removed. Then, using an adjustable wrench, unscrew the faulty axle box and replace the gaskets: both retaining and intermediate. Lubricate new products with silicone sealant, and then reassemble everything in the reverse order.
If the cause of the leak is a crack in the housing, then there are several options for further action. You can cover the crack with epoxy resin or cold welding. You can solder it, you just need a high-power soldering iron, at least 100 W. In both cases, it is necessary to clean the repair area from the galvanic decorative coating. If you are not sure that such repairs will be completed successfully, it is better to replace the mixer entirely.
Disassembling the valve
Replacing the gasket
Gaskets age, lose elasticity over time and begin to leak water. It is better to replace them with branded ones. If they are unavailable, you can cut such rubber products yourself.
Replacing the stuffing box seal
Gland seals also do not last forever; they must be replaced whenever the faucet is disassembled.
Crane axle design with ceramic discs
Related article:
How to disassemble a single-lever mixer : detailed step-by-step instructions with photos and videos, the design of the mixer, a set of preventive measures, recommendations and advice from experts - in our publication.
Disassembling the cartridge mixer
As mentioned above, a cartridge mixer differs from a ball mixer only in the presence of a cylindrical working body. It fits tightly into the body of the device, preventing water from passing through the gap. But if the rubber cuffs become unusable, the mixer begins to leak. Dismantling of this type of cranes is carried out in exactly the same way as in the previous case. First, the handle is removed, then the plastic sealing cap is removed, and at the very end the cartridge itself is pulled out. Underneath there are holes into which rubber cuffs are inserted; they create a tight seal between the two elements of the plumbing fixture.
A failed cartridge cannot be repaired. It is replaced with a new one.
Required set of tools and materials
In order to start repairing a kitchen faucet, it is enough to have at your disposal a simple set of plumbing tools suitable for use in different situations:
- a set of open-end wrenches (can be replaced with an adjustable wrench with a jaw width of up to 19 mm);
Set of wrenches
- Phillips and flathead screwdrivers (need in at least a couple of sizes);
- pliers;
- fum tape (can be replaced with tow);
- solid oil
Attention! It is not a fact that all of the tools listed will be useful in a particular situation. It all depends on the design of the faulty mixer and what type of breakdown you will encounter.