A breakdown of a kitchen faucet can happen at the most inopportune moment, when there is simply no time to wait for a plumber to arrive. Agree, the ability to replace a plumbing fixture is useful to every home handyman. Moreover, you don’t need special skills or expensive tools to do the job.
Before you change the faucet in the kitchen, you need to understand its structure and have a clear idea of the procedure. We will help you in these matters.
The article provides detailed instructions for dismantling old devices and installing new models, taking into account their design features. Having studied the material, you can easily cope with the work and save your family budget on calling a plumber.
When to replace a kitchen faucet
A mixer is a piece of equipment that can work properly for many years. Faucet breakdowns and malfunctions are the result of many years of exposure to moisture and water impurities on the components of the water supply system and faucet. Here is a list of malfunctions for which replacement of the mixer is necessary:
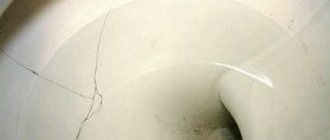
- Rust has appeared in the area where the faucet and sink meet. Further corrosion of the material will lead to water leakage through the resulting cracks in the sink and the appearance of mold;
- The water does not completely shut off after work is completed. Here the problem lies in the breakdown of the components of the mixer such as the spout, valve or faucet;
- Rust formation at the junction of the spout and the body;
- Problems along the water supply hoses. Often the breakdown is localized at the junction of the hose with the faucet mounting elements, as well as in the area of adapters, if any.
The question “how to change a kitchen faucet” may arise during a renovation, when the selected project requires the installation of a new faucet in the kitchen.
Rust and scale are the first signs of faucet replacement. Metal corrosion processes lead to leaks and disrupt the flow of water
Pressure testing and commissioning
It is recommended to pressurize the assembled structure and check for leaks. To do this, the taps on the mixer must be closed (on a lever model, lower the lever all the way). Open the linear taps on the hot/cold water lines one by one, and then carefully inspect all installation connections, as well as the mixer itself.
If after 15-20 minutes no water leak is detected, the installation was completed efficiently. You can safely start using your new faucet in the kitchen.
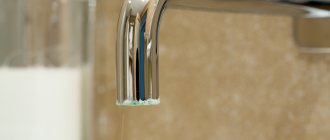
Before starting operation, it is necessary to remove the aerator - mesh filter from the mixer body. In this position, open the taps and run water for a short time in order to wash out the particles of rust, oxides, and scale remaining in the pipelines.
After the procedure, put the aerator back in place and test the water flow in filtration mode. The stream should come out smooth, without splashing water to the sides.
This is how a properly installed kitchen faucet works - an even, dense stream of water coming out of the device
Typically, well-known manufacturers provide a warranty of at least 5 years on devices. During this period, claims from buyers are accepted. The warranty period provides for the repair of kitchen faucets at the manufacturer’s expense if manufacturing defects are found, the use of low-quality materials, etc.
In this case, repairs are carried out within 20 working days, unless there are justified reasons for extending this period. However, in the history of returns, there is one important point - the warranty remains valid if the mixer was dismantled only after inspection by a representative of the manufacturer.
Types of kitchen taps
There are 3 main types of faucets that can be seen in the kitchen:
- Two-valve;
- Single lever;
- Contactless.
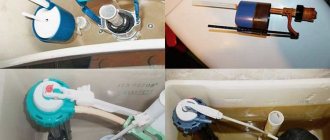
- Two-valve mixers have been familiar since the times of the USSR. Easy to use, such taps can often be found in the kitchens of most Khrushchev and inexpensive apartments. The operation of a two-valve faucet is based on the operation of a two-piece axle-box faucet for hot and cold water, respectively. When the valve turns, the faucet opens or, conversely, shuts off the flow of water to the faucet spout.
- Single-lever faucets have become popular due to their ease of operation and sleek design. The main difference is the replacement of two axle-box taps with one cartridge with holes that ensure the flow of hot, cold water, as well as mixed water into the spout. With the use of a cartridge, the external structure of the faucet has also changed: now, instead of two valves, one lever is used to regulate the flow of water, which rotates in two planes.
- Touchless faucets are rarely found in residential kitchens.
The peculiarity of the operation of such a tap is to pre-set the water temperature on a special control panel or using an adjustment valve. To turn on the water supply in touchless faucets, simply bring an object to the sensor built into the body. The electromagnetic signal that is generated in this case activates the operation of the solenoid valve, which regulates the water supply to the spout. The tap stops operating a few seconds after the object is removed from the sensor.
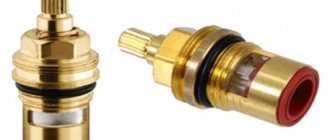
Crane axle boxes come in two types: screw and ceramic crane axle boxes. The latter are found in modern models, when screw ones are the lot of USSR times
Cheap single-lever models often use cartridges that incorrectly regulate the supply of hot and cold water. To avoid discomfort when operating such a crane, you should not save when purchasing
The price of touchless faucets is very high due to the additional electronics. Such tap options are often found in cafes, restaurants and other service places
The nuances of dismantling the old mixer
Before starting work, turn off the hot and cold water at the valve closest to the mixer. If they were not installed when laying out the water supply, then you need to shut off the riser at the entrance to the apartment. Next, the sequence of operations is as follows:
- open the mixer tap completely to relieve pressure;
- let the water drain completely;
- place a water container under the connections of the mixer connections with the pipes;
- Unscrew the connection and allow the remaining water to flow into the container.
Now you can start removing the old faucet. If its lower part is located between the sink and the back wall of the washing module, it will be inconvenient to work in such a cramped space, and it will be difficult to see. If possible, the washing module should be moved away from the wall. To do this, you will have to disconnect the sink drain from the sewer pipe. If you use a modern corrugated flexible pipe, this will be easy and convenient. It is better not to mess with old cast iron pipes.
The time spent moving the sink module away and returning it to its place will definitely pay off. If convenient access to the installation site of the mixer is provided, the old one will be easy to remove, and the new one will be installed quickly and without errors, the first time.
If the sink is embedded into a single countertop, then experts suggest dismantling the sink. After installing the mixer, the sink is put back, lubricating the contour with silicone sealant.
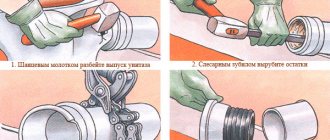
When trying to remove an old faucet, a home craftsman may encounter an unpleasant situation: the nuts and studs securing the device to the sink or countertop have oxidized and become coated with mineral deposits. To unscrew such a “soured” threaded connection, you will have to spray it with WD-40 liquid. If the connection is neglected and it was not possible to unscrew the nut (or a pin with a slot for a screwdriver slot) the first time, the processing must be repeated.
If repeated processing does not give results, you can try tapping the nut from different sides with frequent gentle blows of a small hammer or wrench.
Well, and finally, if all else fails, you will have to cut off the pipe before the hopeless connection, cut a new thread on it (or install a new fitting if the pipe is plastic).
After dismantling the mixer, it is useful to inspect all threaded connections and fittings and assess their condition. Parts and elements with signs of wear, traces of corrosion, or partially damaged rubber gaskets are best replaced while everything is disassembled and easy access is ensured. Otherwise, you will have to disassemble everything again after a while, but this time in conditions of a local flood.
Necessary tools for work
Here is a list of necessary things that you should acquire before starting installation work:
- Adjustable wrench, as well as wrenches in sizes 10, 11, 22 and 24;
- Hoses for connecting the tap to the water supply. Such hoses are sold complete with the mixer, and they can also be found over the counter in a plumbing store;
- Sandpaper for adjusting some elements;
- Screwdriver Set;
- Pliers;
- An electric drill with the necessary bit, if you need to make an inlet hole in the sink for the faucet;
- Kerosene or special lubricant for plumbing. Such compositions are useful in cases of rust accumulation and “sticking” of the faucet to the sink in order to facilitate dismantling.
This simple set of tools should be in every apartment. The only thing is that you will have to buy lubricant or kerasin at a plumbing store
Connecting the mixer to the water supply
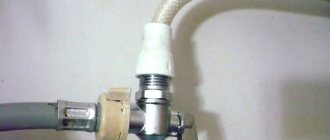
When connecting flexible faucet hoses to water pipes, try to do it so that the hot water is on the left and the cold water is on the right.
Before doing a test run of water, you should unscrew the aerator nozzle
Before making a test run of water, you should unscrew the aerator nozzle so that it does not become clogged with disturbed particles of rust and other mineral deposits. It is better to drain 20-50 liters of water into the drainage, and then put the aerator in place.
During the test run, you need to be prepared to immediately shut off the riser if an error was made during installation.
Replacing a kitchen faucet yourself is a fairly simple operation. It requires basic skills in using metalwork tools and is quite within the capabilities of a home handyman.
Material for making faucets and hoses
The mixer can be made from the following materials:
- Metal alloys based on brass, steel or bronze. These mixers have a number of positive properties: wear resistance, long service life, presentable appearance. Of the shortcomings, only one can be highlighted - the high price;
- Plastic. Plastic faucets are inexpensive, have low thermal conductivity and are not susceptible to chemicals. The plastic faucet is very lightweight and resistant to dirt. The disadvantage of such a mixer is its susceptibility to mechanical damage;
- Ceramics are used more for the manufacture of internal parts of the faucet, for example, axle boxes or even a filter. There are completely ceramic faucets, but practice shows their low wear resistance;
- Enameled and chrome-plated faucets are almost no different from those made of metal. Brass and steel are coated with a small layer of enamel or chrome, which gives shine and a metallic color to the product. Beautiful appearance is the main reason for purchasing.
An important property of a plastic mixer is low thermal conductivity. This is relevant in conditions of constant overheating of the tap during a long supply of hot water.
Plumbing hoses also differ in the quality of the material. Among them:
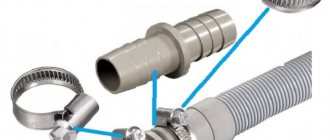
- Bellows hoses. Here the base is a rubber insert, covered on top with a corrugated layer of metal. Such conductors are durable, reliable in operation and easy to install. Low noise insulation is their main drawback;
- Reinforced hoses. They have a rubber gasket that is adjacent to a layer of metal mesh on top. These hoses are easy to bend, resistant to water changes and can be installed without problems. Disadvantages include rapid wear of the fastening nuts and compression of the gasket;
- Stainless steel hoses or nylon hoses. This is probably the most reliable option of all. They are not easy to install, but retain their shape even after the work is completed;
- Aluminum hoses. This option is short-lived, but its components are elastic and pliable;
- Steel hoses. This is a temporary option when installing a mixer, which will soon be replaced by other types of hoses. Steel hoses last no more than one year, and then they leak or completely fail.
They often sell hoses that are too short. Make sure that the hoses you purchase are long enough without tension along their entire length.
It is important that the hose fittings are of different lengths, which will simplify the installation process. The fitting is the end part of the hose that connects to the mixer body
How to change wall-mounted faucets
Sometimes wall-mounted faucet models are included with kitchen sinks. The advantage of this option is the ease of fastening directly to pipes. You do not need to use additional hoses to connect.
Decorative wall-mounted faucet in the kitchen.
Wall-mounted sink faucets are mounted in two main ways. Either with an external location, or with water pipes walled into the wall. But in any case, the replacement will be carried out using the same technology. Places where pipelines are connected and at the same time places where the mixer is rigidly fixed to the pipes. It is due to these connecting parts that the structure becomes especially strong and reliable. It is impossible to remove them.
Instructions for replacing the faucet
Now we have come to the solution to the question: how to replace a faucet in the kitchen. The process can be divided into several stages, which include dismantling the old tap, assembling a new one, installation and connection to the water supply.
Dismantling
What needs to be done before starting work?
- Turn off the water;
- Open the cold and hot water taps to equalize the pressure in the conductive system.
Our advice: remove the sink and faucet. This way the work will be much easier, because the need to crawl into hard-to-reach places will automatically disappear.
To do this you need in advance:
- Disconnect the water supply hoses from the water supply;
- Disconnect the siphon from the sink.
To create a new inlet hole for the faucet in the sink, you will need a drill and a crown of the required diameter. It is important when working not to damage the main part of the sink, preventing the formation of cracks
There may be water left inside the siphon or hoses, which should be drained into a previously prepared container. Now you can start dismantling the sink, and then the faucet itself.
From the back of the sink we begin to disconnect the faucet mount. This may be the first problem - the formation of rust, sticking of the faucet body to the sink. In this case, treat the surface with kerosene or plumbing lubricant, then wait about half an hour and continue working.
In “particularly severe” cases, the use of a grinder will be required. At the same time, try not to damage the water supply connections that are untouched by rust, as well as the sink at the junction with the mixer body
After disconnecting the tap, dismantling ends. Check the condition of the threaded surface of the water supply line to which the new hose is connected. It may be necessary to replace it by installing new extension cords with high-quality threads. Also process the inlet hole in the sink for the new part.
Assembling a new crane
Assembling the mixer consists of connecting the spout to the main body. To do this, using a screwing motion, insert the spout into the corresponding hole in the faucet body until it stops. The connection should be strong, but it is important not to tighten it tightly: this will cause damage in the future.
There are a few more nuances before installing the faucet. For example, check for cracks and other mechanical damage, and also find the hoses for connecting to the water supply, which are included in the kit.
Installation
Faucet fasteners are always included additionally when purchasing, so check their availability. There are two options: mounting with nuts or mounting with studs.
Installing a nut-mounted mixer
The bottom of the faucet should have a cylindrical metal piece whose diameter matches the hole in the sink. It is the basis for fastening. We start with actually attaching the faucet to the sink.
The gasket has the shape of a ring. Make sure that during installation it does not fall out of the cavity, otherwise the tightness of the joint between the sink and the mixer in the area of the inlet will be compromised
- The mixer kit comes with a rubber gasket, which must be inserted into the corresponding slot on the body;
- We insert the cylinder into the mounting hole with the threaded side down, after which we need to gain access to the back of the sink for further measures;
- Next you need to secure the faucet. To do this, we place a rubber plate on the cylindrical part of the faucet, again for tightness, and press it against the lower surface of the sink. We tighten the top with a brass nut, which has a peculiar skirt shape - another solution in favor of tightness;
- Having installed the faucet correctly relative to the sink, we continue the installation by connecting the hoses. You need to start with a short fitting that screws into one of the holes in the cylinder. Then we work in exactly the same way with a hose that has a long fitting.
It is necessary to tighten the nut until the tap is completely immobile. Think in advance about how the mixer will be positioned relative to the sink. If you secure it unsuccessfully, you can always unscrew the nut and turn the tap in the desired direction
Installing a faucet with stud mounting
The difference from the previous installation scheme is the connection of the hoses before attaching the faucet to the sink hole. The fact is that the structural features of the studs will not allow the fittings to be properly fixed when the mixer is already installed.
- First, check the presence of studs in the kit. There may be two of them, or maybe one, depending on the crane model. Also included with each stud is a brass nut of the appropriate diameter;
- Unscrew the nuts and insert the studs into the holes on the underside of the mixer body. You can use screwdrivers, but it will be easier to tighten the studs by hand. Tighten until you feel the fastening is secure without swaying;
- We check for the presence of an o-ring, which is also located in its own notch on the base of the body; We pass the hoses through the hole in the sink, and then attach them to the faucet body. The sequence is the same: first we work with the short fitting, and then with the long one;
- After checking the reliability of fastening, insert the lower part of the part body into the hole in the sink or countertop. On the back of the sink we put on a rubber gasket, on top of which there is a crescent-shaped brass pressure plate. This plate must be included with the tap;
- After applying the metal plate, we tighten the studs using brass nuts, which were previously unscrewed at the beginning of installation.
That's it, installation of the mixer on the studs is complete.
Do not overtighten the hoses at the connection points with the tap and water supply; usually 1-2 turns of the wrench are enough. Otherwise there is a risk of leakage
It is important to check the entire structure for leaks, because When installing the mixer on studs, it is easy to miss the gaps between the rubber and metal plate. The studs may be screwed in at an angle
Connecting to the water supply and checking
We start by returning the sink to its original place with a built-in mixer. To connect the sink to the table surface, it is necessary to treat the edges with sealants, and then press the edges of the metal case tightly. Next, connect the hoses to the water supply. Don't forget that the cold water pipe is usually located on the right, and the hot water pipe on the left.
The final stage of replacing the faucet is connecting the siphon to the sink.
Before supplying water, disconnect the aerator from the spout. Accumulated particles that enter the water supply during installation can clog the small pores of the aerator and lead to its breakdown.
Preparing to install a new device
First, the faucet itself, purchased in a store, is removed from the packaging for work. If a visual inspection was not carried out earlier, then this must be taken care of now. The main thing is that there are no defects or damage on the surface, even minor ones.
Kitchen faucet with hand sensor.
If the product is defective, then branded stores must accept it and exchange it, at the first request of the buyer. In this case, you only need to take care of keeping the sales receipt. There are the following parameters that deserve separate checking for older products.
- Quality of flexible hoses used for connection and operation.
- The integrity of the thread where one part connects to another.
- Rotation or movement of flow regulators. Otherwise, the installation of the mixer will not proceed correctly.
The movement of the part should be easy and smooth during operation. The model you purchase does not matter. The slightest defects must be excluded at the connecting threads. Otherwise, the risk that the entire assembly will be damaged increases. And the old ones will have to be replaced with new ones.
The nickel plating of the mixer should remain smooth and uniform during operation. Scratches and dents are not acceptable on this product. The protective polished casing must not be damaged.
When purchasing a new faucet, inspect it carefully to ensure there are no cracks.
The internal outlets of the pipes themselves must be thoroughly cleaned before proceeding with the installation of a new product. A rough metal brush will be an excellent help in solving this issue. The place where the faucet is installed on the sink requires additional cleaning. A rag helps in this case. And for old parts too.
Features of installation work with other types of mixers
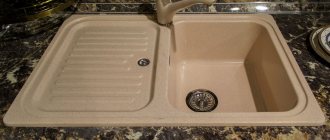
Mixer tap with two spouts and filter. A special feature of this faucet is an additional spout for supplying purified drinking water. The installation of the faucet differs only in that it is necessary to connect not two hoses to the base of the body, but three (a water supply from the filter is added).
- Wall-mounted faucets Replacing a wall-mounted faucet is easy. Here you just need to unscrew the nuts that secure the faucet to the wall surface, and then carefully disconnect it from the end section of the water supply. A new mixer is installed along the same path, only in reverse.
- Sensor/Thermostat Faucets These kitchen faucet options are more of a luxury item that you don't see very often. To install or replace a faucet, you need to have an understanding of the electrical conductors that are separately connected to the faucet to provide additional functions: heating water or recognizing objects at a distance. Otherwise, it is better to contact specialists.
Apply the new wall-mounted faucet to the outlet pipes before installation. If the plumbing holes and the parts do not match, use adapters. Usually adapters are included immediately
How to change a device with valves
The first step in any repair process is to stop the water supply itself. After this, you are allowed to take the following actions:
- They always start by determining the reason why the leak occurred, including cold water.
- If the reason is the spout, then the repair procedure is described as follows.
- We remove the valve and unscrew the valve axle.
- We change the gaskets and seal the threads with fum tape.
- Screw the valve axle back in. Mixer installation is complete.
Replacing a tap with two valves.
Tips and tricks
- Replacing the faucet should be accompanied by installing new hoses and a sink. Complete renewal of parts of the water supply system will increase the service life of the equipment, providing peace of mind for the owners for many years;
- Metal-plastic hoses are an alternative to flexible bellows and reinforced counterparts. The rigidity of the structure and the need to purchase fittings for metal plastic complicate installation, but in the future you will not need to worry about this section of the water supply;
- When dismantling and installing a new faucet, it is not necessary to remove the sink. However, practice shows that working with a fixed sink is inconvenient: you have to spend a long time in unimaginable positions, trying to get to all the nuts and connections;
- When connecting the siphon to the pipe, tighten the nuts without using keys. This way you will definitely not damage the plastic parts;
- Just in case, it’s worth purchasing fum tape or a sealant paste of your choice, because if a leak occurs, they will help create an additional seal and save weak water supply connections.
Replacing the faucet yourself will not be difficult if you follow simple rules and pay attention to some subtleties in the work. There is no need to be afraid of breaking or damaging something, because this will not happen if you have a competent approach and have the slightest idea about installing and replacing a faucet in the kitchen.
Recommendations for choosing flexible hoses
The flexible hoses included in the kit are usually 300 mm long. This may not be enough; moreover, during installation, in order to avoid rapid wear from pressure drops, it is recommended to leave a slight slack in the liner.
In addition, low-quality hoses are found in the set of budget faucets, so sometimes it is advisable to additionally purchase new ones.
When purchasing, you should pay attention to the following points:
- The diameter and type of fastening must correspond to the main pipes.
- Length. If the distance between the attachment points is 520 mm, you need to choose a liner with a length of at least 600 mm.
- The faucet should only be purchased in specialized stores.
- The type of liner varies according to temperature conditions. Accordingly, hoses are marked by weaving red and blue threads into a metal braid. Universal ones are considered more durable.
- You need to pay attention to the quality and thickness of the union nuts. Reputable manufacturers have a nut thickness of at least eight millimeters.
- The fittings must be made of high quality brass. Other materials are acceptable, but usually have a shorter service life.
- The eyeliner should be heavy - light weight indicates low-quality metal.
The smell of the product is also an important criterion. If the chosen eyeliner has a strong odor, this means that technical rubber was used in its manufacture, which can negatively affect health.
How to connect filters
Using clean water for drinking and cooking is one of the ways to maintain health – for you and your loved ones. Nowadays, it is not difficult to obtain potable water in an apartment. Special filter systems will help cope with this task.
If you have already purchased a water purification kit, you will have noticed that it includes several straws, a mini-faucet and a key. Keep in mind - you will not need any sealing tapes, sealing pastes or threads.
Step-by-step instructions for connecting the filter system
- Turn off the cold water using the tap located under the sink. It is located on the pipe and a cold water supply is connected to it for supply to the mixer. Don’t confuse it with a “hot” tap - open cold water and check if it flows.
- We unscrew the hose and instead mount the tee that came with the kit, and then screw the liner to it. Open the cold water and check the tightness of the joints.
- We decide on the location of the filter installation. It is better to place it on the side wall of the cabinet. We advise you to place it in such a way that the filter that performs rough cleaning is easily accessible - you will change it more often than others. There should be at least 10 cm at the bottom so that replacement can be done without hindrance. Leave a distance of approximately 10 cm from the doors at which it cannot damage the hoses. The kit includes a template that will facilitate the fixation procedure. We screw the screws into the marked points.
- We remove the plugs and connect the tubes to the filter in accordance with the arrows indicating the correct direction in which the water should move in it. First, we insert the tube through which untreated water is supplied from the system and connect it to one of the outlets of the previously installed tee. Then insert the outlet tube into the filter with the side without the metal tip until it stops.
- We connect the faucet for drinking water from the kit or a special mixer with two spouts - one for ordinary water, the second for drinking water. Such a device allows you to avoid making additional holes in the sink or countertop, but it will cost more than the standard version. Another drawback is that if the mixer fails, you will not have a single source of water left.
A separate faucet must first be secured to the sink or work surface, and only after that the filter tube must be attached to it. To install a two-in-one faucet, you need to find out whether the design has an adapter into which you can insert a drinking water supply tube. If there is none, you will have to cut off the metal tip from the tube and put a nut on it. After this, insert the fitting and screw the nut onto the thread.
- Check the tightness of the system and rinse the filter for 4 minutes. The water may contain impurities and white foam.
I can't turn on the tap
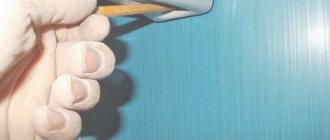
For example, it is necessary to repair a door lock or faucet, an old washing machine or a fan. There can be a lot of such examples and there can be no less difficulties in repair. Among all the problems that one has to face in this case, the most difficult may be the situation with a broken or tightly stuck screw.
To remove an old screw, you will need a wrench and chisel, a screwdriver and a hammer, a soldering iron or blowtorch, kerosene, sulfuric acid solution, an industrial hair dryer, zinc, turpentine and graphite lubricant.
This is interesting: Do-it-yourself homemade water filter - what you need to know
Mounting the device on a wall
Installing a faucet into the wall is a rather original solution for the kitchen interior. In this case, the crane will occupy a minimum of working space. Appropriate cutouts are first made in the tile or wall through which the connection will be made.
This type of installation looks quite aesthetically pleasing. In some cases, the pipes from the wall are brought outside, but this option is detrimental to the interior of the kitchen; it is better to hide all the pipes behind the wall.
Wall mounting does not require the use of flexible hoses. The main difficulty is to remove the pipes and cover them behind a layer of finishing
Installing the mixer on the wall requires appropriate water supply with the elements for connection to the outside. The connection method is the same for iron, plastic, copper or metal-plastic pipes, with the exception of the use of adapters and fittings.
The connection method is also not affected by the type of mixer (valve, cartridges, etc.). A prerequisite is the selection of a wall-mounted mixer, the design of which involves installation in the wall.
For installation on iron pipes, tees and angles are used. If the axes of the connectors for connecting the mixer coincide with the axes of the pipes, then it is enough to use couplings. To connect to other types of pipes, special fittings are used, which are also called water sockets.
Features of wall-mounted mixers
These models can be mounted at any height. Faucets are available with flexible and rigid spouts. Flexible ones have many position variations that allow you to perform any task in the kitchen. Products with a rigid spout require limited travel and rotation of the mixer.
The design of wall-mounted faucets is varied, as are their external design features. The photo shows a chrome-plated device with a flexible spout and aerator
For most kitchens, wall-mounted models are a fairly convenient and practical solution.
Connection sequence
First you need to screw on the eccentrics that connect the mixer to the pipes. To avoid increased condensation formation, the distance between the pipe axes should be 150 mm.
Most wall mixers are produced with exactly this distance between the eccentrics. You need to wrap tow (linen or synthetic) around the threads.
Threaded connections wrapped in tow or linen thread and then treated with sealant last longer and do not allow water to pass through
Next, screw the faucet nuts onto the eccentrics and install the decorative screen (overlay). It is carefully screwed on by hand, as it must fit snugly to the surface of the wall.
If the gap is no more than 5 mm, then you can disconnect the mixer and cut the eccentrics to the appropriate length. The decorative panel hides all imperfections on the wall.
Next, you should install the gaskets, which are included with the mixer and can be made of silicone, paronite, rubber and other polymer materials.
Gaskets are inserted into the housing nuts, ensuring a tight fit to the eccentrics. For maximum density, there should be no cracks on the eccentric. An uneven cut surface can be sanded with sandpaper.
The last stage is tightening the nuts: first with your hands, and when your own efforts are no longer enough, you need to tighten the connections with an adjustable wrench. The efforts should not be excessive so as not to damage the threads.
Is it necessary to install ball valves in front of the mixer?
The ball valve has only two operating positions:
- open,
- closed.
Installing such a tap allows you to cut off the tap from the water supply for repair or replacement. However, in practice this does not always make sense.
As plumbing experts recommend, first you need to study the water distribution diagram throughout the apartment. If there is already a ball valve immediately after the outlet from the riser, then there is no need to duplicate it. If desired, you can install a valve or reducer that will help limit the water pressure in the tap.
What is flexible eyeliner?
The flexible line is a hose protected by a special braid. On one side of the hose there is a crimp sleeve intended for connection to the mixer. On the other side there is a union nut complemented by a rubber gasket. A nut is used to connect the inlet to the outlet of the water pipe.
Components of flexible liner
The liner hose can be made:
- made of rubber;
- made of rubber.
The rubber hose has an unpleasant odor and cannot be used to supply drinking water.
For braiding the following can be used:
- aluminum. Hoses with aluminum braid are designed to pass water whose temperature does not exceed 80ºC. Working pressure no more than 5 atmospheres. The average service life of the product is 5 years. The main disadvantage of aluminum-wrapped hoses is their high susceptibility to corrosion when used in rooms with high humidity;
- stainless steel. The service life of such a product increases to 10 years. At the same time, the flexible liner can withstand water temperatures up to 95ºС and pressure up to 10 atmospheres;
Flexible hose with stainless steel braid
nylon. The hose with nylon braid has a long service life (up to 15 years). Installation is possible at water temperatures up to 110ºС and pressure up to 20 atmospheres. The cost of such products is higher than other types;
Flexible eyeliner with nylon braid
- galvanized wire. Hoses are characterized by high flexibility and low price, but at the same time they have a short service life;
- one-piece corrugated hose (bellows connection). The eyeliner is quite strong and durable. It is characterized by high cost.
Liner with braided solid corrugated hose
The most common hoses for home use are stainless steel braided hoses.
Installing a faucet into a countertop
For this method, in addition to the devices described above, you will need the following:
- electric jigsaw;
- drill;
- set of drills.
The installation method is practically no different from the previous one. Only in this case there is no need to dismantle the sink. Installing a faucet into a countertop requires making a hole in the countertop itself.
To install it in the countertop, you need to make a hole of suitable size. Externally, it should look like a similar hole in sinks
The choice of location for the hole should be based on practical recommendations:
- water should not fall on the countertop while using the mixer;
- the valves/lever should be comfortable to use;
- The spout should be positioned relative to the sink according to the recommendations presented at the beginning of the article.
First you need to make markings along the contour of the base of the mixer using a pencil. Using a drill, drill four holes in the corners of the drawn perimeter.
Then use a jigsaw to cut a hole through which you can pull the liner and insert the threaded pins. The cut needs to be cleared of sawdust and the edges cleaned with sandpaper.
It is important not to make the hole too large. Otherwise, the size of the clamping ring may not be enough to cover the entire hole. Further, the sequence of actions remains the same as when installing the mixer on the sink.
What to consider before starting installation?
First you need to decide on the installation method: the mixer can be mounted on a countertop, sink body or on a wall. It is necessary to outline in advance the routes for the location of hot and cold water pipes.
In this case, the connection points must be accessible in case of subsequent repairs or maintenance. If you plan to install a filter, then the place for its installation must be provided in advance.
Several recommendations for choosing a mixer
The mixer is invariably operated in tandem with the sink, so when choosing a product you need to take into account its size and depth, as well as:
- distance between the wall and the hole for the mixer;
- diameter of the hole for the mixer insert;
- drain location points.
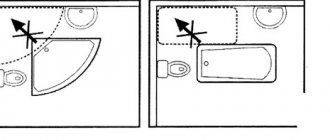
In this case, the faucet must be of sufficient length so that the end of the spout, after installation, falls on the center of the sink or sink.
The length of the spout should be equal to half the width of the sink bowl. The most ideal case is when a stream of water hits the drain directly
The height of the spout should be enough so that you can place a tall pan under the tap. But don’t go to extremes and buy a faucet that is too tall. Otherwise, splashes are created that fly outside the sink.
Another important parameter regarding the geometry of the mixer is the rotation angle. If the sink is close to the wall, then it is enough to install a faucet with a rotation angle of up to 90 degrees. If you use a sink with two bowls, then you need to pay attention to models with a rotation angle of 180-360 degrees.
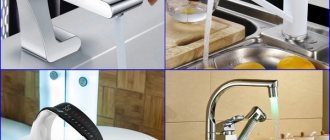
Variety of styles of plumbing fixtures
Having finished with the technical part, you need to decide on the appearance. Today, the choice of faucet styles is so huge that even the most spoiled owner will be able to find a model to suit his taste.
Classic, hi-tech, loft, minimalism, chopped and streamlined shapes, chrome, copper or black - you can choose an option for any kitchen.
At the same time, unfortunately, the rule applies: the more expensive, the better - especially true for plumbing fixtures and faucets in particular. There is a limit to everything, but high-quality plumbing fixtures made in Europe are an order of magnitude more expensive than domestically made products.
Determining the optimal design
When choosing, you need to take into account the design features of the mixers. The most practical models are single-lever ones, in which the flow intensity and temperature can be adjusted using one handle. Models with two valves are less practical, but go well with the classic kitchen interior.
A single lever mixer is the most practical option in the kitchen. With one movement of your hand you can adjust both the jet strength and the water temperature
Manufacturers also produce contactless products that are equipped with a motion sensor. When you raise your hands, the sensor is triggered and the mixer starts dispensing water.
For the kitchen, this is also not the most practical option, since you often have to change the temperature and collect water in containers.
Prices for faucets depend on the type of alloy used and the brand of the manufacturer. The cheapest models are made of silumin, have a beautiful appearance, but quickly wear out and become unusable. Silumin and other cheap alloys crumble and crack quite quickly.
The highest quality products are made from brass. A layer of nickel, aluminum or chrome is applied to the surface to give the faucet a beautiful appearance. Chrome plated products are the most wear-resistant. We recommend that you read our other article, in which we described in detail the features of choosing kitchen faucets.
Image gallery
Photo from
Kitchen valve mixer
Vintage style faucet model
Single lever kitchen faucet
Operating the articulated device