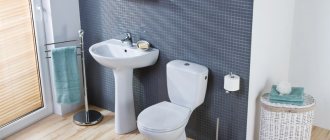
There are things in every house and apartment without which a comfortable life is impossible. And plumbing is one of them. You can install the toilet yourself, but for some this task somehow becomes impossible. And the point is not so much in the complexity of installing this object, but in deciding the question of how to attach the toilet to the floor. After all, its stable position and reliable fixation are very important. Let's figure out how to solve this problem.
Methods for fixing the toilet to the floor
There are several popular ways to secure the toilet to the floor - using:
- dowels;
- adhesive composition;
- cement;
- taffeta;
- fastenings on the sides.
To make the right choice from the possible options, the first thing you need to pay attention to is the quality of the floor in the bathroom or toilet.
Connection to sewerage and water supply
The supplied toilet must be connected to the sewer system for further use. For this, a corrugated plastic pipe is most often used. It allows you to adjust the distance and angle of entry into the sewer pipe. The corrugated pipe has reliable seals that prevent leakage at the outlet and at the junction with the drain hole.
The corrugation must be inserted into the sewer pipe and into the toilet outlet, and lubricated at the junction with plumbing silicone. Then you need to check the tightness by draining water from the drain barrel. If the tank is not yet connected, this can be done using a bucket of water.
Features and nuances of different installation options
In most cases, the plumbing equipment includes a suitable mounting kit. It may well be useful, but with its help it will not always be possible to secure the device. If the plumbing fixtures are attached according to this scheme to a perfectly flat floor, then they will be as stable as possible. Otherwise, you should consider other options.
To understand how to fix the toilet to the floor, you need to inspect the surface in the place where the plumbing will be installed and choose the appropriate method. The methods for attaching the toilet to the floor vary greatly. It is imperative to consider installation methods using glue or cement. Then you will be able to fix the toilet without bolts.
If the plumbing fixtures are attached to the tiles with cement mortar, the connection will be the most reliable. The problem will be revealed later when you have to replace the installed device with a new one, because it is difficult to dismantle the structure fixed with cement. It is logical to use cement if you have purchased high-quality plumbing fixtures and plan to use them for a long time. Another reliable type of fastening to the floor is closed. But you will need to spend more time and effort on installation. Externally, the design will look attractive and aesthetically pleasing. Each element is hidden from view so as not to spoil the appearance of the room with bolts protruding from their plumbing fixtures.
Problems also arise when attaching a wall-hung toilet. In this case, it is necessary to create a niche or build a box to hide the installation, which can withstand the significant weight of the plumbing fixtures (up to 400 kg). The toilet is attached to the installation using long pins that are screwed into the structure.
When choosing an installation method, you need to know about all the possible options, as well as how to attach the lid to the toilet.
What types of toilets are there?
To begin with, before we talk about mounting methods, let’s get acquainted with the varieties of this plumbing fixture. Toilets can be classified according to the following characteristics:
- weight and dimensions;
- the material from which they are made;
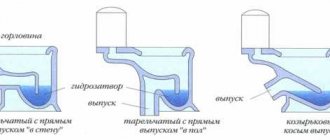
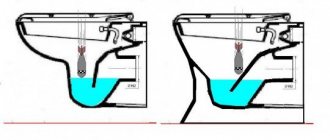
- release direction;
- type of tank, bowl.
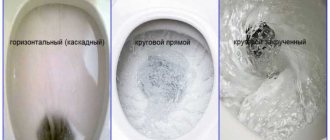
Types of toilets according to the type of connection to the sewer
If we talk about the materials used for manufacturing, these include:
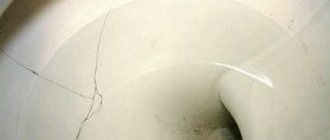
- faience _ This is a fragile but inexpensive material with a service life of approximately 15 years;
- steel _ It is reliable and strong, toilets made from it are ideal for public places;
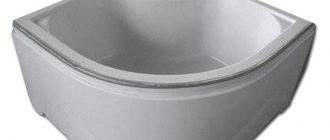
- reinforced acrylic . It is characterized by durability, low weight, strength, but reacts negatively to high temperatures;
- porcelain _ More durable, more beautiful and durable than faience, but also more expensive.
About the advantages of a porcelain toilet
As for the design of the bowl and cistern, you can find the types of toilets classified according to this characteristic in the table below.
Table. Types of toilets from a constructive point of view.
| Name, photo | Short description | Advantages and disadvantages |
| With hidden tank | The device is installed using a metal frame that is attached to the wall. The frame houses the tank, while the bowl is located outside. After installation, the frame is covered with a false wall (usually plasterboard). | The advantages include compactness and attractiveness. But there are also weaknesses - you need to spend a lot of time/effort to install such a toilet, and when repairing a cistern, you cannot do without dismantling the false wall. |
| Monoblock | Here the bowl and tank are a single piece, and therefore do not need to be connected to each other. | The advantages of the design include reliability (there are no connections through which leaks could begin), as well as ease of maintenance. There is only one minus, and it is that if one part (bowl or tank) is damaged, then the entire toilet needs to be replaced. |
| Compact | This is the most popular version of the toilet - its tank is installed behind the bowl and located against the wall. | As for the advantages, these include ease of operation/maintenance, as well as a low noise level during flushing. The downside is the weaker liquid pressure during operation. |
| Separated | Also an extremely popular option, but only among outdated models. The distance between the bowl and the tank is large; the first, as a rule, is located under the ceiling. | The main advantage is good water pressure. The tank, which is still located high, does not “steal” the usable area of the room, which is already minimal. Disadvantages - the water makes a lot of noise during flushing, and if repairs are necessary, it is not easy to get to the tank. |
What types of toilet bowls are there
? Now let’s look at how exactly the toilet can be attached to the floor:
- dowels;
- through a frame covered with a false wall;
- using sealant/glue;
- on taffeta;
- cement (the “hardest” method).
Fastening with taffeta, dowels and glue
Below we will talk in more detail about two methods of fastening a plumbing fixture - with dowels and with glue.
How to glue the toilet to the tile?
Preparatory activities before installation
Regardless of which fastener you choose for the toilet to the floor, you first need to carry out preparatory work. The process begins with assembling individual elements and attaching the tank to the toilet. If we are talking about a compact type model, then installation is simple. After installing the fittings inside the tank, it is fixed on a shelf on which a sealing gasket is pre-installed. Then the bolts are inserted into the holes and tightened. When attaching the flush tank to the toilet is completed, proceed to other tasks.
Preparation for installation work
The preparatory stage consists of the following steps:
- choosing a suitable location for plumbing fixtures in the toilet, creating markings;
- sewerage and water supply outlet. The ends of the pipes should be approximately 13-16 cm from the surface so that the device can be connected to communications;
- If a room is being renovated, you first need to lay tiles and then begin installing the plumbing. Otherwise, you will need to cut the required pedestal shape from the floor tiles.
After preparation has been completed, you need to prepare the necessary tools.
How to install a toilet on dowels
Fastening with dowels is the most practical option. Fixing this method takes little time. But to do everything right, you will first have to prepare the surface: to achieve its maximum smoothness. If there are differences in the base, the device will rock.
If the floor is tiled, then you need to carefully drill holes in the tiles for fastening. This must be done extremely carefully so as not to damage the surface of the tile. When drilling holes, do not put too much pressure on the working tool, otherwise the tile will crack and you will have to replace it.
Dowel fastening is usually used for toilets with small dimensions. If it is massive and heavy, reliable fixation will not be achieved.
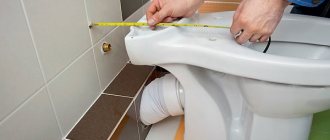
Detailed installation instructions
To fasten with dowels, you first need to mark the surface and mark the place where the device will be installed. Next, mark the holes for the dowels. The next step is making holes with a drill. Once the holes in the covering have been drilled with the appropriate drill bit, you need to use a hammer drill to drill into the concrete. To avoid going too deep inside, you need to stick a marker made of electrical tape onto the drill. You need to immerse the drill into the floor exactly up to this mark.
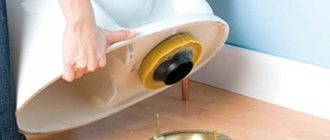
Installation using adhesives
Using glue or silicone sealant, you can attach the device without using hex screws. But it will take a lot of time, most of which is necessary for the adhesive composition to harden. It should harden within 12-24 hours. If you start using plumbing too early, it will quickly become loose.
This is a safe method of fastening, since it is difficult to damage earthenware mechanically, and this only happens through negligence. The best glue for a toilet bowl is a mixture of epoxy resin or Poxipol glue.
Step-by-step description of the work
- As in previous cases, the first step is marking. The base of the sole is outlined with a pencil or marker.
- Then, before attaching the product to the adhesive, prepare both surfaces by first cleaning them. No debris or dust should get inside.
- If the fixation is carried out on slippery tiles, then the tiles must be treated with a drill with an attachment in the form of a metal brush. The top slippery layer will be removed. After this, the surface must be thoroughly treated with a cloth moistened with solvent. When the surface is completely degreased, its adhesive properties will increase.
- Next, the floor is wiped with microfiber. An adhesive composition is applied to the base of the device and installed in the selected location.
- The area around the sole should be sprayed with soapy water. Thanks to this, after treatment with sealant, excess composition is easier to remove from the floor surface. A silicone spatula is moistened in soapy water and the excess glue is carefully removed. This must be done immediately after installation, before it has time to dry.
- After carrying out these manipulations, you need to give the adhesive composition time to harden. For this, 12 hours is usually enough, but it is recommended to read the instructions. When the toilet is firmly fixed, you can proceed to connecting the communications.
For cement mortar
This method is well suited if a new toilet is installed in place of a dismantled one. But, you can also use it when the house does not have the tools necessary to secure the plumbing accessory to the floor.
The simplest, but far from the best way is to install the toilet on concrete mortar.
In order to install a toilet on a tile in this way, you will need concrete mortar or cement-based ceramic tile adhesive, a marker, a chisel, a hammer and two spatulas - narrow and medium width. The installation process itself is carried out in the following sequence:
- The toilet is installed in the place provided for it and connected to the sewer pipe with a rigid or corrugated adapter. A trial connection must be carried out in order to make sure that all elements fit perfectly together.
- Next, the base of the toilet seat is outlined with a marker.
- Then, the toilet is removed, and at the place of its installation, in the outlined area, notches are made on the tile using a chisel and hammer. This process must be carried out carefully so that impacts leave marks only on the front surface of the tile, but do not cause cracks. It is recommended to carry out this work wearing safety glasses to prevent breaking off crumbs of the coating from accidentally getting into your eyes.
- Instead of notches, you can chaotically stick waterproof masking tape onto the outlined area. O is also capable of creating a rough base on which the solution can adhere well. It is important to ensure that the pasted tape does not extend beyond the edges of the outline.
- The next step is to make a concrete solution from sand and cement in a 2:1 ratio, or dilute tile adhesive. The latter solution is preferable, since it sets quickly and has a fine granularity of powder, which is much more convenient than concrete, which can contain large fractions of sand. The finished solution will require 3÷4 kg.
- The next step is to spread the finished mixture onto the prepared and moistened area of the tile with notches or masking tape glued to it.
- Then, the lower section of the toilet leg is also wetted around the perimeter, and the device is installed in its designated place. Two plastic pads 5÷7 mm thick and 50÷80 mm wide are placed under its base on the front and back sides. These elements are necessary to create a “cushion” of mortar between the tile and the toilet. When performing this operation, it is very important to level the toilet bowl, since it must stand without distortion, perfectly horizontal.
- The mortar that has protruded beyond the edges of the toilet seat is immediately collected with a spatula, and the joining seam is carefully leveled. The gaskets can be removed only after the solution has set well, and the recesses remaining from them must also be filled with the solution and leveled. The drying time for the tile adhesive is indicated on the packaging, and the concrete must stand without use for at least 3-4 days. The toilet can only be used after the solution has completely hardened.
The disadvantage of this installation method is that if you have to dismantle the toilet, it is not always possible to remove it entirely - it usually ends with the base splitting.
Find out which is better to choose a wall-hung toilet with installation from a new article on our portal.
Installing a toilet on cement
This is an outdated installation option that is being used less and less. It is used in cases where other fastening methods are not feasible (do not approach with a key). The cement fixation technology is similar to the adhesive fixation method. But instead of modern means, they use self-prepared cement mortar.
- In order not to spoil the appearance of the room, a recess is first made in the floor.
- This place will need to be reliably cleared of debris, install a toilet there and fill it with the prepared solution. The edges of the sole of the plumbing fixtures must be moistened with clean water before the device is secured to the floor.
- If there is excess mortar left on the floor, it must be carefully removed with a spatula before it has time to set. Next, you need to let the solution harden for 24 hours. After this, they begin to connect communications.
How to attach a toilet to taffeta
This option is used to connect the toilet to a wooden surface. Taffeta is a wooden spacer that is pre-cut from a wooden board to the required dimensions. Then the toilet is installed on it and the device is secured to the floor.
- Anchors are installed on the part from below or regular nails or studs are driven in in a checkerboard pattern. This must be done so that the metal clamps protrude from the part by about 3 centimeters.
- A recess is made in the floor, which is filled to the brim with cement. The taffeta is placed in the solution with the anchors facing down - this ensures reliable fixation. The part must be installed exactly level with the floor.
- It is advisable to wait 24 hours for the solution to set. Then the toilet is placed on top and secured with screws to the wooden base. Be sure to place a gasket under the head of the hardware so that the fixation is as reliable as possible.
Experts say that instead of a wooden gasket, you can install taffeta made from a thick piece of rubber (15 mm). But it should be quite dense.
Mounting options
Depending on the outlet design, floor-standing toilets are either attached to the wall or screwed to the floor.
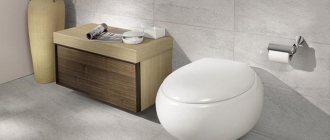
Floor mounted toilet
The toilet bowl must have holes for screws. The bowl is secured in such a way as to connect the outlet to the sewer outlet. Install a drainage system.
Sound insulation of sewer riser
The big advantage of a floor-standing toilet with a hidden cistern is its noiselessness, since the pipes are hidden in the design of the product, and the pipes leading to the cistern are hidden behind the wall and plasterboard partition.
To prevent the sounds of draining water from being heard in the bathroom, the sewer drain is installed outside the apartment.
If this is not possible, silent pipes with thickened walls are used. They are somewhat more expensive than conventional pipes, but last for more than two decades.
Additional sound insulation can be provided by wrapping the pipe with insulating materials: rubber, isopropylene, polyethylene foam.
Installation of a tank with a button
When choosing a hidden tank, keep in mind that there are the following types of drain buttons:
- stop drain – pressing the button causes a drain, a second press stops the flow of water;
- normal - when you press the button, a full portion of liquid in the tank is simultaneously released;
- dual-mode - an economical option, in which the first press partially empties the tank, the second - drains the water in full.
The most common mistakes at work
To securely fix bathroom fixtures, you need to be careful and consistent. Then you will be able to avoid leaks, unpleasant odors and other problems.
In the case of plumbing installation, the most important mistake is haste. First you need to carefully level the surface. Quite often this requirement is not met.
We must not forget about sealing connections to the sewer system. If the units are not sealed enough, sewer fluid will begin to seep into the cracks, which will lead to an unpleasant odor. Experienced craftsmen do not spare sealant, applying an additional layer to all connecting parts.
If the chosen fastening method is dowels, you cannot tighten the bolts too much, because the toilet leg will not withstand the pressure of the fasteners and will crack. You'll have to buy new plumbing fixtures. But too loose tightening of the bolts leads to problems - the structure will sway. Taking these points into account, reliable fixation can be achieved without complications.
The choice of method for attaching the toilet depends on the initial installation conditions, but in any case it is important not to violate the instructions and properly prepare the floor for installation work. The main thing is the calculation of construction data from which you need to build. Then the structure will last a long time.
Tools and materials
To perform installation work on installing plumbing, it is necessary to prepare all the tools and equipment:
- hammer drill with drills;
- a hose for supplying water;
- corrugated pipe for connecting the drain to the sewer;
- a set of keys, including a wrench;
- rubber spatula;
- Screwdriver Set;
- sealant or silicone;
- glue;
- cement mortar;
- substrates;
- core;
- hammer;
- ball valve;
- winding for sealing connections;
- marker or simple pencil.
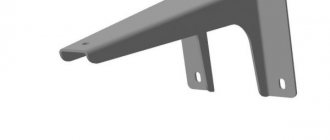
Mounting bolts
To securely fasten the device, it is necessary to use mounting bolts and gaskets for them. When installing, it is necessary to use dowels.
Liquid Nails
Liquid nails are used when installing plumbing fixtures without fastening bolts and act as glue, firmly gluing plumbing fixtures in the bathroom.
Sealant
The sealant is responsible for the tightness of all joints and joints and prevents the leakage of moisture.
Before using sealant, silicone and liquid nails to increase the adhesive properties of the surfaces to be joined during fastening, it is necessary to clean the surfaces from dirt and grease with acetone, turpentine or industrial alcohol.
Silicone
When installing plumbing fixtures, silicone is used to create waterproofing under the frame of the device.
Other types
In addition to sealing and adhesive consumables, you can also use concrete mortar during installation. The main thing to remember is that equipment installed without mounting bolts can be damaged during repair or dismantling.
Substrate
The underlay is used when installing the device on an uneven floor, to level the surface and prevent rocking and wobbling.
Glue
During installation, glue is used to provide strength to the device. It is used depending on the preferences of the owner.