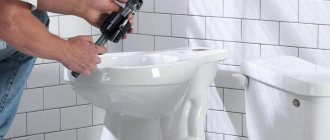
05/12/2019 Bender Rodriguez Homemade Judging by numerous reviews, a leaking faucet in the bathroom or kitchen is the most common problem. You shouldn't turn a blind eye to it. The fact is that dripping water is very annoying, and if you have a meter installed, it will significantly hit your budget. To make repairs, you will first have to unscrew the faucet. Then, depending on the situation, you either repair it or replace it with a new one. According to experts, there is nothing complicated in this matter. All you need is the appropriate tool. You will learn how to unscrew the tap from this article.
How to choose a new faucet
Having decided to replace the faucet in the kitchen or bathroom yourself, first of all, of course, you need to worry about buying a new faucet. In this case, of course, you should choose the right model.
To purchase for a bath or kitchen, subject to independent replacement, experts also advise taps of the simplest possible design. It will be less difficult to install such a mixer, and subsequently, if necessary, remove it.
Also, when choosing a faucet, you should definitely pay attention to the manufacturer’s brand. It is best if she is famous and popular. In the future, if necessary, it will be easier to select spare parts for such a mixer.
The most durable types of sink faucets are brass. Such models are relatively inexpensive. However, experienced professionals do not recommend purchasing them for self-installation. Brass is a fairly soft material. Therefore, it is very easy to break the thread in any unit made from it if done incorrectly. For self-installation, it is better to choose a stainless steel faucet. Although such models are more expensive than brass ones, they have an increased margin of safety.
Quite often, bronze faucets are also installed in houses and apartments. Such models are even more expensive than steel ones and have the longest service life. It is quite difficult to damage the threads in a bronze faucet. Therefore, for self-installation, you can, if desired, choose such a model. Most often, apartment owners purchase taps, of course, separately. However, nowadays you can buy a whole set of sink faucets at once. Most often, such sets come with taps of the same design, intended for bathtubs and sinks. Such kits may also include models for shower stalls.
How to prevent possible breakdown in the future
No matter how expensive a two-valve mixer is, without proper care and careful handling, damage is inevitable.
Basic rules that can extend the service life of your crane:
- You need to open and close the valves calmly, without sudden movements, so as not to break the tap.
- It is better to install a silicone gasket, since it has increased wear resistance compared to rubber.
- Regularly inspect connections for leaks.
- At the first signs of leaks, it is necessary to immediately replace the gasket, so that later you do not have to change the entire plumbing fixture, which will be much more expensive.
- When disassembling the structure, it is necessary to clean the parts from contamination.
By following these simple rules, you can extend the performance of your faucet for several years.
If a malfunction of the faucet in the bathroom is detected, it is recommended to carry out timely repairs so that in the future you do not have to buy a new device. The repair process is shown in the video:
It is better to do the replacement yourself, since this option is much cheaper than calling a plumber. And you may have to spend a little time and effort, but you will be confident in the reliability of the design.
Main types by design
We’ll talk about how to remove the faucet from the sink with your own hands below. To begin with, let’s figure out what kind of actual design such plumbing equipment can have.
According to the method of operation, the following types of mixers are currently distinguished:
- with valve taps;
- with lever ball;
- with lever cartridge.
Models with valve taps are considered the easiest to install. However, in terms of ease of use, they are inferior to lever ones. For self-installation, mixers with valve taps are best suited. But if you want to install it yourself, you can try a faucet with a lever.
Faucets can be attached to the sink in two ways:
- directly to the pipes;
- through flexible hoses.
How to remove a faucet from a sink: preparations
Before you begin dismantling the faucet in the kitchen or bathroom, you must turn off the general water supply. Of course, it is impossible to begin dismantling without performing such a procedure. Otherwise, there will simply be a flood in the apartment. In combined bathrooms of old houses, common hot water and cold water taps are usually located nearby - on the corresponding pipes at the entrance to the apartment. Also, the cold water tap can be located in the bathroom, and the hot water tap in the toilet (for separate bathrooms).
In very old houses, common taps directly in the apartments are often not provided at all. In this case, before performing the procedure for replacing the mixer, you will have to call the housing and communal services department and ask them to send a technician to shut off the valves of the common water supply risers in the basement. Before this, you will need to warn all your neighbors that due to a problem they will have to be left without cold water and hot water for some time.
After the common taps are turned off, you need to unscrew the valve of the old mixer and drain the remaining water in the pipes. Next, you can begin to actually dismantle the crane itself.
How to replace eyeliner
When replacement is necessary
It is necessary to change the hose if:
The flexible line broke. Breakage of the braid or rupture of the internal hose will lead to the formation of a leak and, as a result, flooding of the room. The causes of leakage may be high pressure in the system or mechanical impact;
Loss of tightness of the connecting hose
A flexible hose leak was detected at the junction with the mixer or water pipe. The causes of leakage may be natural wear of the gasket or a crack in the fitting (nut).
Leak at the hose connection
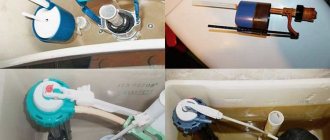
Flexible line replacement process
To install a flexible water supply to connect a mixer, you must:
- turn off the water supply. This can be done using a tap installed in the apartment;
- open the mixer taps to drain the remaining liquid;
- Using an adjustable wrench or a wrench corresponding to the diameter of the union nut, unscrew the hose from the water pipe. If the connection point is rusty and the hose does not unscrew, then you should not make any effort to remove the liner. In this case, a solvent or WD 40 liquid is applied to the rust, which removes plaque;
Disconnecting a flexible hose from a water pipe
To avoid flooding with water remaining in the hose, it is recommended to place a container under the wiring connections.
- remove the mixer. To do this, it is necessary to loosen the nuts securing the device;
disconnect the hoses from the mixer with an adjustable wrench; connect new connecting hoses to the mixer and install the device in its original place. If the mount on the hose does not correspond to the connector on the faucets, then additional adapters are installed
When installing the adapter, it is important to take care of the tightness of the connection, which is made using FUM tape or linen thread;
Installing flexible hoses on the mixer
- Attach the supply hoses to the outlet of the water pipe.
It is necessary to screw the hoses to the mixer and outlet without much force, which can lead to the formation of a crack in the union nut or fitting. There is no need to use additional means to seal the connection, since the liner already contains built-in gaskets.
- When you turn on the water for the first time, it is recommended to check the flexible hose and connection points for leaks. The average inspection time is 20 – 30 minutes.
The process of replacing connecting hoses is presented in the video.
Replacing flexible hoses yourself is not a problem. The main thing is to choose the right hose that meets all the parameters.
What materials and tools will be required
In order to remove the old faucet in the kitchen or bathroom and install a new one, you need to prepare:
- a plumber's adjustable wrench and several open-end wrenches;
- screwdriver;
- sealing tape.
In the connection points of old mixers, the parts often stick strongly to each other due to rust. Therefore, liquid for softening scale will also be a necessary purchase for those who are thinking about the question of how to remove the faucet from the sink. The necessary tools and materials must be prepared in advance in full. This will make your work easier and more productive in the future.
Required Tools
It is important to prepare in advance all the necessary tools for replacing the faucet, so as not to waste time in the process, being distracted by searching for a key or screwdriver.
You will need:
- adjustable (gas) wrenches;
- open-end wrenches;
- screwdriver;
- FUM tape.
Instead of the latter, you can use tow (linen) with oil paint or silicone. But in this case, the mixer cannot be used for at least a day after installation.
If the old faucet has not been changed for many years and is clearly rusty, then VD-40 liquid (“liquid key”) may be needed for dismantling. Pliers and a small hammer will also come in handy.
Water pipes: what you need to know
Water can be supplied to plumbing equipment through pipes made of different materials. Most often, in our time, steel or polypropylene lines are laid for water supply in multi-story and low-rise buildings. In the latter case, replacing the faucet in the sink in the bathroom or kitchen should be done as carefully as possible. Unfortunately, polypropylene lines are not very resistant to mechanical stress and pressure. When unscrewing/tightening the tap nuts, such pipes must be held by the adapter with a wrench. In any case, it is impossible to twist polypropylene when performing work.
Steel, as a much stronger material, can be handled less carefully. But still, in this case, too much effort should not be applied when tightening/unscrewing the nuts.
Kitchen faucet installation
The kitchen faucet replacement is nearing completion. Now we assemble the tap and install it in place. It is much more convenient if work can be carried out on a removed sink. If this is not possible, all manipulations will have to be carried out reclining in the closet. About the same as in the photo.
Not the most comfortable position
Assembly
First, we screw the flexible hoses to the mixer. They are screwed in by hand, then tightened a little with a wrench - no more than 2 turns.
Screw the flexible hose into the holes on the mixer body and tighten lightly with a wrench
Now you need to pull a rubber gasket onto the body, which seals the junction of the mixer and the surface of the sink. This rubber ring of decent diameter is included in the kit. It is pulled through the installed supply hoses and placed on the body.
Install the gasket on the body
Modern kitchen faucets have two different forms of attachment to the sink. You saw the first one - using a nut - in the part where we talked about dismantling the mixer. It's just an "older" system. The second provides for the presence of rods and spacers-retainers in the form of a horseshoe. There is usually one rod, but there may be two. If there are such rods, they are screwed into the corresponding socket. If there is a nut on it, remove it.
Rod for additional fixation
Installation on the sink
Now the kitchen faucet can be installed on the sink. First, flexible hoses are inserted into the hole, then the housing is placed in the center of the hole. Further actions depend on the type of fastener. If it is an ordinary nut, simply tighten it, being careful not to overtighten it.
The nut is screwed onto the body
If it is a model with rods, the appearance is different, although the meaning is the same. First, the gasket is put on (it is also in the shape of a horseshoe), then the pressure plate. Next, screw the nuts onto the rods. The nuts are tightened a little with a wrench. THEN nothing complicated.
Mounting the mixer with rods
Turn the sink over and turn the tap. He should stand "dead". There should be no backlash. If there is movement, tighten the fastening.
Sink installation
Now the sink with the mixer installed on it is placed in the prepared place. First, apply silicone sealant around the perimeter of the back of the sink (not acrylic - it quickly turns yellow). Then the sink is installed in place and the mounting bolts are tightened.
Preparing the sink for installation
Then everything is simple: put it in place, align it with the edges of the table, tighten the fasteners. It is made in the form of petals that attract the sink to the countertop when you tighten the nuts. The sink should stand firmly, without moving.
Connecting hoses and siphon
With a siphon, everything is simple - pull the corrugated hose to the pipe, tighten the nut by hand until it stops. All. Don't use keys - everything is made of plastic.
Connecting the water supply is not much more difficult. You just need to be careful not to confuse the cold water connection location. Its entrance is on the right. After making sure that there is a rubber gasket in the union nut of the flexible line, we bring it to the pipe and tighten the nut as much as possible with our fingers. Then take the key and tighten it one or two turns. Do not pull too hard - you can cut through the gasket and then the connection will leak.
Crane dismantling
So let's see how to remove a faucet from a sink. Once all the necessary materials have been prepared, you can begin the actual procedure for replacing the faucet. Dismantling an old mixer, both ball and lever, is usually done as follows:
- place some container under the sink or place a dry cloth (some water remains in the taps even after it is drained from the pipes);
- simultaneously loosen the fastening nuts on the eccentrics of the hot water and cold water valves;
- unscrew the nuts completely and remove the old faucet from the sink.
Very often, as already mentioned, the nuts in water taps stick to the eccentrics. In this case, of course, there is no need to apply too much effort when unscrewing them. If the nuts are stuck, you should:
- moisten a rag generously with rust softening liquid;
- wrap a rag around the nut;
- wait a while;
- remove the rag from the faucet mounting area.
Next you need to try to unscrew the nuts again.
Using the technology described above, you can dismantle any taps directly attached to pipes. This could be a sink faucet (long or short spout), a model with a shower, a valve, or a lever. The main difficulty in removing such taps from the sink lies precisely in the need to unscrew the stuck nuts. Otherwise, the procedure for removing faucets attached to pipes, as you can see, is extremely simple.
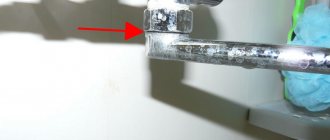
Recommendations from specialists and possible difficulties
Figure 6: Sticky threaded connection
Chemical. Use universal assistant WD 40, table vinegar or descaling agent. They need to wet the visible part of the thread and let it sit for 10 minutes to several hours, depending on the amount of deposits.
- Thermal. Heat the connection with a construction or household hairdryer at low power, so as not to overheat the rubber parts. Due to the different coefficient of expansion, the steel case will expand more than the brass axlebox and can be unscrewed.
- Mechanical. Tapping with a rubber or wooden mallet on all sides 10-20 times destroys the lime deposits, and it will be possible to unscrew the stuck connection.
- Boiling. You will need to completely remove the mixer and boil it in a soda solution for 2-3 hours. The deposits should dissolve and the connection can be unscrewed.
Flexible connections should first be unscrewed from the main line. From this side, the nut can turn on the hose flange, and it will not tighten. The hoses must be passed through the hole in the sink one at a time so that the nuts do not get stuck.
If you are removing a faucet in a shower stall, you need to take into account the design of the cabin and the mixer. If a freestanding cabin is equipped with a mode switch, it is usually integrated with the mixer.
Figure 7: Integrated shower mixer
You will have to remove both handles and unscrew the nuts securing the controls.
Figure 8: Removing the handles. The cartridge and mode switch mounts are visible
This is best done with an assistant holding the reinforcement from the back.
There are two nuts under the handle (lever) of the mixer, one is decorative, they unscrew it and the second nut presses the cartridge to the mixer body.
This nut is very stuck, how can I unscrew it?
More than once I came across a situation where a customer, without thoroughly studying the structure of such a mixer, tried to change the cartridge on his own and little worked.
Before unscrewing the nut pressing the cartridge to the body, you need to unscrew (unscrew it by hand) this one
Otherwise, the edges of the pressing nut will be inaccessible, that is, the opinion that the mixer body is one whole is erroneous; the decorative nut is unscrewed.
Next, you need to turn off the water on the risers.
Remove the plug by prying it with a knife.
We unscrew 1 screw and the mixer lever itself is removed upwards.
Unscrew the spherical nut.
That's it, in front of you is the same clamping nut.
You need a suitable tool to unscrew it.
Plumber's pliers will do, or something like this
But it's better like this
A wrench is inserted into the holes of the socket wrench, and you can use any wrench that fits the size of the holes in the wrench.
The lever is significant and unscrewing any nut, even a very stuck one, is not a problem.
Tap the nut lightly along the edges with a hammer.
Next we try to jerk and unscrew it.
If that doesn't help, you can use penetrating liquids.
Or simply soak a rag in vinegar and place it on the nut for a couple of hours.
That's it, again we try to unscrew it jerkily, counterclockwise.
More drastic methods include dismantling the mixer and unscrewing the nut in a vice.
Or a chisel and hammer, hit counterclockwise, be careful, the nut is needed to install a new cartridge.
Although they are sold separately, as spare parts for the mixer.
That's it, unscrew the nut, change the cartridge and reassemble the mixer in the reverse order.
Often, beginners do not know which way to unscrew the faucet. Since the usual thread is right-handed, you need to twist to the left, namely counterclockwise. Very often, when starting repairs, a home craftsman notices that the faucet is rusty. How to unscrew it in this case? According to experienced craftsmen, in order for the nuts to come off easily, you need to tap them lightly.
Some home craftsmen remove scale using table vinegar. Judging by numerous consumer reviews, the substance will take effect within half an hour. Of course, if there are few deposits. The nut may start to turn after 10 minutes or after several hours. Also for this purpose, specialized stores sell a universal professional product, namely WD-40 impregnation.
After working with chemicals, it is advisable to rinse the parts thoroughly in warm water. Judging by the reviews, the thermal method is considered quite effective. You will need a construction or household hair dryer. To prevent rubber parts from melting, you need to work at low power. The essence of this method is that steel and brass have different expansion coefficients.
Tags: shoot
« Previous entry
How to install new equipment
So, we figured out how to remove the faucet from the sink. The procedure for dismantling such plumbing equipment is therefore simple. The home handyman just needs to unscrew the nuts, disconnecting the mixer from the pipes. How to properly install a new faucet on a sink? This operation is also a fairly simple set of actions. Before performing such work, the purchased crane may have to be pre-assembled, following the instructions from the manufacturer.
So, let's see how to install a faucet on a sink correctly? Installation of such equipment is usually carried out as follows:
- wrap the ends of the adapters on the pipes with Teflon tape;
- install the tap in place and simultaneously attach the nuts to the eccentrics of the hot water and cold water;
- wrap the nuts with electrical tape so as not to scratch their surface;
- tighten the nuts as tightly as possible.
At the final stage of installation, open the common taps and check the operation of the mixer.
How to unscrew a faucet with hoses from a sink
These types of faucets are also quite often installed in kitchens or bathroom sinks. Dismantling them is a slightly more complicated procedure than removing faucets simply attached to the pipes from the sink. To remove such a tap, you need:
- turn off the general valves and drain the water from the pipes;
- disconnect the sewer pipes and siphon;
- place a basin or a rag under the sink;
- unscrew the flexible wiring from the hot water and cold water pipes using a plumbing adjustable wrench;
- clean the fittings of the supply pipes from old sealant.
Next, you can begin to unscrew the lower faucet fasteners. This stage in the procedure for dismantling a mixer with hoses can be considered the most difficult. Unwinding in this case is usually performed as follows:
- lubricate the threads of the pins with the nuts screwed onto them with a rust-softening liquid;
- After some time, completely unscrew the nuts.
At the next stage:
- pull the faucet out of the sink as far as possible;
- in the lower part of the mixer body, unscrew the flexible connections from the outlet holes using pliers;
- pull up the entire tap;
- clean the area under the faucet from both the bottom and top of the sink from deposits.
It is better not to throw away the crane dismantled in this way, but to disassemble it for spare parts. Perhaps the parts of the old mixer will be useful in the future. Install a new faucet with hoses or an old one after repair in place simply by performing the steps in reverse order. The threads, of course, are sealed with sealing tape.
What is needed for work
Replacing a kitchen faucet consists of two stages: first, remove the old one, then install and connect the new one. In addition to the new faucet, you will need wrenches of the appropriate size and some auxiliary materials. Most often, you need keys for 10 and 11, 22 and 24. In order to remove the mixer from the countertop or sink, you will need two adjustable wrenches.
One more thing. You will most likely need new hoses. Although most kitchen faucets are equipped with flexible hoses, their length is 30 cm. This is not always enough. Before starting work, you need to make sure that the standard hoses are long enough.
What is needed to replace a kitchen faucet?
It depends on how far the cold and hot water pipes are from the mixer. The hoses should sag slightly, because when you turn the tap on/off, there is a sharp change in pressure, which causes the hoses to twitch. If they are tight, the connection will very quickly become loose and leak. So, if there are 25 cm or less from the pipes to the mixer inlet, standard hoses will be enough. If more, buy longer ones. And advice: buy high-quality ones, not the cheapest ones. They quickly become unusable and can flood both you and your neighbors below, if there are any. Therefore, take flexible hoses made of stainless braid or corrugated stainless pipe. They will serve for a long time and without complaints.
To purchase hoses for a kitchen faucet, you will need the size of the “needle” - the tip that is screwed into the faucet, as well as the diameter of the pipe and the type of end (male-female) - in order to select the right fittings.
To seal the joint you will need linen tow with a sealant paste or fum tape. You will need various gaskets and o-rings (should be included in the kit, but just in case, find everything you have).
Removing the shower mixer
This procedure can also be considered relatively simple and completely doable with your own hands. Shower mixers consist of several basic structural elements:
- metal case coated with galvanic composition;
- a cartridge responsible for the actual water supply;
- holder - a fastening element connecting the faucet body to the facade of the shower cabin;
- handwheels;
- diverter, which is an intermediate element between the tap and the main cartridge.
Before dismantling such a mixer, as in all other cases, first shut off the water supply to the apartment. Next, drain the water from the pipes and disassemble the tap itself:
- remove the decorative plug located at the bottom of the faucet body;
- unscrew the holder screw using a screwdriver;
- remove the faucet handle;
- remove decorative trims from the mixer;
- below, under the mixer, move the plates towards you and put them aside;
- carefully unscrew the fasteners holding the panel;
- on the back panel of the shower cabin, unscrew the nut and remove the faucet along with the sealing collar.
At the next stage, the vacated space is cleaned, dried and treated with silicone sealant. Installation of a new faucet or a repaired old one in a shower stall is carried out as follows:
- insert the cartridge into special grooves;
- fix the device on the cabin wall.
After installing the tap, it must be checked for functionality and absence of leaks.
Features of installation work with other types of mixers
Mixer tap with two spouts and filter. A special feature of this faucet is an additional spout for supplying purified drinking water. The installation of the faucet differs only in that it is necessary to connect not two hoses to the base of the body, but three (a water supply from the filter is added).
- Wall-mounted faucets Replacing a wall-mounted faucet is easy. Here you just need to unscrew the nuts that secure the faucet to the wall surface, and then carefully disconnect it from the end section of the water supply. A new mixer is installed along the same path, only in reverse.
- Sensor/Thermostat Faucets These kitchen faucet options are more of a luxury item that you don't see very often. To install or replace a faucet, you need to have an understanding of the electrical conductors that are separately connected to the faucet to provide additional functions: heating water or recognizing objects at a distance. Otherwise, it is better to contact specialists.
Apply the new wall-mounted faucet to the outlet pipes before installation. If the plumbing holes and the parts do not match, use adapters. Usually adapters are included immediately
How to disassemble a single lever mixer
Faucets in the kitchen or bathroom are usually removed to replace them with new ones. But it often happens that the mixer has to be unscrewed just to repair it. In this case, difficulties for a beginner can mainly be caused by disassembling the ball mixer. How to properly repair such models?
To remove the handle of a single-lever faucet on a sink, as in the case of a shower stall, you first need to simply pry off the decorative cap located on the body with a screwdriver and pull it out. Next, you should unscrew the screw in the opened hole. After the flywheel is removed, you need to remove the cartridge from the tap.
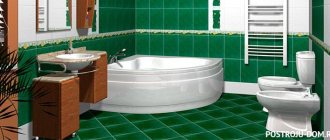
Replacing an old faucet in the kitchen and bathroom
2020-12-22 14:57:25 0 725
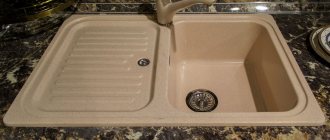
How to change a faucet in the kitchen.
There are several types of faucets, differing in their internal design and the method of supplying water to them, unlike devices for bathrooms, which are located on the wall, kitchen types are mounted on the sink.
Faucet selection.
To select a faucet for a sink, several options are considered: single-lever, two-valve, touch.
There is no alternative to single-lever types when choosing a sink mixer - they are simple and easy to use, have a wide range and affordable price, and are designed to work in various sink designs.
Two-valve devices are used quite rarely in modern kitchens due to the inconvenience of operation - to set the temperature and flow, control of two handles is required. They are purchased as a budget option or, on the contrary, as a very expensive exclusive, made to order for a specific kitchen style.
Touch sensors are the most modern and technologically advanced, and in terms of ease of use they have no competitors: just put your hands or any object in the range of the infrared sensors - the water turns on automatically. The device does not have valves to turn the water on and off; a built-in battery is used to control the mechanism. Touch models allow you to pre-program the temperature and pressure of the water jet; to change the operating mode, you need to install another program. In the kitchen, water supply modes are constantly changing, so using these types is not practical.
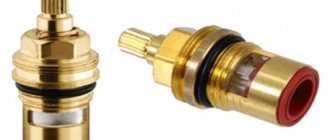
Single lever mixer.
They have a simple design in the form of a body of two main units or a permanent connection; water flows are controlled by a cartridge built inside with a lever for attaching the handle.
All modifications of single-lever devices have a unified design for the dimensions of the built-in cartridges and differ in the shape of the body and spout.
Two-valve models.
In devices with two valves, hot and cold water is turned on and shut off using worm or ceramic shut-off elements. The valves have a standard design; the body and spout may differ in different models.
Preparatory work.
Before replacing the mixer, purchase the device itself and the necessary accessories, and prepare plumbing tools.
Installation work consists of the following stages:
- disconnection of hot and cold water from the apartment’s general water supply.
— Freeing the sink from water pipes protruding from the wall, dismantling the old faucet and preparing the mounting hole.
— Installation of a kitchen faucet with your own hands in the sink with connection of supply hoses.
— Connecting the sink to the drain and water pipes, installing the cabinet with the sink in place.
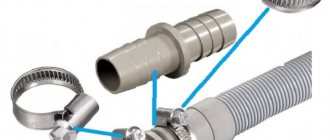
Recommendations for choosing flexible supply hoses.
When purchasing water supply hoses, you should consider the materials used to make them, which affect their physical characteristics and service life.
Products with aluminum braiding are short-lived, their average service life is no more than three years, while stainless steel braiding increases the service life of plumbing connections up to 10 years. There are reinforced varieties of flexible hoses, combining several braiding materials, designed for high pressure with a service life of up to 15 years.
Necessary consumables.
To fasten water supply hoses, additional sealants and sealing parts are usually not required - the gasket, which is built into the union nut, and the rings on the external thread of the outlet fitting, when installed correctly, provide reliable sealing.
Sometimes you may need flax or fluoroplastic sealing material, sealing paste, or household products to remove limescale or rust.
When carrying out plumbing work involving the removal of a built-in sink from a countertop and its subsequent installation, you may need silicone sealant to protect the edges of the cut hole from moisture.
How to remove a kitchen faucet.
Before disassembling the faucet in the kitchen, they prepare plumbing tools and components; dismantling and installing new equipment is often accompanied by replacing supply hoses, which have lost their properties over time and can be damaged when unscrewed.
Short hoses are supplied as standard from the factory; upon purchase, they often have to be replaced with long ones in such a way that they sag freely during installation.
Before unscrewing the tap, the old fasteners, if rust and limescale appear on them, are treated with household chemicals and left for a while, after which it is a little easier to disassemble the water tap. In a similar way, the threads on pipes are cleaned of rust and lime deposits.
Dismantling process.
— The device is disassembled after the water is turned off, first the siphon is untwisted and disconnected from the sink, then with a wrench you can unscrew the water supply hoses from the water pipes.
— When the sink is installed in the countertop of the kitchen cabinet near the wall, it is quite difficult to unscrew and dismantle the mixer - it is easier to remove the sink outside to continue further work. To do this, simply lift it or unscrew the fixing bolts and fasteners in cases of a mortise model.
— Before removing the faucet from the sink, turn it over for better access to the fasteners, then unscrew it by hand or using a liner wrench.
— Further disassembly involves unscrewing the body from the sink: depending on the type of fastening and for ease of operation, use an adjustable or socket wrench of a suitable diameter or a flat-head screwdriver.
How to install the mixer correctly.
Before installing the faucet in the kitchen sink, remove it from the old device and clean the installation area from limescale. The faucet is installed differently depending on the design of the fastener.
It is easier to change a kitchen faucet that has a thread in the lower part of the body for fixing the union nut; in addition, the design provides a stronger and tighter connection to the sink.
If you install the housing on studs, installation will take longer, and the connection will not be very stable and tight and may become loose over time.
Crane assembly.
Typically, a single-lever model is supplied assembled; before installing it, you need to check the threaded connections for ease of assembly by first tightening the studs or nuts into the body.
To correctly assemble all connections during installation, it is useful to use the recommendations and diagrams given in the attached instructions.
Preparation for installation.
Mixer installation.
Depending on the type of fastener, work is carried out as follows:
— It’s easiest to install a model with a clamping nut that provides reliable fastening on the sink: screw the supply hoses into the body, push it into the hole and fix it with a nut with a rubber gasket and an adjustable wrench.
— When designing with threaded rods, proceed in the same way: connect the connections and studs to the body, insert it into the sink and press it with nuts through a metal plate with a rubber gasket.
Connection to water supply.
The installed plumbing fixtures are connected to the water supply - the water supply is made using flexible hoses, manually screwing them to the housings and pipes with some force. If there is a leak, you can lightly tighten the outlet fitting and the union nut with an adjustable wrench, but it is important not to twist the fasteners - in this case, the gaskets may be pinched and damaged, leading to a failure of the seal.
When installing the liner, you should not pull it, twist it or bend it too much - this significantly reduces its service life.
Functionality check.
To check the correct installation, wipe all parts dry with a rag and turn on the water: the location of possible leaks can be determined by running your hand over the parts, but it is better to use a small piece of a dry white rag.
What to look for and possible mistakes.
One of the main operations when installing plumbing is the correct connection of flexible hoses supplying water. When installing, it is important not to pinch the rubber ring - for this, the couplings are screwed on by hand with force; the use of additional and synthetic seals is not required.
I would also like to consider replacing the bathroom faucet.
Before proceeding directly to replacing the mixer, it is necessary to dismantle the old one. This is quite easy to do. First you need to turn off the water. After this, you can begin dismantling the old mixer. For these purposes, we will need an adjustable and gas wrench.
We drain the remaining water from the tap and begin to unscrew the mixer from the wall. In this case, everything is done very carefully so as not to damage the threads on the fitting mounted into the wall. If the thread becomes unusable, then replacing the faucet may turn into a partial renovation of the bathroom, since to replace the fitting you will have to dismantle the wall surface.
Installation of fittings.
Installation of fittings may be required when moving to a new apartment or if the threads on previously installed fittings have become loose.
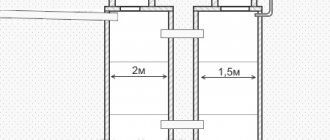
Before installing fittings for installing a mixer, it is necessary to make some calculations. Please note that a distance of 150 mm must be maintained between the centers of the fittings and they must be parallel to each other. Using a level, check that the fittings are level with each other.
Unsoldering of fittings is carried out exclusively after installing beacons under plaster or sheathing for drywall, after laying out water pipes. In this case, the fittings can protrude beyond the outer edge of the sheathing by 25 - 28 mm in the case of plasterboard wall finishing and by 13 -17 mm if the wall is to be plastered.
Mixer installation.
If installation of fittings is not required, replacing the mixer will be quite simple. To do this you should:
— Using an adjustable wrench, you need to loosen and then unscrew the two union nuts of the old mixer.
— Check the location of the fittings - they should be horizontally located, and the distance between them should be 15 cm.
— Attach the union nuts from the new mixer to the eccentrics and check whether the mixer fits. If not, you will need to either replace the eccentrics with new ones, or try to adjust them.
— We take the decorative cups from the kit and screw them onto the eccentrics.
— We completely assemble the new mixer.
— We insert gaskets. In this case, it would be better to immediately replace them with new ones made of paronite and add more silicone gaskets. We tighten the union nuts onto the fittings.
— Use a wrench to tighten the connections.
How to disassemble a valve mixer
Repairing such a kitchen faucet yourself may also not be difficult. Valve mixers are most often disassembled in the following order:
- shut off the water supply to the apartment and plug the sink drain with some rag;
- using a screwdriver, pry up and pull out the decorative plugs on the valves (red and blue circles);
- Unscrew the exposed screws.
At the final stage, when disassembling the valve model, carefully turn out the valve axle boxes using an adjustable wrench. Next, disassemble the remaining parts of the double-lever sink faucet and check it for blockages, breakages, deposits, etc.
Methods for unscrewing plumbing nuts
This procedure, as already mentioned, should be carried out as carefully as possible so as not to damage the pipes. The easiest way to unscrew rusted nuts is, of course, to use a special liquid. But what to do if such a remedy is not at hand?
If necessary, you can replace purchased scale softening liquid with:
- kerosene;
- vinegar and soda.
When using such products, you must first thoroughly clean the problematic joint with a wire brush, trying to remove all rust and dirt. Next, you should take vinegar or kerosene into a syringe and inject it under the nut from all sides.
The next step is to wait two hours, leaving the kitchen tap alone. During this time, the chosen home remedy will eat away the rust and soften it. Thanks to this, the nut will most likely unscrew quite easily in the future. If the problem area was treated with vinegar, all parts should be wiped with a soda solution at the final stage.
How to remove a sink
We have thus found out how to change the faucet without removing the sink. The procedure is relatively simple. But sometimes in the kitchen or bathroom, in addition to the faucet itself, the sink itself needs to be replaced. Removing the sink and putting a new one in its place with your own hands will also most likely not be difficult for a DIYer.
They usually begin to dismantle such plumbing equipment as follows:
- turn off the water in the apartment and prepare a bucket and dry rags to remove residual water leaking from the pipes;
- holding the siphon glass, unscrew the nut under the sink counterclockwise;
- disconnect the drain pipe from the siphon by unscrewing the top nut;
- remove the wedge-shaped washer and nuts from both sides of the drain pipe;
- remove the pipe itself.
Having completed these manipulations, simply pull out the siphon from the sewer socket. Next, using the technology described above, remove the mixer from the sink. To dismantle the sink itself, either unscrew the fastener holding it, or simply remove the bowl from the stand.