Residential buildings of the Soviet and earlier eras are mainly equipped with cast iron sewer networks. Old houses with a Khrushchev-type layout have cast iron pipelines and are designed for a standard service life of up to 70 years. In fact, owners of five-story apartments need to replace the sewer system much earlier. The reason for this may be repair work to redevelop the apartment, major or current repairs, requiring a general replacement of utility networks in the apartment: water supply and repair of the sewer pipe in the apartment.
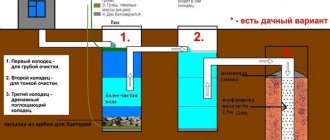
Sewage network design diagram
Replacing the sewer pipeline
Before changing the sewer pipes in the apartment, a plan for dismantling work is outlined.
Schematic sequence of repair work
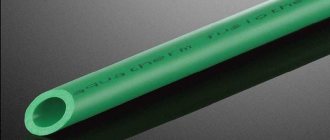
Currently, the alternative piping for cast iron is PVC sewer piping. The phased replacement of sewer pipes and the sequence of repairs consists of the following types of work:
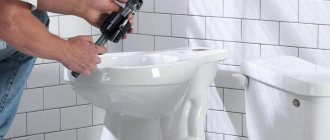
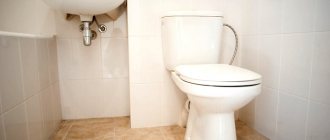
- Disconnecting sanitary fixtures from the existing sewer system. If you plan to reuse household plumbing fixtures, then in this case it is recommended that dismantling be carried out carefully and carefully in order to preserve the material. Old toilets were usually installed with a cement connection to the sewer pipe, so to remove it you have to break the connecting seam with a hammer and remove it piece by piece;
- Dismantling of existing horizontal sewer pipes made of cast iron;
- Old pipes can be dismantled using a heavy rubber hammer or wooden sledgehammer. In some cases, if the pipelines are in good condition during dismantling, a circular angle saw “grinder” with a diamond blade is used;
- Dismantling the existing sewer riser. At this stage, it is best for the owner of an apartment in a multi-storey building to ask the neighbors on the upper floors not to use the sewer. If the owners of the upper and lower apartments do not intend to replace the common sewer riser, then in this case there is only one way out - using a grinder saw, carefully cut the existing riser at the ceiling level at a distance of 100 mm from the ceiling and 80 mm from the floor level;
- The upper and lower uneven cut lines of the cast iron sewer riser are carefully cleaned using a grinding machine equipped with a removable cleaning disc.
Important! Sewerage repairs in an apartment are carried out with mandatory compliance with safety regulations and the use of personal protective equipment: safety glasses and respirators.
Installation of a bathtub and production of a screen for a bathtub
While I was waiting for the couriers with the new bathroom, I started leveling the second crooked wall of the Khrushchev building (the wall with the door). The same slabs of moisture-resistant plasterboard were used, the joints between which were covered with plaster. The corners that are visible in the frame were intended for attaching shelves to them across the entire width of the wall (for basins, etc.). During the work, the decorator suggested a slightly different method of manufacturing and attaching such a shelf (I will describe it later).
I also installed an outlet with several degrees of protection (a special outlet for bathrooms) and soldered the pipes for the heated towel rail. Later, all that remains is to screw the corner brass “American” pieces into them and hang a “towel” on them.
Finally, the new bathtub arrived. We make sure to inspect the product together with the couriers on the street, after which they bring it into the apartment and place it on its back in the bathroom.
Here we need to start talking about the eternal: what kind of bathtub should it be - acrylic, steel or cast iron? You can argue and give arguments endlessly, but I won’t do this, because this is the topic of a separate article. Personally, I liked the German steel bathtub Kaldewei Saniform Plus 140*70. Is steel noisy? Doesn't hold temperature well? Calm down dears, all this is not about her. There are steel bathtubs on sale with a wall thickness of 2 and even 1.3 mm, and this one has a record 3.5 mm. I read a bunch of negative and sometimes terrifying reviews about modern cast iron bathtubs, about the unsatisfactory quality of casting, about how the enamel is already starting to turn yellow literally after a month or two of use...Kaldewei Saniform Plus turned out to be the only bathroom about which there was not a single negative review, but on the contrary, the owners were happy with everything. So I bought it and did not regret it.
I installed the 40-kilogram bathtub in one person, without assistants, which would have been impossible to do with a cast iron product. I installed a siphon/semi-automatic device on it, installed the legs,
and then carefully placed it on the floor. There were two levels on the sides of the bathtub (long and short), along which I installed the product strictly horizontally using adjustable legs. No lifting towards the drain!!! Absolutely all baths have a bottom slope, which ensures normal water flow. To eliminate the slightest wobble, the bathtub must be wedged: wooden wedges are driven between the wall and the side.
A noise test showed that the noise of falling water in this bathtub differs little from what it was in the old cast iron one. If you continue to look at this matter skeptically, then buy a couple of sheets of automotive sound insulation and glue them to the bottom and sides of the bathtub.
Now that the bathtub is wedged and does not wobble, you can start making the screen. To begin with, general provisions:
— If you want to make a really good renovation, then refuse any purchased screens for the bathtub.
— The screen under the bathroom should be tiled - it’s both beautiful and hygienic.
- Forget about the last century and under no circumstances make these wretched niches for your feet. Previously, when they washed in basins or in the bathroom, housewives may have needed them, but today we live in the age of washing machines, so what the hell with these useless niches.
— The screen should provide emergency access to the pipes, so a small part (in the area of the siphon) should either be left open or covered with a piece of tile, which can be easily removed if necessary. It is not at all necessary to install inspection hatches made of steel or plastic.
— And also, make the screen strictly vertical, do not experiment with any inclined surfaces. They can seriously spoil the geometry of the room.
Well, now let's start making a screen for the bathtub with our own hands. For the screen frame we will need 27*27 mm steel profiles for plasterboard. Using videos on YouTube, I made preliminary markings under the bathtub (at the bottom left of the frame you can see pencil marks and a long line along the entire length of the bathtub). In general, the markup is done like this:
— From the side of the bathtub on the wall along the level we draw a vertical line to the floor - this is the first notch on the floor.
— From the first notch, we retreat inward a distance equal to the width of the folded edge of the bathtub side and place a second notch.
— From the second notch we retreat a distance equal to the thickness of the tile and adhesive layer (third notch) and, finally, we retreat another 12 mm (thickness of the drywall sheet) and get the fourth notch.
— The fourth notch will be the edge of our steel frame for the bathtub. Using a level and a ruler, we retreat the resulting distance on the other side of the bath. Draw a straight line between the serifs. We will attach the profile using it.
The steel profile is trimmed with a grinder; to give rigidity to the structure, two profiles are folded and twisted with self-tapping screws. To save myself from the unnecessary drilling of holes in the floor of the Khrushchev building, I glued the lower profile with silicone sealant. The most important thing in this matter is to first reliably degrease the surfaces to be glued with white spirit or acetone. Next, apply silicone sealant and firmly press the profile to the floor. After about an hour and a half, it will be practically impossible to dislodge it. The top profile is glued to the side of the bath in the same way. You can insert bars into the gaps between the bathtub and the profile, again to add rigidity.
The vertical ribs near the wall already need to be mounted on dowels (you can’t do without drilling here), and the middle vertical ones - on self-tapping screws.
Before sealing the space with a sheet of drywall, we run a grounding wire to the bathtub (attached to the black eyelet on the left in the top photo).
Finally, a sheet of drywall with a cutout for access to the siphon under the bathtub takes its place. Cutout dimensions 260x400 mm. The drywall is attached to the profile with self-tapping screws. So, the manufacture of the screen for the bathtub in my Khrushchev apartment is completed.
New sewer riser
Sewer ventilation in a private house
Home sewerage after renovation
After completing the dismantling of outdated cast iron sewerage networks made of cast iron, you can begin installing a new central drainage pipeline. Any sewerage scheme consists of such elements as:
- Central vertical drainage pipe riser 100 mm;
- Sewer tee with a diameter of 100 mm for connecting the toilet of the bathroom;
- Drainage pipes with a diameter of 50 mm, connected to the bathtub, sink, washbasin, dishwasher, washing machine.
The most crucial moment of repair work to replace the sewer system is the installation of a new sewer riser.
Installation subtleties
Central drainage sewer riser
Replacement of sewerage in Khrushchev is carried out in the following order:
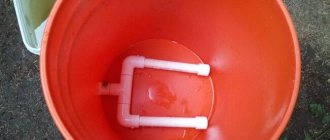
- Before starting work, it is necessary to caulk the existing holes in the sewer pipe with a wad of rolled polyethylene, which will prevent debris from getting into the pipeline;
- Special seals in the form of a thick rubber cuff are inserted into the upper and lower sections of the existing pipeline. The surface of the rubber joints must be coated with silicone sealant. This protective measure eliminates the possibility of liquid leakage during the operation of the home sewage system;
- After installing the seal, it’s time to install the main part of the sewer riser - an adapter with a diameter of 110 mm made of PVC. The connecting fitting is mounted on top of the rubber seal at the top and bottom of the sewer riser. Connections must be tight and tight;
- The assembled new sewer riser with bends is installed strictly vertically and fixed to the wall with special clamps with a diameter of 100 mm. The fixing elements are attached to the wall with construction plastic dowels. For a standard bathroom, three sewer riser fastenings are sufficient.
After installing the main sewer pipeline, you can begin installing the vertical part of the drainage pipeline.
Dismantling the old tee
Replacing the sewer tee connecting the toilet with the horizontal drainage pipe and the central riser is considered the most labor-intensive job. In older residential buildings, bathrooms are equipped with cast iron tees, completely walled up in monolithic concrete. Therefore, to dismantle and replace them, you will need to dismantle part of the floor. Another important problem in replacing this important element is the fragility of cast iron when dismantling a sewer pipeline. One careless impact movement can lead to a chain reaction of destruction of the sewer riser going to the neighbors.
After installing a new tee measuring 100x100x100 mm made of polypropylene, its holes are covered with a thick layer of silicone sealant to create a tight connection with the plastic sewer pipeline.
Fittings for sewerage
Initial data and idea
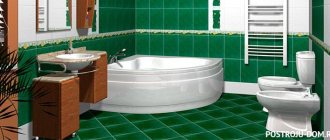
The bathroom in my Khrushchev apartment is separate. The clear dimensions of the bathroom are 1520*1360 mm, but with certain manipulations they can be increased by 5-6 cm in each dimension, which I will discuss below.
The main idea of the new bathroom was to turn the bathtub 90 degrees and orient it along the far wall (opposite the front door). In my wife’s and my opinion, this position is more rational, although we understood that we would lose ten centimeters in length.
Installation of horizontal sewerage
Sewage system in an apartment building
After assembling and installing the central drainage pipeline, the replacement of the sewerage system in the apartment begins. Pipe sewerage distribution to connection points for household appliances is made from pipes with a diameter of 50 mm and combines all drainage elements into a single home sewerage network. To repair the sewer system, straight plastic pipes and a variety of fittings are used.
Table of slopes and diameters of home sewerage
| Plumbing fixture | Slope | Distance between the central sewer riser and the siphon, mm | Diameter of horizontal pipeline, mm |
| Bath | 1:30 | 100-300 | 40-50 |
| Shower | 1:48 | 150-170 | 40-50 |
| Toilet | 1:20 | up to 600 | 100 |
| Sink | 1:12 | 0-80 | 40-50 |
| Bidet | 1:20 | 70-100 | 30-40 |
| Washing | 1:36 | 130-150 | 30-40 |
| Sink with shower | 1:48 | 170-230 | 50 |
| Central drainage riser | 100 | ||
| Branches from the central sewer riser | 65-75 |
Since liquid flows by gravity in the apartment’s sewer pipeline, during installation the sewer line must be laid with a slope towards the riser. To solve this problem, you need to know the exact placement of plumbing fixtures and other drainage elements.
Sewer pipeline in the apartment
Preparatory work
I took about two weeks to prepare for the immediate start of work in the bathroom to decide on the design of the future bathroom: draw up the wiring of water supply and sewerage, ventilation, tile laying scheme, etc.
So, what is a bathroom like in a typical Khrushchev panel building? In fact, this is just a cabin that was cast somewhere at DSK and already assembled was installed in its place in the Khrushchev-era building during construction. The cabin walls have a scanty thickness of 3-5 cm and are made of reinforced gypsum concrete. The material is very weak and easily crumbles with a hammer drill or even a hammer. In the figure below, the walls of the “cabin” are shaded and, as we see, they are adjacent to two load-bearing walls of the Khrushchev building, in one of which (between the kitchen and the bathroom) there are ventilation shafts.
In renovation practice, the most common option is to demolish the Khrushchev-era partition between the toilet and the bathroom, which supposedly makes the bathroom more spacious and creates a lot of additional space. However, in my opinion, this is the most common misconception: no matter how much I tried to hypothetically design such a “spacious” combined bathroom in my Khrushchev-era apartment building, nothing worked out for me.
As I already said, the dimensions of the bathroom in my Khrushchev-era apartment are 1360*1520 mm. We had a 150 cm bathtub on the long side, which we decided to replace with a 140 cm one and put it on the short side. For this, from the existing dimensions, I was missing 4 cm, which I decided to obtain by demolishing the wall of the bathroom adjacent to the load-bearing wall of the Khrushchev building with ventilation shafts. This "plasterboard concrete" was broken with a regular mason's hammer in just three to four hours. The hardest thing was to take out almost two full bathtubs of construction waste. The reinforcing mesh is carefully cut with a grinder.
Unfortunately, I cannot demonstrate the old, pre-renovation look of the Khrushchev-era bathroom, but believe me, everything was very sad there.
I warn you that by demolishing the Khrushchev wall, you deprive the ceiling of one point of support. It is composed of the same gypsum concrete and is part of a solid “cabin”. It can also be dismantled, but I decided to simply strengthen the bathroom ceiling by supporting it with 40*50 mm timber and 10*100mm dowels - this is quite enough.
Two of the four walls in the Khrushchev-era bathroom turned out to be crooked, with a blockage of up to 3 cm, so I had to start leveling them.
After I renovated the kitchen and hallway in my Khrushchev-era apartment, I already had some plasterer skills, but in the bathroom I decided to use a different method of leveling the walls, which I really liked in the end. Holes are drilled in several rows in the wall, self-tapping screws are screwed into them, the heads of which are aligned and thus the reference points of a new, flat and strictly vertical plane are obtained (in the first photo below you can see the screws sticking out of the wall on the right). We prime the walls and wait 1.5-2 hours. Next, we take slabs of moisture-resistant plasterboard 1500*600 mm, which are ideally adjusted to the dimensions of our wall in Khrushchev (1520 mm) and “glued” to the wall using a special adhesive solution for plasterboard. Unlike plaster, the adhesive composition hardens faster (up to 20 minutes), so the slabs do not slip. The composition is applied in “buns” every 15-20 cm, on which the gypsum board slab is placed and tapped with a mallet or pressed with a rule so that the plane of the slab coincides with the plane of the previously exposed screw heads.
The joints between the slabs are sealed either with the same compound or simply with plaster. The time it takes to level the wall takes only 20 minutes, that is, exactly as long as the adhesive mixture diluted in the bucket hardens.
The real work could be considered begun when the time came to dismantle the old cast-iron bathtub in my Khrushchev apartment.
Just try to move 120 kilograms from its place, and then carry it out so as not to bomb half of the apartment in the Khrushchev building (already renovated, by the way). I watched videos on YouTube of how these cast-iron bathtubs are cut with grinders, drilled with drills, and even smashed with pound weights! (cast iron is a brittle material and can be chipped/broken). However, my wife’s uncle stopped me in time and said that all these baths are easy to take out if you do everything correctly and technically.
While the guy was at the entrance to the house, I managed to loosen the bathtub, put it on its back and remove the legs. The thresholds were covered with thick rugs, and soft tourist rugs were laid along the path of our movement from the apartment. In this vertical position, we carefully carried the bathtub onto the landing of the Khrushchev building and then further up the stairs we took it out into the street without any problems. On this day, our apartment lost its last original element - an old Soviet cast-iron bathtub.
So, now I have nowhere to wash in the Khrushchev-era building, so I need to act quickly and efficiently so that the new bathtub is in place in at least three to four days. The first thing to do is water supply and sewerage.
Purpose of fan pipes
Installation of an autonomous sewer system in a private house
The drain pipe can be considered as a kind of ventilation hood of the central sewer riser.
Location of the vent pipe on a metal roof
In fact, it is a continuation of the sewer drainage pipe with a diameter of 110 mm. To prevent unpleasant odors from appearing in the internal sewer system and harmful gases from accumulating, the upper part is placed above the level of the roof covering and goes directly into the air atmosphere. To protect against rain and snow, the fan pipe is covered on top with a protective cap in the form of a fungus.
Instructions for repairing a drain pipe
Replacing the drain pipe is a necessary measure during the general repair of the in-house sewer system. The simplified work plan consists of the following activities:
- dismantling the old drain pipe;
- installation of a new structure.
In Khrushchev-era houses, fan pipes were installed from cast iron pipes. The specific gravity of 1 meter of cast iron sewer pipe with a diameter of 110 mm is 25 kg. If you make a simple arithmetic calculation, you can understand that when dismantling a 3-meter-long gray cast iron fan pipe, the weight of the dismantled structure will be about 100 kg. Therefore, it is unsafe to dismantle it yourself; it is difficult to hold such a significant weight in your hands.
The work of replacing a drain pipe is similar to replacing a sewer riser. The only difference is that a ventilation section of the pipe is added that extends beyond the roof structure.
How to change at the expense of the Criminal Code
The procedure for free replacement of a faulty riser with the involvement of specialists from the management company is carried out in the following order:
- A plumber is called to the house, who inspects the riser, draws up a report, records all damage and confirms the validity of the replacement.
- After this, a free-form application is drawn up in 2 copies addressed to the boss, indicating the reasons for the replacement, the second copy remains in hand.
It is important that the owner does not have rent debts, otherwise the application may not be accepted for consideration, and the repair of the riser or its replacement may be denied.
- After a positive response to the application, a time is agreed upon; before starting work, plumbers visit the apartments above and warn residents about the temporary cessation of using the sewerage system.
- The tenant provides free access to the riser; most likely, he will have to remove the toilet himself or entrust this to plumbers for an additional fee; there are no other costs for replacement.
Sometimes the management company misleads residents with the statement that the riser is located in the apartment, and therefore, all costs for its repair (replacement) must be borne by the owner. With this approach, it is useful to draw the management’s attention to the document MDK 2-04.2004, according to which all sewer risers, heating radiators, water pipes in an apartment panel or brick building are common property and therefore their maintenance, repair or replacement should be carried out by the management company of the management company.
If a cast-iron sewer riser is replaced with a plastic one with the involvement of third-party specialists, the price of the work, depending on the complexity, is in the range of 5,000 - 7,000 rubles.
Rice. 5 Replacement parts
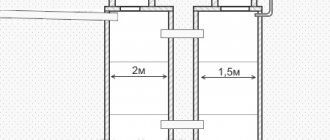
Replacement of external sewerage
Trenchless sewer replacement
The problem of worn-out external sewer lines often leads to serious accidents. Therefore, there is an urgent need for emergency emergency repairs. Many city residents are familiar with a similar picture: a part of the street blocked off with a large amount of digging equipment and piles of earth near an open pit. Replacing sewer pipes of an external pipeline using an open method is associated with great inconvenience and difficulty. After all, often at the location of sewer pressure and free-flow pipelines there are other underground communications of water supply, electrical power cables, and communications.
Alternative sewer replacement method
An alternative solution for the open method of repairing external pipelines is trenchless sewer repair. In dense urban areas, this replacement method has gained popularity due to its obvious advantages:
- Reducing work costs. With trenchless replacement, there is no need to use earthmoving equipment to develop a pit and remove soil;
- Reducing the duration of sewer replacement work;
- Sewer replacement is carried out by a small number of workers;
- To carry out the work, there is no need to obtain a special permit - an earthwork warrant;
- There is no risk of damage to other utilities. With the trenchless method, the new sewer pipeline line runs along the old route;
- Possibility of laying a pipeline of a larger diameter, which increases the sewerage capacity;
- No interference for the movement of city vehicles and pedestrians.
Trenchless sewerage replacement in urban environments makes it possible to quickly restore emergency sections of pressure sewerage. What is the trenchless replacement method?
Rehabilitation method – replacement of sewerage system “pipe in pipe”
There are several types of trenchless sewer line replacement. The most popular method is to lay a new sewer system using the “pipe-in-pipe” principle. Sewer pipes that have become unusable are replaced with special polyethylene pipes. For this work, special equipment is used - a pipe pulling device with a pneumatic drive. Repair work is carried out from one sewer well to another. Modern technologies make it possible to replace a significant length of external sewer pipeline in two to three days.
Using the trenchless replacement method, you can repair not only sewer networks, but also replace water pipes.