One of the common types of bathroom sinks is with a hanging cabinet. This design of the washbasin allows you to organize additional places for storing useful little things in an accessible place, but at the same time not overly cluttering the bathroom space. Sinks and cabinets have many designs, shapes and sizes, which allows you to choose plumbing equipment to suit any interior and bathroom dimensions.
Main types of shells
The method of installing a sink depends on its type. Manufacturers offer the following types of washbasins:
- Built-in. They are cut into the top of a cabinet, table or other furniture module that has a flat surface. They disguise water and sewer pipes.
- With a pedestal. Such models are combined with classic interiors. A massive pedestal is placed on a horizontal base, on which the bowl rests. The support also camouflages the engineering structures.
- Console. The plumbing fixture is suspended using a special frame. The washbasin has a stylish modern design.
- With a semi-pedestal. They are equipped with a stand that rests on the wall, making the sink look more elegant. Installation is complicated by the need to ensure the specified height of the siphon.
Built-in models are placed on the countertop, secured with sides around the perimeter of the base or inserted into the support from below. Regardless of the installation method, bowls can be round, oval, or rectangular. Semi-recessed models that wrap around the edge of the surface are suitable for a small bathroom. When installing such a product, a homemade cabinet is created to cover the pipes.
Sink in the bathroom.
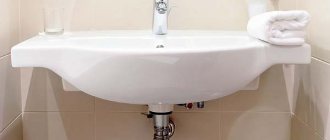
How to choose a wall-hung washbasin
Antique acrylic wall-hung sink
Even in a small bathroom you can create the most unexpected style. Today there are all possibilities for this. Even if the floor and walls are tiled with neutral colors and patterns, an original wall-mounted washbasin will radically change the interior of the room.
Let's look at the main styles that are used today when installing hanging furniture for bathrooms:
- Provence. It consists of discreet smooth lines and shapes applied to a dazzling white base. The composition lacks angles, edges, contrast and hints of modernity. The shells have a round or oval shape. For such products, you should choose faucets with a white matte finish.
- Antique. Both the furniture and the sink are made in dark shades like bronze and old shabby wood. The ideal option is to install a black or brown faucet on such a sink.
- Mysterious Asia. Oriental style interiors are very popular today. To create it, a large number of elements made of non-ferrous metal, natural wood or a reliable imitation of these materials are used.
- Tropical paradise. Using a long, narrow vanity, a blue sink and a yellow faucet, you can create an exotic resort atmosphere. The bright yellow and green tones of the cabinet doors will complement the picture.
You can diversify the interior of your bathroom with the help of original washbasins in the shape of a shell, fountain or basket. Combined towel racks or containers for toiletries look good.
Dismantling of old equipment
To remove an old sink, follow these steps:
- The water supply to the apartment is stopped. Unscrew the fastening elements of the mixer. The device is disconnected from the water supply. Make sure that the shut-off valve is not leaking.
- They are dismantling the drain. The lower part of the siphon is removed from the fixing nuts. Disconnect the flask from the outlet, pour out the water, and remove contaminants. Unscrew the fastening nut by turning it to the left.
- If the drainage device needs to be replaced, it is disconnected from the sewer pipe. At the junction of the flexible tube and the common line, unscrew the nut, lift and move the siphon. Before removing the device, you need to move the spacer washer and remove the outlet with the water seal from the sewer pipe. During work, a basin is placed under the sink, which prevents flooding of the room.
- The sewer socket is closed with a plug or rag.
To remove a sink attached to the wall, you need to loosen the fastenings located on the sides. If the washbasin does not have a pedestal, one hand of the master should hold the device so that it does not fall.
Removing an old sink.
Step-by-step instructions for installing a console sink
When installing the console device, follow the technological sequence. For installation you will need the following materials and tools:
- drill with drill bits for concrete;
- laser level;
- tape measure, marker;
- set of wrenches;
- fastening elements (dowels, screws);
- sealing tape;
- sealant.
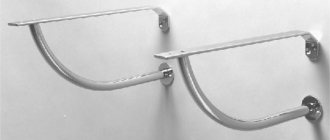
Fastenings for a wall-hung sink are welded blanks of different shapes. More reliable fixation is provided by frame-shaped parts. Models of non-standard shapes are supplied with metal brackets. Before starting work, check whether the wall can withstand the load. If the nail easily enters the material, then increase the size of the fasteners or install a frame.
Console sink.
Preliminary surface marking
When performing markings, consider the following:
- Sink location and height. When calculating the parameter, we focus on the ease of use of the equipment. The standard height is 85 cm, it is suitable for a person with a height of 160-180 cm. At the desired level, draw a horizontal line, which is the upper limit of the device. At right angles to the floor, draw 2 lines, the distance between which should be equal to the width of the washbasin.
- Location of tile joints. In order for a wall-hung sink to look aesthetically pleasing, it is necessary that the fastening elements coincide with the seams. When making markings, use a level.
Making holes for fasteners
To insert the brackets, the bowl is turned over. After installing the fasteners, the level is moved to a horizontal line. Places of fixation are marked on the wall. At the resulting points, holes are drilled with a drill 1-2 mm smaller than the diameter of the dowel leg. For reliable adhesion, they are filled with glue. Next, polymer dowels are driven in, into which self-tapping screws are screwed. To prevent the drill from moving, apply masking tape to the tile.
Drilling holes for the sink.
Installation of the sink bowl
Before fixing the bathroom sink to the wall, check the reliability of the brackets. The pins are inserted into the mounting holes of the bowl. Self-tapping screws are equipped with gaskets and nuts, which are tightened until the washbasin takes the desired position. The joint between the device and the wall is coated with sealant. When screwing in the fasteners, apply moderate force.
Otherwise, the surface of the device will be damaged. The insertion points for self-tapping screws must be covered with plugs.
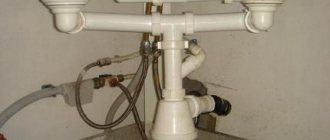
Connecting the siphon to communications
The installation process of a drainage device includes the following steps:
- Fixing the bell. A rubber seal is installed on the hole, allowing for a tight connection, grille and clamping bolt. The spacer should not move while screwing in the screw.
- Siphon assembly. The bell is connected to a flask and a flexible tube. The latter is inserted into the sewer pipe outlet using cuffs or a rubber seal.
Siphon connection.
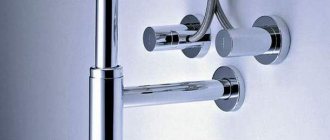
Faucet installation process
The faucet is installed before hanging the sink on the wall, because... Once the sink is fixed, it is difficult to install. Installation is done as follows:
- Flexible water pipes are connected to the mixer body. Using these elements, the device is attached to the washbasin and water supply system. To seal the joints, sealing tape is used.
- Flexible hoses are inserted into the sink hole and semicircular gaskets are put on them. The threaded end is connected to the mixer, and the end with the clamping nut is connected to the pipes. If the dimensions of the pipe and hose do not match, use an adapter sleeve.
- Testing the system. To do this, restore the water supply while inspecting the connections. If there is no leakage, the installation was completed correctly.
Reviews
Antonina, Moscow : “Our bathroom is small, and we have to save space. Actually, that’s why we bought Roco Hall 327881: it is suspended, there is free space under it, and its dimensions are small. We bought it, installed it, it’s worth it, it’s pleasing to the eye. Yes, and it’s comfortable with it, although it’s not big. I like everything so far."
Oleg, Moscow : “A wall-hung sink is the simplest and most convenient option. We chose a model with a cabinet to hide communications. It turned out beautiful. And my wife put all the chemicals in the cabinet so that it wouldn’t hurt her eyes.”
Features of installing a built-in sink
Installation is carried out in two ways:
- On top of the tabletop. The bowl protrudes above the surface by several centimeters.
- Below the tabletop. This method is convenient because when using a sink, splashes will be removed in one motion.
Type of built-in sink.
Marking the installation site
A template prepared in advance makes this step easier. A stencil is included with most built-in plumbing fixtures. When choosing an installation location, consider the following points:
- The sink cannot be installed close to the wall or the edge of the countertop, because This leads to water getting on the floor and contaminants accumulating.
- Access to the plumbing fixture must be free.
When marking is done correctly, the bowl is securely fixed.
If there is no template, the washbasin is turned over and applied to the countertop. Using a pencil, trace the outline. At a distance of 1.5-2 cm towards the center, draw another contour line. They are guided by it when cutting out a hole. After this, measure the distance from the sides of the sink to the fasteners. Places of fixation are marked on the contour.
Marking the installation site.
Sawing and finishing edges
When preparing the installation hole, perform the following steps:
- Install the jigsaw and guide it along the drawn line. When using a hacksaw, additional processing of the cut will be required. In this case, a hole is drilled in the marking area to allow insertion of a saw blade.
- Cut out the desired section of the tabletop. To avoid damage to the decorative coating, actions are performed smoothly, without unnecessary effort.
- The cuts are cleaned with an emery block.
- The edges are covered with sealant. The mixture is applied in several layers. When choosing a protective agent, take into account the type of material from which the countertop is made. For products made of porous materials, alcohol compositions are used.
Installing the bowl and connecting equipment
At this stage the following actions are performed:
- The bowl is inserted into the prepared hole. The shell is rocked, ensuring a tight fixation. Tighten the previously installed fasteners. Excess sealant is removed with a rag. Do not perform any work for 24 hours, allowing the glue to dry.
- Install the mixer. The device is inserted into a special hole before installing the sink. The hoses are attached to the body, and nuts are screwed onto the studs. After this, the bowls of the tube are connected to the water supply.
- Connect the siphon. The socket is combined with the drain hole of the sink and the decorative grille, and the screw is screwed in. The outlet of the device is inserted into the sewer line pipe.
Connecting equipment to the sink.
What to look for when choosing a wall-hung sink?
The main thing you should pay attention to when choosing a sink is not its elaborate shape or any unusual elements, but its convenience. After all, you will use it every day. And, if it is impossible to place a tube of toothpaste on it, or put a razor on it, or its depth is too shallow and water constantly splashes out onto the floor, then such daily hygiene procedures can turn into a test of your nerves for strength. It is unlikely that an inconvenient model will add convenience to your home.
When purchasing, first of all, you should make sure that the size of the sink is convenient enough for all family members, its color and material suit the chosen interior style, and it itself is equipped with everything that may be useful to you - a cabinet, holes for installing a mixer, overflow, shelves , table top.
Detailed instructions for installing a tulip sink
Connecting the sink to water supply and sewerage systems is carried out using standard methods.
Marking the location for attaching the sink
Despite the fact that the bowl rests on a pedestal, it must be additionally attached to the wall. Before marking, a trial installation of the product is carried out. The stand should not wobble. After leveling the pedestal, mark the locations of all parts on the wall and floor. Using a building level helps to draw lines correctly.
Marking the sink mounting location.
Installing fastenings for brackets
At this stage, holes are formed. After drilling, the holes are filled with glue, then dowels are inserted there. To secure the brackets, use anchor bolts longer than 7.5 cm, because under the influence of load, ordinary self-tapping screws pop out of the wall with dowels.
Installing brackets for the sink
The installation hole of the fastener is aligned with the dowel. Screw in the bolt, ensuring reliable fixation of the part. Check the quality of the connection and move on to the next step.
Installation of brackets.
Install and connect the mixer
The washbasin is installed on the holders in two ways:
- The bowl is placed on supports, after which the wall is tiled. The gap between the washbasin and the tiles is filled with sealant. It is recommended to choose a product that contains antifungal additives.
- The composition is applied to the surfaces of the holders. Next, you can place the bowl and fill the joint with plumbing sealant. This prevents the sink from moving.
The mixer and sink are connected before installing the bowl. After mounting the product on the brackets, flexible hoses are connected to the water supply.
We connect the siphon to the sewer
To assemble a drainage system with your own hands, you need to perform the following steps:
- Connect the overflow. The hole is combined with a flexible hose, which is connected to the base of the siphon and secured with a nut.
- A grate, rubber seals, and a screw are placed on the grooves of the washbasin. Tighten the bolt, ensuring a tight connection.
- The drain pipe is bent and inserted into the sewer pipe. Raise the sink, move the pedestal, placing elements of the drainage system in it.
Connecting the siphon to the sewer.
Tools and materials
The best device for setting the vertical is a plumb line.
When installing wall-mounted washbasins, you need to perform all actions conscientiously, using only high-quality fasteners and serviceable equipment. A sink falling over can lead to the most dire consequences, both in terms of damage to the product itself and possible flooding.
To work you will need:
- perforator;
- Bulgarian;
- roulette;
- building level;
- square;
- plumb line;
- screwdriver;
- adjustable wrench;
- marker.
As for consumables, you must have the following:
- sealant;
- tile drill;
- bit for cutting concrete;
- set of rubber gaskets;
- anchor bolts, hooks, plastic dowels;
- safety glasses and gloves;
- rags.
When drilling holes, you need to change the drill bits in a timely manner. This is how a tile drill immediately becomes dull when it comes into contact with concrete. In turn, a concrete drill will not drill through the tiles, and when the device is switched to the “impact” mode, the tiles crack and fall off the wall. As for the diamond-coated drill bit, it drills equally well in tiles, concrete, brick and metal.
Installation of a water lily shell
Mounted water lily models are installed on top of the washing machine. Installation is done as follows:
- Mark the locations of household appliances and washbasins. Place the machine without connecting it. Leave a distance of 2-3 cm between the body of the appliance and the sink. Holding the sink, mark the brackets.
- A hole is drilled according to the marks made in advance. If the old equipment had fasteners, the new one can be installed on them.
- The siphon begins to be installed after studying the instructions. Each threaded connection is equipped with a seal. After which the plumbing fittings are installed under the bowl. A rubber gasket is placed on top of the bell and a decorative grille is secured. The washing machine hose is connected to a special outlet of the siphon. The corrugated part of the drain system is discharged into the sewer pipe.
- Fix the bowl. A hook is inserted into the hole on the back wall. It is secured with a dowel and a self-tapping screw. The bracket bolts are screwed in until they stop. The surfaces of the holders are pre-treated with sealant.
- Install the mixer. For this purpose, there is a hole located between it and the body. Place the seal.
After completion of the work, the water supply is resumed and the quality of the connections is checked.
Similar articles
How to install a shower system with your own hands
How to put a bathtub on a brick support
How to assemble and install a siphon under the sink yourself
Mounting the washbasin to the wall
Applying markings to the wall
First of all, select the place where the washbasin will be installed. After this, you need to decide on its height. For an adult, the optimal sink height is 80 cm from the floor. If there are small children in the house, then this is not a problem. You can buy or make a small stool for them. It can be hidden in a cabinet or pushed under it after use.
Once the exact place where the washbasin will hang is determined, the following actions are performed:
- Markings are applied to the wall. The points for the holes are marked with maximum accuracy, since if the calculations are incorrect, the sink may crack at the fastening points. For a shelf, such precision is not needed, since the hinges allow you to maneuver to the right or left by 1-1.5 cm.
- Holes are made. First, using a special cone-shaped drill, holes are made in the tile to a depth of 1-1.2 cm. After this, a hammer drill with a drill is taken. The “impact-drilling” mode is set. The drill is carefully inserted into the holes, holes are made, the depth of which should exceed the length of the hardware by 2-3 mm. Dust and stone chips are removed from the holes made. Plastic dowels are inserted into them.
- Brackets are attached to the wall to install the sink. They must be strong enough to support the weight of not only the sink, but also a person leaning on it. Hooks are screwed into the hinge holes.
- The sink is firmly fixed to the wall. Plastic washers are placed under the heads of the anchors or screws so that the bowl does not crack and fits tightly to the wall. Before making the last few turns, caulk is added to the opening between the sink and the wall.
- The shelf is hung on hinges. If the sink is of a mortise type, then its joint with the countertop is sealed with silicone. The hoses are connected to the pipes and the drainage system is assembled.
The final stage of work is installing the shelves and doors of the cabinet in their places.