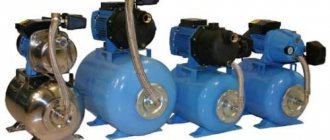
Pump modifications and characteristic differences
Many vibration devices of the same type only have a different body configuration and a different name:
- "Strunok";
- "Chestnut";
- "Stream";
- "Neptune";
- "Sega" and others.
All these units use the same electromechanical circuit. There are 4 types of such devices:
- “Malysh” is the most popular among village residents, summer residents and the most powerful option from the entire line of vibration submersible pumps. This is a design with a bottom water intake. However, the device is not suitable for use in the bottom zone, since it often sucks up silt deposits and quickly breaks down.
- “Malysh-K” is a similar device, also with a lower water intake. But it differs from the base model in a built-in thermal relay, the presence of which increases the reliability of the unit and extends its service life. Because of this, it costs more. In addition, the pump is equipped with a three-wire wire and has grounding. Previously, the model was produced only for export.
- “Malysh-M” is an option with an upper water intake. It is slightly weaker in power, but does not absorb dirty slurry from the bottom of the well. Does not overheat during long-term operation and is less likely to break. When the water level is insufficient and drawing becomes impossible, the housing is still cooled because partially immersed in the source.
- “Baby-3” is the smallest model with a diameter of only 80 mm
and has an upper water intake. Its ultra-small dimensions allow it to be placed in narrow wells and boreholes. Water heating is allowed up to +35°C. The maximum operating depth of the apparatus is 3 m.
Design and principle of operation of the unit
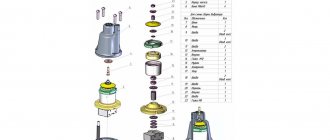
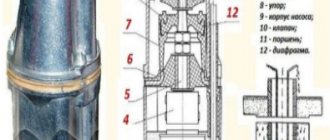
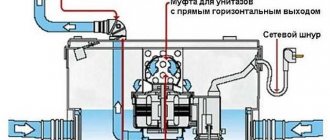
Its body can be disassembled into 2 parts. A yoke is pressed into the bottom. These are 2 electric coils with a core, filled with a compound (polymer resin), an armature. In the upper half is the mechanical system. A vibrator with a piston rests on a shock absorber made of elastic rubber. You can install a check valve on the water intake pipe and pump it out.
The operating principle of the device is simple. When it is plugged into the network, the coil creates an electromagnetic field. The core begins to vibrate. The membrane prevents it from swinging too much, and the shock absorber returns it to a neutral position. A piston attached to the armature pushes an elastic mixture of liquid and air, and the water pump begins to work. This creates fluid movement in the hose or pipe.
The core performs 50 vibrations per second. At a similar speed, the piston performs translational and reciprocal movements. Portions of water controlled by the valve rush in a given direction and flow out of the outlet pipe.
Design options
The water pump can be with top or bottom water intake. If vibration pumps have an upper liquid intake, then the suction valve is located at the top, and the electric drive is located at the bottom. This arrangement has a number of advantages:
- the “electrical part” of the device is under water, which promotes constant cooling;
- silt deposits are not absorbed from the bottom.
Models with lower water intake have the opposite arrangement of mechanism components. Such units require constant monitoring of the water level. Dry operation leads to overheating and, as a result, breakdown. The technical parameters of the models differ from each other.
Important installation points
In order to know how to repair a baby pump, you need to understand all the nuances of installing the mechanism. It is important to know not only the structure of this device, but also all its “problem areas”.
The electromagnet is firmly attached to the housing with a compound. It not only fixes the core with the coils, but also acts as an insulator and transfers heat from the coils to the body. The compound is a special mixture prepared from epoxy resin, sand, and a plasticizer. When carrying out repairs yourself, the damaged areas of the compound are sealed with sealant.
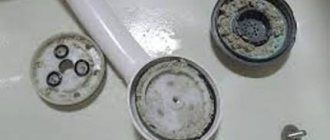
The vulnerable elements of a submersible electric pump are rubber parts. Despite the fact that they are made of high-quality material, they wear out during operation and therefore require replacement. If the baby pump fails, repairs should begin with an inspection of the rubber parts.
Please note that there must be a gap of 0.6-0.8 mm between the body and the valve. It allows water to flow out when there is no pressure.
First of all, you should inspect the rubber valve that covers the inlet. It has to be changed most often. After this, we inspect the rubber diaphragm separating the hydraulic chamber from the electric drive. Don't ignore the rubber piston located on the rod.
How does the Baby pump work?
The principle of operation of a vibration pump is that alternating current is converted into electromagnetic vibrations of the armature, which are transmitted to a piston located on the same rod. The oscillatory movements of the piston build up pressure, allowing water to be pumped.
How does an electric pump work? After connecting the device to the mains, the magnet attracts the armature. At this moment the poles are remagnetized. The shock absorber performs its function - returning the anchor to its place. This process occurs in half the period of the current wave. Accordingly, over a full period the anchor will be attracted twice. Considering that the power supply frequency is 50 Hz, there will be 100 armature oscillations per second.
The rubber piston vibrates at a similar frequency. After all, it is placed on a rod pressed into the anchor. The pump design promotes the formation of a hydraulic chamber, which is limited on one side by a valve near the inlet, and on the other by a piston.
Water is an elastic two-component medium consisting of air that has dissolved and that which has not dissolved. Through the inlet hole, the valve allows liquid to enter the inside of the electric pump. The vibration of the piston causes the water to behave like a spring. With each release, some of the water is pushed out of the device’s chamber.
How to assemble and disassemble the unit
Assembling the Baby with your own hands
- The main and most important thing before disassembling is to mark the location of the parts relative to each other on the body. It is best to make notches with a sharp screwdriver. But you can do it with a marker.
- Next, remove the screws that connect the pump. First, unscrew the screws a few turns one by one, and then tighten them completely. For convenience, the device can be fixed in a vice.
- The piston disc is aligned parallel to the seat along the axes, checking the distance from the edge to the gasket with a centimeter or compass. Sometimes the parallel breaks down. The reason may be a groove on the screw (you can wrap a strip of foil under it) or a bend in the rod (turn the gasket a little to align it).
- When assembling, it is important not to confuse the position of the rubber gasket where the holes coincide.
- After the defects or breakdowns have been corrected, you need to check the operation of the pump. To do this, it is lowered into a bucket full of water. Even if there is no hose, if the equipment is in working order, a stream of water will flow from the pipe.
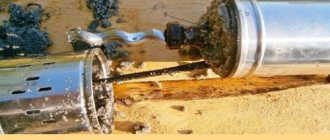
The electromagnet has peeled off from the housing
This type of breakdown is the leader in calls to service centers. The reason is the uneven expansion of the metal case when heated during operation. As a result of this unevenness, the epoxy compound begins to peel off from the body in some places. This is a polymer with extremely low shrinkage, high adhesion and good dielectric properties, but it does not have the same ductility as metal, so it peels off.
Repairing a baby pump with your own hands will have the following sequence:
- It is necessary to disassemble the electric pump - separate the electrical part. We make sure that there are places where there is no fastening. To do this, tap the unit with a hammer. You can immediately hear from the sound whether there are gaps.
- If the electromagnet has completely peeled off, then remove it.
- Using a small grinder, we make random longitudinal and transverse grooves on it, as well as inside the body, no deeper than 2 mm.
- We coat the compound with which the magnet is filled with sealant. We press it into place using a press.
Better adhesion is provided by sealant for glass surfaces.
- When the sealant hardens, you can “assemble” the mechanism.
Experts advise using sealant that is used to glue car windows. It differs from others in its special strength.
The gap size does not meet the standards
When tightening the screws, constantly check the gap size, otherwise the pump will not work
The design requires a gap of 4-5 millimeters between the coils mounted on the electromagnet and the piston. When the distance is greater, the device overheats. If the value is lower, the coils wear out. The clearance is calculated as the difference between the depth of the coils into the compound and the size of the piston protrusion above the level of the rubberized shock absorber. We measure with a caliper. If necessary, we repair the baby vibration pump with our own hands according to the following algorithm:
- We disassemble the piston block. To do this, unscrew the nut to remove all the parts located up to the bushing: piston; washers used to adjust the gap; thrust ring, rubber diaphragm and coupling.
- The bushing needs to be tightly clamped to the shock absorber, which looks like a rubber spring.
- We put on a washer (maybe two).
- We tighten it with a nut and use another nut to unlock it.
- We put everything back together in reverse order.
Repairing the pump with your own hands is not yet complete. You need to measure the gap. If it does not meet the requirements, then adjustment is carried out with washers. The thickness of one washer is 0.5 mm. By adding or removing washers, you can change the size of the gap.
VIDEO: How to properly clean a self-priming device
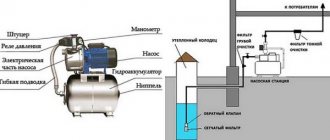
Design and operating principle of a submersible pump
In order to correctly diagnose a pump malfunction and subsequently be able to fix the problem yourself, you should first study the operating principle and internal structure of the unit. This is especially true for those who are faced with such a problem as a breakdown of a vibration pump for the first time and have no idea how it can be repaired.
Let's look at these questions in detail using a visual diagram.
The operation of a submersible pump is based on the conversion of alternating current into mechanical vibrations of the armature and piston, which contribute to the movement of water. The vibration of the piston forces water from the hydraulic chamber (the space between the piston and the valve) into the discharge pipe. The main components of the pump are: housing, electromagnet and vibrator.
An electromagnet consists of a core and two coils wound with copper wire. Placed in the pump housing, it is filled with a compound, which serves not only to fix the magnetic system in the housing, but also as an insulating and heat-dissipating material.
The vibrator consists of: an armature, a rod, a shock absorber. The rod is pressed into the armature, the shock absorber is installed on the rod and is a rubber membrane, the quality of which determines some parameters of the pump's operation.
A rubber diaphragm, fixed with a stop, separates the hydraulic and electrical chambers of the pump and also serves as a support for the rod, determining its direction. At the top of the rod there is a rubber piston.
There is a rubber valve in the pump body that closes the water outlets, but in the absence of pressure in the pump ensures its free flow.
Design features of drainage pumps
A drainage water pump for pumping water uses its main element - an impeller - to build up pressure in the system. In addition to this, the design contains the following elements:
- pump unit;
- electric motor operating from a 220 V household network;
- suction unit with filter element;
- float circuit breaker.
Design
Since operating conditions imply the presence of liquid in contact with the housing, the outer part consists of tightly fitted parts of a composite housing. This ensures high-quality sealing, and the material for the housing is:
- stainless steel with sufficient chromium alloying content;
- moisture-resistant plastic.
During operation, it is necessary to protect the housing from mechanical damage so as not to depressurize the installation.
It is necessary to follow the manufacturer's operating recommendations so that the float pump for pumping out water works with liquid that contains contaminant particles of an acceptable fraction. The threshold geometric value is indicated in the device passport. Typically the permitted interval is 3-50 mm in diameter.
Industrial units can also work with large fractions. Improper operation of the pumps can lead to the electric motor humming, but not starting to return, or to other types of breakdowns.
How the pump works
To understand how to independently repair and maintain submersible vibration pumping devices, you need to understand the principle of their operation.
When connecting equipment to the electrical network, the armature, under the influence of an electromagnetic field, approaches the magnet. After some time, the electromagnetic force of attraction disappears and the shock absorber spring, made of very elastic rubber, returns the anchor to its place. Such oscillations occur 50 times per second. The piston, located together with the anchor, changes its position with the same frequency.
Between the extreme positions of the piston element, a “hydraulic chamber” is formed, into which a two-component mixture (water and air dissolved in it) enters. This mixture, unlike pure liquid, has greater elasticity. New portions of the mixture enter through the inlet valve and are pushed out through the outlet tube, creating pressure inside the pipe or hose, thereby causing the movement of water.
Device with bottom and top water intake
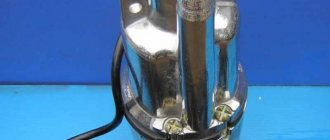
“Kid” is one of the simplest and most accessible submersible devices today. It has been produced for a long time and has established itself as a high-quality and reliable device.
Materials for repairing the Malysh pump can be purchased in a specialized store and on the Internet
With its small dimensions, it can easily perform the following tasks:
- Provide water supply from sources with a diameter of up to 11 centimeters and reservoirs with a water temperature of less than 36°C;
- Pump water from open reservoirs;
- Transport it from containers to the home water supply;
- Fill swimming pools with water and drain it from there;
- Pump out liquid from flooded areas, such as basements.
It is necessary to take into account that the “Malysh” pump can pump water with an extremely small amount of mechanical impurities.
If you need to pump contaminated liquid, you must additionally use a filtration system.
“Malysh” compares favorably in price and quality with similar devices such as “Rodnichok”, “Rucheek” and “Typhoon”.
“Baby” has three varieties, differing in technical characteristics and used for different purposes:
- Classical. This model has a lower water intake, so it can easily cope with the supply of water from open sources located at a great distance. They can also drain flooded rooms, and pumping occurs to a minimum level. If dirt particles get inside the pump, it can damage it. The advantage of the device is the thermal protection function. A relay in the unit turns it off when it overheats. Such a pump is marked in the form of the letter “K”. There are models marked “P”. They differ in that their upper body is plastic. This is the most budget option. Models without this marking are made of aluminum. This is a higher quality and durable material.
- "Baby-M" This is a model with a top liquid intake. It is convenient for pumping from a well or wells. The advantage is that it can be used in contaminated waters. This is due to the fact that during its operation, debris will remain at the bottom and will not clog the unit. The motor in these devices is cooled better, which avoids overheating of the equipment.
- "Baby-Z." This pump is also a top intake model. It is used for the same purposes as “Malysh-M”, but it is smaller in size and has less power and pressure. These properties make it possible to use it for pumping water from shallow wells and small wells.
What to do if the device does not work well
If the pump is not functioning well, its power has decreased and there is no pressure, you should try to rinse it with clean water; perhaps the reason is that it is clogged with debris. Disassembly of the “Baby” is required if the causes of the breakdown were not established during an external inspection.
The repair includes the following steps:
- It is necessary to unscrew the bolts on the body connecting the two parts of the device. If they are rusty and cannot be twisted by hand, you can cut them off with a grinder.
- The piston and other internal parts should be cleaned of dirt. The pump coil is treated with a compound; it must be removed from the housing.
- The reel needs to be inspected, repaired and rewinded. If the rewind is burned out, you should replace it with a new one.
- An ohmmeter is used to check the functionality of the power cord. If it malfunctions, it can be shortened or a new one installed.
- Assembly of the device. Be sure to properly align the holes through which the water flows.
Check the functionality of the pump. If there is additional noise, the bolts need to be tightened better.
If the pump is running but the water is not pumping
There are three steps to solve this problem.
Step 1. Slightly loosen the lock nut that is located where the water enters. This action should slightly reduce the efficiency of the device.
Step 2. The rubber cuff may be damaged. This can only be checked after disassembling the pump. They look quite small (4 cm in diameter), and they don’t cost much.
Step 3. The pumping rod is damaged. Repairing a device with a faulty pumping rod is a very complex procedure. You will need the old pump as a parts donor. In addition, getting to this part is very difficult, and you cannot do it without special equipment.
Main types of malfunctions and their causes
Devices with a lower water intake are more likely to break down, since the engines in them heat up more. The causes of defects due to which the pump does not pump water lie either in its mechanics or in its electrics.
The most common problems with the “Baby”:
- loosening of nuts due to vibration of the core;
- valve wear caused by abrasive impurities in water;
- core rod breakage.
Fault 1: The pump hums, but does not pump water (or pumps weakly)
Reason 1:
The nuts located on the rod on top of the shock absorber have become loose.
Troubleshooting method:
Disassemble the pump and tighten the nuts until they stop. Lock the top nut (fix) so that the fastening of the nuts does not loosen in the future. When disassembling the pump, you may encounter a problem such as rusty coupling screws (M8x40). In this case, it will be impossible to remove them. However, this does not mean that repairs are impossible. You can use a grinder and just carefully cut them off, and after fixing the problem, replace them with hex head screws.
Reason 2:
Wear, valve rupture
Remedy:
Replace valve.
Reason 3:
Broken rod
In this case, check what happened to the rod. If it is deformed or broken, it cannot be replaced.
Malfunction 2: When connected to the power supply, plugs are knocked out, the cable becomes charred
Reason 1:
Burnt armature winding
Remedy:
Replace the winding with a new one.
Reason 2:
Cable fault
Remedy:
Check the cable with a tester. If it is defective, replace it with a new one. However, it is not possible to replace the cable in all models of submersible pumps, since some models, for example “Malysh”, provide for filling the wire in the housing with a compound. If you are faced with just such a model, the cable can only be extended by twisting.
Fault 3: Vibration too strong, pump overheating
Cause:
Operation without water, as a result of which the magnetic part of the pump peels off.
Remedy:
The breakdown is quite serious and requires a lot of time and effort to fix. Disassemble the pump. Separate the electrical part. To check whether the magnet is attached or has come off, tap the housing. If you are faced with this problem, separate the magnet from the body and use a grinder to cut grooves (2 mm) lengthwise and crosswise. Also make grooves on the inside of the body. Next, you should cover the inside of the case with glue and sealant and insert a magnet inside. When everything is dry, start assembling the pump.
Fault 4: Low pressure, pump pumps weakly
Cause:
Insufficient clearance in the vibrator (or weak fastening of the nuts - see point 1)
Remedy:
Add washers to the vibrator (11 in the diagram). Determine the number of washers to add experimentally to the required water pressure.
The pump creates little pressure and hardly pumps
The pump operates in this mode due to the small gap between the piston and its seat, unless there is another reason discussed above.
An additional washer on the piston rod restores operation. Using washers, you can reduce or increase performance within the stated characteristics.
It should also be remembered that pumping equipment is electrical and compliance with safety conditions with it is mandatory.
Overheating of the electric pump with simultaneous significant vibration
When the device is turned on, it must always be in the water, because... the pumped liquid removes the heat it produces. In cases where there is no coolant, the pump begins to heat up sharply, which can lead to irreversible damage. The pump housing expands and a special filling lags behind it, which holds the electromagnet. The “clanging” of the electromagnet becomes the basis of the vibration process. If dry operation continues long enough, the magnet will inevitably completely peel off and the piston will not be able to move.
This type of breakdown is one of the most difficult, and doing the repair yourself requires a lot of patience.
First, the user disassembles the pump, separating the electrical part of the product. Then tapping on the body will probably determine if the electromagnet is loose. Having removed the pump from the casing, you need to use a small grinding machine to cut small grooves in a chaotic manner on the inner surface of the casing and on the unit itself.
After the work has been done, it is necessary to cover the housing with window sealant or high-quality strong glue and press in the electromagnet. After the structure has dried, you can reassemble it.
A thermal relay built into the housing helps to avoid breakdowns, which will turn off the power supply to the pump if it gets too hot or short circuited. Models equipped with such protection are more expensive, but last longer.
Electrical faults
Due to strong heating, the following breakdowns often occur:
- a short circuit occurs;
- the electrical wire becomes charred or breaks;
- the copper winding in the coil burns out;
- The compound peels off from the body.
Mechanical breakdowns
The most frequently detected defects are:
- clogging of the internal cavity of the pump with mechanical impurities;
- liming of parts due to excessive water hardness;
- loosening of nuts due to strong vibration;
- damage to the device from impacts against the concrete wall of the well;
- weakening of the properties of the rubber shock absorber;
- loss of valve elasticity;
- piston failure.
Self-repair of pumps such as Brook, Malysh, Aquarius-3
Do-it-yourself repair of a vibration submersible pump such as Rucheek-1, Malysh, Aquarius-3.
Submersible vibration pumps such as “Rucheek”, “Malysh”, and other modifications that work on the same principle are very popular among gardeners and summer residents. They are inexpensive, productive, create quite high pressure and have high pumpability (i.e. they can supply water over a fairly long distance). But, unfortunately, these pumps are not very reliable. Moreover, their breakdowns are very diverse. Where the valves are leaking, where the thrust breaks, problems with the pump winding, power magnet, short circuit or break. There are quite a lot of simple faults that can be easily fixed, but after repairs, for example replacing rubber valves, the pump does not pump or pumps very weakly. Here you still need to properly adjust and assemble the pump. To understand how to properly adjust the pump, consider the principle of operation and important points of correct adjustment.
Operating principle and design
Vibrating submersible pumps are inertial type pumps. The operation of inertial pumps is based on the excitation of oscillatory processes in the liquid, promoting its movement. The design of all vibration pumps is the same. The pump consists of an electromagnet, a vibrator and a pump housing.
The electromagnet consists of a U-shaped core assembled from sheet electrical steel and two coils wound with enameled copper wire. The core with coils is installed in the housing and filled with epoxy compound. The compound serves to secure the core with the coils in the housing, serves as an insulating material and ensures heat transfer from the coils to the housing, through which they are cooled. The compound is prepared from epoxy resin, plasticizer, hardener and quartz sand, which improves thermal conductivity.
The vibrator consists of an armature with a rod pressed into it. A rubber spring called a shock absorber is installed on the rod. The pump parameters and its efficiency depend on the quality of the shock absorber.
The design of “Rucheyok” and “Malysh” uses shock absorbers only from natural rubber, which is vulcanized for a long time. This ensures stable pump parameters. A rubber diaphragm, installed at an appropriate distance from the shock absorber through a spacer coupling, serves as additional support for the rod and ensures its direction. The diaphragm also separates the electrical and hydraulic chambers under pressure. The stop ensures compression and fixation of the diaphragm in the pump housing. A rubber piston is attached to the end of the rod.
And finally, the last unit is the pump housing with a valve installed in it that closes the inlet holes. There is also a gap of 0.6-0.8 mm between the valve and the body, which ensures free flow of liquid in the absence of pressure.
The valve is also made of high quality rubber. It is the most vulnerable element in the pump and is the first to fail.
You can buy all spare parts, including the repair kit, on our website Rucheek1.ru.
How does a vibration pump work?
When the pump is connected to an electrical network with a current frequency of 50 Hz, the armature is attracted to the magnet. When the poles are remagnetized, every half cycle the shock absorber throws the armature back. That is, during one period of the current wave, for those who know electrical engineering, the armature is attracted 2 times. Accordingly, per second at a frequency of 50 Hz, the armature is attracted 100 times. The piston located on the same rod with the armature vibrates at the same frequency.
The volume in the pump body, limited by the piston and valve, forms the hydraulic chamber. Since the water pumped by pumps is a two-component mixture containing dissolved and undissolved air, it has some elasticity - it springs under mechanical influence, which is what happens in the hydraulic chamber when the piston oscillates.
Water, like a spring, compresses and expands and its excess is pushed into the pressure pipe - thus the pump pumps water. In this case, the valve allows water to enter and limits the exit of water through the suction openings.
Pump modifications
The “Rucheek” pump manufactured by Olsa OJSC (formerly Technopribor) has a classic layout, i.e. The suction ports are located at the top and the electric drive is located at the bottom. This design has better cooling and eliminates the capture of impurities from the bottom. The pump can operate for a long time submerged with the suction openings open to air.
In this condition, according to international standards, the pump must operate for 7 hours. Top suction pumps withstand these tests.
In critical cases, it is still worth purchasing pumps with a thermal relay that will turn off the pump if it overheats. Overheating can occur in a confined area or when the voltage rises beyond the permissible limit. A pump with a thermal relay will cost more.
JSC "GMS Livgidromash", Livny, Russia, satisfying the demand of discerning consumers, has mastered the production of "Malysh" pumps in several versions:
— “Baby” and “Baby K” — with a lower location of the suction holes (K- with thermal relay); — “Malysh-M” — with an upper location of suction holes; — “Malysh-3” — allows use in 3-inch wells, i.e. wells equipped with casing pipes with an internal diameter of 80 mm.
It is advisable to purchase pumps with bottom suction holes with a thermal relay. Otherwise, they should not be left unattended. The prevailing opinion about the advantage of pumps with lower water intake is that they can pump water from a shallower reservoir is controversial. A pump with an upper water intake can be positioned horizontally and it will work perfectly.
Pumps are necessarily equipped with a nylon cable for mounting and securing the pump. The nylon cable is not conductive and prevents electric shock in the event of an insulation breakdown. The use of a steel cable for fastening leads to rubbing of the eyes in the pump housing.
Although domestic pumps are produced according to class II of protection against electric shock (-class II mark) and the insulation strength is tested with a voltage of 3750 V, it is better not to touch the electric pump connected to the network and not to tempt fate.
If the wiring is equipped with grounding, then it is better to purchase pumps with protection class 1, i.e. with Euro plug. But such pumps are also more expensive.
NOTE:
- for fakes, when the pump is equipped with a Euro plug, and the wire is two-core, and even with a cross-section of 2x0.5 mm, instead of the minimum permissible according to the international standard of 2x0.75 mm;
— you should not equip pumps with hoses with an internal passage of less than 19 mm (3/4²). This leads to pump overload and loss of performance.
Pump parameters
Information on the parameters of vibration pumps from different manufacturers, indicated on plates and in advertising, is very contradictory. Most domestic pumps are marked with a nominal head of 40 m at a nominal flow of -0.12 l/s (or 0.43 m3/h).
On imported (Chinese) pumps, the maximum pressure is marked from 60 to 80 m. This is the pressure when the supply is completely shut off. In fact, all of these pumps at a head of 40 m pump much less than the “Rucheek” or “Malysh” pumps.
The maximum flow, determined when vibration pumps operate without pressure, varies from 1 to 1.5 m3/h, depending on the adjustment.
The power consumption of the pumps is indicated in the range from 180 to 300 W. In fact, pumps adjusted to nominal parameters consume power from 190 to 220 W in a head range from 1 to 40 m. As the voltage increases, productivity, current and power increase. When the voltage drops to 200 V, performance decreases by 25%. Thus, vibration pumps can operate under voltage fluctuations typical of rural and suburban areas.
The immersion depth indicated in the marking means to what level under the layer of water the pump can be immersed, in this case - 3 m.
Although the pump shell can withstand significantly higher pressure, we stopped at 3 meters. For Russian “Kids” and Belarusian “Rucheyki” this is enough. If the pump is buried deeper (up to 5-7 meters) there will be no problems.
The most common breakdowns and how to fix them
During short operation without immersion in water, the pump heats up and the aluminum casing expands out of proportion to the compound (epoxy filling of the magnet) and due to the lack of plasticity of the latter, the filling peels off from the pump body... the situation is greatly aggravated by an increase in vibration when working without water at all (during pumping dry.. as a result, complete detachment of the magnet and the absence of a gap between the vibrating piston and the magnet - no movement of the piston...
From correspondence with our client:
The treatment is simply impossible... it was performed in a car service center on the occasion of being there - first of all, we separate the electrical part (we disassemble the vibration pump) by tapping on the body with a hammer, we make sure that there is no fastening (the sound immediately senses that the contents are not solid) of the magnet.. we remove it from the body, we make longitudinal and transverse grooves on it with a small grinder (less than 2 millimeters deep), we make such grooves inside the body in a chaotic order, then we coat it with a thin layer of “glass” sealant (the kind that is used to glue glass into foreign cars) - it is very durable and strong - compared to ordinary sealants it's like the moon!! and press the magnet into the body using a press with a force of about 250-300 kilos (with less you can’t push it in due to the viscosity of the sealant) I admit that instead of the sealant you can use some kind of adhesive composition, but I was at a car service, let it stand until it hardens and reassemble in the reverse order ..
— The first, most important thing, with a working valve and piston, is the gap between the coil electromagnets and the piston, the gap should be 4-5 mm. If the gap is smaller, the coils will break if more and the motor will overheat. It is calculated as the difference between the depth of recessing of the iron of the coils in the housing and the amount of protrusion of the iron of the piston above the rubberized spring flange.
— The second valve should play freely on the stand; if you try to blow from the water intake side, the air should flow freely in both directions. There must be no damage to the valve! It is advisable to unlock the stand from the outside with two nuts. That's it with the valve.
- Third, this is the piston. It should also be free from mechanical damage and distortion of shape, and be quite elastic. Rivet the nut that secures it to the bushing.
All this turned out to be very good, and the question lurked, why is it humming and not pumping? It turned out that inside the piston block, its bushing (on which both the piston and part of the electromagnet iron sits) is screwed with a nut to a rubberized flange (such as a membrane-spring), and is released with another nut. So these two nuts were completely unscrewed (((. In order to see this, you just had to disassemble this block, remove the piston, remove the clearance washers, remove the thrust ring and pull off the rubber membrane (from the piston side!). Underneath it was a view to this disgrace. Having removed the aluminum cylinder, we tightly clamp the piston bushing to the rubberized flange-spring, release it, and put everything back together. We measure the gap, if it goes beyond 4-5 mm, then there are washers on this bushing, 0.5 mm thick, adding or by removing them from one side, we can change the gap in any direction...
We collect our happiness, special attention should be paid to the correct installation of the cover - the tube through which water comes out of the motor should be on the same side as the hole on the rubberized flange-spring))). We tighten, or rather twist (assemble) our miracle, and check it. If the stream hits at least a meter (by immersing the motor in a full bucket of water and plugging it in) - then everything is ok! If not, we take it apart and check everything again...
A little from personal experience: the comrade above said correctly about setting up the magnetic system, the gap is 4-5 mm. checked with a rod, the depth gauge rod into the end of the coils, and onto the mating surface. then do the same on the moving system, the depth gauge rod on the rubber, but do not press, and on the end of the anchor yoke. on the piston: you need to align it like this, the depth gauge rod to the edge of contact with the piston, the end to one of the four arms. We assemble the moving system, a glass, rubber, a ring with four ears, we keep this ring as straight as possible without distortions or pressure, the depth gauge rod into it, the end to the edge of the piston, the data should agree with the body.
And in the end, the final assembly is the pump housing with a valve installed in it that closes the inlet holes. There is also a gap of 0.6-0.8 mm between the valve and the body, which ensures free flow of water in the absence of pressure.
Recommendations from Rucheek1.ru store specialists:
Before disassembling the vibration pump:
1) Hang the pump without a hose in a bucket of water, plug it in and check the voltage during operation. It should be between 200-240 volts. 2) If the voltage is normal, turn off the vibration pump, drain the water from it and blow into the outlet with your mouth. A correctly configured vibration pump is blown, but if you blow harder, it locks up with the feeling of the piston moving inside. On the contrary, when sucking through the mouth, the air must pass through a vibration pump. Sometimes, if the settings are incorrect, when air is not blown through the vibration pump, but passes through during suction, you can make the pump work by reducing the supply voltage, for example, using a LATR (laboratory autotransformer) to 160 - 200 volts. 3) Before disassembling, make marks on mating parts.
Disassembling the vibration pump:
You can make disassembly easier using a vice, squeezing the ledges on the body near the next screw with the corners of the jaws. Loosen the screws little by little, one at a time. For disassembly, instead of a slotted screwdriver, I used pliers with straight handles, the ends of which were ground off for a screwdriver. Similarly, using a vice, but in the reverse order, the final tightening during assembly is carried out. If possible, replace the slotted coupling screws (M8x50) with similar coupling screws with an internal hexagon head. This will make disassembly and reassembly much easier (some new pumps are equipped with such screws). At least after disassembly, make an additional slotted cut for the screws for a screwdriver, perpendicular to the existing one.
To understand the essence of the settings, we first describe the operation of the vibration pump (in simple words). The pump consists of an inlet valve, an inlet cup and a disc-shaped piston driven into vibrating motion by a rod connected to the moving part of the electromagnet core. The stiffness of the spring (rubber) and the mass of the moving system are selected so that the natural resonant frequency of oscillations is equal to twice the network frequency (100 Hz). During operation, the peripheral (thin) part of the piston acts as a valve, and the central thick (near the rod) acts as the piston itself. When the piston moves towards the electric magnet, the peripheral (thin) part of the piston, due to an increase in outlet pressure, is pressed against the outlet (conical) seat of the glass and blocks the path of water into the inlet glass, and the central part of the piston simultaneously sucks water into the inlet glass and pushes water out of the outlet cavity. When the piston moves in the opposite direction, the inlet valve closes, and water from the inlet glass is displaced by the piston into the outlet cavity. Thus, during operation, the piston makes ring-shaped wave movements, and replacing it with a product of a different shape (I have seen such attempts) is unlikely to work. From the described principle of operation follows the setting (control) of three assembly parameters in the specified sequence.
I. There must be parallelism between the piston disk and its seat (parallelism between the piston axis and the seat axis). To do this, a caliper is used to control the uniformity of the distance from the gasket to the thin edge of the piston along the entire perimeter.
Options:
1) non-parallelism can arise due to a large gap between the metal sleeve of the piston and the rod (when tightening the piston with a nut with a screw, the screw initially distorts the tightened connection). Remedy: Wrap the rod with foil, for example from a chocolate bar, and fit the piston bushing tightly
2) the rod itself is bent. It is unlikely that it will be possible to fix it, but if the pump was working before and was not dropped, perhaps parallelism can be achieved by turning the gasket relative to the rod by 180°.
II. In addition to parallelism, there must also be coincidence of the axes of the piston and the seat. And since the input glass, with some reserve, “crawls” against the gasket, this is not easy to achieve during assembly. You can remove the inlet valve and, using the hole from the screw as a “peephole”, pre-assemble the pump and check the position of the center of the piston (rod). A clear misalignment indicates incorrect assembly. It is possible that alignment will be achieved by rotating the inlet glass 180°. To eliminate the fidgeting of the glass on the gasket during final assembly, you can insert pieces of electrical tape into the gasket eyes or put bushings on the coupling screws in this place (you can insert curved metal strips).
III. In addition to the coincidence of the axes, the piston must be at a certain distance from the seat. From my experience this distance should be greater than zero, but less than 0.5 mm. Adjustment is made by the number of adjusting washers (the thinnest of which are 0.5 mm) on the rod. At the correct distance, air passes when pressurized with the mouth into the water outlet, however, if you blow much harder, the piston closes the air passage (it is the piston valve that is activated, not the inlet valve, since the inlet valve closes from much greater pressure). If you increase the number of adjusting washers by one (moving the piston to the seat by 0.5 mm), air does not pass through when blowing into the mouth. When sucking through the mouth, air must pass in both cases.
We had a case where the pump stopped working 2-3 minutes after setting it up. Blowing with the mouth showed that the pump was not venting. When the supply voltage dropped to 160-200 volts, the pump started working again, albeit with less productivity (at voltages above 200 volts, the operation failed due to incorrect position of the piston).
A properly assembled vibration pump without a hose, when immersed in a bucket, produces a jet 25-30 cm high and operates without disruption at a voltage of 180-240 volts.
Troubleshooting algorithm
Troubleshooting.
If the unit pumps water poorly or stops working completely, you need to turn it off and lift it up. Then you should disconnect the hose and check if there are any obvious damage to the device.
Stage 1: careful external inspection
If microcracks are visible on the surface of the case, it will have to be replaced. If the integrity of the unit is not compromised, a tester should check the resistance of the coils (the norm is about 10 Ohms) and the absence of short circuits to the metal casing. Replacement of a burnt coil should be entrusted to a specialist.
Then you need to blow lightly into both pipes of the pump - the air should flow unhindered. When exhaling sharply into the supply hole, the valve should close.
You should shake the device. Extraneous sounds are a signal of possible destruction of the mechanical part or peeling of the compound. We rinse the unit with a stream of water to free it from dirty impurities.
Then we immerse the device for 5-6 hours in water with the addition of 9% table vinegar to dissolve limescale. Rinse it again with clean water.
Then, gradually loosening the locknut and clamping nut on the water intake of the pump, we repair the valve clearances. The norm is 0.5-0.8 mm. A precisely adjusted device, lowered into a container of water without a hose, produces a fountain 0.5-1 m high.
Stage 2: A closer look from the inside
To find the defect, disassembling the unit is required. You can do this yourself. Necessary:
To find the cause of the failure, it is necessary to disassemble the pump.
- Scratch the symbols on the body with a sharp object
so that later during assembly you can accurately align the lower and upper parts along them. - Unscrew all the screws
securing the pump cover at the same time. If they are very rusty, cut off the caps with a grinder. - Remove the piston, core, rubber gaskets.
Reassemble the device in exactly the reverse order. In this case it is necessary:
- accurately seat the piston disk; it itself must be at a distance of at least 4 mm from the coil;
- align the housing holes and gaskets, otherwise the unit will be depressurized;
- free all of its internal space from litter;
- check the pump in a container of water - if it is working properly, a fountain 0.5-1 m high should appear.
Step 3: Troubleshooting the Electrical Problem
If you need electrical repairs, it is better to contact the factory. It is easier and cheaper to replace a burnt coil with a new unit.
If the electromagnet has completely peeled off, you can try to fix this problem yourself:
- remove the electromagnet;
- apply intersecting grooves up to 2 mm deep on it and on the inner surface of the body with a grinder;
- lubricate the compound with glass sealant and press the magnet into its original place using a press;
- After the composition has hardened, assemble the pump.
Stage 4: Correction of mechanical problems
Procedure:
- A tear in the membrane can be repaired with rubber glue.
- A torn shock absorber should be replaced with a new part.
- A worn piston must also be replaced. You need to remove the bushing from it and press it into the new part. It is necessary to adjust the gap between the piston and the body to 4-5 mm by removing or adding washers.
- The required distance between the anchor and the yoke is achieved by adjusting the washers and locknuts, the final tightening of which is carried out when it is 6-8 mm.
- The projections of the coils and the rod armature must necessarily coincide. Adjustment is made by loosening the nuts.
- A gap of 0.6-0.8 mm between the new valve and the water intake hole is achieved by tightening the screw.
The operating conditions of the vibration pump must be strictly observed. They are described in detail in the technical data sheet of the device. Then the likelihood of “Baby” breakdowns will be minimal.
Competent DIY repairs
Failures can occur in electrical and mechanical parts. The equipment may fail partially or completely. Partial malfunction of the device may mean either a breakdown of internal parts or a violation of adjustment.
Most often, due to the operation of the device without water, it overheats and the automation fails. For the same reason, the insulation may overheat, the filling will delaminate, and the yoke may fall out of the body. In this case, the pump hums, does not pump liquid, and the body of the product may be damaged. It is possible to avoid such malfunctions by following the operating rules of the pump.
Mechanical failures of the vibration pump occur quite often.
Let's look at the most common causes of breakdowns:
- Limescale deposits on parts;
- Depressurization of the housing due to mechanical damage;
- Clogging of the insides with dirt;
- Loosening of bolt connections.
If you suspect a malfunction of the device, you must disconnect it from the power supply and remove it from the water. Before disassembling the pump, you should inspect it. Disconnect the supply hose and inspect the device from above for damage. Violation of the integrity of the housing can only be eliminated by completely replacing it. If everything is fine with it, you need to check the resistance of the coils with a tester. If the contacts close, the coil must be replaced.
This usually requires a specialist, because... It is very difficult to do this at home.
Pump repairs should be carried out when it is turned off.
The next step, if the coil is in good condition, is to bleed the pump. If air enters freely or the valve closes when taking a sharp breath into the inlet, then everything is fine with the pump. The device also needs to be shaken; the presence of extraneous sounds indicates a breakdown inside.
The procedure for disassembling and assembling the device
Answering the question “how to repair a baby pump with your own hands?”, first of all, you should clearly understand how to properly disassemble the pump without damaging its main components. Disassembling the device is carried out in the following order:
Pump Baby disassembled
- The first thing to do is to indicate the correct location of the upper and lower parts of the body relative to each other. To do this, a notch is made at the junction of the body and the lid with a nail or other sharp object.
- Next, remove the fixing screws of the cover. Here you need to be very careful not to deform the fasteners or damage the mechanisms inside the device. All screws are unscrewed several turns each and removed simultaneously after maximum loosening. When working with liquid, the bolts may rust and cannot be removed. In this case, the bolts are cut off with a grinder, and new ones are installed in their place.
- Next, the piston, armature and electromagnet are removed, and the gaskets are removed.
The disassembled device is reassembled in the reverse order. There are important points on which the correct functioning of the pump depends:
- First of all, the piston disc must be installed correctly. It is installed on a special saddle. It is important to strictly observe the distance between these components and their mutual parallelism. If the disc does not become parallel to the seat, the stem is most likely bent. In this case, you need to select the correct position of the gasket. The distance from the piston to the magnetic coil must be at least 4 mm.
- When assembling the water pump, you should make sure that the holes in the rubber gasket are clearly in place and coincide with the holes in the housing. Otherwise, moisture may enter the electrical part.
- Before full operation of the device, you should check it in a bucket or barrel. The pump is lowered into the container without connecting a hose. If the device is working properly, a stream of water with a height of 20-30 cm will emerge from the outlet pipe.
Compound replacement steps
- Let's disassemble the device.
- We determine the place where the compound has peeled off from the submersible pump housing. This can be done by lightly tapping the body with a small hammer. In normal areas the sound will be dull, in damaged areas it will be ringing.
- We remove the assembly with the compound from the vibration pump housing.
- Using a grinder, we carefully apply a mesh of notches, up to 2 millimeters deep, to the inside of the body. We make the same mesh on the unit with epoxy compound.
- Cover both areas with notches with glue for glass surfaces (any sealant can be used)
- We return the assembly with the compound to its original position - fix it and wait until the sealant hardens.
- Putting the body back together.
Steps to set up a vibrating electric pump
Before the user becomes determined to disassemble a non-working product, a number of simple manipulations should be performed to establish a preliminary diagnosis:
With an incorrect setting, when air is not blown through the pump, but passes through with suction, the pump can operate at a reduced voltage of less than 200 V.
Before you begin active disassembly of the pump housing, you should leave marks on the joints for proper assembly in the future.
The operating principle of pumping equipment dictates the control of three important parameters of reassembly in the specified order:
- Axial alignment of piston and seat. The sliding of the inlet cup along the gasket makes it very difficult to achieve this when assembling the pump, but misalignment will not allow the pump to operate in principle.
- The piston must be at some distance from its seat. The size of this gap should not exceed 0.5 mm, but be greater than 0. The gap can be adjusted using shims. The correct distance allows air to pass into the outlet pipe for water, and with a greater blowing force, the piston closes the channel.
- It is necessary to maintain parallelism between the piston disc and its seat - their axes must also be parallel.
Cases of non-parallelism:
- large gap between piston sleeve and rod. Such a problem can not only affect the adjustment, but also cause vibration of the operating unit. How to reduce a large gap? It is enough to replace either the bushing or the rod, and the popular method is to seal the rod with improvised material, for example, foil.
- rod is bent. In this case, the problem is unlikely to be corrected, but perhaps parallelism can be achieved by rotating the gasket to 180 0.
A correctly replaced structural element and a correctly assembled electric pump when immersed in water produces a jet of at least 30 cm in height and operates without interruption with a voltage of up to 240 V. Reducing the voltage changes the sound of the pump and can reduce performance.
Water pump repair Baby video
Before you begin repairing the “Malysh” pump, you should accurately determine the cause that caused this or that malfunction. Correct troubleshooting will depend on this.
- Detachment of the electromagnet can lead to the fact that the water pressure will be much weaker than that specified in the technical passport. In normal condition, the electromagnet is attached to the bottom of the housing using a special epoxy filler - compound. As a result of prolonged use, it may peel off as a result of prolonged use of the device. To eliminate this problem, remove the magnet from the housing, knock off the remaining non-exfoliated compound from its surface, and use a sharp object to draw small grooves on its surface. Then we coat the electromagnet with sealant, a composition for glass is better suited, and press it back into the housing. When the sealant has completely set, the “Baby” can be assembled and launched.
- When the size of the gap between the piston coils and the vibrator electromagnet does not correspond to the norm, the engine may fail. The normal operating gap should be between 4 and 5 mm. With a higher value, the electric mechanism will overheat, and with a lower value, the likelihood of wear on the coils increases. To adjust the gap, we disassemble the vibrator, right down to the shock absorber. Then we assemble all the components back onto the rod, if necessary adding or removing washers between the piston bushing and the shock absorber, ensuring that the gap between the coils matches the required standard value of 4-5 mm.
- The pump hums when turned on, but no water flows through the hose. There are several reasons for this. The most harmless one is that the nut on the adjusting screw is too tight. You should loosen it and try to start the “Baby” again. Another reason is a rupture of the rubber piston seal. In this situation, there is no point in gluing it together, but it is easier to buy and install another one. Another reason, also beyond repair, is a breakdown of the central piston rod. Here you should also purchase a new part and install all the other parts of the vibrator on it.