When the plumbing in a house suddenly breaks down, almost all owners immediately call a specialist , although in most cases the problems that arise can be solved without much effort on your own , having a minimum of tools in the house.
Simple DIY repairs will help save money, time, and in some cases, nerves.
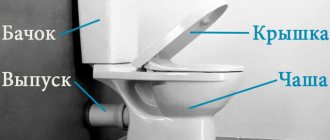
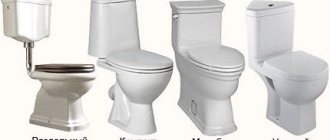
The most common and easily fixed problem that arises with plumbing equipment is a breakdown of the toilet, namely a violation of the normal functioning of the cistern float. All components of a faience container can be called shut-off valves, which control drainage and filling.
Place of the float in the design of the cistern
The float mechanism itself is just a small part with a simple device, but together with the rest of the tank fittings it performs a significant mission - it is responsible for flushing. More precisely, it is an intermediary between two internal systems: bulk and drain.
To understand what role is assigned to this simple device, let’s figure out how the toilet flush cistern works.
We will not consider elements of a built-in installation or retro models suspended from the wall, but will focus on the most popular solutions - cisterns, which are part of compact toilets and are installed on the back shelf of the bowl.
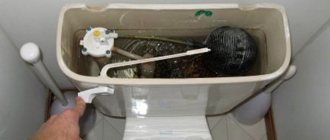
Diagram of the internal structure of a toilet tank with a lower water supply and a side control lever. These are outdated fittings preserved in Soviet-era tanks
Externally, it is a faience (porcelain, plastic) tank, closed on top with a lid with a hole for a control lever, which is increasingly being replaced by a button (single or double). In addition to this hole, there are two more: for the flow of water from the cold water system and for draining liquid from the tank into the toilet bowl.
The fittings are installed inside the tank - a collapsible system of plastic, metal and rubber parts. The configuration, dimensions, and materials used to manufacture the elements differ from one manufacturer to another. In addition, there are several types of mechanisms.
However, they are all united by a common principle of operation: water flows into the tank through the inlet hole (through a flexible pipe connected to the cold water pipe) in the required volume (on average 4.5-6 liters).
Along with the level of water filling the tank, the float also rises. When the liquid level reaches the desired level, the float device blocks the flow of water. This state persists until flushing.
Image gallery
Photo from
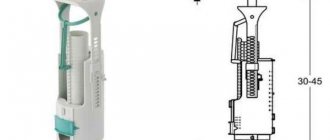
Filling valve with side connection
Glass type float with adjustment screw
Flush drain valve
Overflow to remove excess water
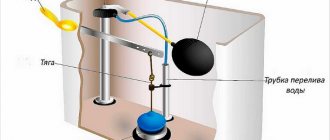
During the flushing process, other elements of the system are activated. A button (or lever) moves a rod, to the end of which a membrane (or gasket) is attached. The flush valve opens and water rushes into the toilet.
The function of the float is obvious - adjusting the volume of water entering the tank. If the mechanism fails, water will flow continuously, and the apartment will be saved from flooding by another important element of the system - the overflow.
How to install
If a spherical element is installed in the toilet, then its installation can be done without dismantling the locking device:
- Before starting this operation, you must turn off the water in the riser.
- Remove the top lid of the toilet cistern.
- The float is carefully placed on the locking mechanism lever and moved from the edge by 2 - 3 cm.
- The tank cover is installed in place.
After turning on the water supply in the water supply system, you can use the plumbing fixture for its intended purpose.
Installation of the glass-shaped element is carried out complete with a locking device:
- The water supply is cut off.
- The cistern lid is removed.
- The locking mechanism with a float is installed in the lower hole of the toilet and secured with a nut.
- A water hose is connected to the fitting of the locking mechanism.
- The drain tank cover is installed in place.
When installing such a structure, the installation of rubber sealing washers in the place where the locking mechanism is attached to the toilet is mandatory.
After turning on the water supply, it is necessary to inspect the tank for possible liquid leaks at the place where the water hose is attached. If leaks are detected, tighten the threaded connections or replace the sealing washers.
Types of float devices
The type of float in the cistern of a compact toilet depends on the design of the fittings: in old-style devices there are plastic balls or cylinders floating on the surface of the water, in new modifications these are moving elements that slide vertically and resemble a glass.
The spherical float is also called a “rocker arm”. Indeed, the thick wire on which the ball is attached is shaped like a household item that has become rare.
Plastic ball fixtures can still be found for sale in plumbing stores. This is explained by consumer demand: not everyone is ready to buy improved fittings for the tank
The principle of operation of an essentially primitive float is quite simple: when flushed, it sinks to the bottom of the tank and, through a rod (the same wire), opens the inlet valve.
Image gallery
Photo from
The simplest float mechanism
Device for automatic water collection
The process of collecting water into the cistern
Pear-shaped float in highest position
Water enters, fills the tank, and the float rises up. At a certain point, it reaches the required level (the volume of liquid can be adjusted manually) and blocks the flow of water. The inlet valve closes until flushing occurs again and the float falls to the bottom.
The modern appearance of the float device vaguely resembles a spherical model. This is a plastic part attached to a vertical rod, which, like an elevator, moves up and down and is also responsible for the timely blocking of the intake valve.
Modern type float mechanism: installed on a vertical “lift”, can have different shapes and is most often a complete part of the tank fittings
The advantage of the improved model is more precise adjustment of the level of water entering the tank. The rod along which the float moves is similar to a ruler with divisions, where notches are made for ease of adjustment.
It is believed that designs with a spherical float are noisier. In fact, the noise level does not depend on the type of float mechanism, but on the method of water supply.
With an upper side connection, it is poured from above (a flexible hose is connected to the hole in the upper part), which is why the noise is created. In tanks with bottom supply, water flows quietly, and if there is noise, it is only due to a malfunction of the fittings.
The toilet doesn't flush well
How to adjust the toilet if, after a certain point, the flush has sharply worsened?
Cause
If the toilet begins to flush poorly suddenly, literally in one day, and the flush does not depend on how much water is in the tank, most likely something has gotten into the outlet of the tank or the drain of the toilet itself. You understand that adjusting the water level in the toilet tank will not help here.
Most often, this item is a rubber hose from a float valve. It is put on the valve outlet so that water is drawn into the tank silently. Rubber loses its elasticity over time; the hose slides off the valve and starts swimming alone.
Usually, after the next flush, his regatta ends somewhere between the release of the cistern and the toilet bowl. And since water passes through a piece of rubber extremely poorly, we immediately face the consequences.
However, if the tank is without a lid, the most unexpected objects can sometimes be found in the tank outlet. The imagination of preschool children is especially limitless.
And in this case, do not rush to despair
Solution
- Turn off the water to the tank.
- We lift the pear and look under it. If we see a foreign object and can pull it out, great, adjusting the toilet barrel ends there.
- If a hose or any other debris is visible, but not accessible for removal, we look for tweezers.
- Finally, if you still can’t get to the source of our troubles, alas, you’ll have to remove the tank. We take pliers and an adjustable wrench and unscrew the bolts between the tank and the shelf.
Carefully lift the tank (the flexible connection can be left on) and place it on the toilet; To avoid leaving chips, it would be a great idea to put a rag or towel underneath. We extract from the recess in the shelf something that should not be there.
Brief installation instructions
Sometimes it is necessary to repair, replace or simply install a new float model - separately or as part of a valve block. Let's consider all the solutions in order. Installation of new spare parts is easiest, since there is no need to disassemble old mechanisms, and the tank and the parts themselves are in perfect condition.
Option #1 – installation of a spherical model
Let us immediately make a reservation that it is necessary to install a new spherical-type device in the only case - if the old element fails. It is unlikely that a new toilet model is equipped with a fill/flush system with this type of float.
A plastic ball or other shaped part can be purchased separately, since the advantage of the outdated mechanism is that the “rocker arm” is easy to install or change without replacing the rod-shaped water drainage system.
The appearance of the ball and shut-off valves may vary. The picture shows a bright orange plastic ball with brass fittings costing 430 rubles
The float is usually sold with a metal holder and a fill valve. The latter is inserted into the water inlet hole (located in the upper part of the tank, on the left or right) and fixed, the “yoke” is positioned horizontally.
Approximately in the middle part it is attached to the “pear” - a rod-type exhaust valve. When pouring liquid into the tank, the plastic ball should lie freely on the surface of the water.
Option #2 – glass-shaped installation
Kits designed for containers with bottom connections are usually fixed in the tank even before it is installed in its rightful place - the toilet shelf. This is necessary since both valves - drain and inlet - are located at the bottom of the tank, and during installation, the parts must be tightened and tightened on both sides.
If the tank is already installed, this will be difficult to deal with.
Plastic fitting kit for a cistern with a single push-button water inlet valve. The package includes a drain mechanism, float, seal, fasteners
First, install a larger drain mechanism, making sure to use the gaskets and washers that come with the kit. Align the device along the axis and tighten the nut from the outside. It is important that the O-ring seals tightly in the hole area.
Then, using the same scheme, the filling valve with a float device is fixed. It is usually allowed for the parts to touch each other or the walls of the tank, but it is better to try to secure them strictly vertically.
Particular attention should be paid to sealing the junctions of devices and openings. It is necessary to use all seals, washers and gaskets that are recommended by the manufacturer and supplied with the kit, with the exception of spare parts. If difficulties arise, just look at the installation instructions.
The float device is replaced using the same scheme, only before installing a new one it is necessary to dismantle the old one. For repairs, you will have to disassemble the toilet cistern.
Repair of valve faults
Troubles usually happen unexpectedly, when there is no way to call a specialist or seek help from more knowledgeable people, so you always need to be prepared to act independently.
Failures of the float mechanism can disable the operation of the drain tank, and flushing it off with water from buckets every time is not an interesting task. Let's figure out how to quickly change or repair the float in the toilet if it has become unusable.
Violation of the tightness of the plastic ball
When the old float wears out, a crack may appear, which over time will turn into a hole. Liquid will begin to flow through the hole into the plastic ball, and it will no longer be able to float up and block the inlet valve. A problem arises - a constant flow of water in the toilet. Water losses quickly turn into financial costs.
Let's find out how to avoid this:
- turn off the water;
- remove the float;
- wipe it dry;
- cover the crack with waterproof sealant;
- dry;
- fix the float in the tank;
- We check his work.
There is no point in repairing a float with a large hole or completely leaky plastic; in this case, we rush to the store and purchase a new part to replace it.
If the float valve fills with water due to a ruptured membrane or a crack in the valve, this sealing device must be replaced:
Image gallery
Photo from
Step 1: Removing the toilet float valve
Step 2: Disassemble the float head
Step 3: Diaphragm rupture - cause of problem
Step 4: Reassemble the Float Device
Skewed float structure
Due to wear of the rubber (silicone) seals or due to poor water quality, the glass-type float device may become misaligned.
Does the plastic float “stick” with each release of water or does it even stop moving up and down relative to the guide “sliders”. Depending on its position, either the flow of water into the tank stops, or, on the contrary, it constantly pours, flowing straight into the sewer.
A common cause of breakdowns is poor quality tap water. It is characterized by a high content of lime and rust, which settle on the walls of the “glass” and on the rods (holders, guides)
First, try cleaning the mechanism without disassembling the entire structure. Perhaps the movement of the float is slowed down by debris that has fallen into the water. If this does not help, you will have to turn off the water, remove the tank, and then the float block. The drainage device may not be touched.
Then we carry out diagnostics and act on the results: we correct the position of the float and install it in place or completely change the block responsible for the water inlet.
Most often, breakdowns associated with changes in the position of the structure are corrected quickly, while it is better not to repair worn-out devices, but to replace them with new ones.