The Japanese used to drop drops on a person’s forehead – and it was excruciating torture. For Russians, the drops hit the sink loudly, causing our brain to put on its coat and go out. It's the kitchen faucet dripping! How to fix a leaking friend if the plumber seems to be already drunk in the morning, and his hands are itching and demanding revenge for a sleepless night? How to fix the faucet in the kitchen if it leaks as if cruel Japanese were hiding somewhere in the apartment?
The eyes are afraid, but the hands do the work - this is our motto, because most of the breakdowns in the plumbing can be repaired yourself, including fixing the faucet in the kitchen yourself if it is leaking. How? It is only necessary to establish the reason why he behaves in such a disgusting manner and punish him with all severity.
As plumbing practice shows, malfunctions occur in those places where the water supply is regulated. Whether the faucet is leaking from the gander, from the valve, or simply dripping from the tap - in this article there is an appropriate repair approach to all breakdowns.
Which fellow is dripping from the end in the morning?
A typical situation: an ordinary person, who has never been a plumber, has a dripping faucet in the kitchen - how to fix it? First you need to find the problem and decide why this happened:
- a person bought a low quality faucet. For example, in a Chinese online store, or from a similar Chinese friend near his home. I didn’t pay attention to the material of manufacture, because the price was favorable - I saved money;
- If the faucet in the kitchen is dripping, you need to remember whether the plumber who was already drunk in the morning did the installation. Here I connected the parts poorly, there I chose the wrong gasket and this is the result;
- Sometimes a man either quarrels with his wife, or pisses off his boss at work, and so he gets even on the tap - he twists the handle at the wrong angle, and uses heroic force. In general, it is used incorrectly.
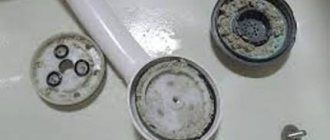
The main reason for a leak in a kitchen faucet is the wear of the main parts : rubber gaskets, faucet axle boxes and other elements that bear the main load. The simplest thing is that the aerator is clogged due to poor quality water.
Valve taps
Valve-type taps have been used in water supply for a long time. Despite the fact that modern designs are being created to replace them, they do not go out of circulation. Their internal structure remains unchanged for decades. Only the design has changed.
These products are reliable and simple. If all the internals are of proper quality, then over a fairly long time only the gaskets can wear out. By replacing them, you can safely use water for a long time without experiencing the inconvenience of leaks.
The patient is probably alive
To find out why the faucet is dripping, our man, although he does not take a taxi to the bakery, is obliged to look at the places where the problem appeared:
- a leak has appeared between the sink body and the faucet, or from the valve;
- the valve is closed, but water still drips from the gander or flows in a thin stream;
- the problem is at the junction of the mixer body and the spout;
- the valve handles are open, but the water does not flow for the life of you or has weak pressure;
- liquid leaks through damage to the valve body;
- It may leak under the sink where the pipes and hoses are located.
If the water flow becomes too weak
The filter aerator is clogged - and now you have a weak stream of water from the tap. The cartridge or shut-off valve is broken, the gaskets are worn out - the same result. In the first case, it is enough to unscrew the aerator filter, clean it and rinse it. But to eliminate other faults, it is necessary to replace worn parts.
Leaking under the sink
If you have your own Niagara under your sink, the problem is probably a damaged hose or a worn gasket where it connects to the body. In this case, head to the store for a new hose or seals: evil neighbors downstairs are an unpleasant occurrence, and replacing a hose or rubber seals is a very simple procedure.
Leakage at spout connection point
A kitchen faucet may leak between the spout and the body. Otherwise the gaskets are worn out or badly damaged. The solution is the same: buy new ones and replace them.
The gander is flowing
Is the faucet leaking from under the gander in the kitchen? This means that its body is damaged. This defect is caused by a clogged filter, which is why the water pressure seems to tear the metal tube from the inside. If the mixer is a single structure, then the entire body must be replaced. In a two-valve design, the gooseneck can be easily removed and replaced with a new one.
Other causes of water leaks
Sometimes there are no obvious reasons for the faucet to break down, so it’s not immediately clear how to fix it if the faucet drips. This is due to the formation of lime salt deposits on the faucet parts. In this case, you need to do this: disassemble and clean the tap, using special household chemicals for cleaning lime from plumbing fixtures.
If it leaks from under the lever
Experts attribute the appearance of water from under the faucet lever to a broken cartridge. In this regard, we will need to disassemble the device and replace the cartridge.
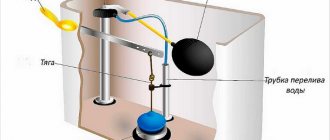
Analysis of the mixer
At the initial stage of work, you need to remove the small rounded decorative cover. Usually on this plate there are two different colored dots (red and blue) indicating how to turn the faucet lever to add hot or cold water. If the direction of liquid supply does not match, the lid is turned over to the opposite side.
Single lever mixer device
When the decorative cover is removed, a screw will be exposed inside the hole that holds the lever in position. This lock can be unscrewed using a regular or Phillips screwdriver. There are times when you will need a hex wrench to remove the faucet.
Note! If you cannot unscrew the screw with a screwdriver (the fastener is rusty or the thread is broken), then in this case you need to pull the lever forcefully. In this case, the base of the screw should come off the plastic attachment.
After removing the decorative cover
After removing the lever in one way or another, remove the decorative cover. It happens that this part also cannot be removed in the usual way. The insert can be loosened by hand; to improve the effect, place a soft, dry cloth at the place where the force is applied. If you cannot remove the cap by hand, you can use the following to pull it out:
- Pipe wrench;
- Pliers.
To protect the surface, the working part of the tool must be in contact with the part through the fabric. After several rotations in different directions, you can quickly remove the decorative cup.
Tightening or replacing the cartridge
After removing the protective cover, we see the cartridge in front of us. Now you need to unscrew the ring nut and you can remove the mechanism for supplying and mixing water. After pulling out this part, you can see the landing grooves on the bottom, which are used to install the device in its working position.
Grooves for cartridge installation
If, after removing the cartridge, wear and tear from metal corrosion is noticed, the mixer can be replaced with a new one. In some cases, water leakage from under the lever can be eliminated by tightening the nut.
Note! To resuscitate the mixer, you can cover the shells in the metal with silicone and wait for this substance to dry, after which the cartridge itself is installed according to the marks.
Reassembly
Assembling the mixer begins with installing a new cartridge. After this, tighten the circular nut and install the decorative cup. Next, install the lever or flag and secure its position with a screw. If the fastener was rusty or had damaged threads, then the lever must be pressed tightly onto the cartridge holder.
Cartridge for single lever faucet
Important! Before purchasing a new cartridge, you should understand the design of the old model. The diameter of this part can be 35 or 40 millimeters, but there are devices with an additional sealing ring. That is, if replacement is necessary, you need to take into account the design features of the old cartridge model.
If it leaks after replacing the cartridge
The main reason for this fairly common phenomenon is considered to be corrosion of the metal in the seat. We have already said that you can try to cover such areas with silicone, but if this does not help, then you will need to change the entire mixer.
whose will you be
In a nutshell about the classification of mixers. When working with leaking plumbing fixtures, it is necessary to understand the structure of the internal mechanism and how it operates.
Double valve mixers
The design of this type of mixer consists of a pair of faucet axle boxes (handwheels or two handles) located in one housing. They easily and naturally regulate the temperature and pressure of supplied cold and hot water.
Important! All two-valve mixers are divided into two groups, and their difference from each other lies not in the water mixing device, but in the valves (handles).
The first group includes faucets in which an elastic rubber gasket acts as a locking mechanism. This mechanism is called a reciprocating crane axle box with a flexible gasket. The principle of operation is that the faucet axle closes the place through which water enters the spout (gander) of the faucet.
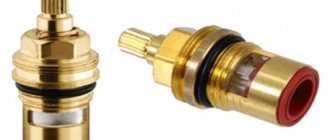
In two-valve mixers of the second group, two ceramic plates act as a locking mechanism. This locking mechanism is called a ceramic valve. The design of such a valve uses the same locking mechanism as in a ceramic cartridge - connecting holes on ceramic plates.
Single lever kitchen appliances
Joystick, cartridge or single-command - this is what most modern mixers are called, which are of the single-lever type. Based on the internal mechanism, there are two types of mixers: ball and disk. The main part of the first type of structure is a ball with a number of holes. To control both the water flow pressure and the water temperature, just turn the handle.
Ball devices have several weak points . During operation, it is possible that gaskets and cuffs may wear out, as well as weakening of the spring support, which can cause a leak. If the mixer is left idle for a long time, its movement may become stuck.
Devices with a disk cartridge in their design and principle of operation resemble ceramic versions of the faucet axle box. The operating mechanism also consists of two parts: a lower fixed plate with a drain hole for hot and cold water, as well as an upper movable component.
Repair of both types of devices with one lever consists of replacing the cartridge: in the first case, it is a sleeve with a hollow ball, in the second, a sleeve with two ceramic disks.
Design and types of single-lever mixers
Models of single-lever mixers are more profitable and more maneuverable compared to two-valve types. The temperature of the water when mixing is controlled using one knob.
Mixing occurs in a round hole in the shape of a ball, and the part itself is represented by three holes. Two are focused on supplying water, and the third is responsible for sending water to the spout at a certain temperature.
As the lever moves, the ball moves in a certain direction and water is mixed. In this case, the ball itself is fixed on top with a sealing collar and a lock nut.
The operating principle of a cartridge mixer is the same as a ball mixer, but the structure is slightly different. The cartridge contains metal-ceramic disks, which move relative to each other when regulating the water.
Do-it-yourself kitchen sink faucet repair
Now that our common man has understood the structure of mixers and is ready to proudly declare “I’ll do it myself!”, we can take a risk and start repairing. It is assumed that he has already gone to the store and purchased the necessary spare parts.
It is recommended to first make the necessary supply of water and turn off the water in the apartment. Briefly: if you are repairing a single-lever faucet, it is enough to replace the damaged cartridge; if you are repairing a double-lever faucet, repairing or replacing the main elements (rubber gasket, gooseneck, faucet axle box) will help.
Repairs cannot be completed with bare hands, so you need to prepare the following tools:
- An adjustable plumbing wrench will help you dismantle a two-valve mixer if you unscrew the decorative trim and the nut that secures the cartridge. This is the scepter of every plumber;
- an hex wrench or screwdriver is necessary when disassembling valves to remove handles and mixer heads screwed to the locking axle boxes with hex or Phillips screws;
- A sharp knife will be needed to remove plugs, adjust rubber seals, and simply as a means of self-defense if something goes wrong.
Design and necessary tools
How to fix a shower faucet if its hose is leaking?
The shower hose is the most frequently broken part of the shower and is the one that most often begins to leak.
The design of the shower hose is a rubber tube placed in a metal sleeve. There may be no metal hose; in this case, the hose is a tube made of flexible plastic. The quality of the rubber part will determine the service life of the entire hose. The service life of a rubber tube, in turn, depends on water and is 5-15 years. Rubber tends to harden over time, the elasticity of the material decreases and this leads to the appearance of cracks and tears. These tubes are simply replaced. It is difficult to look for a replacement rubber tube for a shower, since most often replacement ready-made hoses with a metal sleeve are available for sale. And the cost of such a hose is not very high. Replacement is also carried out if the hose has a rusted metal sleeve. The aesthetics of such a faucet are generally worse, and rust can get on the enamel of plumbing fixtures, which is quite difficult to remove.
Before completely replacing the shower hose, you can try to repair it yourself, unless, of course, it is completely old.
To repair a shower if it breaks, you will need the following tools:
- adjustable wrench;
- screwdriver;
- knife.
This minimum will be a sufficient set, since it is not very difficult to troubleshoot problems with your own hands.
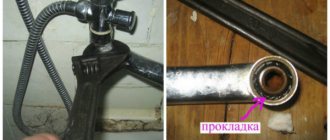
Replacing the rubber gasket
Humanity will make a breakthrough in its development when it invents eternal gaskets for plumbing fixtures, because in modern plumbing fixtures this is the main failure. They are replaced either at the junction of the body with the spout, or at the locking box, where it may simply be missing.
Before changing the gasket in the crane box, perform the following operations:
- After removing the plastic plug, use a Phillips screwdriver to unscrew the screw securing the valve handles.
- Remove the decorative nut. If it is not there, then immediately unscrew the faucet axle box from the mixer body with an adjustable wrench.
- Replace the worn part on the housing and axlebox shut-off valve.
The gasket in a mixer with a ceramic axle box occurs in a similar way.
Before replacing the gasket at the junction of the two parts, it is a good idea to wrap the adjustable wrench with a soft cloth, paper or electrical tape so as not to damage the faucet coating. After removing the low tide, replace the old gaskets with new ones and reassemble the mixer in the reverse order.
The cartridge is produced in a non-separable form, so the wear of the rubber cannot be repaired - you need to change the entire cartridge!
Causes of malfunctions - why the faucet drips
Crane repair is necessary when the following types of malfunctions occur:
- Water leaks from under the nut that secures the spout. Perhaps the leak is coming from under the handle or valve;
- Malfunction of levers and valves (periodically jam, scroll and do not close the water tightly);
- The faucet produces a weak stream pressure;
- The tap is closed, but water continues to flow.
Attention! If one of the above-mentioned malfunctions occurs, it is better to solve it quickly. This way you can significantly extend the life of the device, as well as prevent possible damage to your and your neighboring apartment. Also, this will save money and time spent on repairs.
How to fix a kitchen faucet is the most important question that many of our compatriots ask. Before you begin to eliminate the problems that have arisen, you need to understand the internal structure of mixers of different models and understand the possible cause and install a leakage sensor.
Repair and replacement: gander
It is also necessary to replace the rubber gaskets on the gander - this will eliminate the problem of leakage from under the gander in a two-valve tap:
- Repairing will not be difficult if the gaskets fit into special grooves.
- It happens that a bushing is screwed into the gander, into which rubber rings are installed. In this case, unscrew the bushing with a hexagon, change the rubber bands and put everything back together in the reverse order, not forgetting to tighten the bushing thoroughly with the hexagon, otherwise the leak will not stop.
To replace the gander itself, simply unscrew it and replace it with a new one. In the single-lever model, the gander is installed in the housing, so it cannot be removed. The entire mixer must be replaced.
Flag
Lately, flag cranes have become popular. They have a cartridge installed that is responsible for regulating the pressure.
We recommend watching
- Do-it-yourself eternal lantern - modern projects, forms, diagrams and drawings for manufacturing (70 photos)
Rules for slinging, lifting and moving loads: instructions and recommendations from the pros
- Scheme of how to make a homemade metal detector - step-by-step description of manufacturing and selection of elements for the device (85 photos)
If problems arise with this product, repairs can only be made by replacing the cartridge.
Repair and replacement: axle box
The new and old faucet axleboxes must match in thread, size and material (ceramic or rubber). The easiest way not to make a mistake is to take an old axlebox with you to the store.
Dismantling the faulty part is carried out as follows:
- remove the decorative cap from the flywheel and unscrew the fixing screw;
- use a wrench or wrench to remove the main product;
- the lower gasket is removed, the rotary rod is removed;
- The worn gasket is replaced.
If the crane axlebox has ceramic discs, then it will be easier to replace the entire crane axlebox. In most cases, sellers offer it assembled, but searching for discs separately will take a long time, and repairs will be more difficult.
Replacing the entire crane axle box
The axle box is dismantled as described above and taken with you to a plumbing store. An analogue is selected by eye so that the thread and size match.
Replacement is carried out in the following order:
- We wipe the area for the new product, remove any possible debris and dirt;
- try on the purchased product;
- apply waterproof lubricant - this will facilitate installation when screwing;
- to improve sealing, we additionally wrap the threads with 2–3 layers of fum tape;
- screw the faucet into the mixer manually;
- Next, open the blocked water in the riser;
- Using a wrench or an adjustable wrench, we tighten the axle box until the water stops flowing;
- install the flywheel;
- the crane box is installed.