Home / Accessories and parts
Back
Reading time: 3 min
0
5378
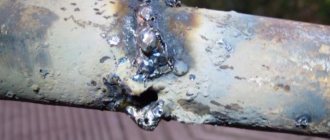
Welding work is a high-risk task, so a person must provide himself with reliable protection so as not to get hurt during work.
Very often a person suffers from sparks when working with metal, different types of radiation, gases and vapors are released during the welding process, different types of radiation...
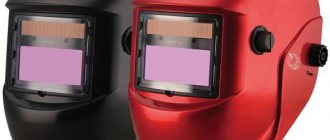
The Chameleon welding mask is your first assistant in protecting against unpleasant consequences during work.
- Features when working with a chameleon welding helmet
- How to fix it yourself
- How to use a welding mask
- How to serve
- Conclusion
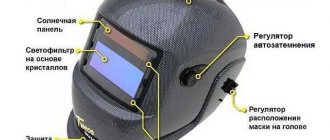
Principle of operation
The appearance of the mask is not very different from classic models. The design is as follows:
- A housing that protects the welder from splashes of molten metal and other harmful factors.
- Liquid crystal multilayer light filter with the function of automatic adjustment of the darkening level, depending on the intensity of work.
- Module for setting and controlling the light filter.
- Removable power supply.
A light filter is installed in the viewing glass. It is a device with several liquid crystals. In an inactive state, they do not show themselves in any way - the glass only protects from glare. But when the light sensors signal, the filter comes into operation, rearranging the arrangement of the crystals, darkening the glass. The reaction to the flash is almost instantaneous - about 0.0005 seconds.
The filter also reacts to the end of work with a delay, the level of which is set manually.
Please note that the design, thanks to built-in filters, provides protection from infrared and ultraviolet radiation even if it breaks.
SECOND AND THIRD OPTIONS
We disassemble the filter again, solder off the batteries, and instead of them solder pieces of wire, 20-30 cm long, with a margin (14) to all four contacts. I pulled them out from some old power cord, and there were three suitable wires with different colors of insulation. Why three and not four? Because at first there was an idea to get by with two. On almost all equipment with several batteries, they are assembled sequentially, one after the other, i.e. It is enough to have only two pins for connection. This option did not work on the mask: with this connection, it darkens, but does not work correctly, and some conductive paths were visible between the two middle pins of the contacts on the board.
In our case, we could get by with three conclusions: the “diagnosis” showed that the middle contacts were connected. It is not a fact that other masks use the same circuit diagram; often the batteries are “spaced” to different edges of the board; whether in such cases there is some kind of common bus connecting them is unknown. In general, the easiest way to do repairs is to solder all four wires, insulate them (15), drill two holes in the housing cover, group the wires in pairs, bring them out and seal the housing. To do this, we again use hot melt glue. We also apply a little glue to the places where the wires come out of the housing (16), “so that they don’t dangle.”
The further task is to attach the batteries to the terminals. The easiest option is to press the wires to the poles of the batteries, for example with the same electrical tape. Let's consider this the second option - photo (17) shows what it might look like assembled with a mask.
The batteries are light, the wires are quite rigid, if you clamp them with a wire frame on the mask, you don’t have to do anything else. It will work, but you shouldn't expect reliable contact. Although it is not difficult to restore contact if it disappears. If you want to make a truly reliable connection, you need to assemble some kind of “battery block”. And this is the third possible option.
Further actions depend on what is available. It is best, of course, to use ready-made blocks. 3V coin cell batteries of various sizes are used in many types of electronic equipment. Each of them can be easily replaced with a pair of “finger” or “little finger” (LA or ALL) batteries or accumulators. Any unnecessary or broken electronics can become a “donor”: remote controls, some car alarm key fobs, toys, household appliances... even computer motherboards. If you cut out a section with a battery slot from a damaged board or case, the problem is almost solved (of course, you will need two such slots). Well, if nothing suitable is found, you can assemble the block yourself from scrap materials.
In our case, everything we needed (18) was found after a short search. Of course, there is no need to assemble exactly the same set - there is room for imagination. The body is an old packaging from cutting discs for an engraver. The same engraver, using another grinding stone, “rubbed” a narrow slot in the housing cover for inserting wires with contacts.
The spring was once part of a bicycle bell, the plastic rings are gaskets of unknown origin (you can cut an analogue from cardboard). The third battery was “cut out” from the mask filter and was also useful as a gasket. Three rings “for curtains” were also needed; they were soldered to three terminals from the filter housing (19). There is no need to use the fourth pin in this configuration. Plastic spacers are needed to ensure the centering of the contacts - those rings that touch the “negative” sides of the batteries: the gap between the poles of such batteries is a fraction of a millimeter, and, of course, it is impossible to bridge the poles.
Next is the assembly. Into the housing we alternately insert the gasket with the “negative” (blue) terminal, the battery with the “negative” side down (20), the second gasket that covers the “intermediate” terminal with the yellow-green wire, and another battery (21). These two wires were intentionally made a little longer than the second pair - it’s easier to assemble. We tie them in a knot, put the “positive” contact - the brown wire (22).
An insulating gasket is not needed for it; instead, we press the contact on top with a third gasket (an old battery), install a spring, and close the cover (23). Actually, that's all. The assembly just seems complicated; replacing the batteries in such a unit in the future is not a problem at all. We insert the resulting structure into the mask (24). The battery pack, of course, needs to be attached to the mask - again glue or sealant will do.
The price of the most popular “chameleon” masks in the budget price range is 1000-4000 rubles. The time spent on repairs, if all the tools are selected and the procedure is clear, is literally an hour or two. The batteries, judging by statistics, last at least three years; I had to change them in the fifth season. The cost of a new pair of elements is 60-70 rubles. In general, the benefits of replacement are quite obvious.
How to configure correctly, what do you need to remember?
After purchasing a new device, you must study the operating instructions . This will help you figure out how to set up a chameleon mask for welding. Types of adjustments will be discussed later. Now we will give some useful tips to future users:
- Do not use the chameleon for gas or plasma welding or cutting.
- The mask has temperature protection against short-term exposures. If you leave the mask on a hot surface for a long time, it may become unusable.
- The body of the shield is not designed for intense mechanical impact. A strong blow can break it.
- Unauthorized changes to the design of the light filter are not allowed. Disassembling the cartridge yourself may cause damage. When replacing components, use spare parts recommended by the manufacturer.
- Do not use surfactants or solvents to clean the mask. Water getting on the filter is strictly unacceptable.
- Replace power supplies only in grinding mode. Salt batteries are used as removable batteries.
- Immediately after purchase, adjust all available settings to your preferences. Even incorrect adjustment of the fastening straps will result in skin irritation.
Contacting the service center
Additional options make repairs more difficult and increase the risk of mask failure. If the degree of darkening has decreased significantly, it is necessary to inspect the structure.
Some components cannot be repaired and require mandatory replacement. If you cannot do this yourself, you need to contact a service center. The guarantee is valid only for complete masks. If you managed to delve into it, you will have to pay for the service.
There is no point in undertaking repairs to the system board: this is a matter for professionals. It is better to contact the service center immediately. Unsuccessful DIY repairs can result in additional costs.
Carrying out maintenance
If the chameleon welding helmet does not darken, as well as in the event of other malfunctions, you should stop working and turn off the power. To reduce the likelihood of failure, it is necessary to carry out regular maintenance of the device at least once a month.
During the work process, dust and dirt get on the filter. To remove dirt, use a cotton rag moistened with a neutral cleaning agent recommended by the manufacturer. The use of abrasives and products containing petroleum products is strictly prohibited . Cleaning is done with smooth wave movements without strong pressure on the surface. Do not bend the electronic cable - this may damage it.
Battery-powered masks require periodic replacement of the power source. The power compartment is located on the case. When changing batteries, do not forget to observe the polarity.
Important! In the case of work in difficult conditions - increased dustiness of metallurgical or coke plants, maintenance should be carried out more often - at least once a week.
Types of adjustments
Regardless of the manufacturer, all models offer a limited selection of operating settings in order to increase comfort and productivity. The following parameters can be adjusted.
Preparation under the head
Reliable fixation is the main guarantee of convenience.
A handle located at the level of the back of the head allows you to adjust the radius of the headband, and a special belt is responsible for the vertical position of the shield. Fitting is performed with the device worn on the head. If discomfort is felt before starting work, readjustment should be carried out. Professional models have several additional fasteners for a more secure fit.
Distance from the eye to the filter
Special nuts are responsible for the distance between the eye and the glass. Please note that this indicator should be the same for each eye. Once the adjustment is complete, the nuts are secured.
Darkness level
Adjustable based on welding parameters. The user manual contains a table for selecting suitable indicators. There are two types:
- internal;
- external.
The first type requires stopping welding to remove the mask and set new parameters. Found on amateur models.
The external location of the regulator allows you to adjust the dimming without interrupting production. Used by large enterprises with large volumes of work.
Sensitivity
Adjustment of the chameleon welder’s mask according to this parameter can be configured in two modes:
- high;
- low.
The first mode will protect vision not only from the arc, but also from all bright light sources, for example, molten metal. Low susceptibility reacts only to the arc.
Semi-automatic welding in an argon environment requires high sensitivity, since this technology has a low current level. There are technological schemes that allow you to select the necessary parameters, depending on the type of work.
Delay time
This function allows you to adjust the duration of the filter after welding is completed. It will be especially useful when using piece electrodes that can stick . If the adjustment is incorrect, the filter will open before the work is completed, which will result in burns to the retina.
Safety precautions
Before putting it on, check the settings, operating mode switches, and battery charge. Always check to see if the filter is getting dark. If it turns off during welding, the protective glass protects the eye to a small extent from IR and UV rays. But it’s safer to stop working immediately. It is dangerous to use a faulty mask. If a defect is found or the filter does not respond, the malfunction is serious and welding cannot be continued.
It must be remembered when working that the powerful radiation of the arc and molten electrodes is destructive. In addition to discomfort, this threatens to damage the retina. To prevent loss of vision, it is necessary to correctly adjust the degree of darkening of the filter.
To preserve the mask, it is important to follow the storage regime: non-functioning filters and solar panels protect from exposure to light.
Possible faults
Regardless of the manufacturer and quality of the unit, any mask can break. The reasons for failure may be the following:
- Violation of operating temperature conditions.
- Mechanical damage.
- Use of low-quality components.
- End of natural lifespan.
If the operating rules are violated, first of all, they lead to malfunctions of the automatic light filter for the welding helmet. Before contacting official representatives, try to determine the cause of the problem . Some breakdowns can be easily fixed on your own, without the involvement of qualified specialists. Spare parts for repairs can be purchased at points of sale of welding equipment.
The simplicity of the mask design ensures no maintenance problems. A technologically complex device is more difficult to repair.
The mask can be powered either by a solar panel or by batteries. Failure of batteries is the main cause of problems with the chameleon . In this case, the solar cells may simply be discharged. To localize the cause, just leave the device under natural light and then check the functionality. Removable batteries need to be replaced. Replacing the power supply assembly will cost much more.
Problems with glass are visible to the naked eye - external defects in the structure will indicate this. In this case, the filter will not work properly. When replacing LCD glass, it is necessary to comply with the parameters of the element. This is the most expensive part of the assembly.
The biggest problems await the user in case of problems with the control board. In this case, independent repairs, without the involvement of service specialists, are impossible.
Possible malfunctions and methods for eliminating them
- The screen will not respond to light unless connected to a power supply. If the model is equipped with AAA alkaloid batteries or rechargeable batteries, charging indicators are displayed in the screen area. If the red light is on, it's time to replace the batteries. Solar panels are charged while welding. If the mask does not turn on, point it towards a light source for a few minutes.
- If the screen darkens unevenly, check the distance from it to both eyes. Perhaps while they were adjusting the mask and adjusting it to the head, the filter shifted. It should be parallel to the face. Loosen the clamps and align the casing.
- If the screen flickers during welding, it may be due to the outer glass. Sometimes it is enough to wash it. In case of mechanical damage (scratches, surface chips) it must be replaced. If the filter continues to act up, check the cleanliness of the sensor surface. When there are two operating modes (welding and grinding), check which position the switch is in. The screen may flicker when low-current welding in low sensitivity mode. The desired level can be established experimentally during operation.
- The filter does not darken immediately in the cold. Viewing screens quickly change the degree of darkness in the temperature range from +50 to -10°C; Chameleons are not intended for harsh winters.
- If the weld seam is difficult to see, there may be several reasons. Sometimes the film is forgotten on the protective glass. You can try cleaning it, switching the dimming control.
Work order
As an example of self-repair, consider the process of restoring a professional device, which, after five years of operation, began to show signs of malfunctioning lithium-ion batteries. The cause of the breakdown was the operating mode - the mask was used several days a year.
The optimal operating mode for lithium-ion batteries is daily. If the work is seasonal, the battery requires periodic charging in the sun. It is recommended to store the mask at room temperature.
Description of the problem: at first the light filter did not work during evening work, while during the day it functioned flawlessly. After some time, the filter stopped working at any time of the day.
The following tools and materials are required for repairs:
- Screwdriver Set;
- Stationery knife;
- Glue gun;
- Lighter or matches;
- Battery holders (2 pcs.);
- Batteries (2 pcs.).
The algorithm of actions is as follows:
Dismantling the chameleon module
We carry out the work according to the scheme below:
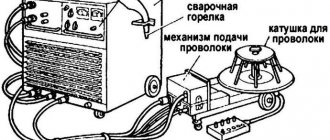
General design of the welding helmet.
Scheme of dismantling the chameleon module.
Chameleon module. Inside view.
Let's open it
The front and back of the module are glued using heat sealant. Using a utility knife, make a continuous cut. Be careful not to damage important structural elements - shading glass, control module and connecting cable. In addition, the module contains glass solar cells. After modernization they will not be needed.
Internal structure of the module.
Removing solar panels and lithium battery
After dismantling the solar panels, access to lithium-ion batteries will open. All connecting wires must be removed
Remove the solar cell and lithium battery.
Installing battery holders
The type of holder depends on the specific model. In our case, the type of battery holders is CR-2025. Another area of application for these power supplies is motherboards.
We connect the contacts with the holder by soldering to the terminals from the batteries, after which we attach them to glue.
The nature of the connection of the elements is serial, with connection to the positive terminal of the connection from the solar battery.
Battery holder type 2025/2032.
Batteries installed. Pay attention to the positive terminal.
Assembly and installation of the module
Place the module halves on glue. After assembly, you can check with matches - the filter should respond to a flash of light.
Module after repair.
How to test a Chameleon mask without welding
When you hold down the Test button for five seconds, the filter should darken. If there is no such configuration function, you need to check Chameleon in other ways. The sensors are triggered by a powerful light beam. The filter is turned towards the light source at least three times, the screen should darken in all cases. Light protection reacts to:
Checking the Chameleon filter
- radiation from the sun (the filter should darken and open after an exposure interval, because the flow is of constant intensity);
- red spirals of incandescent lamps (darkening persists throughout the entire period of being near the emitter; it operates at an alternating current frequency);
- a spark from a silicon lighter (the filter darkens sporadically when the wheel knocks out a spark);
- remote control for household appliances (sensors react to infrared radiation pulses, the light output of the remote control is uniform);
- smartphone screen during flash.
If the filter does not respond, check the power supply: change the batteries or batteries, charge the solar panels. The sensitivity of the filter is checked with an incandescent lamp. If the spiral is equally visible at different settings, the regulator does not work.